ArcWatch: Your e-Magazine for GIS News, Views, and Insights
July 2011
Printing Wall Maps from the World Topographic Map
Maps Also Can Be Printed from Any Other ArcGIS Online Basemap
Want to learn how to create a large-format wall map from the World Topographic Map or any other basemap available from ArcGIS Online? A wall map is a great way to showcase a particular geographic location, especially if your agency contributed data to the basemap. The wall map can be created in ArcGIS Desktop's ArcMap and exported to a number of formats that you can print from. Follow these steps to produce large-format wall map layouts in ArcMap.
Step 1: Add the basemap data
Open ArcMap and click the Add Data button (1.) and click Add Basemap (2.).
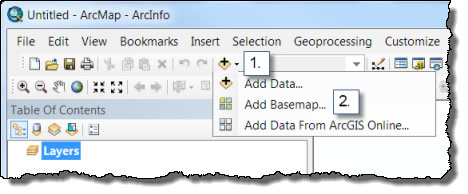
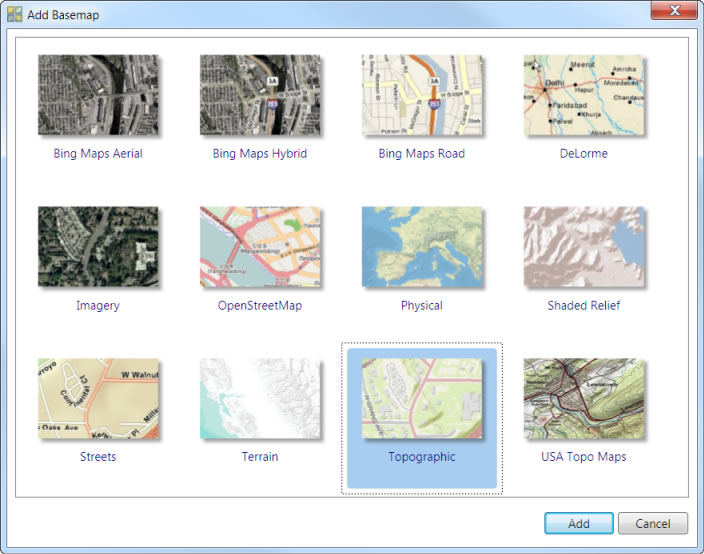
Select Topographic (this is the most up-to-date online version of the World Topographic Community Basemap).
Note that you could also select any other basemap or you could choose Add from ArcGIS Online and select a map from there.
Step 2. Set up the page
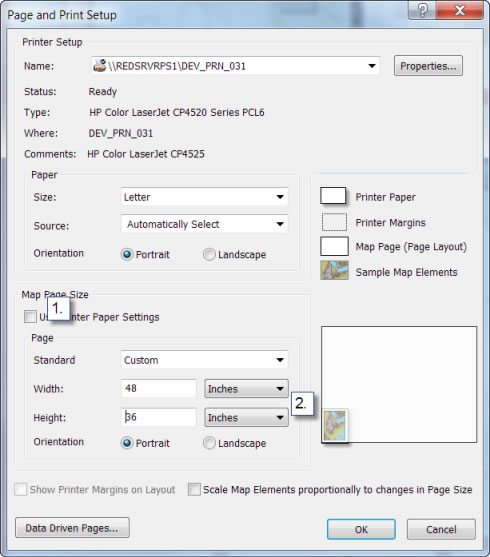
Determine what dimensions you want for your wall map. On the top bar menu, click File then Page and Print Setup. Uncheck Use Printer Paper Settings (1.). In the Page section, type in the dimensions of the map (2.).
Note that the units you can use are points, inches, centimeters, and millimeters. For example, if your wall map will measure six feet wide, enter the corresponding number of inches (72). Click OK.
Step 3. Set up the data frame
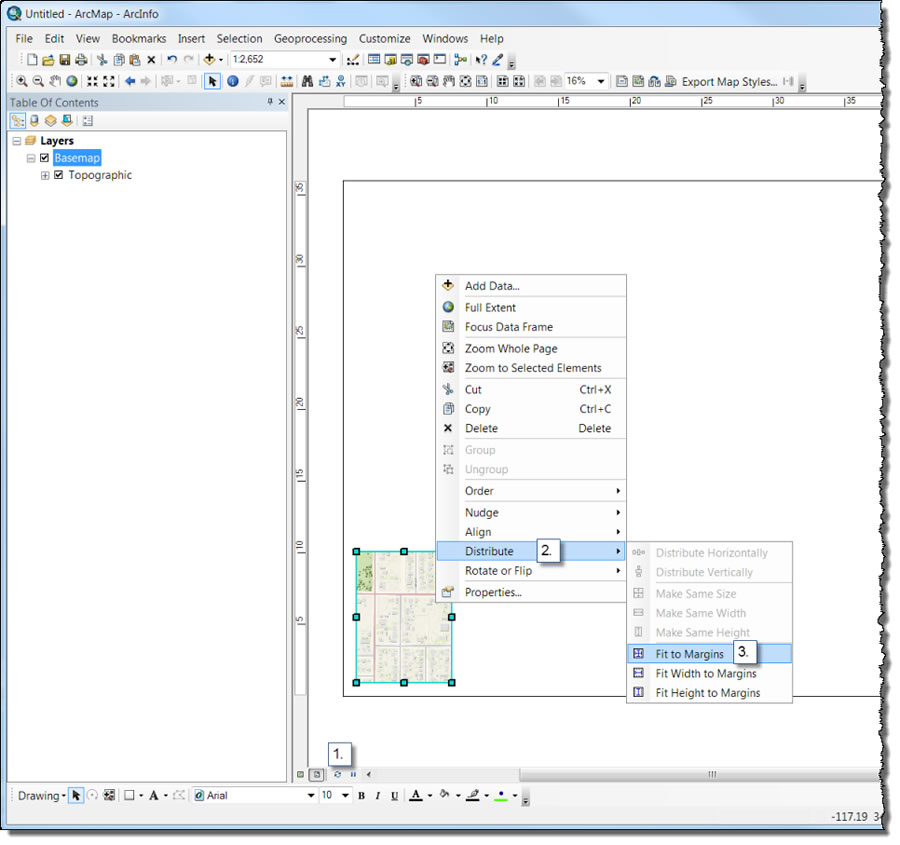
In Layout View (1.), right click the data frame in the map view window and click Distribute (2.), then click Fit to Margins (3.). This will allow the map to fill the entire page. You can set margins as you wish by simply dragging the data frame handles to the desired position.
Step 4. Set the map extent and map scale
Set your map extent and map scale as you would normally, using the Pan and Zoom tools on the Tools toolbar
![]()
and the Map Scale on the Standard toolbar.
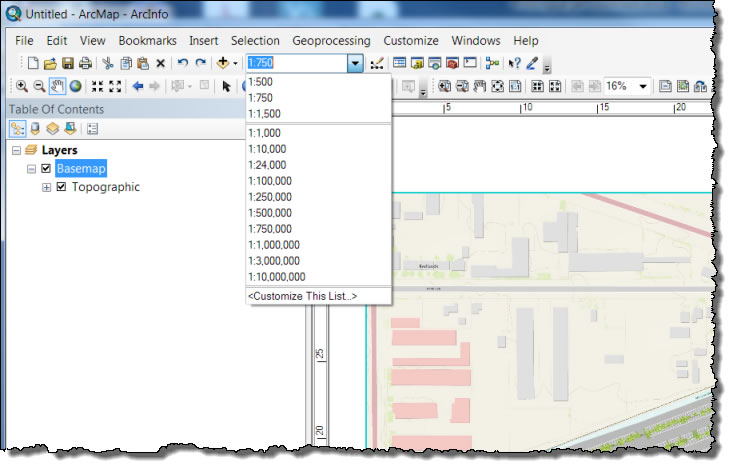
Keep in mind you are using a cached map service, so the drawing time may take longer than you might be used to. The area drawn in larger wall maps or at larger map scales (e.g., 1:2,000) will include more cache tiles than smaller maps or smaller map scales (e.g., 1:2,000,000). It's not unusual for the redraw time to take a minute or more.
Step 5. Make any final edits
You can add titles, text, or any other map surrounds at this point.
Since the map is in a Web Mercator projection—if you have not changed the projection of your data frame— north will be "up" for all locations on the map, so you can use a north arrow.
If you want to add a scale bar to your map, you cannot just use the default because it will reflect the scale at the center of the north-south extent of the dataset. For these data, that is at about the Equator! So instead, you need to create a custom graphic scale bar. There are detailed instructions for how to do this in the Mapping Center blog entry, Making the Scale Bar the Right Length in ArcMap.
When you are done, save the map document.
Step 6. Select the export format
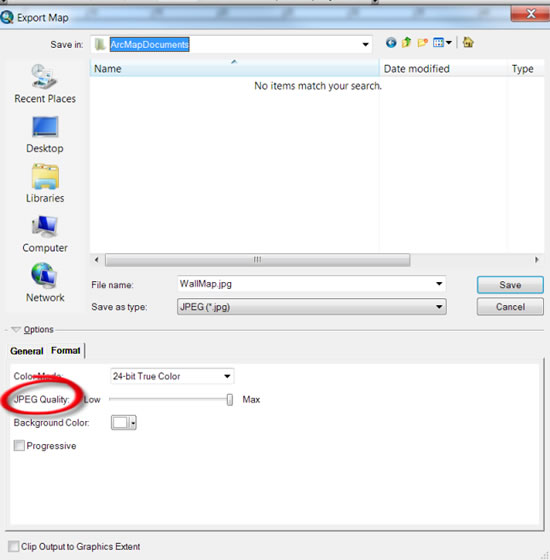
On the top bar menu, click File, then click Export Map. You will see that there are a number of file formats available to you if you click the down arrow next to "Save as type".
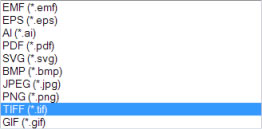
Consider your needs and select an appropriate format. One format commonly used for many printing purposes is PDF, but you could use others. For example, since this basemap includes raster data, you may want to use JPEG, PNG, or TIF formats, rather than .svg or .gif formats. Also consider which formats will compress the file size. For example, the .tif format will not, but you can change the compression of a JPEG (look on the Format tab and you will see a JPEG Quality slider.)
Step 7. Set the resolution
Consider this value carefully. Finer resolutions exponentially increase output file sizes. If your wall map is not meant to be seen at very close distances (say, 4 feet or less), you may be able to use lower resolutions, such as 150 dpi (dots per inch). Conversely, if your wall map is meant to be viewed close up, you'll see better results with higher dpi values. Also think about the printing technology and media you will use to print the map, and consider your output resolution in accordance with what those printers are capable of supporting.
Step 8. Export and save the final map
In the Export Map dialog, click Save to export your map.
Then save the map document if you want to use it again in the future.
Et voila! You now have a wall map of your area of interest! In this article, the World Topographic Map was used as an example. But you can also print out any other basemap. And you can overlay other features from your databases, too.
If you are interested in learning more about the World Topographic Map or other ArcGIS Online basemaps, visit arcgis.com. For more mapping tips, visit the Mapping Center.