ArcWatch: GIS News, Views, and Insights
October 2010
Creating and Sharing Notes Using ArcGIS Explorer
Creating notes in ArcGIS Explorer is an easy way to make maps even more dynamic and interactive by adding non-geographic content such as videos, photographs, documents, HTML links, and embedded Web sites.
Notes include a title, text, and an associated shape or symbol. While in other ArcGIS applications, you usually use HTML pop-ups to display additional information about features on the map, ArcGIS Explorer uses notes. Notes can be created anywhere on the map, independent of features.
Notes you create in either the online or the latest downloadable version of ArcGIS Explorer can be shared with other applications such as the ArcGIS Desktop ArcMap application by converting the notes to a layer package, a process that takes just a few steps. You can only share notes from ArcGIS Explorer to ArcGIS Desktop, not the other way around, since creating and exporting notes is exclusive to ArcGIS Explorer.
How to Create and Share Notes
Say, for example, that you want to create notes for a presentation in ArcGIS Explorer that includes links to photos, reports, and Web sites and then use them in the ArcGIS Desktop ArcMap application. How do you do this?
Step 1: Create a note in ArcGIS Explorer by establishing the geographic location the note will reference. To do this, choose the Target, Point, Line, or Area button or, with the new version of ArcGIS Explorer, an arrow, circle, or rectangle from the Create group on the Home tab. Click a location on the map where you want to place the note, then enter content in the pop-up window. To edit the note's location, you can now use the Move button (located in the Edit group on the Note tab) rather than deleting and re-creating the note.

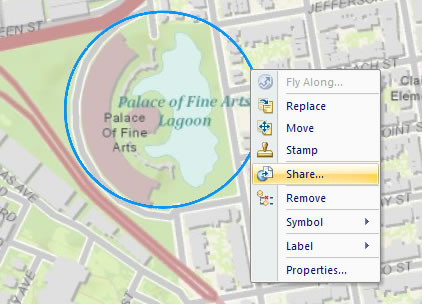
Create a note and enter details.
Step 2: To make notes available to other applications such as ArcMap, export the note by right-clicking on each one in either the map or the table of contents and select Share.
Share the note.
Step 3: Choose a sharing format: an ArcGIS Explorer map content (.nmc) file, a layer package (.lpk) file, or a KML file. In this case, choose a Layer Package.
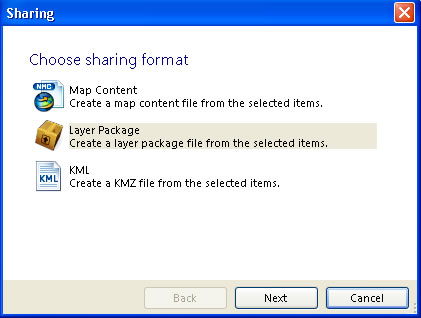
Choose the sharing format.
Step 4: You can save your note as a file, e-mail it, or add it to ArcGIS Online. Choosing ArcGIS Online makes the note available to anyone anywhere, anytime. You will be prompted to sign in to your Esri Global Account before uploading the note and adding a description of it.
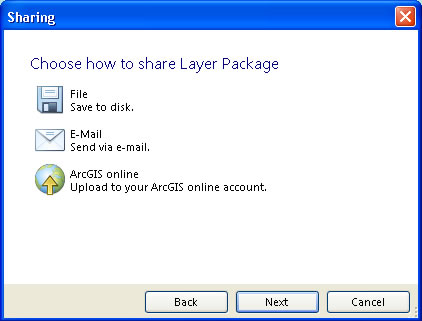
Choose how to save your note.
Step 5: Once you have shared all your notes on ArcGIS Online, you can open the notes in the ArcGIS Desktop ArcMap application by visiting your online account and clicking on each note in your Content list. Choose Open in ArcGIS Desktop from the drop-down menu under the thumbnail on the Details page for each item.

Open the note in another application.
Step 6: Once ArcMap is open and your notes displayed, choose the HTML Pop-up tool—introduced in ArcGIS 9.3.1—from the main toolbar and click the notes to display their contents. (To e-mail the file or save it locally, you will need to drag and drop the layer package into ArcMap, because layer packages are not yet supported using the Add button.)
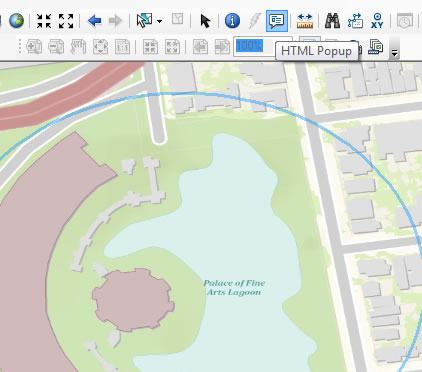
Use the HTML Popup tool to see the note in ArcMap.
Creating New Workflows
Notes give you flexibility and interoperability with the ways they can be created, saved, shared, and converted between different formats. With the latest version of ArcGIS Explorer, you can share notes to ArcGIS Online, layer packages, and KML. KML can also now be converted to notes and, therefore, to layer packages. A Create Note tool has been added to the feature pop-up window, enabling users to create notes directly from any feature on the map, then convert them to KML or layer packages. Learn about other ways you can use notes to support new workflows by visiting the ArcGIS Explorer blog.