Using ArcIMS with the ColdFusion Connector
By Randy Page, TerraVerge Corporation
What You Will Need
- ArcIMS 3 or 3.1
- ColdFusion Server 4.0 or 4.5
- Windows NT or 2000 (Note: The code examples will work with UNIX.)
- Sample data contained in this self-extracting archive
In addition to complex Web-based systems with ArcView-like functionality, ArcIMS can add simple, dynamic maps to Web-based reports, query results, or other data-driven Web pages. Any of the connectors that ship with ArcIMS make simple work of including dynamic maps in Web pages.
However, this article focuses on the use of the ColdFusion Connector. This ability to insert ArcIMS functionality into a ColdFusion application makes it possible to include a map within just about any application that has a spatial element. This exercise shows how to build an application that generates a simple tax parcel property card that contains tabular data from a Microsoft Access database and displays a map highlighting the corresponding parcel.
Getting Started
The data for this tutorial uses property information for Pittsboro, North Carolina, that is stored in a Microsoft Access database and several shapefiles including the parcel layer for the town. The attribute table for the parcel layer contains a parcel number that is related to a parcel number field in the database. Using this relationship, the appropriate parcel record in the database and the parcel geometry from the shapefile can both be located and displayed on a Web page.
Step 1--Set Up the Project
Download the sample dataset, unzip the archive, and place the files in folders you have created for this tutorial. Make sure that the ColdFusion Connector has been installed.
Step 2--Modify the ArcIMS Project
If you are using the ArcXML (.axl) file included with the sample data, modify the SHAPEWORKSPACE parameter to reflect the location of the sample shapefiles. If the path to the shapefile data is d:\arcims\website\data, the parameter will look like this:
<SHAPEWORKSPACE name="shp_ws-8" directory="<drive name>:\arcims\website\data" />
Step 3--Add a Map Service
This step creates the MapService that generates the map portion of the property card.
- Start ArcIMS and log in to Administrator (or Manager).
- Choose MapServices from the left pane of the Administrator interface.
- Click the New MapService button.
- In the New MapService dialog box, enter the name Pittsboro for the service. Enter the directory path and file name of the .axl file modified in the previous step. Set the Virtual Server to Image Server by choosing Image Server from the drop-down box. Click OK.
- From the Administrator main window, start the new MapService and save the configuration.
Step 4--Set Up an ODBC Data Source
To access the parcel data from the Access database, an ODBC data source must be configured using the Windows ODBC Data Source Administrator.
- Choose Start & Control Panel and access the dialog for configuring ODBC data sources. Check Windows online help for specific information on setting up an Access ODBC data source for your version of Windows.
- Add an Access System DSN, name it pittsboroODBC, and select chatham4.mdb, containing the tax parcel data, as the database.
Step 5--Create the Output Page
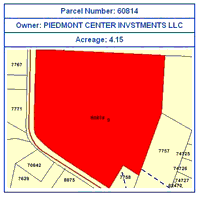
The output page can be complex or simple. Listing 1 shows the HTML for the simple page in this example. It has one table with four rows. The first three rows contain the parcel number, the owner, and the acreage. The final row contains the map. A ColdFusion query pulls the parcel number, owner, and acreage data from the tax parcel database to populate these fields. To specify which parcel's information to display, a variable containing the parcel number is included in the URL string used to call the page. For example, the URL for displaying information for parcel 60814 being served from the TerraVerge Web site would look like this:
http://maps.terraverge.com/arcuser/ propertycard/card.cfm?parcelnum=60814
Display a different parcel by changing the value of parcelnum.
 |
| Listing 1 generates a simple output page with a four-row table containing the specified parcel. |
The ColdFusion query tag used to pull the parcel data is shown in Figure 1. This simple ColdFusion query tag gives the query a name (PropertyCard), specifies the ODBC data source name (pittsboroODBC), and lists the SQL statement. #PARCELNUM# represents the value of parcelnum that is included in the URL. This query can be used to populate the parcel number, owner name, and acreage rows in the output page. Simply add the tag just before the table, and the tag at the end of the table. The CFOUTPUT tag includes records returned from the CFQUERY. Within the CFOUTPUT tags, place the variable, (fieldname) enclosed with hash (#) signs, in the location where data from that field should be displayed on the HTML page. Listing 2 modifies the output page created by Listing 1 with the addition of CFQUERY, CFOUTPUT, and #fieldname# tags that populate table cells with field information from the database.
Adding the ArcIMS ColdFusion Connector tags that generate the map requires two steps-querying ArcIMS for the envelope (i.e., extents) of the selected parcel and instructing ArcIMS to zoom to the envelope of the parcel and highlight it. The tag in Figure 2 returns the envelope of the selected parcel.
When this tag executes, it does not generate a map. It runs the query (WHERE AKPAR = #PARCELNUM#) against the specified map service (Pittsboro) and returns variables that may be used with other tags within the ColdFusion template. The argument returnenvelope="true" tells ArcIMS to return the envelope of the feature selected with the SQL statement as one of these variables. For example, the minimum x extents of the envelope would be returned as OUT_QUERYTABLE.MINX, and the maximum x extents would be OUT_QUERYTABLE.MAXX. Once the CF_ARCIMS query tag has been executed, the extents of the selected parcel will be available for zooming and highlighting. The map for the property card can be generated using the tag in Figure 3.
As you can see, the GENERATEMAP tag in Figure 3 is very similar to the QUERY tag in Figure 2. The only difference is that it specifies an envelope based on the output from the QUERY tag and includes information on how to display the selected parcel. Note that in both the QUERY and GENERATEMAP tags, #PARCELNUM# is included as part of the query. This is the same parcel number value that was passed into the page through the URL when the ColdFusion template was called.
Listing 3 shows the complete code for the output page. To view another parcel, simply change the parcel number specified in the URL. Notice that once that GENERATEMAP tag has executed, the complete path to the map image generated by ArcIMS is automatically inserted where the tag is located. Simply place this tag wherever you want the map located on the page and ArcIMS will take care of the rest!
Visit the TerraVerage Corporation Web site to view additional examples of Web sites using ArcIMS with the ColdFusion Connector.
About the Author
Randy Page is the president and founder of TerraVerge Corporation, a GIS consulting firm specializing in the design of Web-based mapping applications. He has been working with ArcIMS since its beta release and has nearly ten years of application development experience. He can be reached at randy.page@terraverge.com or 919-629-0090, ext. 101.
|