ArcUser Online
Spring 2011 Edition
Recycling VBA
Converting existing projects to ArcGIS Add-ins
By Craig Gallant, LJB Inc.
This article as a PDF.
What You Will Need
- ArcGIS Desktop 10 (ArcView, ArcEditor, or ArcInfo license)
- Sample dataset
- Microsoft Visual Studio 2008 Express Editions with SP1 (either Visual Basic or C#; free download from Microsoft)
- ArcObjects Software Development Kit (SDK) for Microsoft .NET Framework (included with ArcMap 10)

The finished application
You might ask this after installing ArcGIS 10. With the release of ArcMap 10, Visual Basic for Applications (VBA) is on the way out. As the online help article "Migrating VBA customizations to ArcGIS 10" explains, "VBA no longer provides the best toolset for customizing ArcGIS and is not included in the default installation."
At ArcGIS 10, there are two new ways to customize in ArcGIS 10: Python and the new ArcGIS Desktop Add-in. [Add-ins are a new way to customize and extend ArcGIS 10. They are authored in .NET or Java and Extensible Markup Language (XML). They provide a declaratively based framework for creating a collection of customizations that can be conveniently packaged in a single compressed file that is easily shared. Add-ins do not require installation programs or Component Object Model (COM) registration.] Both options have advantages and disadvantages. You need to pick the option that best suits your application. This article shows how, with a little refactoring, existing VBA code can quickly be converted to an ArcGIS Desktop Add-in.
This Exercise
The VBA sample for this exercise is a simple form that reads the selected county on the map and displays its information on the form. You will need at least Visual Studio Express 2008 SP1 (which is a free download from Microsoft). You will also need the ArcObjects SDK for the .NET Framework that is included with ArcMap 10. The SDK will install templates in the Visual Studio environment that will create the Desktop Add-in project. If the ArcGIS templates do not show up when creating a new project, make sure you have .NET Framework 3.5.
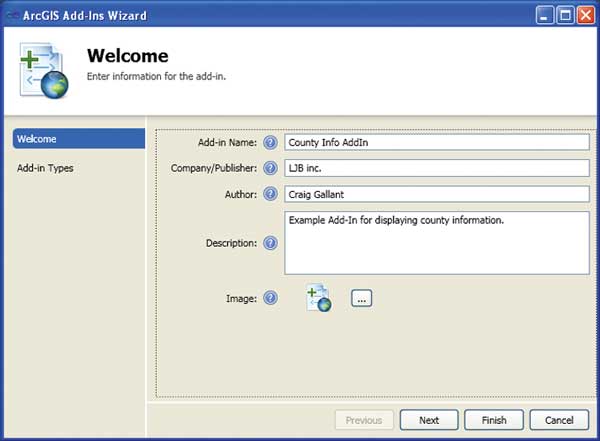
Figure 1: First wizard screen encountered when creating an add-in
Because this article is intended to demonstrate the ease of converting VBA code to .NET, some of the description of the project creation process is not detailed. For more detailed information, Esri has created a very good example. Search the online help for the article "Walkthrough: Migrating VB6 to VB .NET for ArcGIS 10."
Re-creating the Form
- Start by creating a new project. Choose Visual Basic > ArcGIS > Desktop Add-ins and choose ArcMap Add-in. Name it CountyInfoAddIn and click OK.
- The Add-ins Wizard will pop up. Fill out all the information on the welcome screen—this will be the information that is seen when adding the add-in to ArcMap (Figure 1). Click Next to bring up Add-in Types. For this example, all that is needed is a button, so check the Button checkbox, fill in the fields, and click the Finish button. This will create the Add-in project and the Button tool (Figure 2).
- From Project Menu, pick Add Windows Form and name it Form1. Give the form a width of 319 px and a height of 223 px. Also, change the form text property to County Info and set the topmost property to True. This will keep the form in front of ArcMap. (If you don't set this property, every time you click the map, the form will go behind it.)
- To make the form look like a VBA form (Figure 3), add some controls to it. With Visual Studio and .NET, all the controls available in Visual Studio can be used on the form—not just the 14 available in the VBA editor. Put four labels on the form and set their text properties to County Name, State Name, Area, and Population. Because these labels will not interact with the code, leave the default names for these controls (e.g., Label1, Label2).
- Add four more labels to the form that will be used to display the values from the selected county. Name the first one lblCountyName, the second lblStateName, the third lblArea, and the fourth lblPopulation. Set the text property of each one to the word NULL and the autosize property to True.
- Add two buttons to the form. Call one btnRead and set its text property to Read Data. Call the other one btnClose and set its text property to Close. That's it for designing the form.
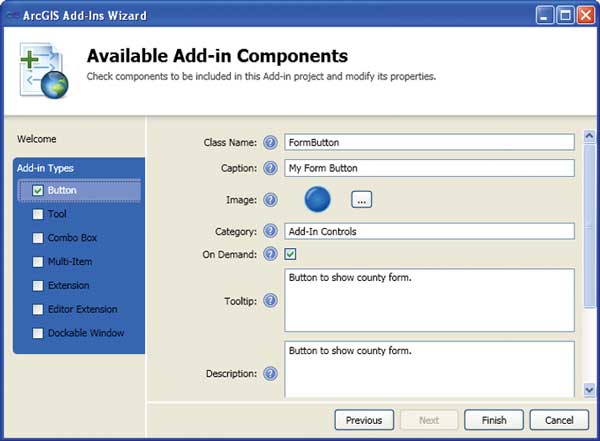
Figure 2: Second wizard screen for creating command button
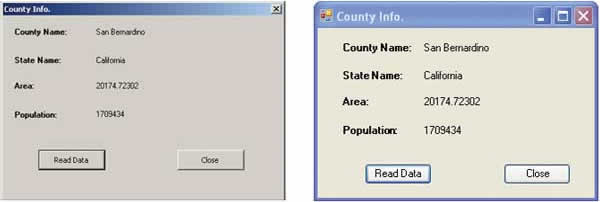
Figure 3: Side-by-side view of VBA form and .NET form
When converting a VBA to an ArcGIS Desktop Add-in, creating the form will take the most time because there is no easy way to copy. It must be manually re-created. However, as demonstrated in the next section, the code is reusable and easily upgraded.
Reusing the Code
The VBA sample is a simple program that has four parts:
- A button on a toolbar to show the form
- A button to read the selected item
- Some labels to display the data
- A button to close the form
There is one other major piece: a subroutine called ReadData. This is where the work is done in the VBA sample, and this code needs to be copied and converted. An easy way to do this is to export the form to be upgraded out of the VBA editor and open the exported file with the .frm extension in Notepad. Copy the subroutine and paste it into the newly created form in the add-in project.
In this example, open the included file called Form1.frm in Notepad and copy the subroutine ReadData. Right-click the form created in Visual Studio and pick View Code. Paste the subroutine in the code behind.

Figure 4: Code view with errors and import statements
Fixing Errors
When the code is pasted, several errors will show up. Most of these will go away once the right references are added. Because the project was created in Visual Studio and not the VBA editor, you have to add references to ArcObjects.
This example requires two references. From Project Menu, pick Add Reference and choose Esri.ArcGIS.Carto and Esri.ArcGIS.Geodatabase from the .NET tab. Just adding the references won't fix the problems because the code that was copied worked in VBA because the VBA editor understood the shorter names for ArcObjects. This is easily fixed by adding import statements at the top of the code. Doing this lets Visual Studio use the shorter names also.
At the very top of the code for the form, above the public class, add three import statements (Figure 4). Type
Imports Esri.ArcGIS.ArcMapUI
Imports Esri.ArcGIS.Carto
Imports Esri.ArcGIS.Geodatabase
Once the imports and references have been added, the number of errors decreases from 10 to 5.
Resetting Properties
The next fix addresses something that happens a lot when converting code from VBA to .NET. To set the text to the labels in VBA, the property is called Caption. In .NET, to set the text to the label, the property is called Text. This is easy enough to fix.
One way would be to simply replace the word caption with the word text. Another way demonstrates one of the benefits of using the Visual Studio environment. Go to the error lblCountyName.Caption and delete .Caption. Place the cursor at the end of the word lblCountyName and press the period key. This brings up Intelli-Sense and shows all the properties available to set on the label. Scroll down and pick the word Text.
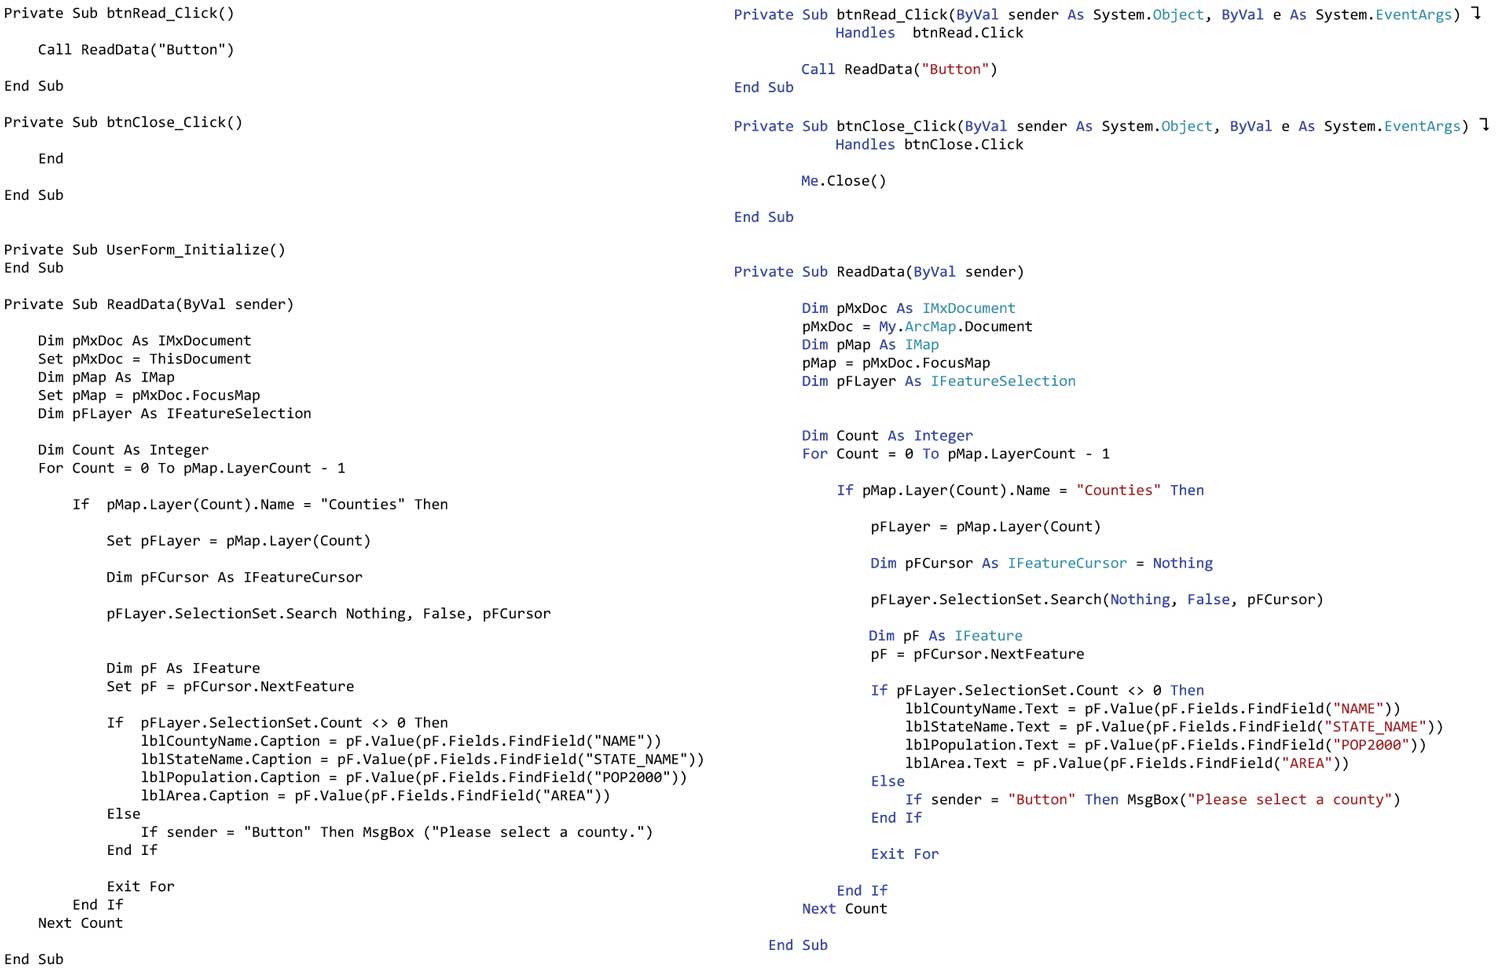
Figure 5: Side-by-side view of VBA code and .NET code
While it might have been easier to just retype Caption to Text, if the correct property is not known, this is a very useful feature. After changing the labels from caption to text, only one error remains. This is really the only major error in converting the code.
Resetting the Current Document
An error is triggered by ThisDocument. Although the VBA editor had a reference to ThisDocument, Visual Studio does not know what ThisDocument is. To fix this error, change ThisDocument to My.ArcMap.Document, which is the ArcGIS Desktop Add-in reference to the current ArcMap document.
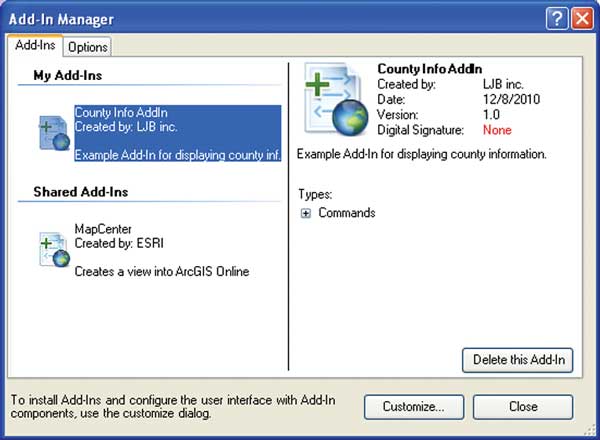
Figure 6: The Add-In Manager dialog box
When all errors are fixed, Visual Studio displays the warning error "'pFCursor' is passed before it is assigned." To fix this, go to the line of code
Dim pFCursor as IfeatureCursor
To the end of this line, add
= Nothing
From the Window menu, pick Form1.vb [Design]. This will switch back to the Form Design view.
- Select the Read Data button and double-click it. This will add the click event handler for the button.
- Open the file Form1.frm (if it is not already open) and copy the command Call ReadData("Button")" from the btnRead_Click subroutine. Paste it into the btnRead_Click subroutine just created.
- Switch to the Form Design view again and double-click the Close button. This adds the close button click event handler. In VBA, all that was in this event was the command End, which will not work in the add-in. To accomplish the same task in the new code, just type Me.Close() in the btnClose subroutine.
All the code has been converted for the form. Figure 5 shows the code before and after. Not much has changed in the conversion between VBA and the add-in. However, note that when pasting the code, Visual Studio did convert some code automatically. In this example, it removed the word Set and it put parentheses around the command pFLayer.SelectionSet.Search.
One More Thing
There is one last thing to do before the code is ready to use. To show the VBA form, it had to be assigned to a button UIControl from the Customize menu. When the add-in project was created, the Button checkbox was checked. This added a command button to the project.
From the Solution Explorer, right-click FormButton.vb and pick View Code. This opens the code for the button. In the OnClick() event, add the following two lines:
Dim frm As New Form1
frm.Show()
This tells the button when it is clicked to create a new form and show it.
That's it for converting the code. Now go to the Build menu and build the project. After the project is built, the files are bundled as an add-in and automatically installed in ArcMap.

Figure 7: The Customize dialog box
Running the Add-in
Open the USA.mxd sample included with the developer kit. It contains counties and states for the entire United States. Go to the Customize menu and pick Add-In Manager (Figure 6), verify the add-in loaded, and close the dialog box. Go to the Customize menu and pick Customize Mode.
In the Customize dialog box, click the Commands tab (Figure 7). Choose Add-In Controls from Categories (the category that was defined when creating the add-in). Drag the My Form Button from Commands and drop it on any toolbar. Close the Customize dialog box.
In ArcMap, select a county on the map. Click the button to show the county form that was just dragged to the toolbar. This opens the County Info dialog box. With a county selected, click the Read Data button on the dialog box. This will read the selected county information and display it on the form. Click the Close button to close the County Info dialog box.
This code could be improved. The add-in model has many more options. For more information on these topics, see the online help for ArcObjects for .NET. The Esri online help is very useful.
In conclusion, even though VBA is gone, with a little refactoring and a good bit of copying and pasting, existing VBA code can be reused in the new .NET environment.
About the Author
Craig Gallant is a senior designer at LJB Inc. in Dayton, Ohio. He can be contacted at cgallant@ljbinc.com.