ArcUser
Fall 2012 Edition
A Simple Approach
Preparing data for the Community Maps Program
By Mark Stewart, Community Maps Training and Support Coordinator, Esri
This article as a PDF.
What You Will Need
- ArcGIS for Desktop (version 10.0 or 10.1, any license level)
- Microsoft Excel 2003, 2007, or 2010
- Sample dataset
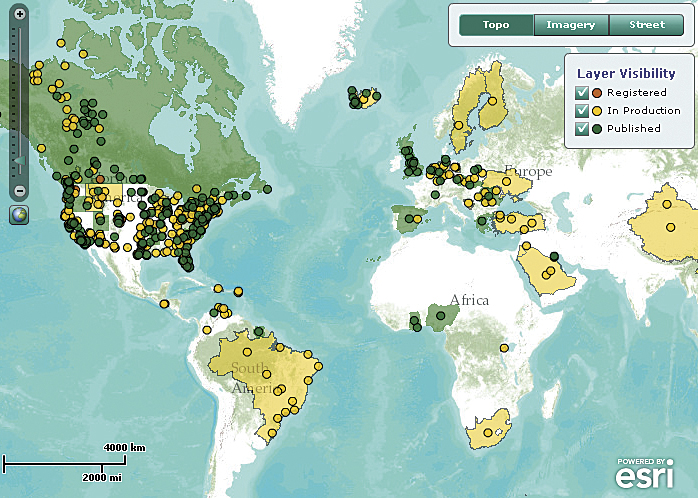
The ArcGIS community members across the world are contributing to the Community Maps Program as shown on this dashboard application.
Through the Community Maps Program, the ArcGIS community and Esri are building a collection of fast, authoritative, and freely available web maps compiled from premier GIS data sources. These maps are authored at multiple levels of detail with map scales as large as 1:1,000. Organizations can contribute to these world basemaps while retaining ownership of the data.
However, to participate, organizations must migrate their basemap layers to the geodatabase schema associated with the Local Government Information Model. This tutorial will explain the Local Government Information Model feature classes and attributes that are relevant to the Community Maps Program generally—and the World Topographic Map specifically—and suggest a workflow for preparing source data for migration.
Getting Started
The Local Government Information Model includes the datasets necessary to support virtually any common municipal application from public safety to election administration. Because it is so robust, the data model can seem overwhelming at first, but you will soon realize that you only need to concentrate on two or three of the model's feature datasets to support your basemap contribution.

In terms of the number of user contributions and the extent covered, the World Topographic Map exemplifies the Community Maps Program. This map service includes administrative boundaries, cities, water features, physiographic features, parks, landmarks, highways, roads, railways, airports, and buildings overlaid on land cover and shaded relief for added context. It was designed for use as a basemap or reference map. This tutorial will show you how to prepare your data for inclusion in the World Topographic Map.
To get started, download the archive file containing the tutorial data. Unzip it locally on your computer. In Windows Explorer, navigate to the CommunityMapsTutorial folder and open the CommunityMapsDataLayers.xlsx Excel spreadsheet. This spreadsheet will help you understand the data layers and associated attributes that are used to build the World Topographic Map. It can also help organize the layers you will contribute and determine what you will need to do to them so that they conform to the Local Government schema that Community Maps uses.
Click the Contents tab of the workbook. This workbook contains a lot of information. You can use the table of contents to easily navigate between its many worksheets. Each worksheet contains information on one of the feature classes in the Local Government Information Model that is relevant to the World Topographic Map. Click the feature class name in the Table of Contents worksheet to go directly to that worksheet.
In the Table of Contents worksheet, click OwnerParcel to go directly to the OwnerParcel worksheet. The top part of the worksheet contains information about the OwnerParcel feature class, including what attributes are required for labeling and symbolization.
In this case, because parcels are all symbolized with a single symbol type and are not labeled in the World Topographic Map, no attributes are needed from this feature class. The bottom portion of the OwnerParcel worksheet contains a table with empty cells that you could populate with information about source data you would use to populate the required feature class if you were going to contribute data for that feature class to Community Maps. Working through this information will help you understand which Community Maps feature classes correspond to your source data layers and determine if this data will require any processing to conform to the Local Government Information Model.
At the top of the OwnerParcel worksheet, click the Return to Table of Contents link. Now that you are familiar with how the spreadsheet works, you can examine a source data layer for the RoadCenterline feature class in the Local Government Information Model and see how well your source conforms.
Examining the RoadCenterline Feature Class
Start ArcGIS for Desktop and open a new, blank ArcMap document. Click the Add Data button and add the PDStreets shapefile from the CommunityMapsTutorial folder to the map. This shapefile contains road centerlines for the city of Palm Desert, so it will correspond to the RoadCenterline feature class in the Local Government schema.
In the CommunityMapsDataLayers Table of Contents worksheet, click the RoadCenterline link. Use the Participant Source Data section of the worksheet to begin documenting the comparison of the PDStreets shapefile to the RoadCenterline feature class.
Type PDStreets.shp in the Dataset Name column. For Geometry, type Polyline. For Geometry Change Required?, type No.
In ArcMap, right-click the PDStreets layer and choose Open Attribute Table. Explore the fields in the PDStreets shapefile to get an idea of the field names and the types of values in those fields. Notice that the StreetName field contains the street name value, while the StreetType field contains the standardized street type abbreviation (e.g., Ave, Dr,). StreetDir, the final field, contains suffix directions. Pay special attention to the Level and Class fields.
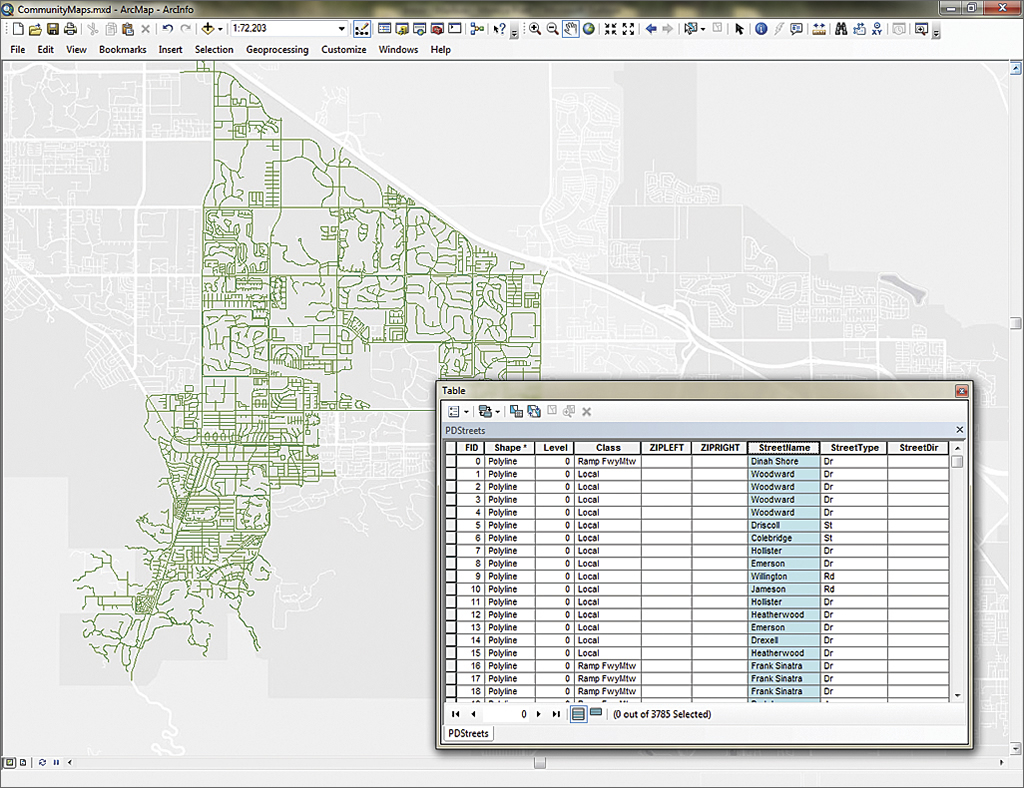

After examining the PDStreets attribute table, you discover that the StreetType, StreetName, and StreetDir fields will need to be combined to supply the necessary values for the FULLNAME field in the RoadCenterline feature class.
Now return to the CommunityMapsDataLayers spreadsheet and examine the Required Attributes section of the RoadCenterline worksheet. The RoadCenterline feature class has two required attributes: FULLNAME and ROADCLASS. The FULLNAME field is used for labeling in the World Topographic Map. The values in the ROADCLASS field are used to symbolize the features based on the type of road they are (e.g., local, highway, ramp). The ROADLEVEL field can be used to symbolize one road feature above or below another, so that bridges and underpasses can be represented properly. The remaining attributes can be used to refine the general information in the FULLNAME and ROADCLASS fields but can be omitted from the feature class if you do not have the data to populate them or they are not needed.
Examining the PDStreets attribute table reveals that the StreetType, StreetName, and StreetDir fields will need to be combined to supply the necessary values for the FULLNAME field in the RoadCenterline feature class. The PDStreets Level and Class fields will map to the RoadCenterline ROADLEVEL and ROADCLASS fields.
In the CommunityMapsDataLayers spreadsheet, update the Relevant Attributes column with the information you have discovered from examining the PDStreets attribute table. You can also add some explanatory comments to indicate which source attributes correspond to which RoadCenterline fields.
Now that you have examined one source feature class and compared it to the Local Government Information Model for Community Maps, you will investigate a few other layers. In ArcMap, close the PDStreets attribute table and remove the PDStreets layer.
Explore the FacilitySite Feature Class
In this step you will use the CommunityMapsDataLayers spreadsheet to explore the FacilitySite feature class and compare it to the source datasets you will use to supply its attributes. FacilitySite is another primary layer in the basemap. This layer represents a combination of area feature types. Features as varied as parks, cemeteries, shopping malls, and casinos can be stored in this feature class. Often this means that several source data layers will be used to complete the FacilitySite feature class.
In the CommunityMapsDataLayers spreadsheet, navigate to the FacilitySite worksheet and review the information it contains to gain an understanding of the types of features in the FacilitySite feature class. In ArcMap, click Add Data and navigate to the CommunityMapsTutorial folder. Open the PDSourceData geodatabase and add the entire Facilities feature dataset. The feature classes in this feature dataset will supply the features for the FacilitySite layer in the basemap.
In the CommunityMapsDataLayers spreadsheet, add the source feature class names to the Participant Source Data section of the FacilitySite worksheet. In ArcMap, open the table for the GolfCourses layer.
This feature class has a field called FacilityName that can be used to label golf courses in the map, so you will note that in the Relevant Attributes column of the spreadsheet. For the GolfCourses layer, type Polygon for Geometry and No for Geometry Change Required.
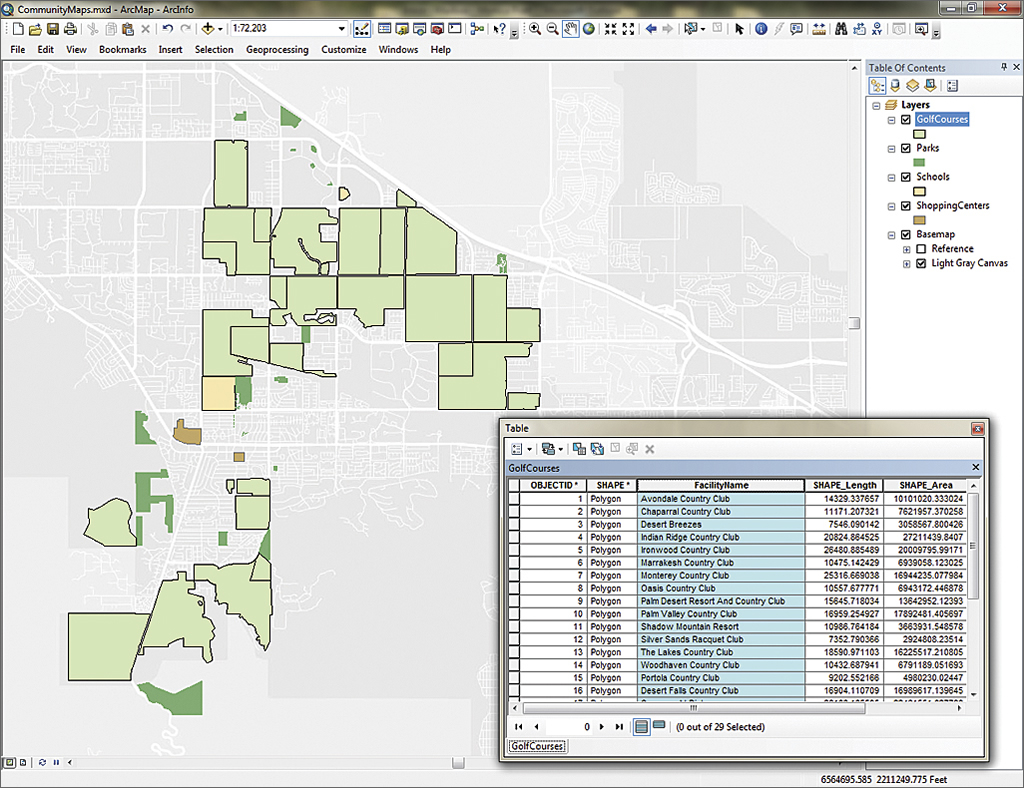
The entire Facilities feature dataset in the PDSourceData geodatabase will supply the FacilitySite layer in the basemap.
In the spreadsheet, notice that the features in the FacilitySite feature class are grouped into subtypes based on values in a field named SubtypeField. The GolfCourses layer does not have an attribute that will correspond to SubtypeField. However, since the golf course features are in their own separate feature class, you will be able to migrate them directly into the correct subtype in FacilitySite. In the Comments section for GolfCourses, type Will load directly into Public Attractions and Landmark Buildings subtype.
The remaining source layers (Parks, Schools, and ShoppingCenters) have schemas similar to the GolfCourses layer. They have a FacilityName field but no subtype field. Once again, because the different types of facilities are divided up into their own feature classes, you can load them directly into their corresponding subtype in FacilitySite.
Use your best judgment to fill in the blanks for the missing subtypes in the following statements and check your answers.
| Parks belong in the | _________________________ | subtype. |
| Schools belong in the | _________________________ | subtype. |
| Shopping centers belong in the | _________________________ | subtype. |
Use your answers to fill in the remaining information for the layers in the Participant Source Data portion of the worksheet.
Conclusion
In this tutorial, you learned a simple workflow for preparing data layers so they can be migrated to the Local Government Information Model. You also used the CommunityMapsData Layers spreadsheet to record relevant information to make the process of migrating the source data into the Local Government Information Model more efficient. For more information about the Community Maps Program, visit the Community Maps Program resource center.