In ArcGIS, users can create, modify, save, and delete metadata. The metadata editor also provides the functionality to overwrite an item’s existing metadata. When you need to update or correct information associated with an item in your ArcGIS portal, metadata editing should be painless. The enhanced metadata editor makes this process simpler than ever. Find out what happens when you overwrite metadata, explore the options available, and learn to overwrite your metadata in ArcGIS Online or ArcGIS Enterprise.
What Are Your Overwrite Options?
Before getting started, you will need to enable metadata for your organization. Only item owners and administrators can edit an item’s metadata.
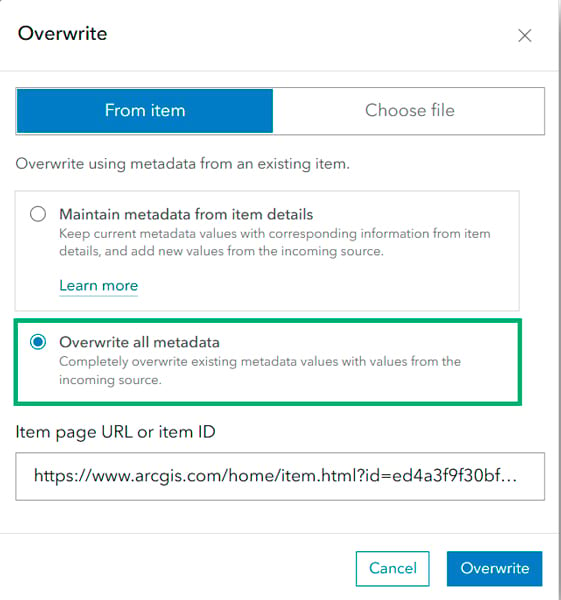
To launch the metadata editor, navigate to the item’s page and click the Metadata button. Once you’re in the metadata editor, click the ellipsis in the top right corner and select the Overwrite option.
Now you’ll need to decide which metadata source you want to use. You have two options for overwriting your metadata: using metadata from an item in your ArcGIS Online or ArcGIS Enterprise organization, or from an ArcGIS metadata XML file.
- From item: Use this option to overwrite your metadata using metadata from another item in your portal or a publicly shared item. Simply provide the URL or item ID of the source item.
- Choose file: This option allows you to overwrite metadata using a local ArcGIS metadata XML file. You can export metadata to this format from ArcGIS Pro or the metadata editor in your ArcGIS portal.
Next, decide whether to maintain the metadata from the item details page or to overwrite all metadata.

The option to maintain metadata from item details is selected by default. It allows you to avoid unintentionally losing any metadata. This option preserves the metadata already populated on your item page—such as Title, Summary, Description, and Terms of Use—and the ArcGIS metadata XML. However, if the existing metadata contains null values (i.e., is not populated), those values will be replaced with the new metadata you are using to overwrite.

Let’s say you have an existing item with a description but no summary. The item you are overwriting from has both the summary and description. Selecting Maintain metadata from item details on the Overwrite dialog will ensure the description of your existing item does not change, but the summary will be filled with the values from the new metadata you are applying.
The help documentation linked in the dialog box specifies the metadata elements that will be maintained when you overwrite metadata. This includes not only the item details, but also elements such as Extent, Access Link/URL, and Metadata File Identifier.

To locate the Access Link/URL element, navigate to All Metadata > Distribution > Digital Transfer Options > Online Distribution. When you create metadata for a layer, the web service URL for the item automatically populates in the Online Distribution section of the metadata editor interface. Generally, you should avoid overwriting this metadata element; it reflects the web service URL for the item’s layer, as illustrated in the screenshot above. Altering or removing the Access Link/URL in the metadata will not affect the web service for the web layer, but it will only impact the information stored in your metadata.
To locate the Metadata File Identifier, open the metadata editor and navigate to All metadata > Metadata Info > Metadata Details. The system automatically assigns the Metadata File Identifier when you create metadata for an item. This identifier corresponds directly to the item ID. Unless necessary, avoid overwriting this metadata element, as it represents the specific metadata file ID linked to the item’s ID.
The Overwrite all metadata option completely replaces existing metadata with the values from the incoming metadata source, which can be either an item or a metadata file.

Let’s take a look at the different options for overwriting your metadata.
1. Leverage a Template
To quickly edit the metadata of web layers that currently lack it in your organization, apply a basic metadata template.
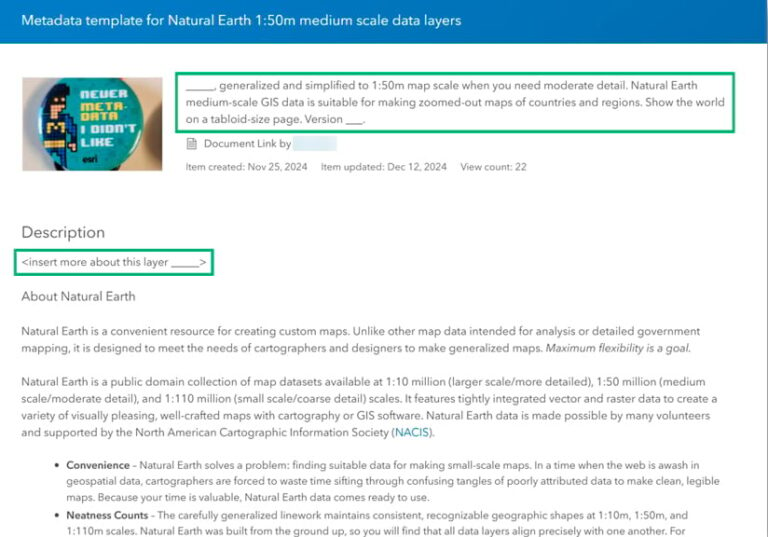
For instance, if you’re tasked with creating a collection of layers, you can systematically fill in their metadata. You can create an item that acts as your metadata template for new items, as illustrated in the image below. When designing your template, thoughtfully choose the values to include, such as placeholder text and your organization’s contact information, ensuring compliance with your organization’s metadata standards. Additionally, consider adding helper text to assist users in populating metadata according to best practices.

You can use the metadata from an item’s URL to overwrite existing metadata, as discussed in the options above. By copying the URL of the template item and navigating to the new item that lacks comprehensive metadata, you can use the overwrite feature to jump-start the process of filling out your metadata.
Selecting Maintain metadata from item details in the dialog will ensure that any populated metadata elements in the item details are retained in both the item details and the ArcGIS metadata XML.
Null values in the item page will be replaced with information from the template. You can always review your metadata before saving.
2. Edit Metadata on a Filtered Layer
For this option, create a filter from a layer and make updates to your newly created layer’s metadata. Let’s use the CDC Social Vulnerability Index 2018 – USA layer from ArcGIS Living Atlas of the World as an example. This layer has been recommended by the Centers for Disease Control and Prevention (CDC) as authoritative, which instills a level of confidence in its reliability for reuse. By leveraging the capabilities of web layers, you can dynamically filter and quickly share authoritative data with relevant metadata.
In this example, use the CDC layer to apply a filter for the state of Texas. Save the filter as a new layer, “Texas,” that will appear in your content. However, the new Texas layer lacks metadata.
You can choose to duplicate the metadata from the CDC layer to your Texas layer. By following a workflow like the one demonstrated in the template metadata example, you can paste the source layer URL for the overwrite process. This action enables you to seamlessly use essential source metadata, including descriptions and terms of use. Additionally, you improve the context by updating the geographic extent to accurately represent the filtered layer as well as other metadata elements.
In addition to overwriting the Texas layer’s metadata, you can also make relevant changes in the editor. Editing the metadata helps to accurately reflect the filtered content in the metadata editor. Note that you cannot edit the sublayer metadata of your new copy of the layer, since it is still referencing the USA layer.
3. Overwrite Metadata Using ArcGIS API for Python
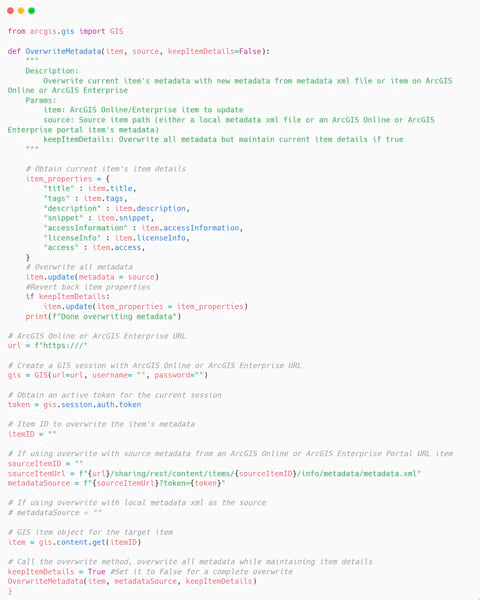
You can also automate your metadata editing and overwriting processes by using ArcPy or ArcGIS API for Python. If you aim to streamline your workflows, ArcGIS API for Python offers a programmatic approach to overwrite metadata efficiently. Through scripting, it is possible to entirely replace the metadata for an item by sourcing it from an ArcGIS portal or an ArcGIS metadata XML file. Additionally, the API enables you to overwrite all metadata while retaining the existing item details, such as summary. This ensures the descriptive properties on the item page remain intact, even as the rest of the metadata gets updated. For scenarios that necessitate a complete metadata overwrite, the API effectively facilitates these updates.

No matter how you edit or overwrite your metadata in ArcGIS, leveraging the capabilities of the metadata editor has never been easier.


