The difference between relates (often called table relates) and relationship classes is a source of much confusion, especially for new ArcGIS users.
Though the terms sound similar, they refer to different things. There are reasons to use each one.
A relate exists in a map or layer file. Relates are great because they allow you to select features in a layer, then easily see related features in a different layer or related records in a nonspatial table.
A relationship class is an object in a geodatabase. Relationship classes enable smart behavior. You can set up rules for how the participating feature classes or tables behave when something happens. For example, with a relationship class in place, if a feature is deleted, then its associated record in the other feature class or table will be automatically deleted.
Both relates and relationship classes rely on cardinality, which describes how records in two different tables are related to one another. Cardinality can be one-to-one, one-to-many, many-to-one, or many-to-many.
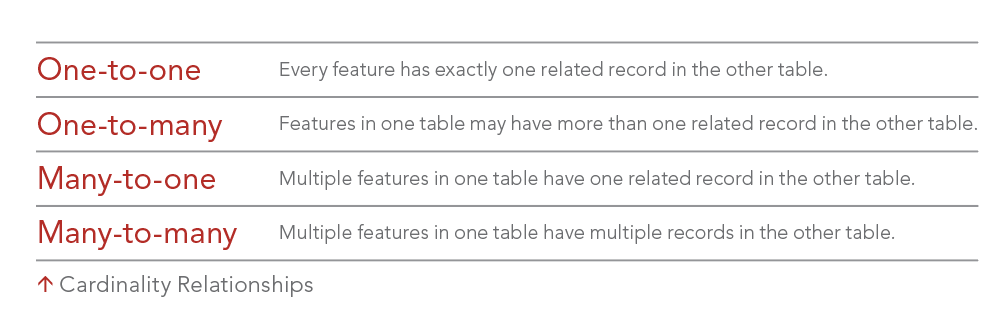
Relates support only one-to-many and many-to-one cardinalities, while relationship classes support all four cardinalities. Feature classes and tables that participate in a relate or a relationship class must have a field of the same data type (e.g., text, short integer, long integer, ObjectID). That field will be the connection point or key field between the two feature classes or tables participating in the relate or the relationship class.

An Example of a Relate
The map below contains a layer of fire stations and a nonspatial table that stores data about the city’s fire department personnel. A relate was created between the layer and the nonspatial table, which has a many-to-one cardinality because every fire station has multiple personnel. The relate is based on a short integer field in both tables that stores a fire station ID number. The fields have different names, but that doesn’t matter.
Relates make it easy to find out which personnel are assigned to any given fire station just by using the Identify tool and clicking a fire station symbol on the map. In the Identify window, the related table name displays below the fire station feature name. Expanding the table shows the records associated with that station. In this example, the Washington station has six assigned personnel.
Suppose Brian Butler is transferred from the Washington station to the Adams station. His record in the FirePersonnel table is edited to replace the Washington station number (which is 2) with the Adams station number (which is 202). When the edit is saved, the data shown in the Identify window will reflect his new assignment. The Washington station now has only five assigned personnel, and the Identify window will now reflect that fact. Clicking the location of the Adams station will now show Butler in its list of personnel.

An Example of a Relationship Class
Table relates are super useful for quickly viewing feature data stored in separate tables for efficient data management. Relationship classes give you the ability to do more than view data easily. With a relationship class, you can set rules and properties that control what happens when data in either table is edited. You can also ensure that only valid edits are made.
Using the previous example, suppose a relationship class named StationsPersonnel has been created between the FireStations feature class and FirePersonnel table. Also suppose the city requires that all stations have a minimum of five assigned firefighters and a maximum of 15 assigned firefighters. A rule has been created in the relationship class to enforce this requirement.

With Butler’s transfer to the Adams station, Washington is left with five assigned firefighters. Jean Fiorini, assigned to the Washington station, has requested a transfer. Her request was approved. The GIS technician responsible for maintaining the fire department’s GIS data tried to update Fiorini’s record in the personnel table with her new station number, but she got a message that the edit cannot be made.
The database would not allow the edit because without Fiorini, Washington will have fewer than five assigned personnel. To comply with the relationship class rule, a firefighter must be added to the Washington station before Fiorini’s record can be edited to reflect her new station assignment.
In this example, the relationship class ensures that data edits are valid and that the city’s GIS database reflects and supports the real-world needs reflected in the rule in the relationship class. If the person who approved Fiorini’s transfer didn’t realize that Washington would be left with only four firefighters, the relationship class rule surfaced that piece of key information, and may have prevented loss of property or lives caused by insufficient staffing of the Washington station.
Both relates and relationship classes can help you work more efficiently, and now that you understand them, you can use them effectively.