Introduction
With the new release of ArcGIS Pro 2.7, users have the ability to transform Revit floorplans into ArcGIS Indoors maps in 5 simple steps.
Before getting started with step 1, make sure to read ‘How to Evaluate Revit Floorplans for ArcGIS Indoors’ as it will be integral to prepare floorplan data for the conversion process.
Step 1
Setting up the File Geodatabase and Converting it into an ArcGIS Indoors geodatabase
Start by opening a new ArcGIS Pro project.
When creating a new project in ArcGIS Pro, it will automatically create a blank file geodatabase to store spatial data and information. This blank file geodatabase will be stored on a special file folder on the computer’s disk. To learn more about file geodatabase creation, follow this link.
From the geodatabase that is generated, it can be converted into an ArcGIS Indoors geodatabase.
Open the geoprocessing pane and search ‘Create Indoors Database’.
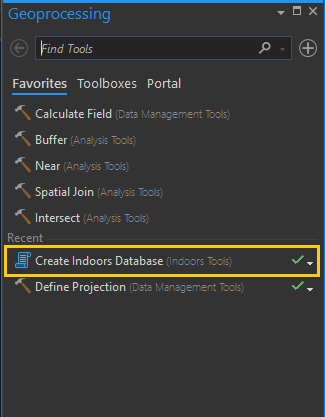
Open the geoprocessing tool ‘Create Indoors Database’.
In the parameters, the ‘Target Geodatabase’ is the blank file geodatabase created with a new ArcGIS Pro Project.
Then, click run.

Step 2
Adding Revit Data in ArcGIS Pro
In this next step, add the Revit building files to the ArcGIS Pro workspace.
Make sure to add and work with the floorplan data in a 2D map, as it will provide accessibility to the ‘Building Management Toolbar’ for georeferencing and reprojecting the floorplan data.

After adding the Revit floorplans to the map’s contents, verify that the layers were added.

These Revit layers store important building information and features. Make sure there is data stored in the ‘Floorplan_Polygon’, ‘Floorplan_Polyline’, and ‘Foorprint’ layers, as these will be the layers that are targeted during the data conversion process.

Step 3
Projecting and Georeferencing Revit Floorplans
For reprojecting Revit floorplans, verify what unit of measurement was used in the creation of the Revit model. Open the attribute table in ArcGIS Pro to check if the data is in feet or meters.
After identifying the unit of measurement that is relevant to the floorplan, select the ‘Floorplan_Poylgon’ layer.
Then, click the ‘Building Management Toolbar’.
Afterwards, select ‘Define Projection’. Make sure to choose a projected coordinate system that matches the unit of measurement in the ‘Floorplan_Polygon’ layer.

After running the ‘Define Projection’ tool, verify the new projection file (.prj) is stored in the location folder as the Revit building files.
Edit the .prj file to be a universal projection for all Revit building files by renaming it to ‘ESRI_CAD.prj’.

Following the projection of the Revit files, proceed with georeferencing the ‘Floorplan_Polygon’ layer.
Next, select the ‘Georeference’ tool to move, rotate, and scale the floorplan data to the building footprint on the basemap.

After georeferencing the ‘Floorplan_Polygon’ layer, save the project and verify that the 3D World file (.wld3) has been created.
Next, rename the 3D World File to ‘ESRI_CAD.wld3’.
This will ensure that the other Revit building files, in that folder, are in the relative location on the map.

If you are looking to learn more about projecting and georeferencing Revit building files, read this article ‘How to Georeference Revit Data in ArcGIS Pro’.
Step 4
Running ‘Import BIM to Indoor Dataset’ Geoprocessing Tool
In this next step, search for the ‘Import BIM to Indoor Dataset’ in the geoprocessing pane.
This tool will easily batch convert Revit floorplans to ArcGIS Indoors layers.
Once the geoprocessing tool is open, begin filling out the parameters.
For the ‘Input BIM Floorplan Polygon Layer’, leverage the drop down to select the ‘Floorplan_Polygon’ layer.
Next, select the Indoors geodatabase created earlier as the ‘Target Indoor Dataset’.
For ‘Building Name’, use the facilities common name.
For the ‘Ground Floor Name’, make sure to target the floor that is on ground level.
Example: If basement needs to be added to the ArcGIS Indoors layers, make sure that is the ‘Ground Floor Name’ selected.
Then, select the floors to load into the ArcGIS Indoors layers with the ‘Floors To Import’ parameter.
Finally, leverage the ‘Area Unit of Measurement’ used in the projected coordinate system. This will define gross and net area for the ‘Facilities’, ‘Levels’, and ‘Units’ layer.

Step 5
Inspect and Verify the Output for the ArcGIS Indoors Floorplan Data
To verify the creation of the ArcGIS Indoors data, begin by adding the ArcGIS Indoors layers from the ArcGIS Indoors geodatabase.
Open the attribute tables to verify the data in the fields is calculated based on the parameters set in the geoprocessing tool.


Conclusion:
In this simple 5-step process, Revit floorplan data was loaded into the ArcGIS Indoors layers. This process will streamline and extend the lifecycle of the building information model.
To add additional value to the newly created ArcGIS Indoors model, follow these resources below:
- ‘Points of Interest and Categories’
- ‘Generate Occupant Features (Indoors)’
- ‘Create an Indoors Category’
- ‘Create the Indoors Network’
Are you looking to get started with ArcGIS Indoors? Visit our webpage now to get in touch with an Indoors expert!

Article Discussion: