
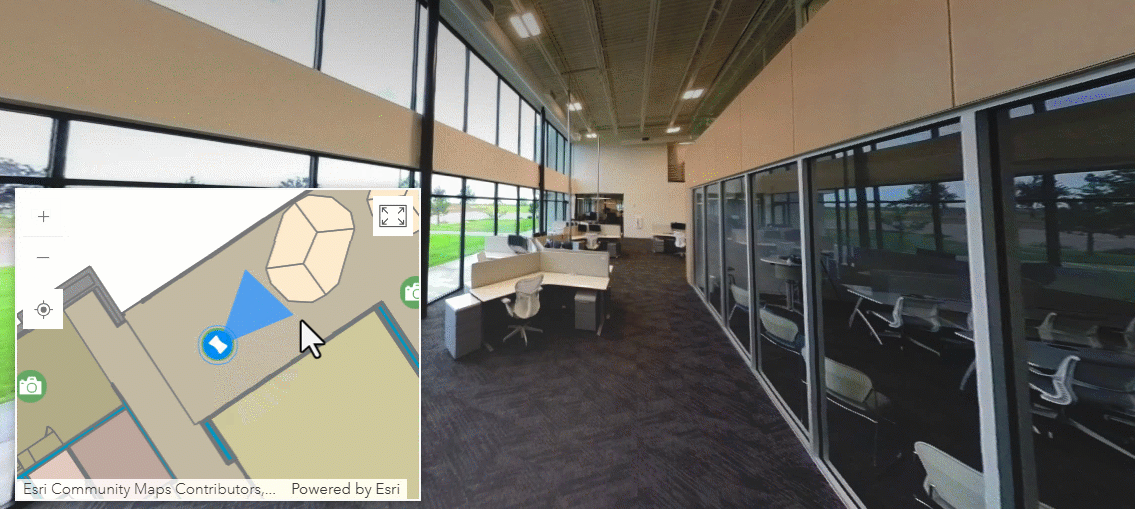
Indoor mapping is the process of digitally representing the inside of buildings, campuses, and other facilities so people can visualize, navigate, and manage these spaces more effectively. ArcGIS Indoors is Esri’s indoor mapping solution that provides interactive floor-aware maps, space reservations, wayfinding, and location-based insights for workplaces, universities, hospitals, and more. Organizations use ArcGIS Indoors to improve occupant experiences, streamline operations, support maintenance workflows, and enhance safety planning. In this post, we’ll look at how you can make these maps even more immersive by adding 360° photos—giving users a realistic, visual understanding of spaces before they visit them in person.
Adding 360° photos to your indoor maps and apps can create a more compelling user experience and be a more intuitive way to present indoor data. For example:
- Visitors and hybrid workers can visualize reservable spaces to assess lighting, equipment, and ergonomics prior to booking a meeting room or office hotel.
- Facility managers and maintenance workers can verify equipment and location access details before going on-site to complete a work order, so they know what tools to bring and exactly which infrastructure to service.
- Emergency planners and first responders can see important details about architecture and furnishings to plan for emergency scenarios and make better decisions when faced with critical situations.
ArcGIS Pro 3.6 introduces a new capability that makes it easier than ever to create immersive, photo-realistic indoor experiences. The new 360 Video To Oriented Imagery geoprocessing tool converts 360° video captured by affordable, consumer-grade devices (such as an Insta360 or Go Pro Max) into geolocated wraparound images suitable for ArcGIS Indoors, ArcGIS Pro, Experience Builder and other ArcGIS products that support Esri’s Oriented Imagery Dataset. Oriented Imagery preserves the geographic location and viewing angles as users seamlessly view, pan, and zoom within the images.
If you’ve ever taken indoor images (no GPS coordinates!) captured with a consumer-grade 360° camera and manually built them into an oriented imagery dataset, you know that process can be time consuming. The 360 Video To Oriented Imagery tool helps by simplifying and automating key aspects of the process:
- Data capture and image extraction: Not only is it faster and easier to collect video than it is to take a bunch of photos, one video is also easier to manage than a folder of images, and video gives you more flexibility to choose from among the extracted images to get the position and quality you need.
- Georeferencing: Instead of positioning and orienting photos on a map one at a time, the 360 Video To oriented imagery tool uses visual simultaneous localization and mapping (VSLAM) and just two control points to quickly geolocate many video frames at once, without reliance on GPS.
- Floor awareness: Need images for a multi-story building? The 360 Video To Oriented Imagery tool can add level identifiers for you, so you can use the floor filter to visualize images by floor in ArcGIS Pro and other apps that support floor awareness.
This blog walks through best practices for capturing and processing 360° video so you can prepare high-quality imagery for your indoor GIS workflows.
Capture the Video
Today’s 360° action cameras are compact, affordable, and capable of producing excellent results in indoor environments. Whether it’s an office, a university campus building, or a manufacturing facility, you can achieve high-quality results with the right approach.
1. Choose a Suitable Device
Leading manufacturers such as Insta360, GoPro, and DJI offer devices that balance portability, resolution, and ease of use. When selecting a camera, consider the following:
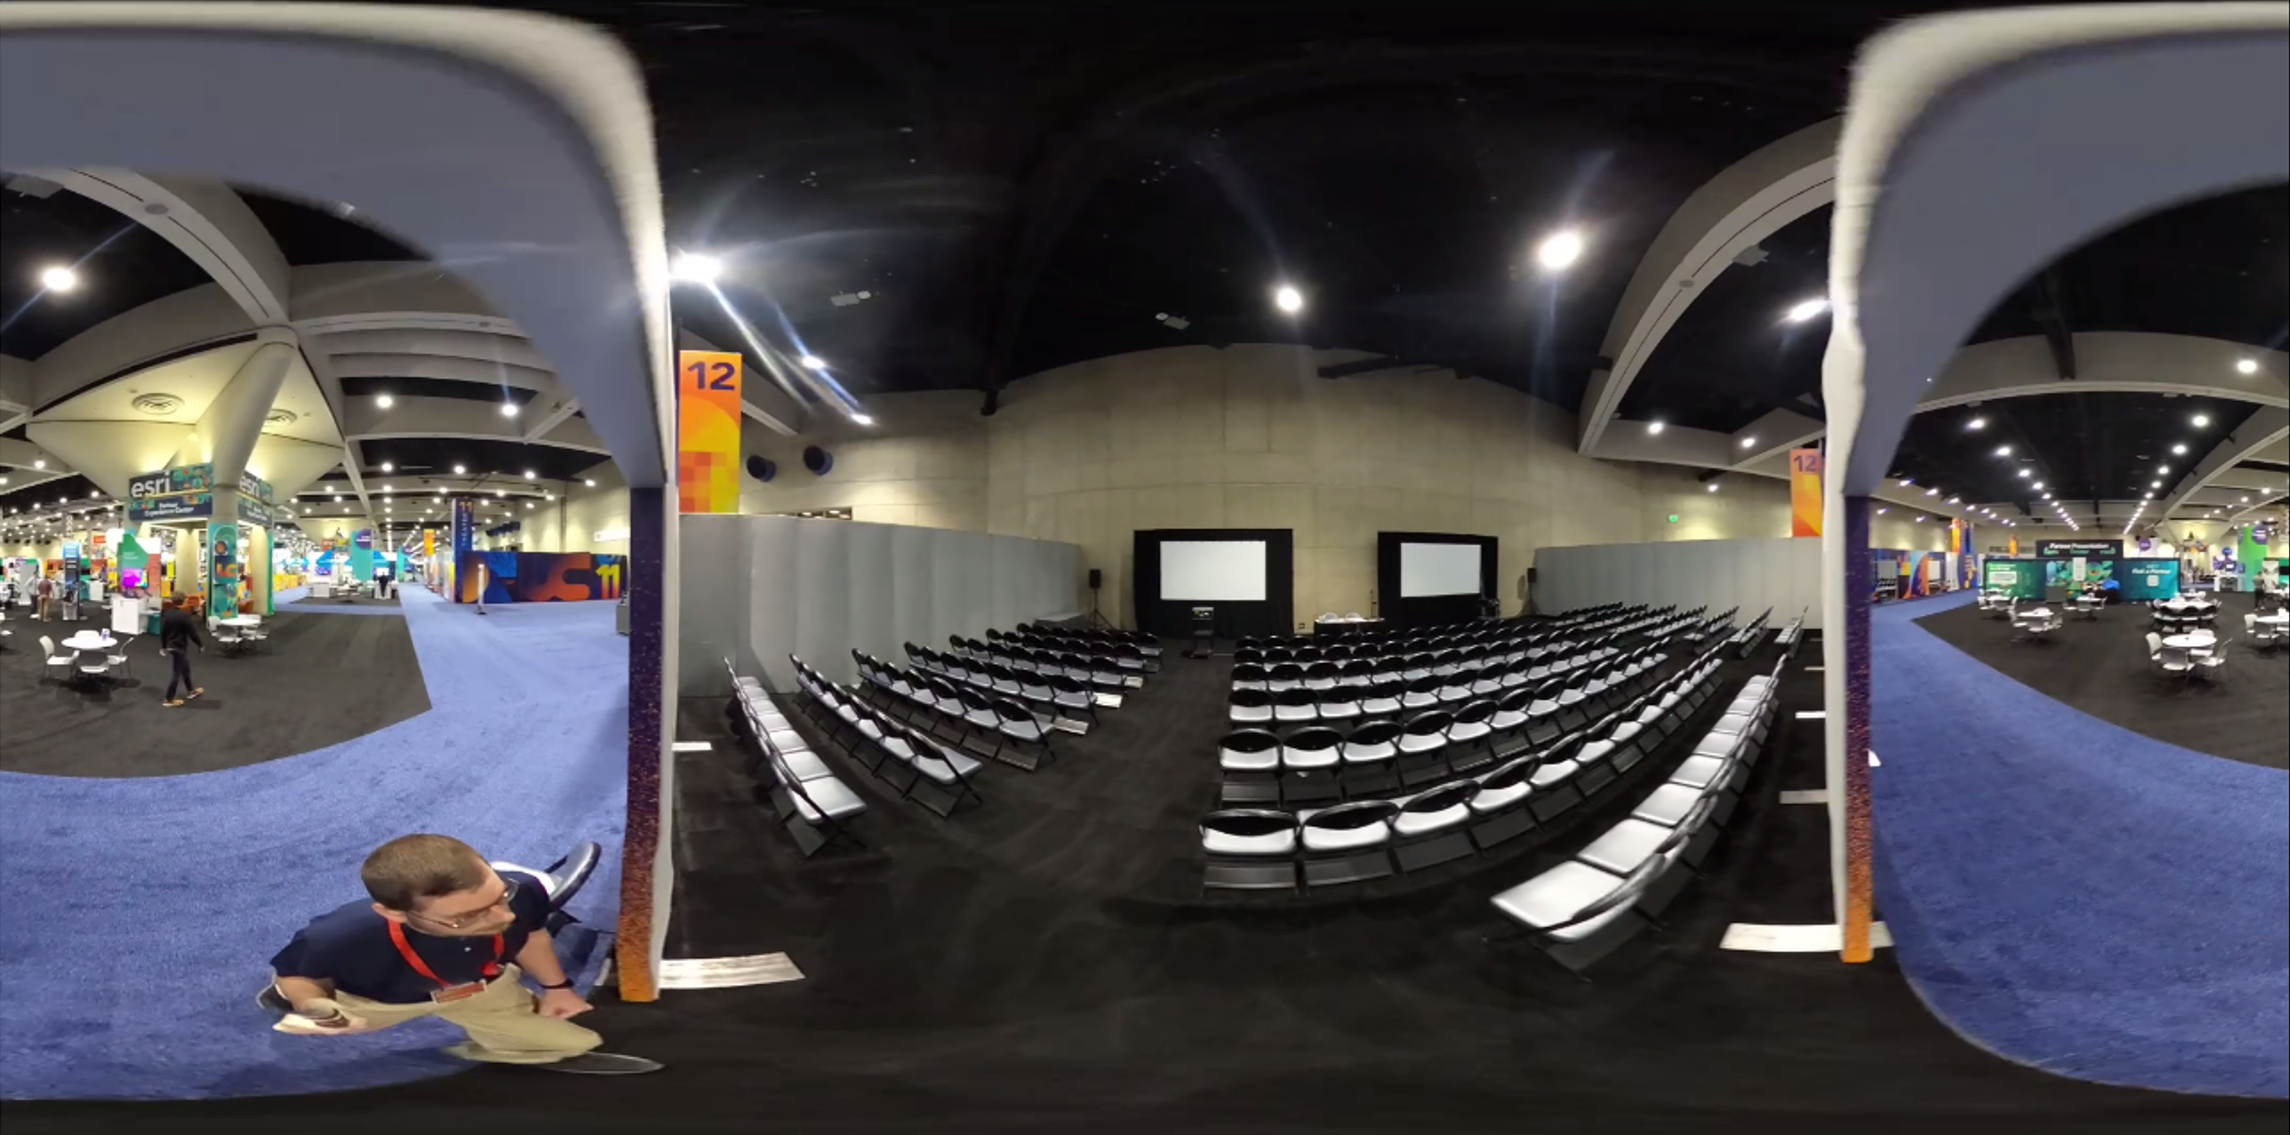
- “360” versus “panorama”: A 360 video camera captures the entire spherical view around the camera, versus a “full panoramic video” that captures a full 360° horizontally but less than +/- 180 degrees vertically. When exported, true 360 video will have a 2:1 aspect ratio and exhibit equirectangular distortion (see figure 2 below for an example).
- Lens size and image quality: Larger lenses admit more light, which reduces motion blur and noise, especially in dimly lit interiors. Using a 360° video camera with just two lenses will also minimize “stitching” seams where images from multiple lenses overlap.
- Resolution: While 4K may sound impressive, it represents relatively few pixels when spread across a full 360° sphere. For indoor mapping, aim for 6K or higher to help ensure extracted frames contain sufficient detail for your intended use cases.
- Stabilization: For VSLAM to determine camera position and heading accurately, the video needs to maintain a consistent horizon and heading as the camera moves around. Check the device’s specifications for features labeled stabilization, steady, or horizon lock.
- Practical factors: Battery life, internal storage capacity, and cost may also influence your choice. Some cameras have a companion app that makes it easy to control and monitor the camera from your mobile device.
Tip: If you plan to record multiple floors or large facilities, bring extra batteries or an external power bank, as well as additional storage media, to reduce interruptions.
2. Configure Camera Settings
Before recording, configure your camera for maximum image quality and stable video. Recommended settings include:
- Resolution: Record in the camera’s highest available 360° resolution and recording bitrate (if that’s adjustable).
- Frame rate: A lower frame rate such as 24–30 frames per second (fps) is sufficient for still-frame extraction and helps conserve storage space. Note: Support for super-low “timelapse” frame rates (e.g., 2 frames per second) is planned for a future release of the tool.
- Stabilization: Ensure the camera’s stabilization and horizon-leveling options are enabled. Some cameras may require enabling these through the vendor’s desktop or mobile software during post-processing or export. Do not enable options to “lock on” or track a person or other subject.
Tips:
- To save some storage space, disable audio or choose a low audio bitrate.
- Using consistent settings across multiple captures will yield more uniform imagery that looks cohesive when viewed in ArcGIS Indoors or ArcGIS Pro
3. Consider the Environment
The 360 Video To Oriented Imagery tool uses Visual Simultaneous Localization and Mapping (VSLAM) to determine camera position and orientation from the video frames. VSLAM relies on tracking visual features across multiple frames to estimate motion. These visual features may be corners, edges, or other visually distinct objects. VSLAM works by measuring how the angles and velocities of many such objects appear to change as the camera moves through the space.
Because of this, environmental conditions can have a major effect on output quality. For example:
- Feature-rich scenes have furniture, signage, equipment, wall art, etc. that provide many stable visual reference points. Feature-poor scenes like empty rooms or blank walls make localization difficult.
- Good lighting improves contrast and minimizes blur. Dim, washed-out, or reflective surfaces may impact VSLAM tracking.
- Moving elements (such as people) and repetitive architecture (such as a large set of similar-looking office cubicles) can also confuse the algorithm.
Best practice: Capture video when lighting is bright and consistent, and when spaces are relatively free of moving people. For example, record after work hours when lights remain on but foot traffic is low.
Because the 360 Video To Oriented Imagery tool processes one floor at a time, plan to record each floor as a separate capture. If possible, capture the entire floor in a single continuous recording; if you need to pause briefly during a capture (to unlock a door, for example), just keep the recording going.
4. Use Good Capture Techniques
A few operator techniques can make a big difference in the quality and stability of your results:
- Keep the camera high. Use an extension pole or monopod so the camera operator can comfortably hold the camera 1-2 feet (30-60 cm) directly overhead. This minimizes the operator’s presence and produces a natural perspective for indoor viewers.
- Wait five seconds. Hold the camera steady for a few seconds at the beginning and end of each capture. This gives the algorithm enough stable frames to anchor the start and end positions.
- Do a looping route. Revisit the starting area before stopping the recording. This helps VSLAM “close the loop,” reducing positional drift over time. For large spaces such as auditoriums or convention centers, plan a looping or S-shaped path that achieves regular visual overlap.
- Keep it smooth and continuous. Smooth movement improves frame alignment and results in cleaner oriented imagery. Pausing the recording breaks continuity and may result in reinitialization of the VSLAM process.
- Slow down for transitions. A walking pace (around 3 mph / 4.8 km/h) should work well for most areas, but slow down and move at about half-speed when moving through doorways or along tight corridors to allow the system to better track features across changing views.
Process the Video
Once the raw video is captured, the next steps involve exporting the video and using the 360 Video To Oriented Imagery tool to process it into GIS features.
1. Export the Video
Use your camera vendor’s software to export the video as a 360-degree .mp4. Choose the highest quality 360 video export option to preserve detail, as compression artifacts can degrade image clarity and affect the VSLAM process.
If you captured multiple floors, or multiple videos per floor, export each as a separate file and name them consistently (e.g., BuildingA_Floor1_EastWing.mp4). Keeping metadata organized will make downstream processing easier.
Review the exported .mp4 in a video player to make sure the video shows the following:
- Expected 2:1 aspect ratio and equirectangular distortion (this distortion happens because the spherical video has been projected into a rectangle—don’t worry, it will look correct when viewed in a 360° viewer!)
- Camera was held above operator
- Consistently level view (flat, centered horizon)
- Consistent heading (turning a corner doesn’t change compass direction)

2.Extract photos with the 360 Video To Oriented Imagery Tool
The 360 Video To Oriented Imagery geoprocessing tool extracts individual frames from the video, computes the camera’s location and orientation for each frame using VSLAM, and creates features in the oriented imagery layer.
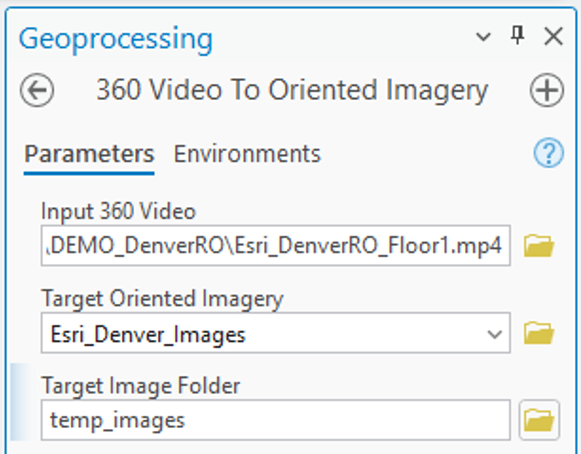
At a minimum, specify the 360° MP4 file, a Z-enabled oriented imagery layer, and a folder where the tool can store the extracted images until publishing.
Georeference with Control Points (recommended)
By default, output features will appear with an arbitrary scale and rotation near coordinate origin (0,0), sometimes called Null Island. To properly align the oriented imagery features with your facility floor plans, specify two control points located on opposite ends of the captured space.
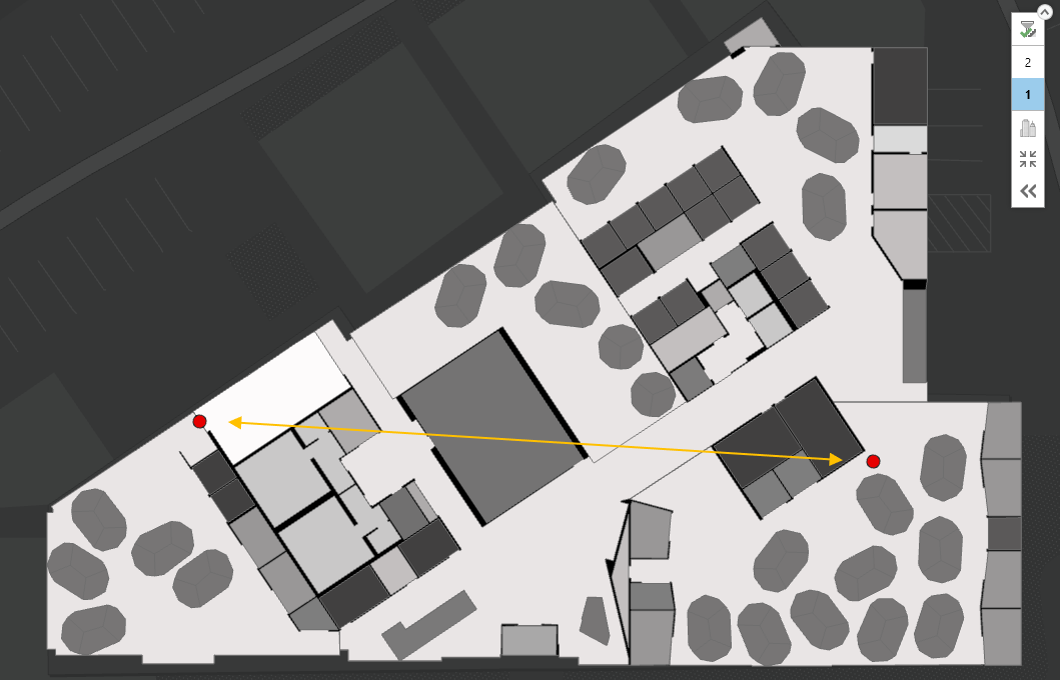
For each control point, you specify the camera’s geographic location at a precise moment, so plan a route that takes the camera over or near features or landmarks you can identify in your map data.
To set control points:
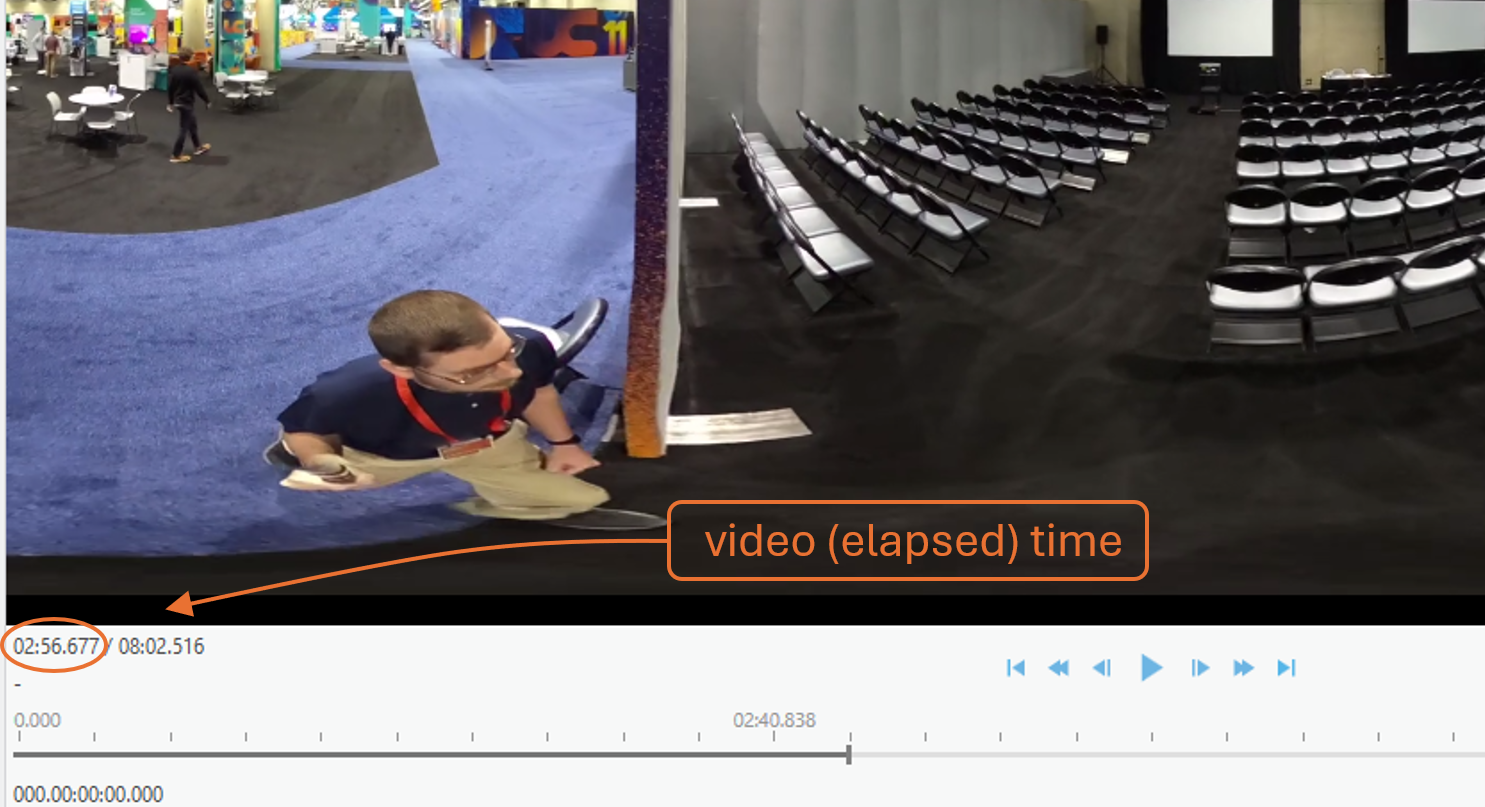
1. Open the video in ArcGIS Pro’s Video Player (available with the Image Analyst extension) or another player that shows playback time to the millisecond.
2. Advance at least five seconds into the video, then pause on a frame where the camera’s location can be precisely identified on your floor plan, such as a corner or doorway.
Tip: Look in the video for the precise moment when a side hallway or wall comes into view to help pinpoint the camera’s position relative to known map features.
3. In the tool’s parameters, enter the Video Time (elapsed timestamp) of the paused frame.
4. Use the interactive input button to add the corresponding Camera Location on the map.
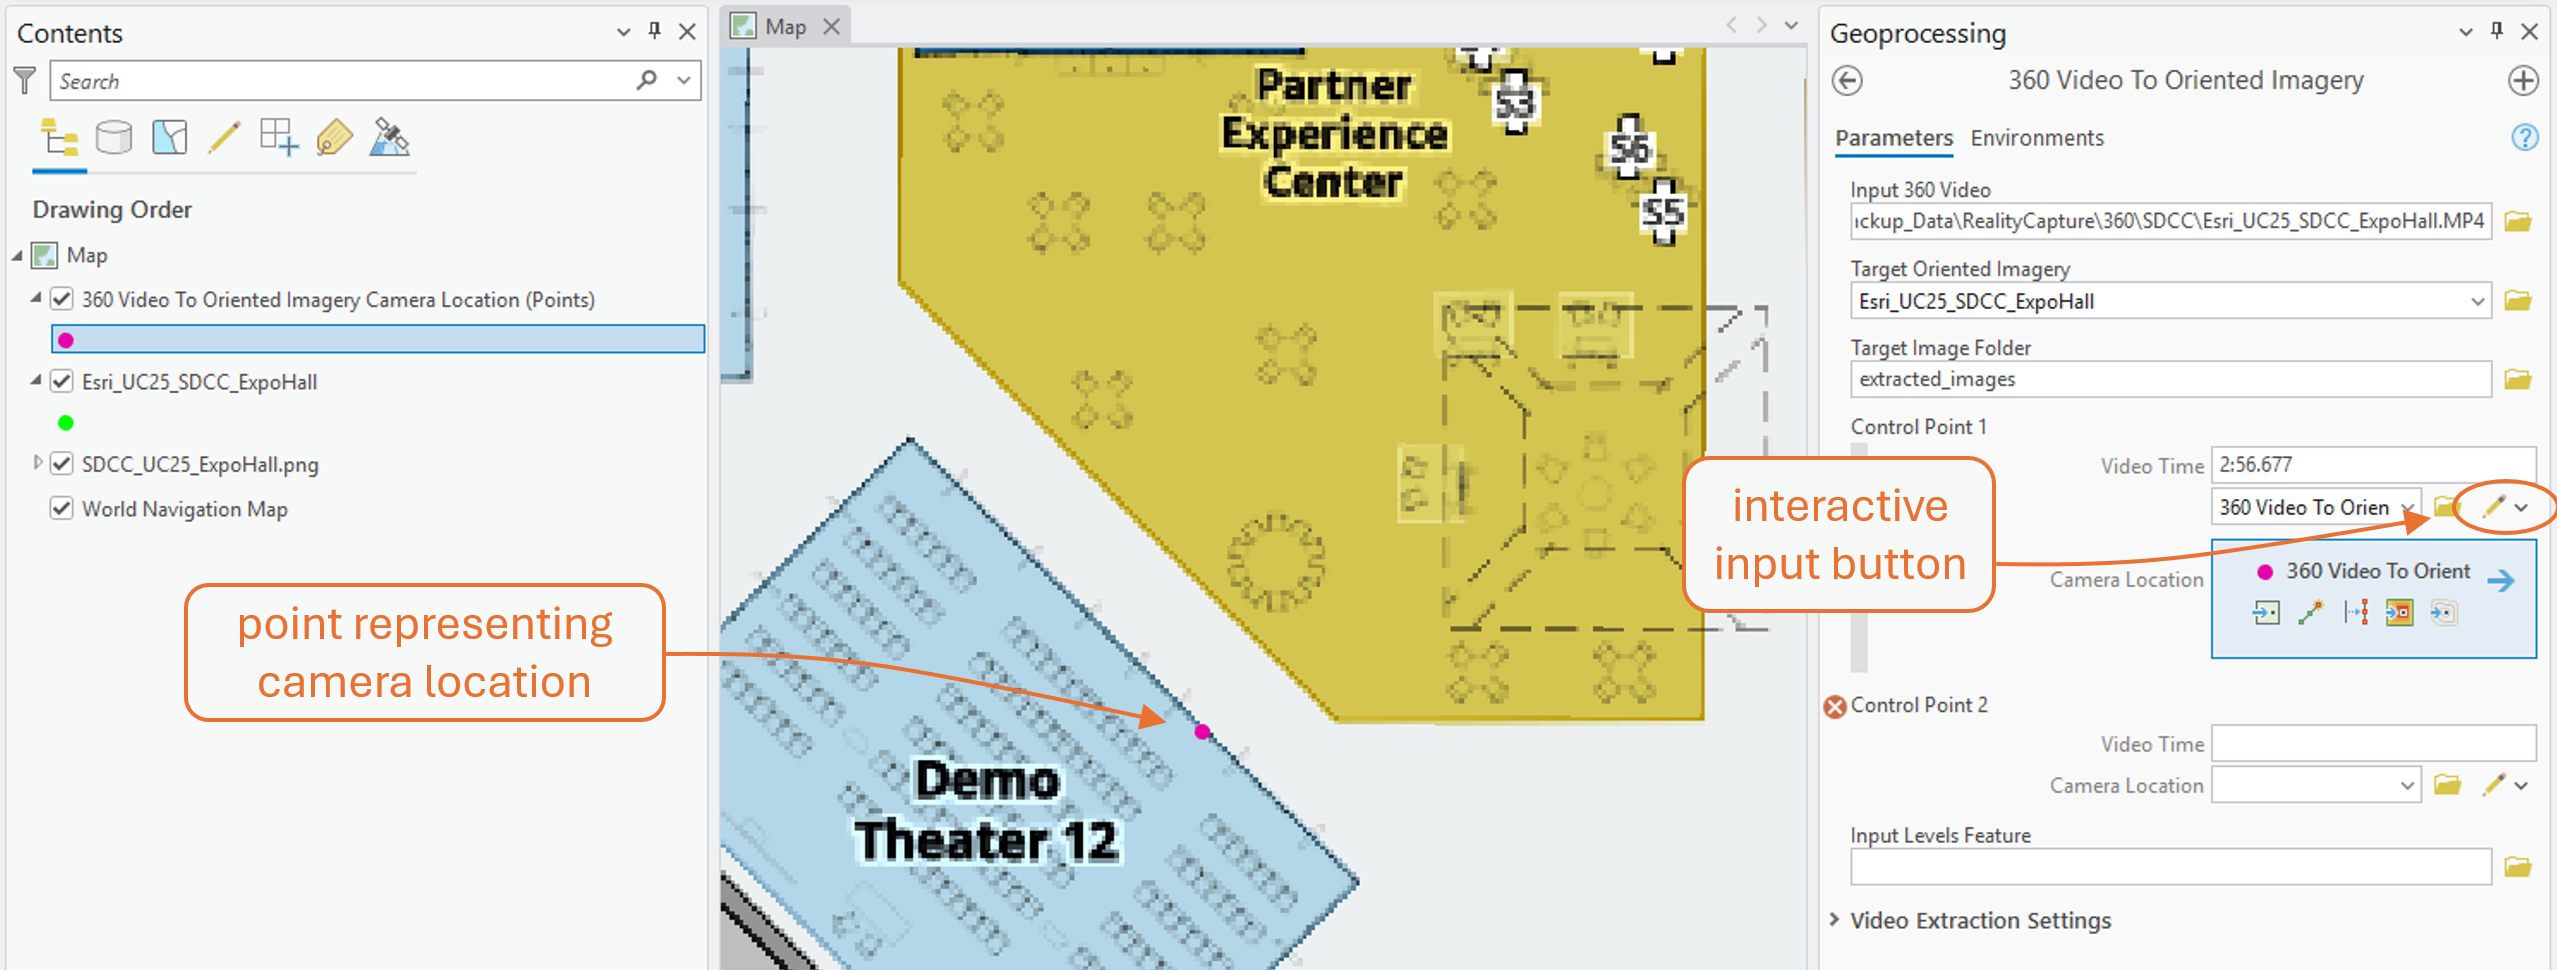
5. Repeat for a second control point at a well-defined location on the opposite side of the space being captured.
Tip: Look in the video for the precise moment when a side hallway or wall comes into view to help pinpoint the camera’s position relative to known map features.
When the tool is run with control points set, the tool moves, rotates, and scales the output features into position based on the control points.
Enable Floor Awareness (recommended)
The ArcGIS Indoors Information Model is the data framework that organizes all the spatial and attribute information needed to create accurate, interactive indoor maps. It defines standard layers—such as Facilities, Levels, Units, and Details—and the relationships between them so your maps can support floor-aware navigation, space management, and operational workflows.
For the topic at hand, the most relevant part of the Indoors Model is the Levels layer, which stores polygon features representing each floor within a building. This layer includes key attributes like Level ID (a unique identifier for each floor) and Z-values (elevation information), which make it possible to link the oriented imagery features to the correct floor. Setting these attributes properly ensures that your imagery can be filtered by floor, delivering a smooth and intuitive user experience for anyone exploring the map.
The 360 Video To Oriented Imagery tool can assign level IDs and Z-values to output features automatically. To do this, include your building’s Levels layer in the tool’s optional Input Levels Feature parameter with the desired Levels feature selected.

If the oriented imagery layer doesn’t already contain a level ID field, the tool creates one and populates it based on the specified Levels feature. Once the layer’s Floor Field is set, oriented imagery features can be filtered dynamically using the floor filter.
Getting the Images You Need
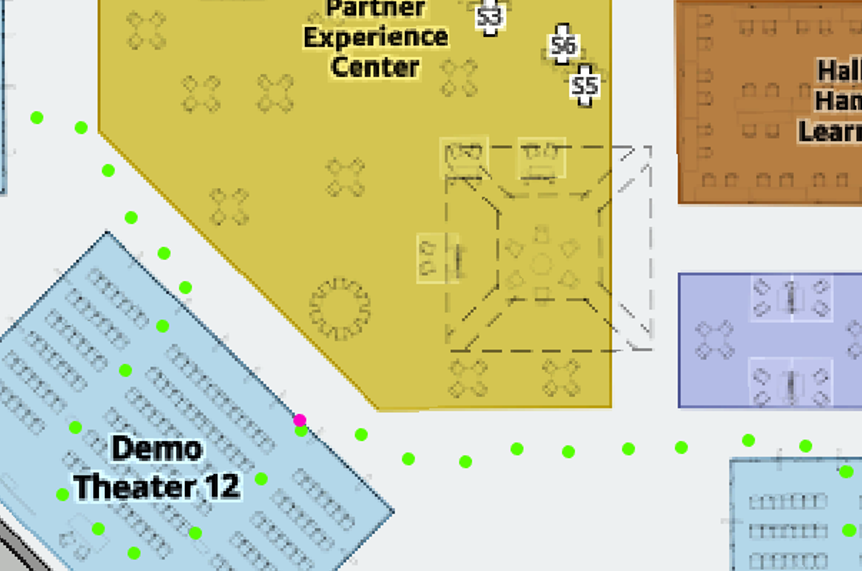
By default, the 360 Video To Oriented Imagery tool will process the entire video and extract an Oriented Imagery (point) feature every 2 seconds of video time. That’s one feature every 4 to 6 feet (1.2 to 1.8 meters), assuming the operator is moving at an average adult walking pace. The idea is to give you plenty of oriented imagery features to choose from. Use ArcGIS Pro’s Oriented Imagery Viewer to review features for placement and image quality, then select and delete the ones you don’t want. Depending on your space and use case, you might keep one feature per room, or per hallway intersection, or per quadrant of an open floor plan.
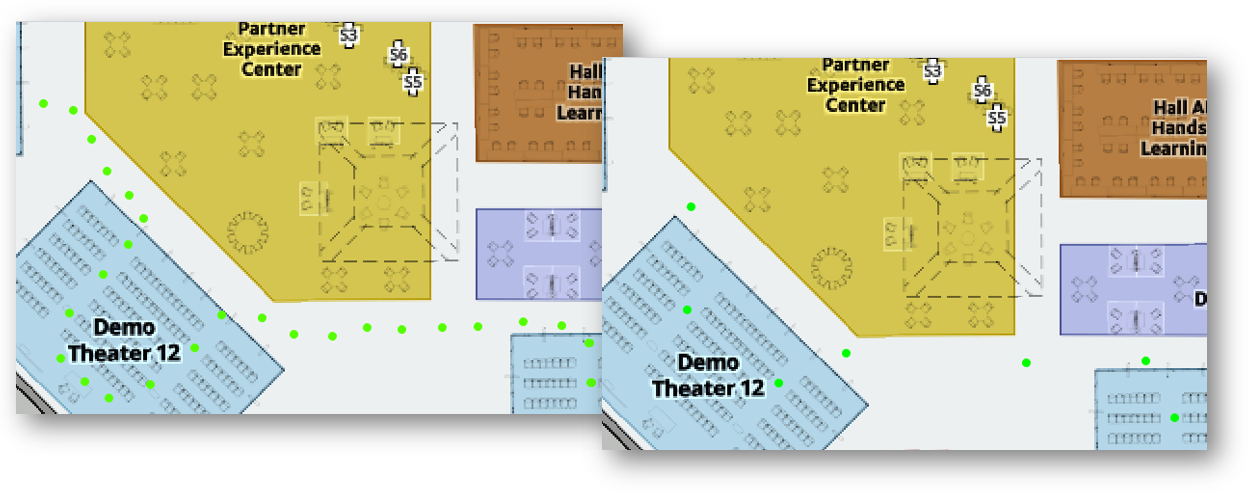
If you want fewer (or more) features to sift through, you can adjust the Extraction Interval in the tool’s Video Extraction Settings. If you only want to process a segment of a longer video, you can set the Start and End Timestamp parameters to the desired video times.
Summary
A 360° camera can be a powerful and affordable reality capture device for indoor GIS. With ArcGIS Pro 3.6, the new 360 Video To Oriented Imagery tool simplifies the process of turning ordinary 360° video into spatially accurate, immersive imagery. Whether you’re documenting building interiors for asset management, facilities planning, or occupant wayfinding, you can enable a richer and more engaging understanding of your indoor maps.
Frequently Asked Questions
Can the tool be used with outdoor 360° video?
The tool is designed for indoor use, but it can be used with atriums, patios, and other outdoor areas as well. Keep the camera positioned overhead at a consistent height, and be mindful of lighting transitions, such as moving between sunlight and shade. Remember to slow down when passing through doorways or under overhangs to help maintain VSLAM tracking.
Can the camera operator be removed or blurred?
Yes. Holding the camera directly overhead minimizes the operator’s presence, but the operator will still be visible near the bottom of the extracted photos. If desired, you can mask the bottom 20% or so of each output image to hide the operator from view. This capability is planned for a future release of the 360 Video To Oriented Imagery tool; in the meantime, you can use free or paid 3rd-party image or video editing software to accomplish the same effect. For example, ImageMagick is free and supports batch processing so you can mask many output images at once. Alternatively, you can apply masking to the input 360 video using tools , such as OpenShot and DaVinci Resolve. Watch an OpenShot tutorial that shows how to pixelate a portion of a video (starts at the 3:41 mark). A word of caution: If you opt to mask the video, mask the minimum area needed, so that as much of the video as possible remains available for VSLAM analysis—and for viewing by your users!
Additional Links
- ArcGIS Pro Help: Import images from 360° video
- Tool Reference: 360 Video To Oriented Imagery (Indoors)
Happy exploring!

This is a fantastic blog. I love that ESRI is investing and building tools for 360 degree video and integration methodologies into GIS. My one concern is leaving this capability to Indoors only. Will this become a broader capability overtime in the platform and include outdoor workflows?