Last year, we brought ModelBuilder to ArcGIS Online, introducing an intuitive, visual canvas for building automated workflows—no coding required.
Today, we are taking the next big step. With the February 2026 update, you can now publish your models as web tools. The multi-step workflows you design in ModelBuilder can be deployed as streamlined analysis tools directly within Map Viewer, ArcGIS Experience Builder, and your favorite web applications.
The result? Custom-built spatial analysis is no longer confined to GIS specialists. It is now accessible across your entire organization, empowering anyone to run powerful, standardized workflows with just a few clicks.
In this blog post, I will show you how to turn your ModelBuilder workflows into web tools and simplify spatial analysis for your organization.

- Why Web Tools Matter?
- Who Can Use Web Tools?
- Creating a Model Web tool
- The Publishing Experience
- Using a Model Web Tool in Map Viewer
- Turning Models into Web Tools: A Step-by-Step Demonstration
Why Web Tools Matter?
A model web tool is a web-accessible analysis tool created from a workflow you design in ModelBuilder within Map Viewer. Configured with input and output parameters, it works just like any standard ArcGIS web tool published from ArcGIS Pro or ArcGIS Notebooks. Users simply provide inputs, run the tool, and receive outputs—such as feature layers—without needing to understand the underlying workflow.
Broadening Access to Spatial Analysis
Web tools make spatial analysis more accessible across your organization. Not everyone is a GIS expert, but many can benefit from the insights spatial analysis provides. The no-code approach is a key advantage: analysts can create custom tools without writing a single line of code, while advanced users can share complex workflows easily. Instead of walking colleagues through multi-step procedures, you can publish a web tool and let others run it in just a few clicks.
Although creating and publishing web tools requires a Professional user type, anyone with a Creator user type can run them. This means users don’t need access to ModelBuilder to leverage your tools, allowing powerful analysis capabilities to reach the entire team.
Real-World Example
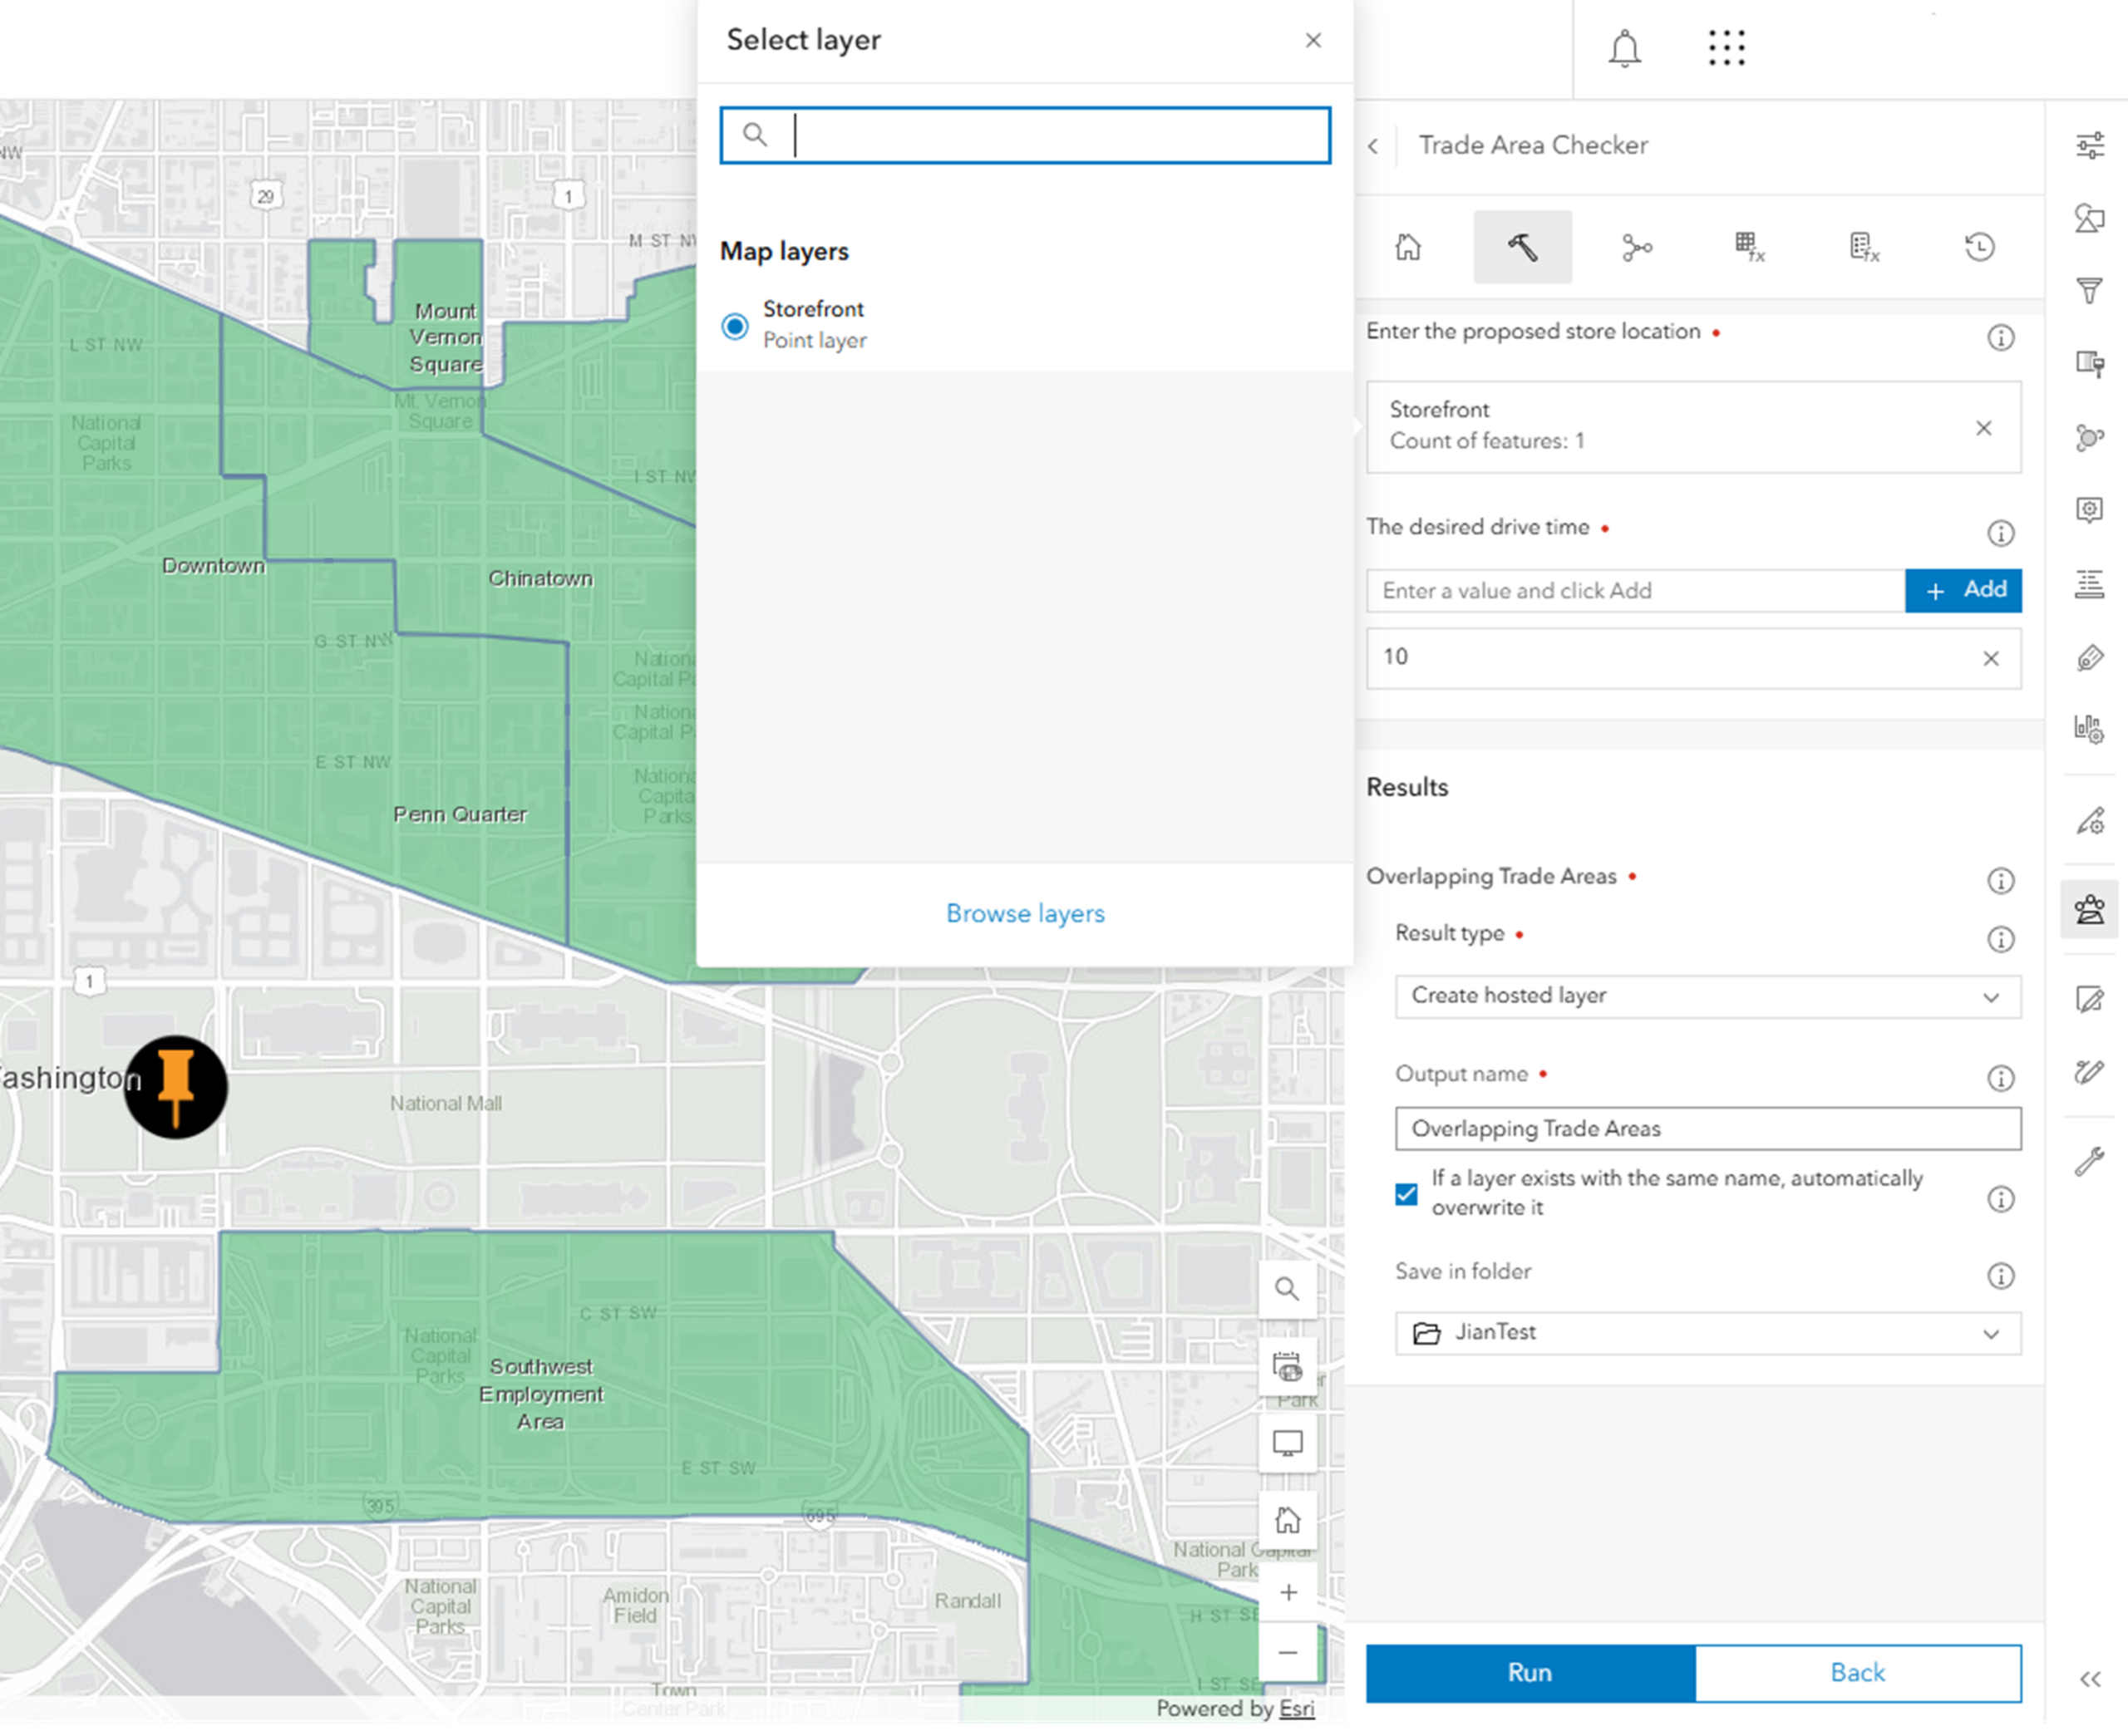
For instance, real estate analysts often need to justify proposed store locations to non-technical stakeholders. A GIS analyst can publish a web tool that calculates drive-time areas around a proposed site and checks whether they overlap with existing store trade areas. A regional manager can then open the tool on a tablet, enter the site location, specify the drive time, and run the analysis. Behind the scenes, the tool performs the drive-time calculations and spatial filtering automatically, delivering results in a clear, easy-to-understand format.
Built for the Web
Because web tools are fully web-based, users can run them from anywhere, on any device, directly in Map Viewer or other web applications. They integrate seamlessly into custom apps and organizational workflows, enabling standardized processes and ensuring consistent, repeatable results across teams.
Who Can Use Web Tools?
Publishing and using ModelBuilder web tools in ArcGIS Online requires specific user types, privileges, and credit considerations. Here is how it breaks down:
Creating and Publishing Web Tools
To create and publish a web tool, you need:
- ModelBuilder licensing – included with a Professional user type or higher
- The Publish web tools privilege – required to configure and publish workflows
These ensure you have the full access to ModelBuilder to configure, test, and publish workflows as web tools.
Running Web Tools
To run a published web tool, users need:
-
A Creator user type
-
The Run web tools privilege
Users do not need access to ModelBuilder to use a web tool. This allows organizations to extend advanced analysis capabilities to a broader audience while administrators maintain control over who can publish and run tools.
Credits
Web tools consume credits in two ways:
-
Creating and publishing web tools from ModelBuilder uses the same timed analysis sessions, which consume credits based on connection duration.
-
Running a web tool consumes credits based on the tool’s runtime.
For detailed information, refer to Understand credits for spatial analysis in the ArcGIS Online documentation.
By separating the publishing and consumption requirements, organizations can empower more team memembers to leverage advanced spatial analysis while maintaining oversight for tool creation and access.
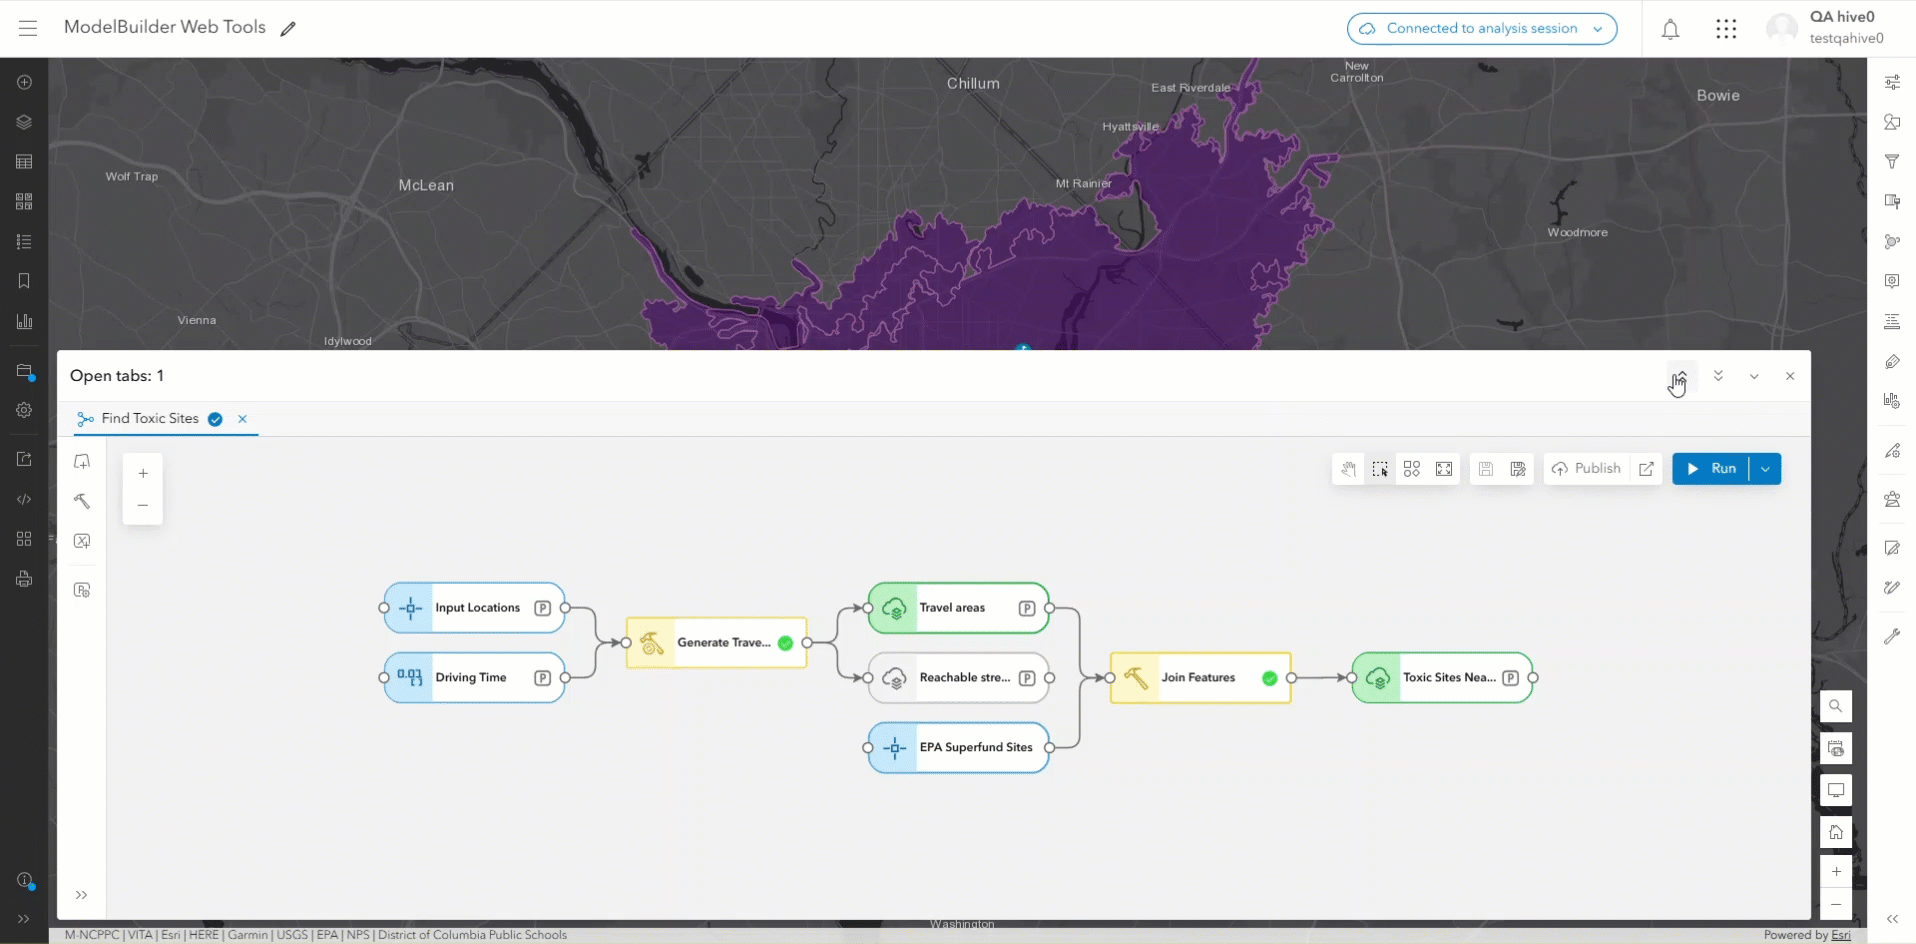
Creating a Model Web Tool
The first step in creating a web tool is to design and test your workflow in ModelBuilder.
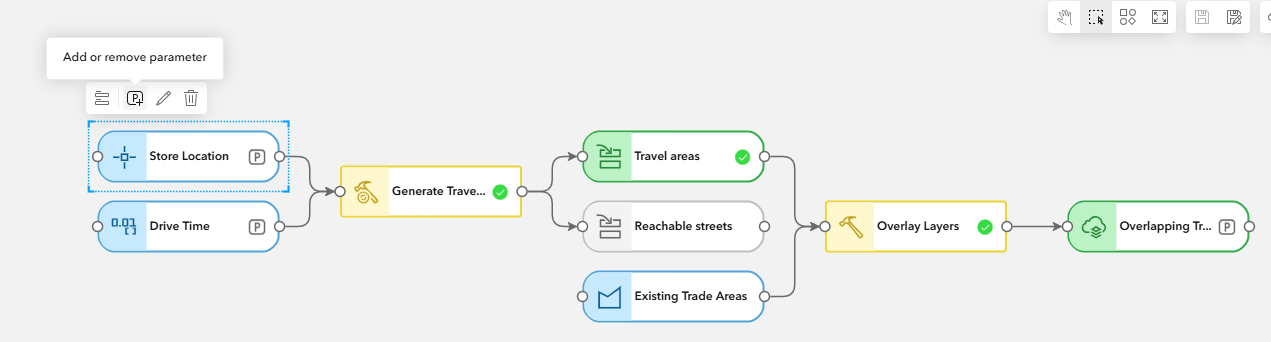
Begin by adding your input data, defining any necessary variables, and connecting the appropriate analysis tools to build a complete workflow. As you construct the model, identify which elements should be exposed as model parameters. These parameters will become the inputs and outputs users interact with once the model is published as a web tool. Be intentional about what you expose—clear, well-defined parameters make the tool easier to use and reduce confusion for end users.
Once the workflow is assembled, run the model to validate it. Carefully review the results to ensure the analysis performs as expected and that results are accurate.
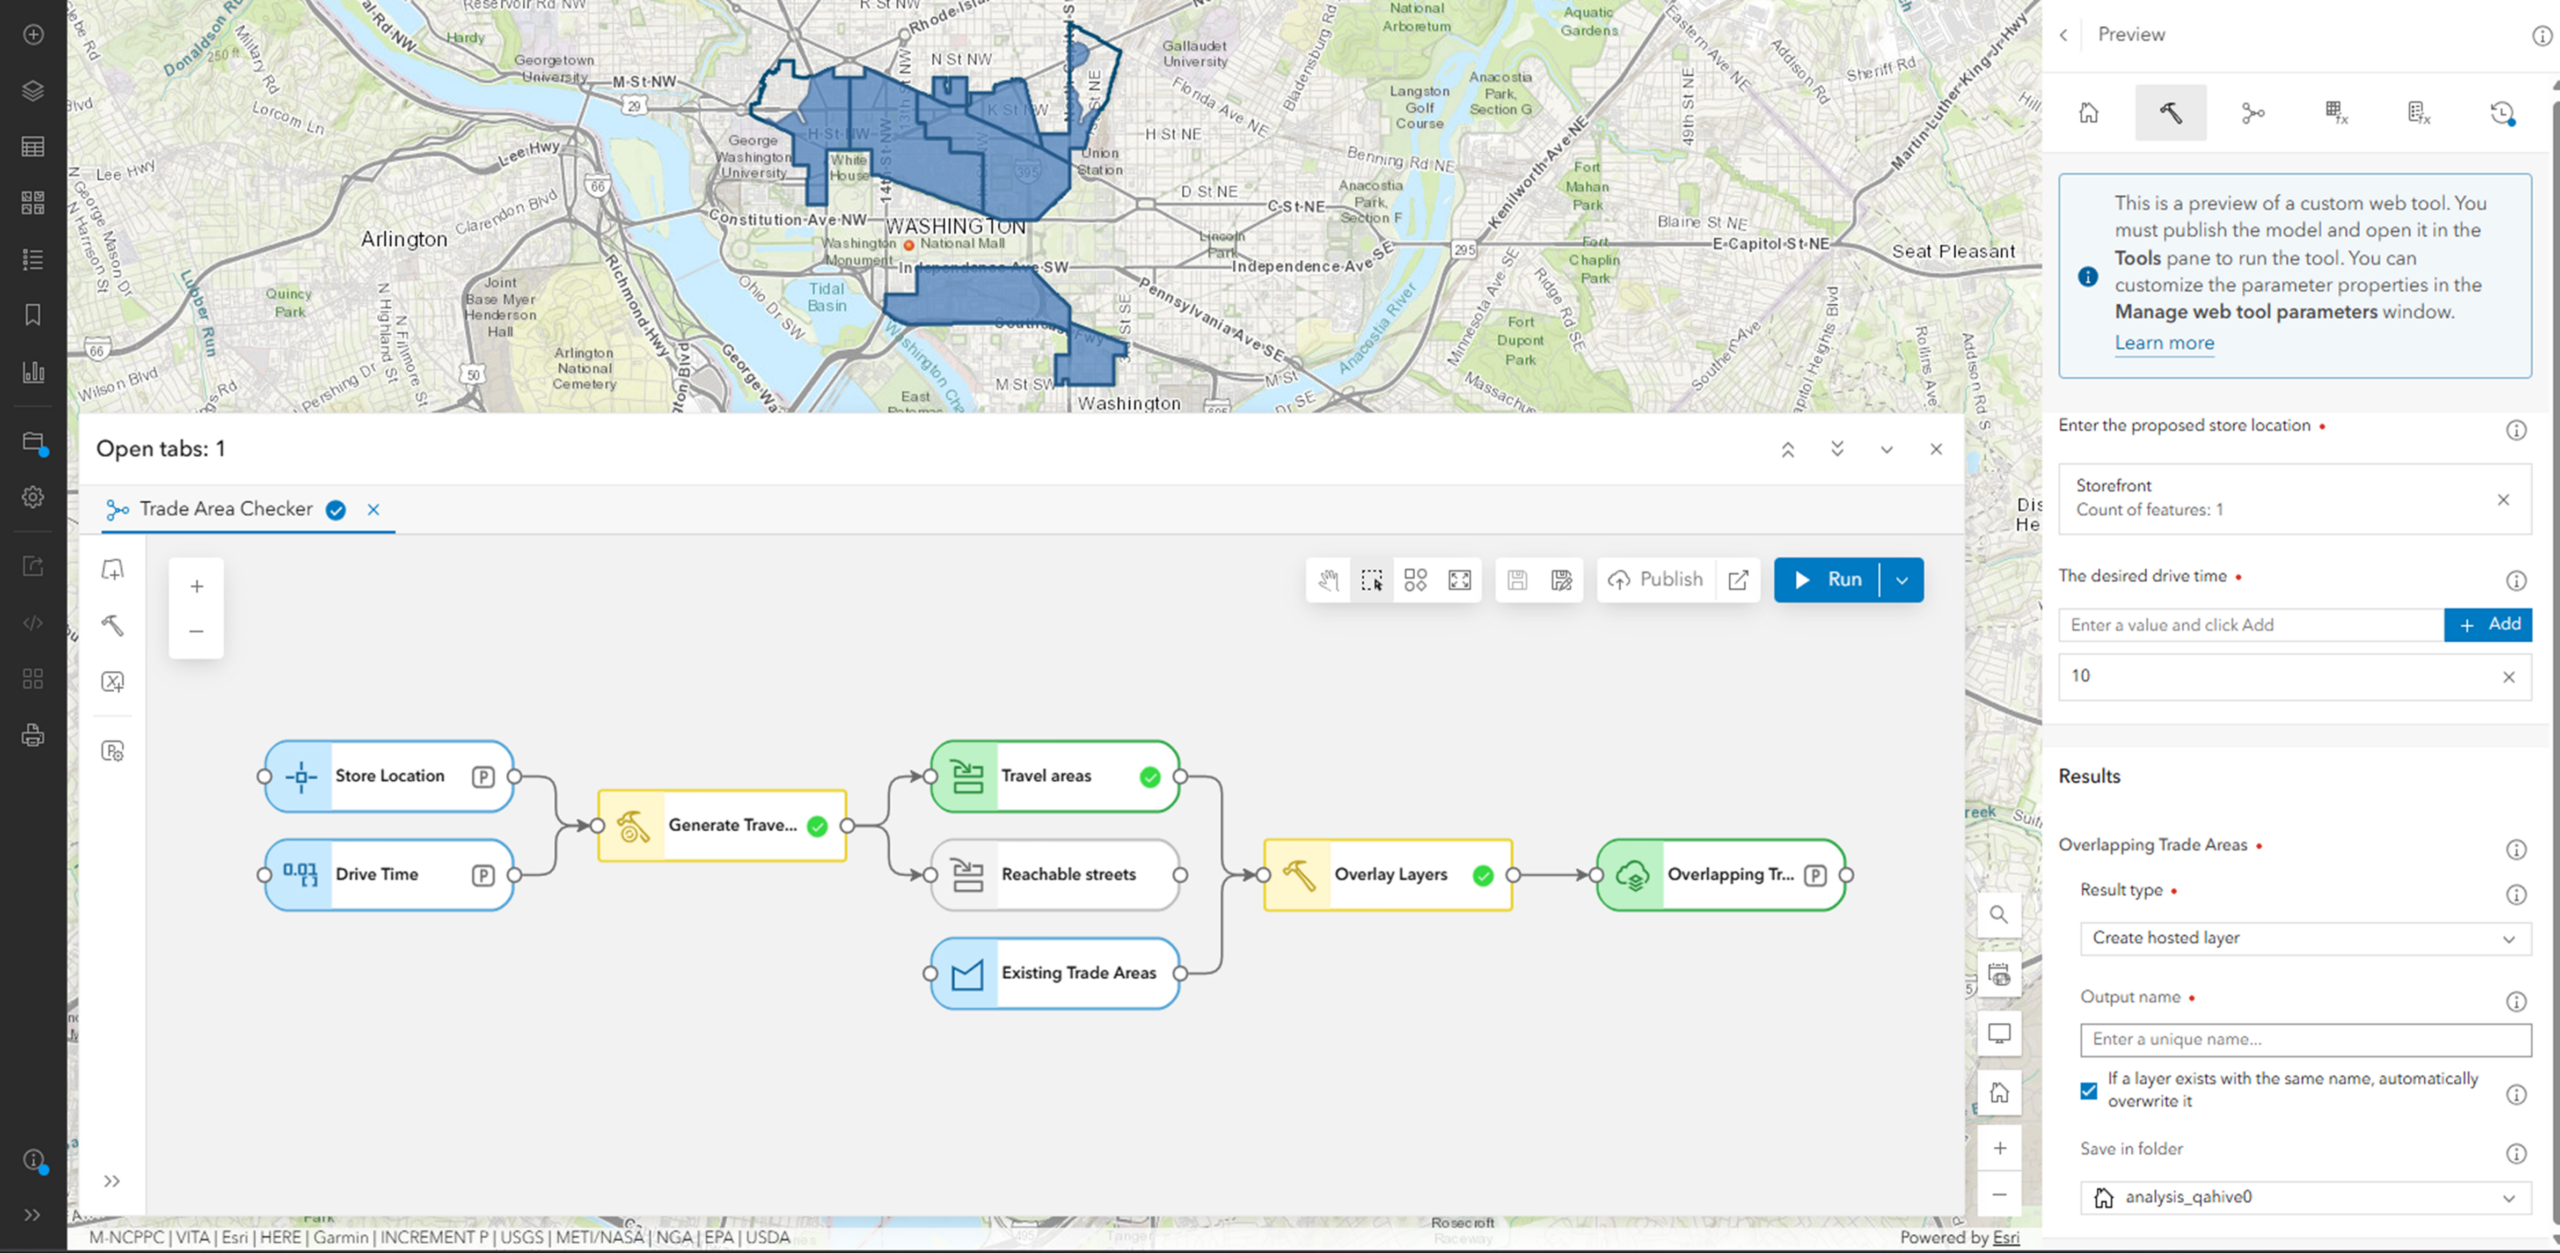
The Publishing Experience
Once your model is complete, the next step is to publish it as a web tool. The publishing experience is designed to guide you through a clear checklist, ensuring your model is properly configured before it is shared with others.
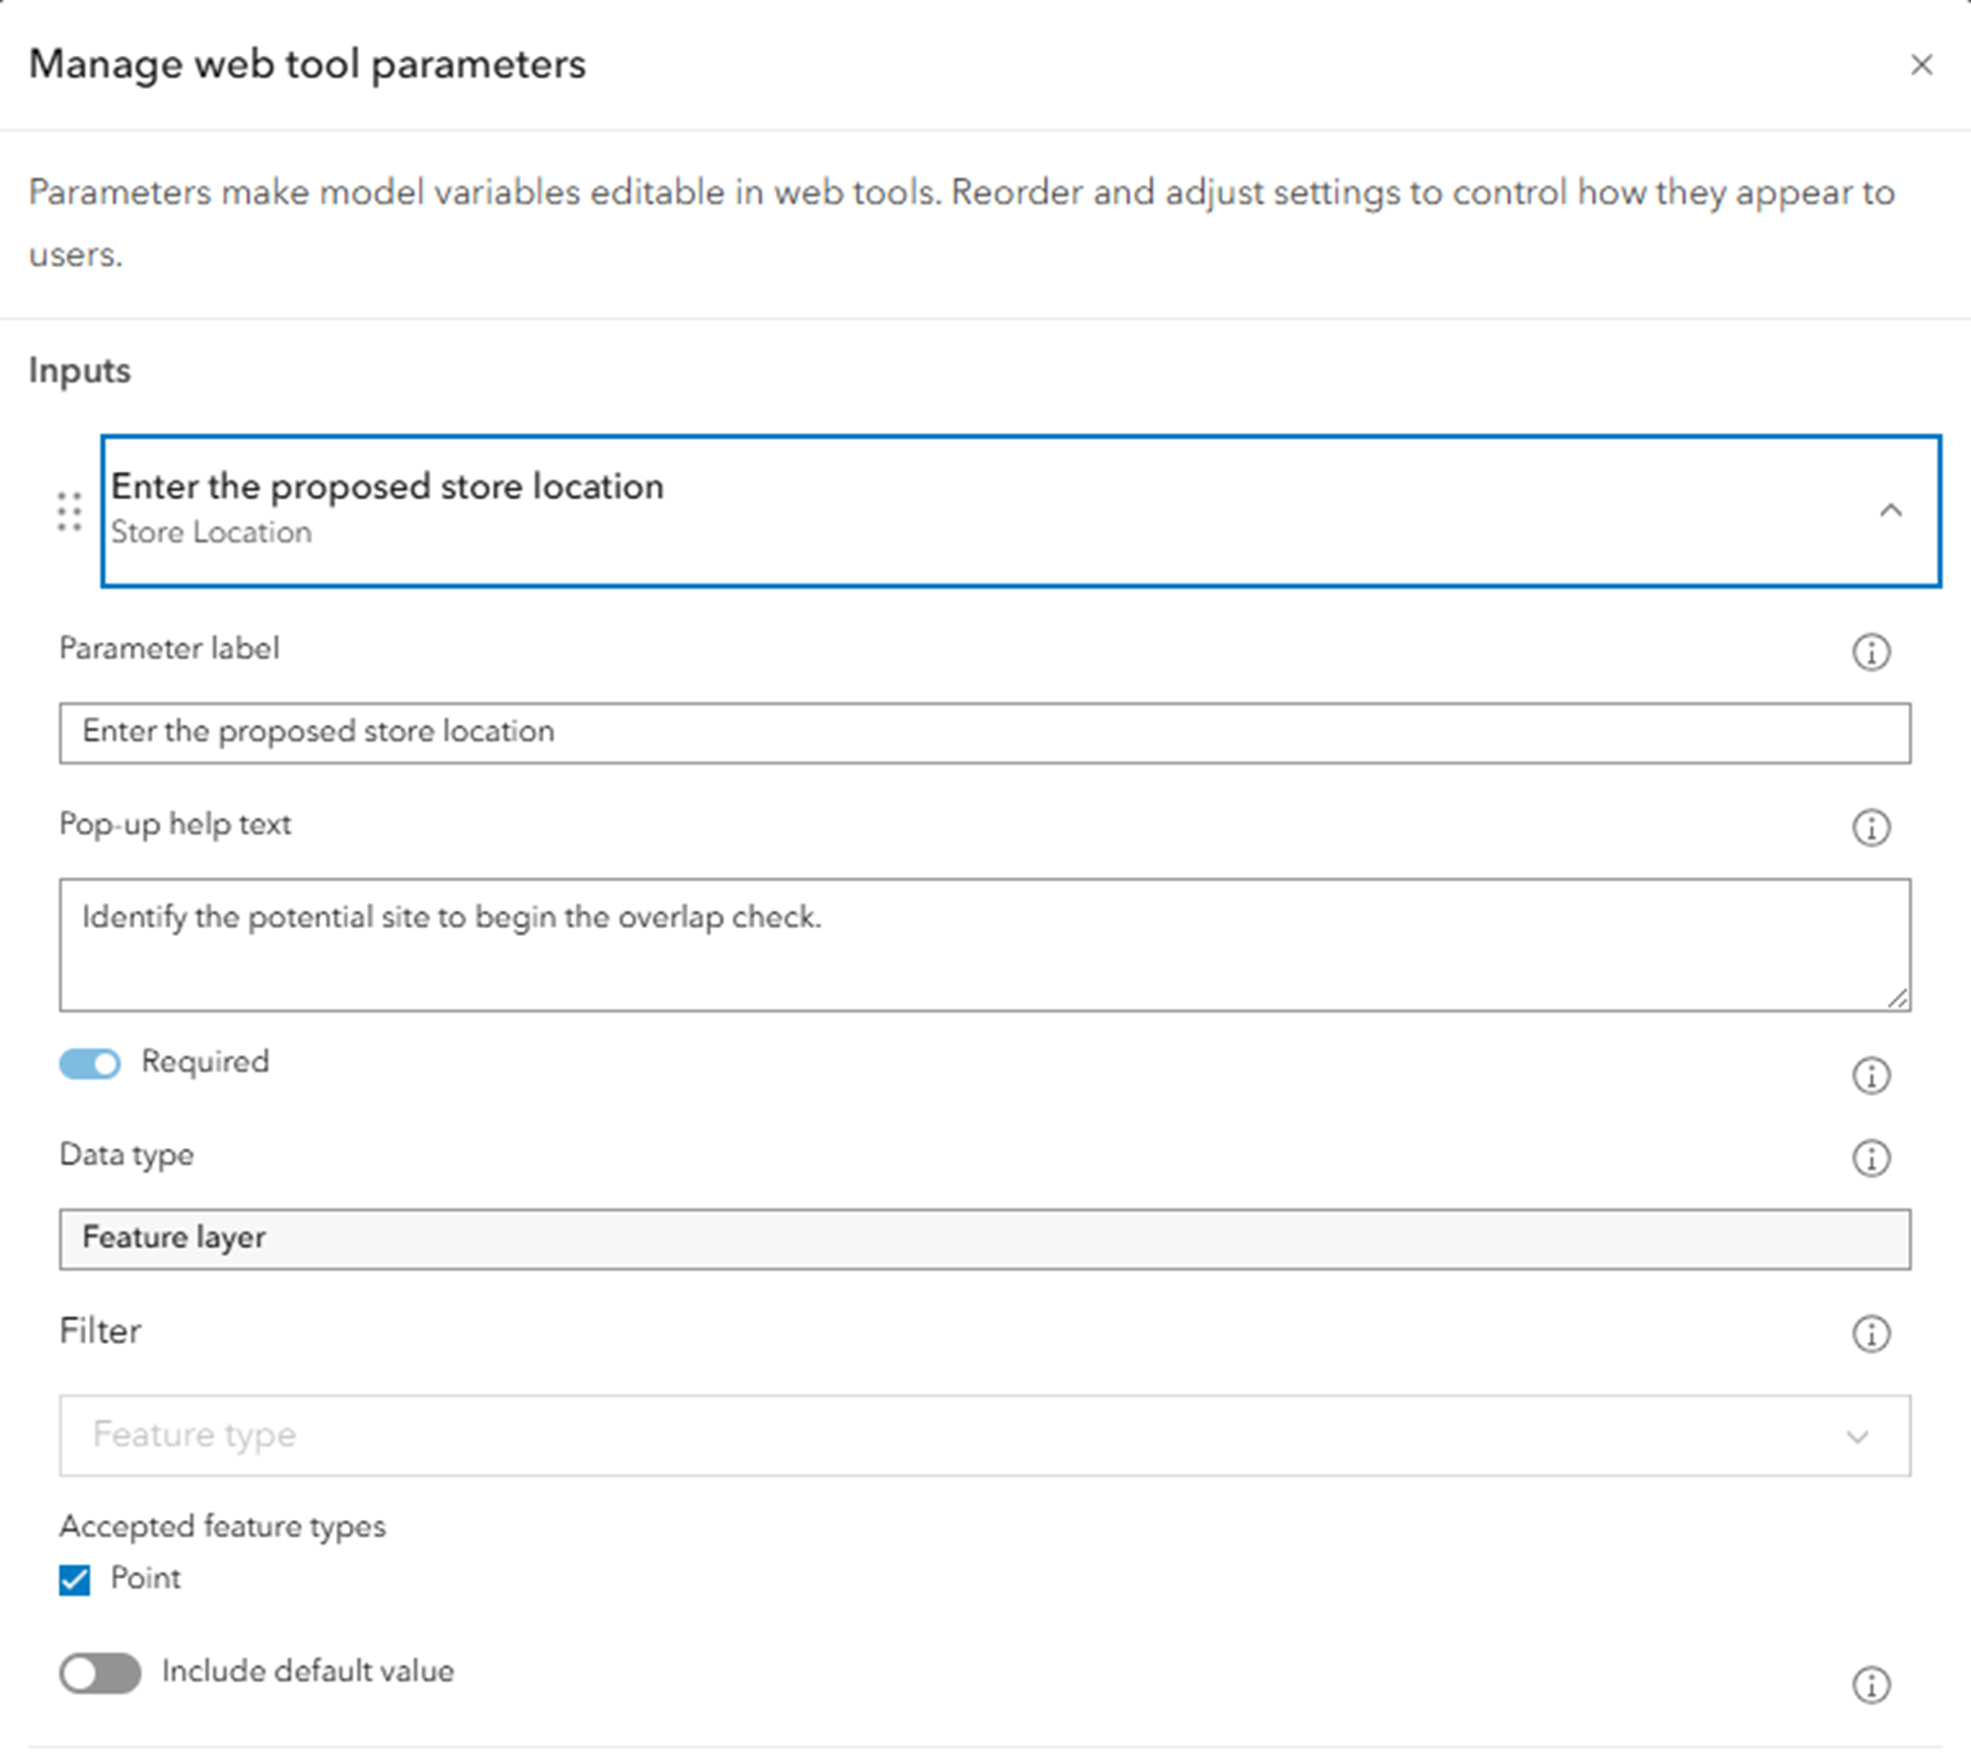
Start by opening Manage Parameters. This is where you control how the tool will appear to end users and how each parameter behaves.
For each input parameter, provide a clear and meaningful description, mark if it is required, and restrict it to accept only the supported feature layer types. This ensures users supply the correct data type and understand exactly what is expected.
For the output parameters, add clear descriptions so users understand what each result represents. Well-written parameter descriptions and pop-up help reduce confusion and minimize follow-up questions once the tool is shared.
Before publishing, use the Preview web tool option to see how the tool will appear in the Analysis pane. If adjustments are needed, return to the model to refine and manage the parameters. Repeat this process until you are fully satisfied with how the tool is configured and presented.
When you click Publish, a tooltip displays a checklist showing whether your model meets all publishing requirements. For example, you might see that five of six requirements are satisfied, with one flagged in orange—such as unsaved changes. In that case, simply save the model to resolve the warning. Once all requirements are met, you can proceed with publishing.
Taking the time to carefully configure, preview, and validate your tool ensures it is not only functional but also intuitive and ready for use.
Using a Model Web Tool in Map Viewer
Once the web tool is published, it becomes available in Content, where it can be shared across your organization. Sharing the tool enables colleagues—including those without access to ModelBuilder—to run the same analysis using their own data and parameters.
While a published web tool can also be used in Map Viewer, ArcGIS Experience Builder, and other custom web applications, this example focuses on the experience in Map Viewer.
In Map Viewer, the custom web tool appears in the Analysis pane once added. From the user’s perspective, it functions just like any built-in analysis tool: you select it, provide the required inputs, adjust the parameters as needed, and run the process.
Users are not limited to predefined default settings, they can modify inputs and options to suit their specific needs. When the tool finishes running, the results are added directly to the map, where they can be explored, symbolized, and shared like any other layer in ArcGIS Online.
Turning Models into Web Tools: A Step-by-Step Demonstration
Creating automated workflows in ModelBuilder is intuitive and visual, making it easy to design powerful spatial analyses without writing any code. By publishing these workflows as web tools, you extend that power beyond GIS specialists—allowing anyone in your organization to run complex analyses through a simple, web-based interface.
To learn more about leveraging analysis in ArcGIS Online and explore the new ModelBuilder functionality, check out the help documentation.
As always, Happy Analysis!

Hi 🙂 Very interesting!!
Can these web tools in ArcGIS Online later be loaded into ArcGIS Pro? And conversely, if we have custom tools, can we publish them from ArcGIS Pro to the Map Viewer as web tools?
Thanks
Hi Pilar,
Thanks for your question—glad you found it interesting!
At the moment, web tools created in ArcGIS Online can’t be brought directly into ArcGIS Pro. Similarly, custom tools authored in Pro can’t currently be published straight to ArcGIS Online Map Viewer as web tools.
That said, this is an area the team is actively exploring and it’s on the roadmap for future enhancements. While I don’t have a specific timeline to share, it’s definitely under active consideration.
In the meantime, there are some practical workarounds depending on your workflow. For example, you can publish custom geoprocessing tools from Pro to ArcGIS Enterprise and then consume them in Map Viewer as web tools.
Thanks again for reaching out!
Jian
Hi Jian,
Can the inputs and outputs of the web tools/workflows be from our local SQL databases or is this only for ESRI-hosted data? Also, is this functionality available in Enterprise or just ArcGIS Online as of now?
Thanks,
Jay
Hi Jay,
Thank you for your question. For the web tools published from Map Viewer ModelBuilder, the input and output layers are hosted ArcGIS Online layers. With ArcGIS Enterprise, you can already publish models from ArcGIS Pro to your enterprise portal as web tools.
Please feel free to reach out to me at jlange@Esri Inc..com if you have any additional questions.
Best regards,
Jian