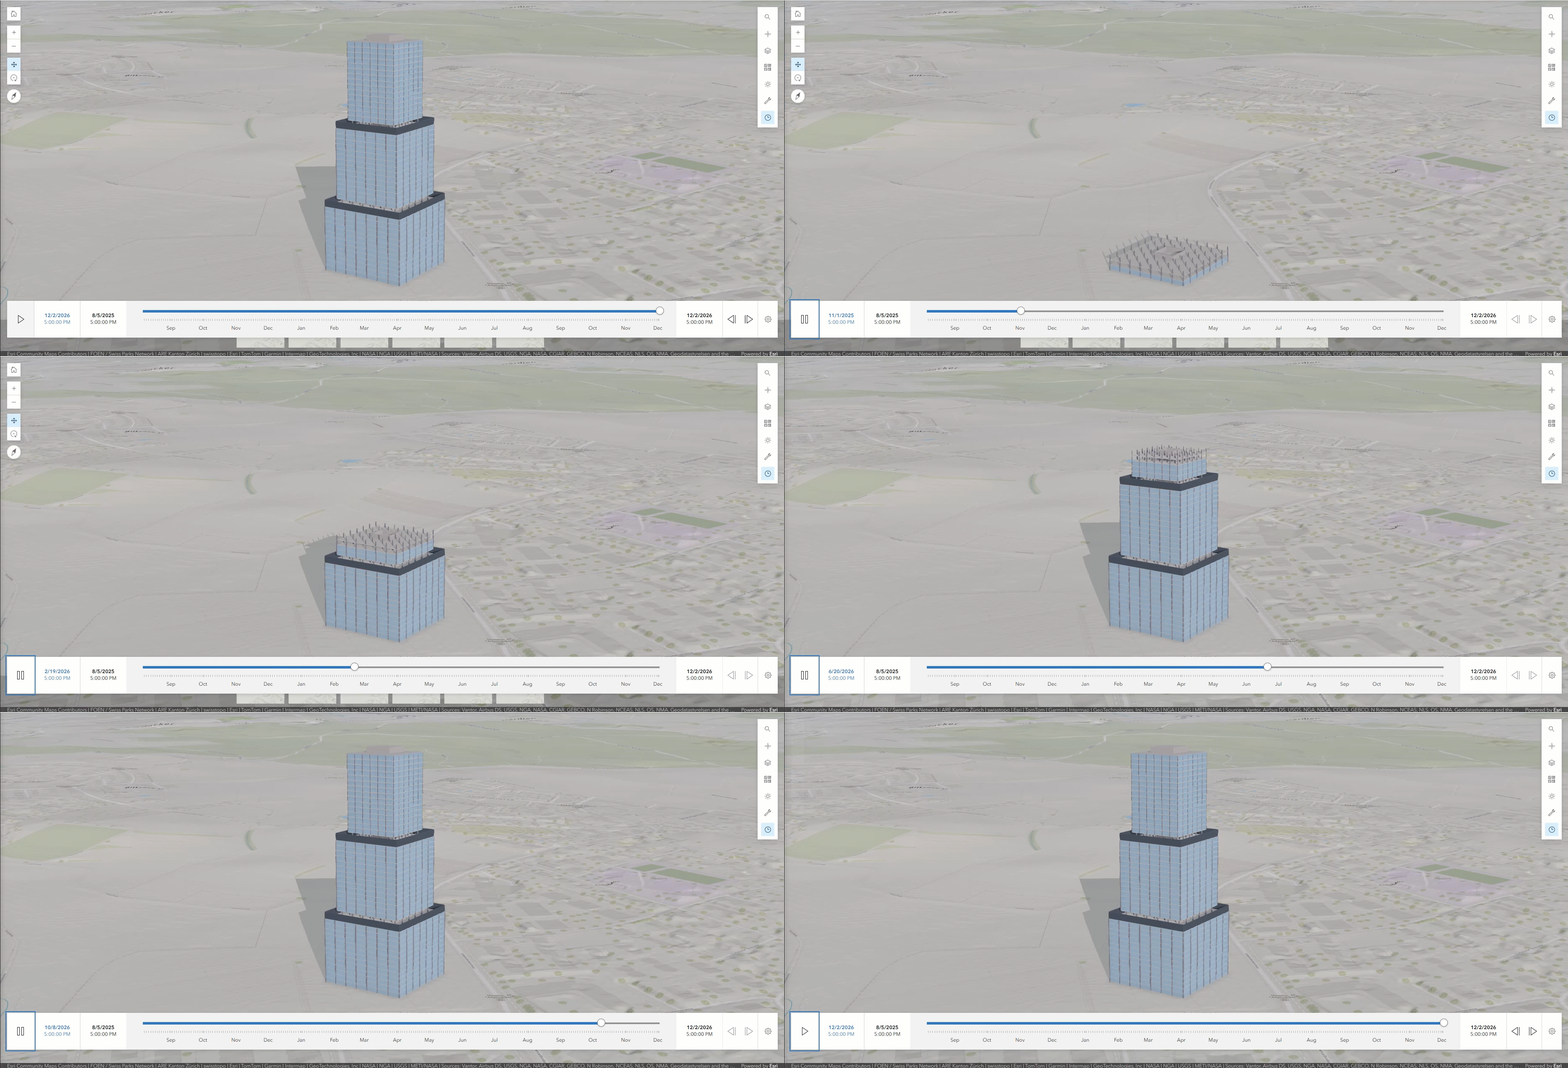
4D simulation integrates time‑based information into building information model (BIM) to create a dynamic, evolving view of the construction process. By connecting the 3D model with the project schedule, it allows teams to visualize how construction activities unfold over time. This time‑sequenced representation helps stakeholders better understand the project timeline, anticipate potential challenges, and enhance overall planning and operations.
This blog article demonstrates how a construction schedule can be connected to an IFC model to generate an interactive 4D simulation that can be shared with stakeholders directly on the web.
Key points of 4D simulation
4D simulations can help with the following:
- Improved planning — 4D simulation turns static schedules into dynamic visuals, helping teams spot sequencing issues and create more accurate timelines.
- Better communication — Visual schedules allow stakeholders to understand the construction process.
- Risk mitigation — By simulating activities in advance, teams can detect clashes and conflicts early, reducing rework and delays.
- Optimized resources — More accurate sequencing leads to better allocation of labor, equipment, and materials.
Before you begin
Ensure that all models are already georeferenced.
What you need
- ArcGIS Notebooks and the notebook included with this post
- ArcGIS Pro 3.2 or later
- ArcGIS Online
The core of 4D simulation is synchronization of the elements of a BIM model with the tasks described in the project schedule. By importing detailed 3D models and linking them directly to timeline data, 4D BIM enables a step‑by‑step visualization of how construction will progress. This alignment ensures that planned activities correspond with actual construction sequences, ultimately improving coordination and overall project efficiency.
Build the initial 4D simulation manually
Complete the following steps to build a 4D simulation using a building scene layer based on a construction schedule:
- Prepare the data to handle the time component.
- Use the BIM File to Geodatabase geoprocessing tool to convert the BIM File Workspace (IFC) to a geodatabase.
The tool also converts all the categories from the BIM File Workspace (IFC) to feature classes.
-
- Delete empty feature classes to make the data more manageable.
- Add the time fields by doing the following for each of the feature classes:
-
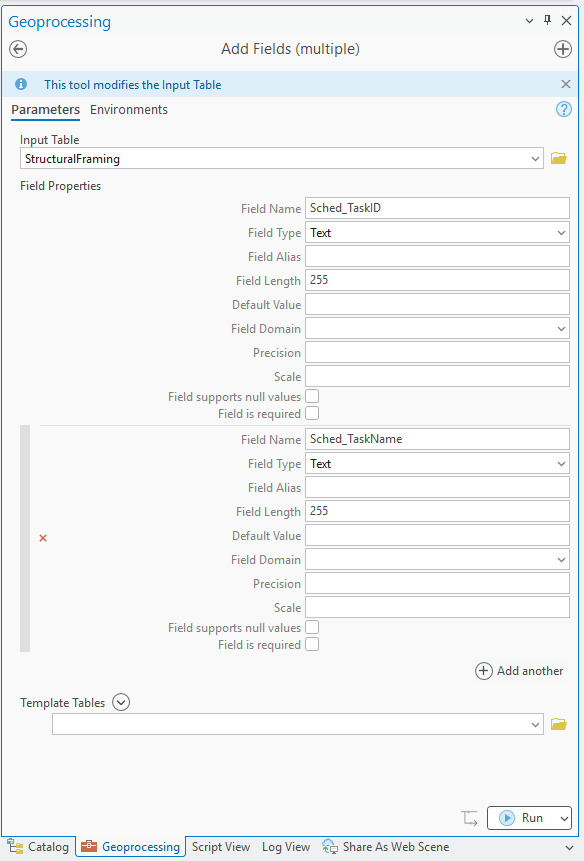
- Using the Add Fields (multiple) geoprocessing tool, add the fields from the table:
| Field Name | Type | Length |
|---|---|---|
| Sched_TaskID | TEXT | 255 |
| Sched_TaskName | TEXT | 255 |
| Sched_Phase | TEXT | 255 |
| Sched_Category | TEXT | 255 |
| Sched_Level | TEXT | 255 |
| Sched_StoreyName | TEXT | 255 |
| Sched_Elev_m | DOUBLE | None |
| Sched_StartDay | LONG | None |
| Sched_Duration | LONG | None |
| Sched_EndDay | LONG | None |
| Sched_StartDate | DATE | None |
| Sched_EndDate | DATE | None |
-
- Using the Add Join geoprocessing tool, join the feature class to the spreadsheet using the Storey Name value on the spreadsheet and ContainerName from the feature class.
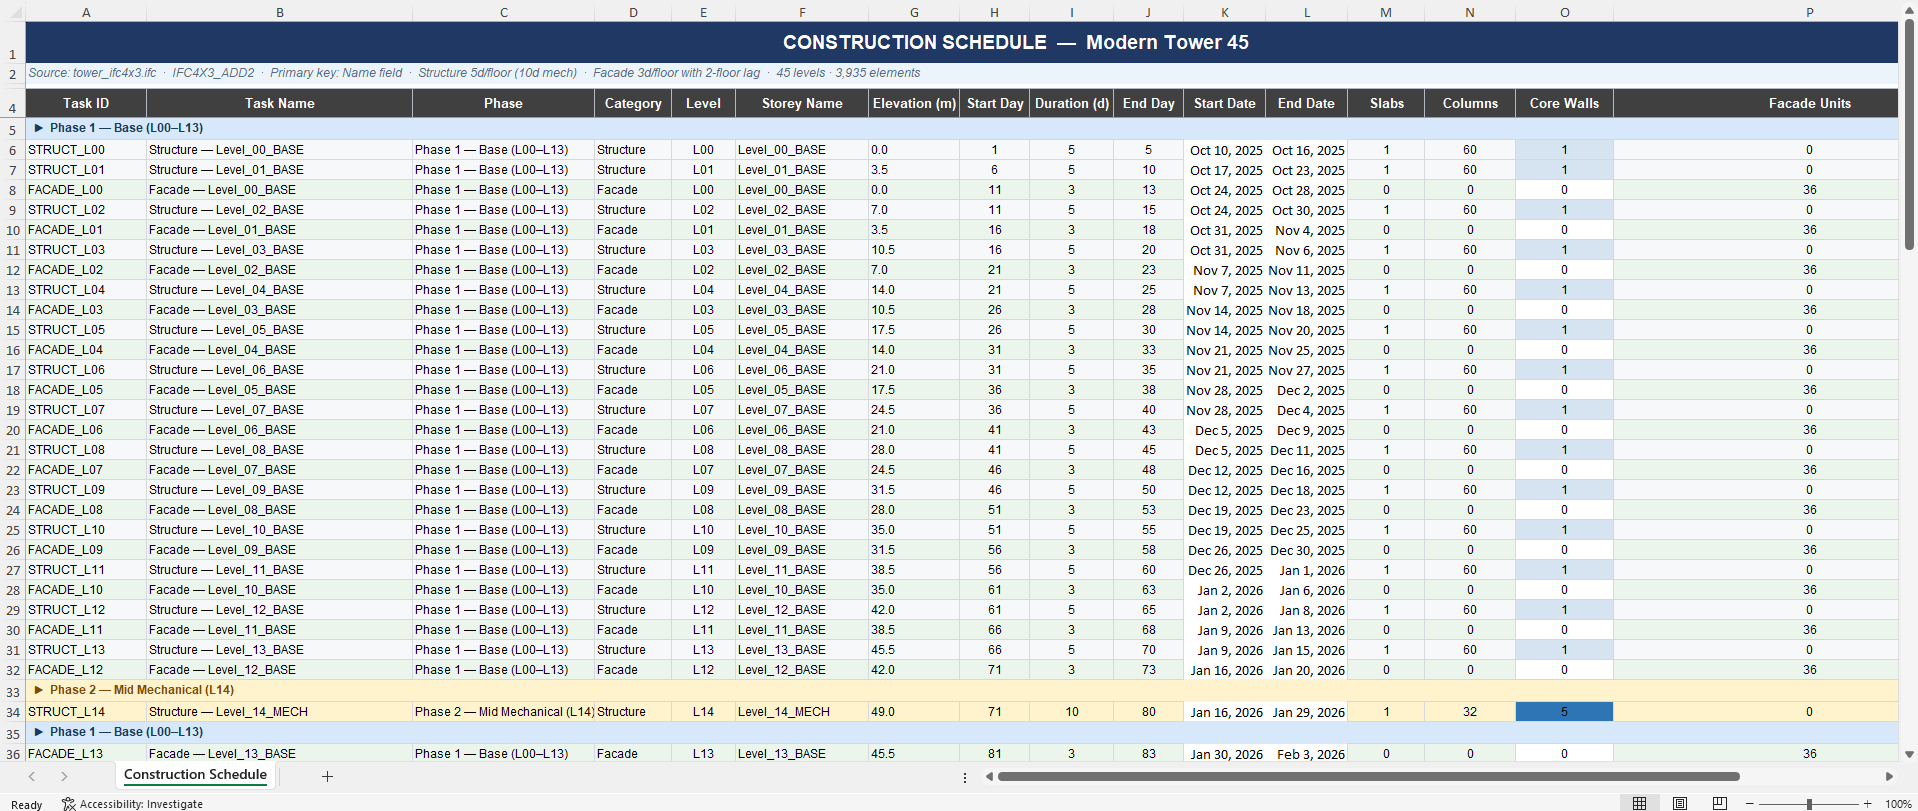
The schedule in the spreadsheet must be formatted so each column represents each of the fields added on the prior step.
-
- Populate the fields with schedule information using the Calculate Field (multiple) geoprocessing tool.
- Set the time property.
- Open a global scene.
- Add the feature class dataset to the scene.
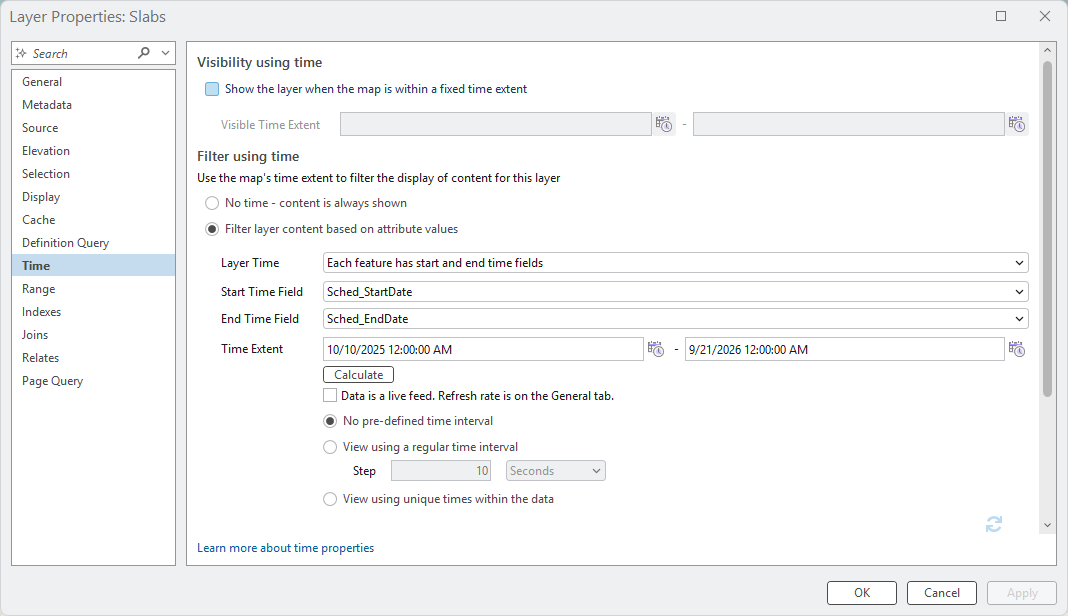
- Enable the time property for each layer, and on the Time tab, set Layer Time to Each feature has start and end time fields using the Sched_StartDate and Sched_EndDate options for the drop-down menus.
- Share on ArcGIS Online with the initial schedule.
- On the ribbon, click the Share
- In the Share As group, click
- Configure options on the Scene tab,
- On the Configuration tab, select Copy all data: Editable.
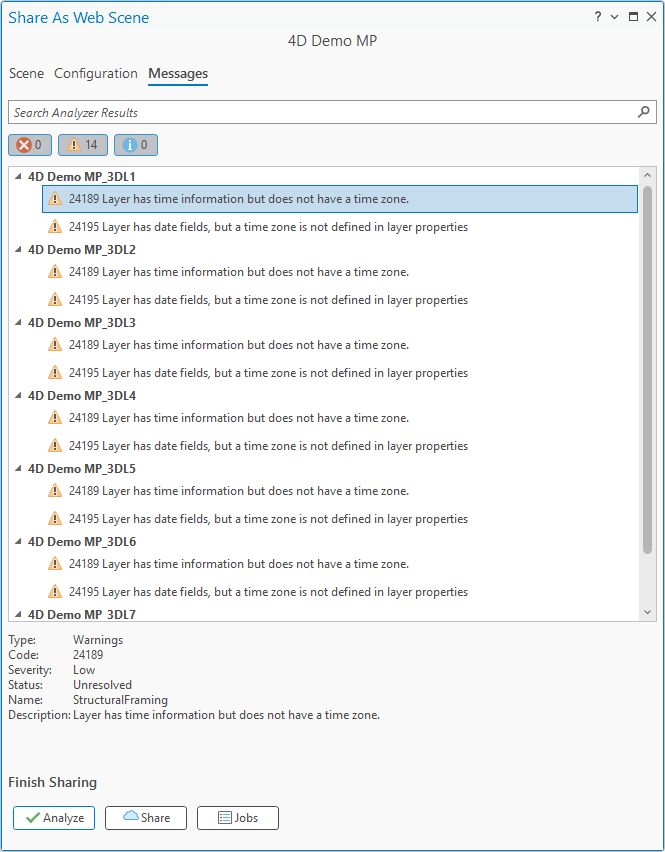
- Click Analyze.
- Ignore the warning that the layer does not have a time zone.
-
- Click Publish.
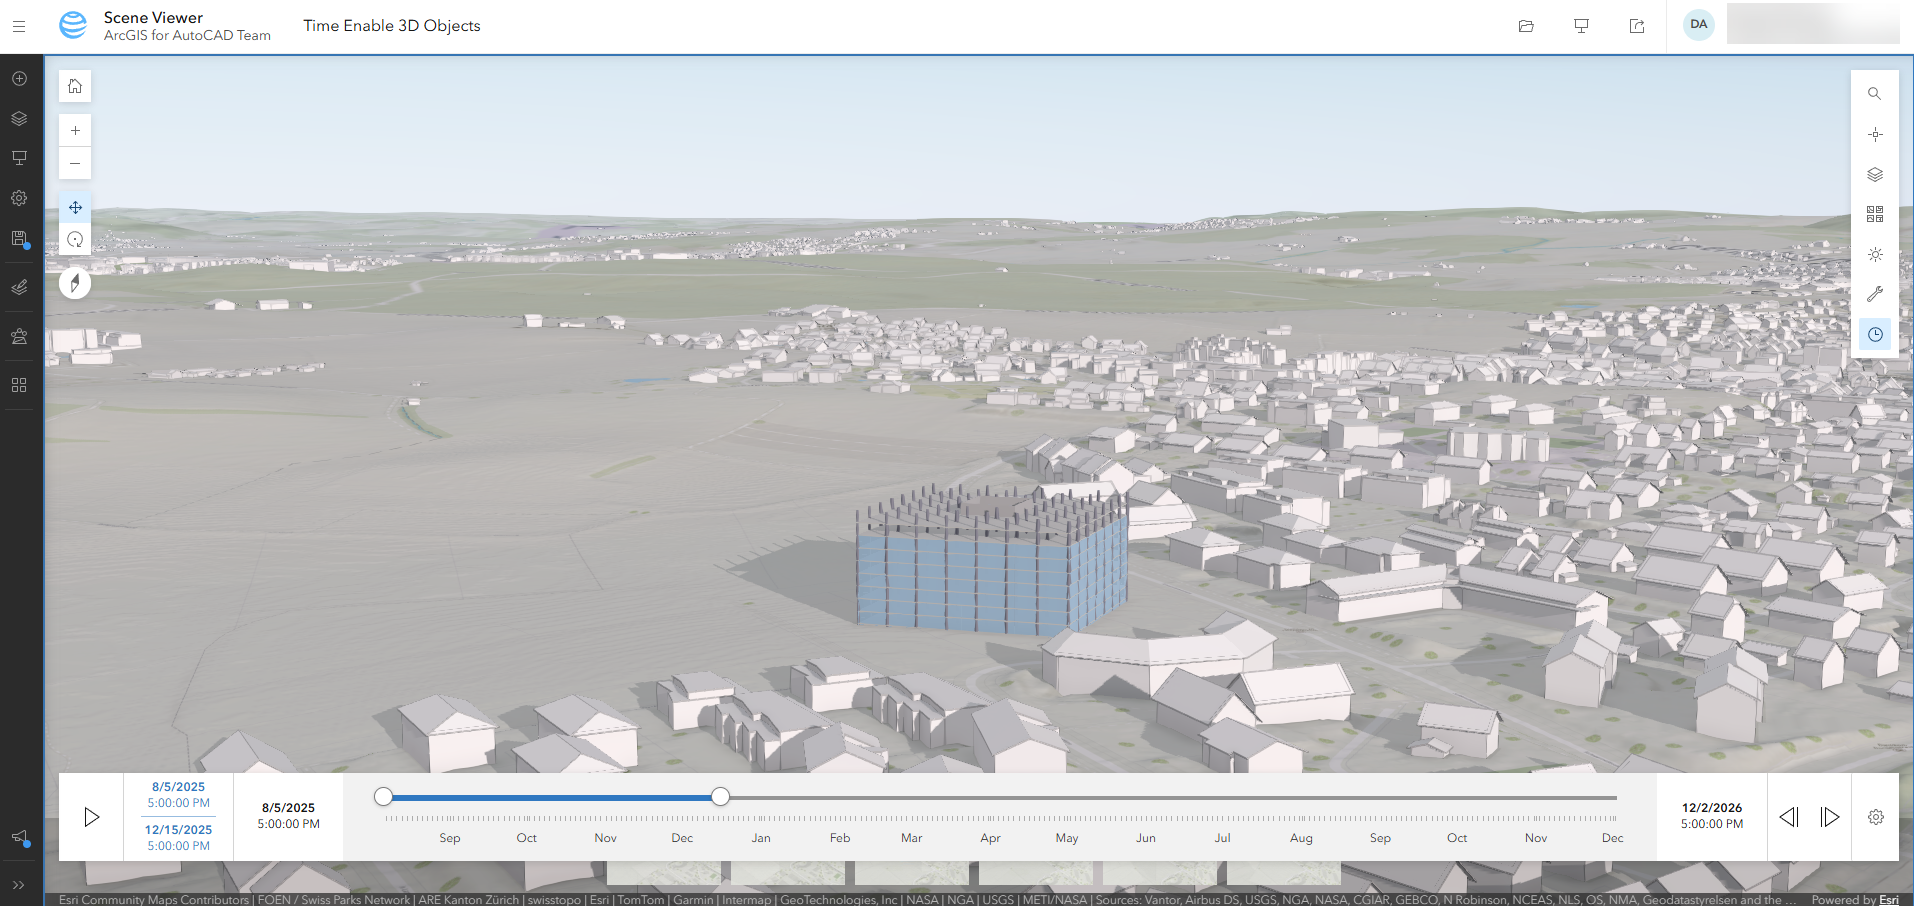
- Open the scene view and start visualizing the progress of the construction.
- On the time slider, click Time slider options.
- Optionally, configure the Time slider mode.
Build the initial 4D simulation automatically
The following code shows the workflow to build a 4D simulation using a hosted 3D object scene layer based on a construction schedule. This is an overview of the code, and the provided notebook contains further details and explanations of the code.
"""
BIM 4D Schedule Pipeline
This notebook demonstrates how to:

Convert a BIM file (IFC/Revit) to a File Geodatabase
Clean up empty feature classes
Add scheduling fields to each feature class
Populate those fields from a Construction Schedule spreadsheet
"""

import os
import re
import json
import math
import arcpy
import openpyxl
from datetime import datetime
from arcgis.gis import GIS
from arcgis.map import Scene

"""
User Configuration
Set input/output paths and scheduling parameters.
"""

# BIM input file and dataset name
BIM_PATH = r"C:\\Blog_4D_Simulation_Vertical\Data\IFC\tower_ifc4x3.ifc"
DATASET_NAME = "Simulation"

# Output geodatabase — defaults to the project's default geodatabase
OUTPUT_GDB = arcpy.mp.ArcGISProject("CURRENT").defaultGeodatabase
# OUTPUT_GDB = r"C:\\Blog_4D_Simulation\Data\GDB\Demo_bldg_time.gdb"  # Uncomment to override

# Excel schedule
EXCEL_PATH = r"C:\\Blog_4D_Simulation_Vertical\Data\Schedule\tower_schedule.xlsx"
SHEET_NAME = "Construction Schedule"
HEADER_ROW = 4  # 1-based row containing column headers

# Join keys
EXCEL_JOIN_COL = "Storey Name"
GDB_JOIN_FIELD = "ContainerName"

"""
Field Definitions
Define the scheduling fields to add and the Excel-to-GDB column mapping.
"""
SCHED_FIELDS = [
    ("Sched_TaskID",     "TEXT",   255),
    ("Sched_TaskName",   "TEXT",   255),
    ("Sched_Phase",      "TEXT",   255),
    ("Sched_Category",   "TEXT",   255),
    ("Sched_Level",      "TEXT",   255),
    ("Sched_StoreyName", "TEXT",   255),
    ("Sched_Elev_m",     "DOUBLE", None),
    ("Sched_StartDay",   "LONG",   None),
    ("Sched_Duration",   "LONG",   None),
    ("Sched_EndDay",     "LONG",   None),
    ("Sched_StartDate",  "DATE",   None),
    ("Sched_EndDate",    "DATE",   None),
]

# Excel column header → GDB field name
FIELD_MAP = {
    "Task ID":       "Sched_TaskID",
    "Task Name":     "Sched_TaskName",
    "Phase":         "Sched_Phase",
    "Category":      "Sched_Category",
    "Level":         "Sched_Level",
    "Storey Name":   "Sched_StoreyName",
    "Elevation (m)": "Sched_Elev_m",
    "Start Day":     "Sched_StartDay",
    "Duration (d)":  "Sched_Duration",
    "End Day":       "Sched_EndDay",
    "Start Date":    "Sched_StartDate",
    "End Date":      "Sched_EndDate",
}

# Keywords to resolve GDB Category → Excel Category
FACADE_KEYWORDS    = {"curtainwall", "plate"}
STRUCTURE_KEYWORDS = {"wall", "slab", "column", "member", "roof"}
"""
Step 1 — Convert BIM to Geodatabase
"""
# Create the output geodatabase
if not arcpy.Exists(OUTPUT_GDB):
    arcpy.management.CreateFileGDB(
        os.path.dirname(OUTPUT_GDB),
        os.path.basename(OUTPUT_GDB)
    )
    print(f"Created: {OUTPUT_GDB}")

# Delete existing feature dataset if it exists (overwrite)
feature_dataset = os.path.join(OUTPUT_GDB, DATASET_NAME)
if arcpy.Exists(feature_dataset):
    arcpy.management.Delete(feature_dataset)
    print(f"Deleted existing: {feature_dataset}")

# Convert BIM file
arcpy.conversion.BIMFileToGeodatabase(
    in_bim_file_workspace=BIM_PATH,
    out_gdb_path=OUTPUT_GDB,
    out_dataset_name=DATASET_NAME
)
print("BIM conversion complete.")

"""
Step 2 — Delete Empty Feature Classes
"""
# List all feature classes in the dataset
feature_dataset = os.path.join(OUTPUT_GDB, DATASET_NAME)
arcpy.env.workspace = feature_dataset
all_fcs = arcpy.ListFeatureClasses()

# Delete any with zero rows
for fc in all_fcs:
    fc_path = os.path.join(feature_dataset, fc)
    if int(arcpy.management.GetCount(fc_path)[0]) == 0:
        arcpy.management.Delete(fc_path)
        print(f"Deleted empty: {fc}")

# Delete ExteriorShell (no ContainerName field, cannot be schedule-joined)
for fc in arcpy.ListFeatureClasses():
    if fc.lower().startswith("exteriorshell"):
        arcpy.management.Delete(os.path.join(feature_dataset, fc))
        print(f"Deleted: {fc}")

# Refresh the list
arcpy.env.workspace = feature_dataset
surviving_fcs = arcpy.ListFeatureClasses()
print(f"\n{len(surviving_fcs)} feature classes remaining.")
"""
Step 3 — Add Scheduling Fields
"""
arcpy.ClearWorkspaceCache_management()
for fc in surviving_fcs:
    fc_path = os.path.join(feature_dataset, fc)
    for field_name, field_type, field_length in SCHED_FIELDS:
        if field_type == "TEXT":
            arcpy.management.AddField(fc_path, field_name, field_type, field_length=field_length)
        else:
            arcpy.management.AddField(fc_path, field_name, field_type)
    print(f"Added fields to: {fc}")
"""
Step 4 — Load Construction Schedule from Excel
"""
wb = openpyxl.load_workbook(EXCEL_PATH, read_only=True, data_only=True)
ws = wb[SHEET_NAME]
rows = list(ws.iter_rows(values_only=True))
headers = [str(h).strip() if h else "" for h in rows[HEADER_ROW - 1]]

join_col_idx = headers.index(EXCEL_JOIN_COL)
cat_col_idx  = headers.index("Category")

# Build lookup: (Storey Name, Category) → row data
schedule = {}
for row in rows[HEADER_ROW:]:
    join_val = row[join_col_idx]
    if not join_val or str(join_val).strip() == "":
        continue
    join_str = str(join_val).strip()
    if join_str.startswith("▶") or join_str.startswith(">"):
        continue

    cat_val = row[cat_col_idx]
    if not cat_val:
        continue
    cat_str = str(cat_val).strip()

    key = (join_str, cat_str)
    schedule[key] = {col: row[headers.index(col)] for col in FIELD_MAP if col in headers}

print(f"Loaded {len(schedule)} schedule entries.")
"""
Step 5 — Resolve Category
Map GDB Category values (e.g. "IfcWall") to Excel categories ("Structure" or "Facade").
"""
def resolve_category(raw_category):
    """Map a GDB Category to 'Structure' or 'Facade' via keyword matching."""
    if not raw_category:
        return None
    lower = raw_category.strip().lower()
    # Test Facade first so 'curtainwall' doesn't match Structure's 'wall'
    if any(kw in lower for kw in FACADE_KEYWORDS):
        return "Facade"
    if any(kw in lower for kw in STRUCTURE_KEYWORDS):
        return "Structure"
    return None
"""
Step 6 — Populate Schedule Fields
Join each feature class row to the schedule by (ContainerName, resolved Category).
"""

cursor_fields = [GDB_JOIN_FIELD, "Category"] + list(FIELD_MAP.values())

for fc in surviving_fcs:
    fc_path = os.path.join(feature_dataset, fc)

    # Skip feature classes without the join fields
    fc_field_names = {f.name for f in arcpy.ListFields(fc_path)}
    if GDB_JOIN_FIELD not in fc_field_names or "Category" not in fc_field_names:
        continue

    matched = 0
    with arcpy.da.UpdateCursor(fc_path, cursor_fields) as cursor:
        for row in cursor:
            container_name = row[0]
            raw_category = row[1]

            if not container_name:
                continue

            resolved_cat = resolve_category(raw_category)
            if not resolved_cat:
                continue

            key = (str(container_name).strip(), resolved_cat)
            if key not in schedule:
                continue

            record = schedule[key]
            new_row = [container_name, raw_category]
            for excel_col in FIELD_MAP:
                new_row.append(record.get(excel_col))

            cursor.updateRow(new_row)
            matched += 1

    print(f"{fc}: {matched} rows updated.")

print("\nDone.")
"""
Step 7 — Create a Global Scene
Create an in-memory global scene and add the feature classes from the geodatabase.
"""
aprx = arcpy.mp.ArcGISProject("CURRENT")
# If running outside ArcGIS Pro, use the path to your .aprx file instead of "CURRENT"
# aprx = arcpy.mp.ArcGISProject(r"C:\Projects\Tower\Tower.aprx")

# Create a new global scene
scene_name = "4D_Schedule_Scene"
scene = aprx.createMap(scene_name, map_type="GLOBE")

# Add each surviving feature class to the scene
for fc in surviving_fcs:
    fc_path = os.path.join(feature_dataset, fc)
    scene.addDataFromPath(fc_path)
    print(f"Added: {fc}")

print(f"\nScene '{scene_name}' created with {len(surviving_fcs)} layers.")
"""
Step 8 — Enable Time on Layers
Enable time properties using the Sched_StartDate and Sched_EndDate fields.
"""
for lyr in scene.listLayers():
    if lyr.isFeatureLayer:
        lyr.enableTime(startTimeField="Sched_StartDate", endTimeField="Sched_EndDate")
        print(f"Time enabled: {lyr.name}")
"""
Step 9 — Share as a Web Scene
Publish each layer as a scene layer, then create a Web Scene item that bundles them all together.
"""
# Connect to portal using the active Pro sign-in
gis = GIS("pro")

# Publish each feature layer as its own scene layer service
published_items = []
layer_names = []
for lyr in scene.listLayers():
    if not lyr.isFeatureLayer:
        continue

    service_name = f"BIM_4D_{lyr.name}".replace(" ", "_")
    draft = scene.getWebLayerSharingDraft(
        server_type="HOSTING_SERVER",
        service_type="SCENE_LAYER",
        service_name=service_name,
        layers_and_tables=[lyr]
    )
    draft.summary = "4D BIM schedule visualization"
    draft.tags = "BIM, 4D, construction schedule, IFC"
    draft.sharing.sharingLevel = "OWNER"

    print(f"Publishing: {lyr.name}...")
    try:
        result = arcpy.sharing.Publish(draft)
        item_url = result["web_scene_layer"]["item_url"]
        item_id = item_url.split("id=")[-1]
        published_items.append(item_id)
        layer_names.append(lyr.name)
        print(f"  Published → {item_url}")
    except Exception as e:
        msg = str(e)
        if "already exists" in msg.lower() or "service name" in msg.lower():
            print(f"  SKIPPED: Service '{service_name}' already exists. "
                  f"Delete or rename the existing service and retry.")
        else:
            print(f"  ERROR publishing {lyr.name}: {msg}")

print(f"\n{len(published_items)} of {sum(1 for l in scene.listLayers() if l.isFeatureLayer)} layers published.")
# Create a Web Scene that references all the published scene layers
web_scene = Scene()
for item_id, name in zip(published_items, layer_names):
    item = gis.content.get(item_id)
    if item is None:
        print(f"  WARNING: Could not find item {item_id}, skipping")
        continue
    web_scene.content.add(item)

web_scene_properties = {
    "title": "BIM_4D_Schedule_Scene",
    "tags": "BIM, 4D, construction schedule, IFC",
    "snippet": "Time-enabled 3D web scene from BIM data with construction schedule"
}
web_scene_item = web_scene.save(web_scene_properties)
print(f"\nWeb Scene published: {web_scene_item.homepage}")
"""
Step 10 (Optional) — Patch Web Scene Viewpoint & Time Slider
Re-read the saved web scene JSON and patch it with a computed viewpoint centered on the data, a time slider widget, and lighting settings.
"""

# --- Patch the web scene JSON: viewpoint from data, time slider, lighting ---
data = web_scene_item.get_data()
layers = data.get("operationalLayers", [])
all_xmin, all_ymin, all_xmax, all_ymax, all_zmin, all_zmax = [], [], [], [], [], []

for lyr in layers:
    url = lyr.get("url")
    if not url:
        continue

    # Fix itemId from the SceneServer root
    svc_url = re.sub(r'/layers/\d+$', '', url)
    svc_info = gis._con.get(svc_url, {"f": "json"})
    if isinstance(svc_info, dict) and "serviceItemId" in svc_info:
        lyr["itemId"] = svc_info["serviceItemId"]

    # Get actual extent from the layer endpoint
    lyr_info = gis._con.get(url, {"f": "json"})
    if isinstance(lyr_info, dict) and "error" not in lyr_info:
        ext = lyr_info.get("fullExtent")
        if ext:
            all_xmin.append(ext.get("xmin", 0))
            all_ymin.append(ext.get("ymin", 0))
            all_xmax.append(ext.get("xmax", 0))
            all_ymax.append(ext.get("ymax", 0))
            all_zmin.append(ext.get("zmin", 0))
            all_zmax.append(ext.get("zmax", 0))

    # Strip bloated blocks
    for key in ["layerDefinition", "popupInfo"]:
        lyr.pop(key, None)

# Compute viewpoint from actual layer extents
if all_xmin:
    cx = (min(all_xmin) + max(all_xmax)) / 2
    cy = (min(all_ymin) + max(all_ymax)) / 2
    cz = max(all_zmax) if all_zmax else 500
    cam_z = cz + 300

    # Project data center from WGS84 to Web Mercator (3857) for the viewpoint
    mx = cx * 20037508.34 / 180.0
    my = math.log(math.tan((90.0 + cy) * math.pi / 360.0)) * 20037508.34 / math.pi

    # Offset camera south so the tilted view looks at the building, not past it
    backoff_m = cam_z * 1.5
    my -= backoff_m

    sr_wkid = 102100
    sr_latest = 3857
    cam_x, cam_y = mx, my
else:
    cam_x, cam_y, cam_z = 0, 0, 300000
    sr_wkid, sr_latest = 102100, 3857

# Get time range from schedule
all_starts = [v["Start Date"] for v in schedule.values() if v.get("Start Date")]
all_ends = [v["End Date"] for v in schedule.values() if v.get("End Date")]
start_ms = int(min(all_starts).timestamp() * 1000)
end_ms = int(max(all_ends).timestamp() * 1000)
total_days = (end_ms - start_ms) / (1000 * 60 * 60 * 24)
interval_days = max(1, int(total_days / 40))

# Apply: time slider
data["widgets"] = {
    "timeSlider": {
        "properties": {
            "startTime": start_ms,
            "endTime": end_ms,
            "currentTimeExtent": [None, end_ms],
            "thumbCount": 1,
            "thumbMovingRate": 300,
            "timeStopInterval": {
                "interval": interval_days,
                "units": "esriTimeUnitsDays"
            }
        }
    }
}

# Apply: initial state
if "initialState" not in data:
    data["initialState"] = {}
if "environment" not in data.get("initialState", {}):
    data["initialState"]["environment"] = {}

data["initialState"]["timeExtent"] = [None, end_ms]
data["initialState"]["viewpoint"] = {
    "camera": {
        "position": {
            "spatialReference": {"latestWkid": sr_latest, "wkid": sr_wkid},
            "x": cam_x, "y": cam_y, "z": cam_z
        },
        "heading": 0, "tilt": 65
    }
}
data["initialState"]["environment"]["lighting"] = {
    "type": "sun", "directShadows": True, "displayUTCOffset": 0
}
data["heightModelInfo"] = {"heightModel": "gravity_related_height", "heightUnit": "meter"}

# Save patched web scene
web_scene_item.update(item_properties={}, data=json.dumps(data))
print(f"\nPatched: viewpoint, time slider ({interval_days}-day intervals over {int(total_days)} days), lighting")
print(f"Data center: ({cx:.4f}, {cy:.4f}), Camera: ({cam_x:.0f}, {cam_y:.0f}, z={cam_z:.0f}) [Web Mercator]")
print(f"Time: {min(all_starts)} → {max(all_ends)}")
print(f"View: {web_scene_item.homepage}")
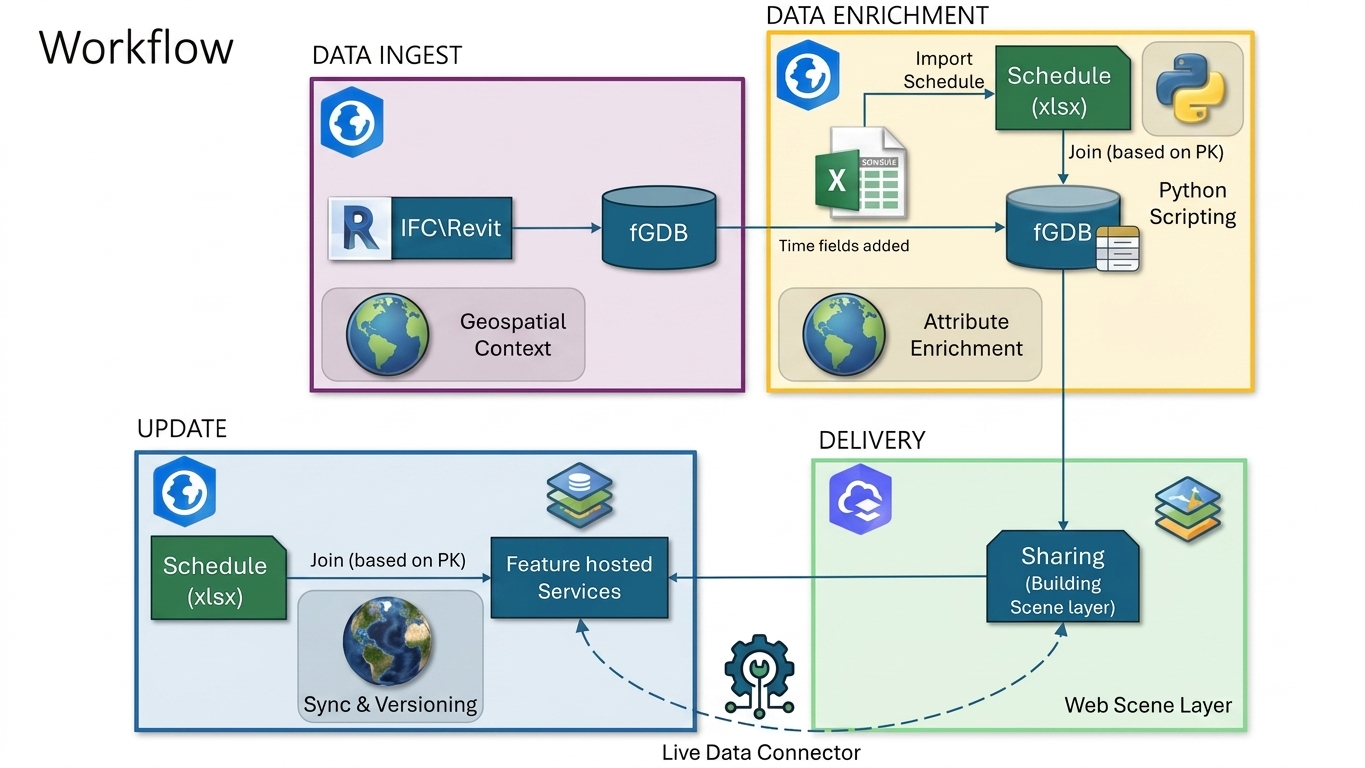
Figure 1 shows an overview of the steps necessary to create the 4D simulation using a hosted 3D object scene layer and how to keep it up to date.
Conclusion
By using ArcGIS Online to create an interactive representation of the construction process, project teams can use a 4D simulation to work more efficiently and accurately. The 4D simulation can enhance BIM projects and improve project planning and scheduling, communication and collaboration, risk mitigation, and resource management.
With a 4D simulation, the schedule is no longer a spreadsheet someone has to interpret. The whole team can watch the structure rising phase by phase where it will actually stands. Planners catch sequencing issues before they ever reach the field, stakeholders follow the construction without needing data interpreted, and everyone can view the same picture at the same time. Because the model and the schedule are connected in ArcGIS, the simulation keeps pace with the project. Part 2 of this blog series will demonstrate an example of a delay in a building project, and the simulation will automatically change to display the new information.
Download the ArcGIS Notebook
This blog demonstrates how a 3D Object Layer can be linked to construction schedule data to create a time-enabled visualization. While the example focuses on a few 3D Object Layer, the same workflow can be applied to additional layers, allowing them to be managed and scheduled consistently using the approach outlined in this article.




Article Discussion: