As the volume of geospatial information continues to grow, tapping into cloud-hosted datasets is essential for GIS professionals. Cloud platforms provide easy access to a wide variety of geospatial data, making it easier than ever to enhance your analysis and visualizations in ArcGIS Pro.
Cloud providers have amassed extensive repositories of openly accessible data. Many federal agencies contribute data to these repositories, like NOAA via the NODD Program or NASA via the Earth Data Program. Also, more organizations are hosting their internal data in the cloud, allowing teams to collaborate with a shared view. With ArcGIS Pro, you can directly connect to these cloud storage warehouses in the user interface.
Cloud storage connections in ArcGIS Pro are saved as .acs files on your file system, which are generated using the Create Cloud Storage Connection File tool. Once a connection is established, your cloud storage will appear in the ArcGIS Pro Catalog pane, allowing you to access available data. Currently, you can view raster items and Apache Parquet files from cloud storage. You can either drag and drop data directly from the catalog pane into the map or use the data as an input to geoprocessing tools.
Example: Connecting to Registry of Open Data on AWS
Let’s walk through an example of connecting to a public dataset from the Registry of Open Data on AWS to visualize multidimensional imagery. We’ll connect to NOAA’s Operational Forecast System (OFS) dataset, create a multidimensional raster in our map, and visualize.
Connecting to Cloud Storage
1. Visit the main Registry of Open Data on AWS page and search for the NOAA Operational Forecast System (OFS) Dataset.
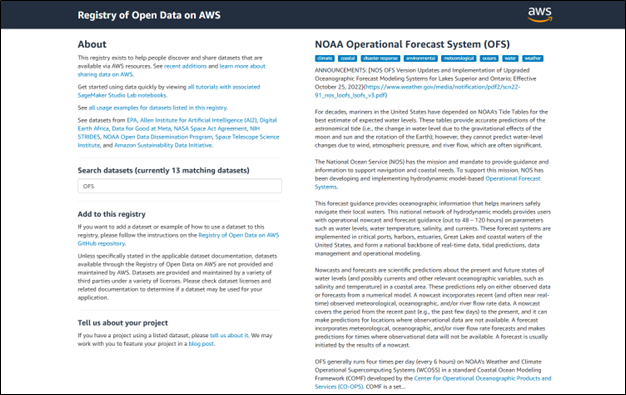
2. From the dataset page, gather the following parameters for your ArcGIS Pro connection:
- Bucket Name (from the Amazon Resource Name)
- Region (Location where the data is stored)
- Additional details such as “No Sign Request” for public data

3. Open ArcGIS Pro and navigate to Insert > Connections > Cloud Store > New Cloud Storage Connection.
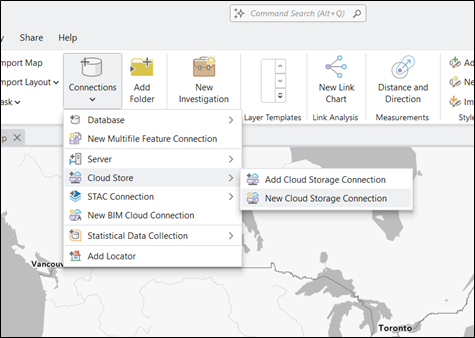
4. Fill out the parameters:
- Name your connection
- Select AMAZON as the service provider
- Enter the bucket name and region
- Set AWS_NO_SIGN_REQUEST = YES for public datasets

Note: If you want to access internal datasets, you may need credentials for authentication.
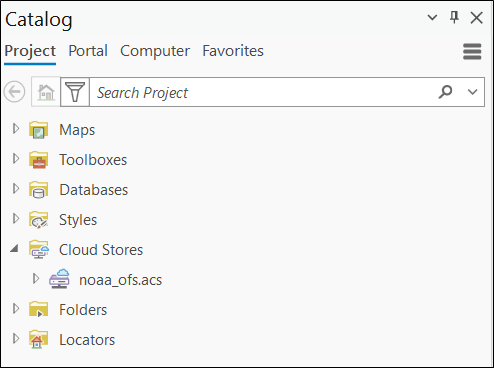
5. Click OK, and then your connection will appear in the Catalog Pane under “Cloud Stores.”
If your files do not require processing, such as GeoTIFFs, you can simply drag and drop them into the map pane. For NOAA’s OFS data, we will process the NetCDF files from the cloud store as multidimensional imagery to visualize them in ArcGIS Pro.
Visualizing Multidimensional Imagery
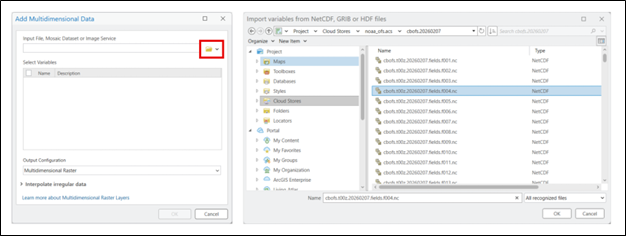
1. Navigate to Map > Add Data > Multidimensional Data.
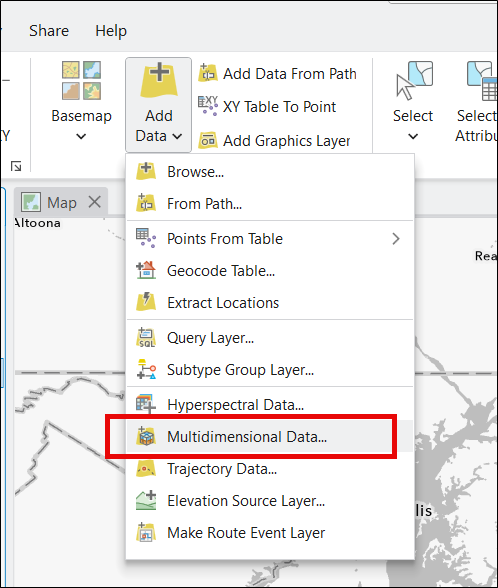
2. Click the folder icon to import variables from a specific file. We’ll look at February 7, 2026 data in the Mid-Atlantic region for this example. Navigate to Project > Cloud Stores > noaa_ofs.acs > cbofs.20260207 > cbofs.t00z.20260207.fields.f004.nc. Then, press OK.
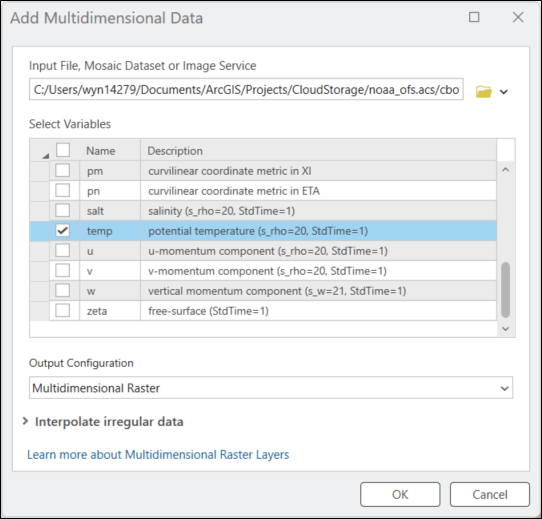
3. Select any relevant variables. For our example, we’ll look at temperature. We can select “temp”, then click OK.
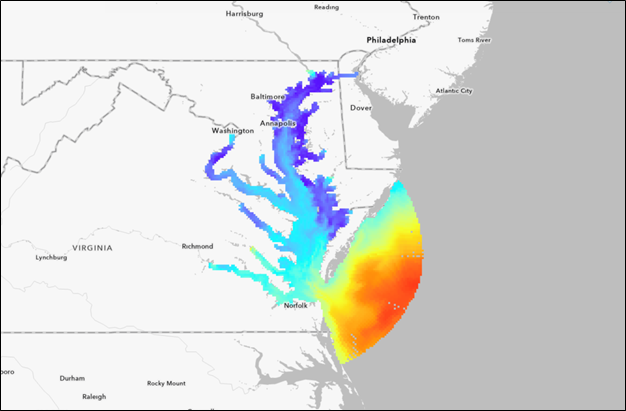
4. View the imagery in the map pane!
Direct access to cloud-hosted, open-source geospatial data in ArcGIS Pro empowers users to analyze and visualize large datasets efficiently. Creating connections to cloud storage warehouses streamlines scientific workflows and makes it easier than ever to work with big data. Whether you’re analyzing environmental trends, supporting disaster relief efforts, or planning infrastructure, integrating cloud storage with ArcGIS Pro provides seamless access to a wide range of geospatial data.


Article Discussion: