
After years of teaching instructor-led classes and covering courses for geodatabases and Python automation, I was excited to recently join the geodatabase team to share new ways to assist our users with their workflows and projects. I know that students love examples, especially sample code and demonstrations when it comes to automating manual workflows with Python scripting.
Geodatabases have supported the ability to enable feature classes (including stand-alone tables) to add attachments for many years. Attachments are one way to associate nongeographic data with geographic data. An example is attaching one or more pictures to a feature in a feature class. When enabled and attachments added, a user can mouse click on a feature to display a pop-up window showing its attributes and associated media data. GIS users have asked if it is possible to download attachments from an enabled feature class to a specified location along with options to rename the exported files.

With a suite of data management geoprocessing tools to manage, maintain, and work with attachments, it is still possible to discover that the tool you need doesn’t currently exist. For example, there is not a Download Attachments tool. With a do-it-yourself (DIY) enthusiasm, I’ll show you how to create your own custom data management geoprocessing tool using ArcPy and ArcGIS Pro script tools. The tool will allow you to quickly download attachments and optionally rename them without manually accessing and saving one attachment at a time.
Let’s get started
To create your own data management tool, you’ll do it in two parts.
- Write a Python script to download all attachments to a specified location. Provide options to download attachments to sub-folders, and options to rename the files using selected field values.
- Design and create the script tool (geoprocessing tool) interface and associate the parameters of the tool with specific lines in the script. Make the tool smart by implementing tool behavior.
Key Script functions
Let’s begin with key items to do the work when you click the tool’s Run button. You want your script to do the following:
- Determine if the feature class has been enabled for attachments.
- Verify that the feature class has attachments to download.
- Select the output folder location path to download the attachments.
- Optionally, allow the user to download attachments to sub-folders. The values in the selected field name, create the Sub-folder name.
- Optionally, allow the user to rename the attachments with values in selected attribute fields.
Writing the Python script
Part 1
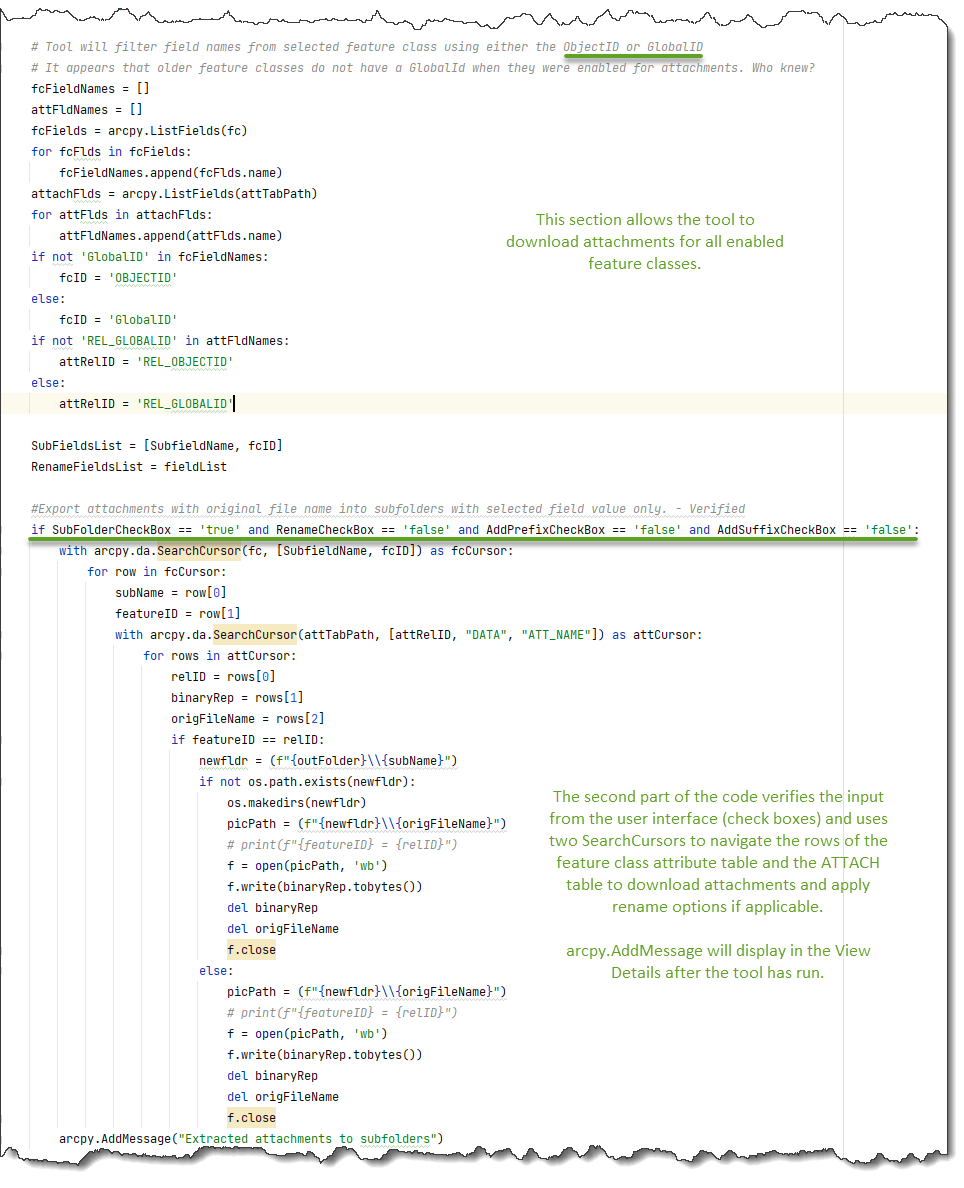
The following static code snippet gives you a glimpse of how you will check to make sure the selected feature class has been enabled for attachments using the arcpy Describe function. You will also use the Describe function to return the associated ATTACH table. This table stores your attachments in the DATA column as binary large objects (BLOB data). If the ATTACH table is empty, your tool will notify the user that the selected feature class has no attachments to download with an error message.

Writing the code
Part 2
The second portion of the script verifies if the user wants to export the attachments to subfolders or rename them. Depending on the combination of options the end user chooses most of the code is similar within a series of elif statements. One important item to note. It is possible that a feature class that has been enabled for attachments may use either the OBJECTID with the REL_OBJECTID relationship in the ATTACH table, or GLOBALID’s for feature classes enabled in newer versions of the software. The script needs to check both so that all enabled feature classes work with the tool. This means that the tool should work with any enabled attachment feature class. Checkbox false on all options will download all attachments with their original names to the output folder only.
With your code completed and tested successfully, you can move on to designing your own script tool with a user-friendly interface to interact with the code. You can download a copy of the completed sample script later in this blog.
If you think that writing code is fun, you’ll probably also like creating your geoprocessing tool interface with a custom script tool inside of ArcGIS Pro.
Creating the script tool
Create script tools in an ArcGIS Pro project default toolbox or a custom one of your own.
- Right-click the toolbox, select New, and select Script.

2. In the new script properties window, on the General tab, give the tool a name and label. The label will be the name that shows up on the tool. The name and label can be the same, but the name cannot have spaces. Provide a brief description about the tool. When a user hovers the mouse over the question mark (?) icon at the top right of the tool, the software will show a text window with the description.

3. Click the Parameters tab in the Tool Properties window to create and add each tool parameter. This section is where you design the user interface of your tool. Users choose the feature class, and output folder as required parameters. Optionally, they can store the attachments in sub-folders in the output folder using field values. Field values can also be used to rename exported attachments.

4. Add each tool parameter with its label, name, data type, type, direction, and so on.
a. Input Feature Class—The first parameter will allow the user to select a feature class. Note: This parameter’s data type is a feature layer, rather than a feature class. What’s the difference? Selecting Feature Layer allows you to pick data from the Contents pane of the active map or from a folder location. Another benefit of using Feature Layer is that it will only export attachments for selected features (if the selected feature has attachments). Having the data type set to Feature Class would only allow a user to select a feature class using the folder icon. You’ll set this parameter to be a required input.
b. Output Folder—The second parameter is a required output to choose a folder to store the downloaded attachments or sub-folders with attachments if applicable.
c. Output attachments to subfolders—The third parameter is an optional input to select a check box if the user wants to download the attachments to individual sub-folders based on a field value. Notice that the data type is Boolean. If checked (true), create sub-folders, otherwise load all files into a single output folder.
d. Subfolder names by field—The fourth parameter is dependent on the third parameter and will only display if the optional check box is checked. If it’s checked, the user can then select a field from the feature class for the sub-folder names. (The validation script implements this behavior on the tool, which will also be available for review in a copy of the final tool).
e. Rename Output Filenames – This is another optional parameter, and if checked, will allow the user to rename the exported images based on selected field values in the feature class attribute table. Note: Renamed files will have an underscore inserted between the field values. When renaming exported attachments based on field values the tool automatically appends the AttachmentID number as the last value to avoid duplicate filenames.
f. Select Fields – This parameter will only appear if the checkbox for the Rename Output Filenames Boolean value equals true (checked). The script allows up to five field selections for renaming the exported files. The script tool validation script prevents date field selections, as the date data type was causing errors with renaming the files. If you would like to use the values from a date field, create a new text field and copy the dates to the new text field. Be aware that special characters such as slashes (“/”) or colons and semicolons (“:”, “;”) will likely cause an operating system error when attempting to rename files or sub-folders. Consider replacing special characters with spaces, underscores or hyphens.
g. Keep existing filename and add field value as a prefix to filename – This optional parameter adds selected field values with an underscore to the beginning of the original filename.
h. Keep existing filename and add field value as a suffix to filename – This optional parameter adds selected field values with an underscore to the end of the original filename.
i. Output Folder Path—The last parameter is set to derived and hidden but is added if a user wants to use the new tool in ModelBuilder. The output path will appear as a result within the model.
Notice that each parameter in the tool properties has a number on the left side, starting with zero. If you are thinking those are index numbers, you are correct. You will match each parameters index with updated variables in your script. The script will now use user input values instead of hard-coded values when the user clicks Run.

Tip: You can add a parameter description by updating the metadata. This allows a user to mouse-over the left side of each parameter to see descriptive information, also known as a tool tip. Right click on the script tool and select Edit Metadata. Under the Syntax Section select the down arrow of the parameter to update it’s description in the Dialog Explanation text box. When finished, click Save on the Metadata Ribbon.

Users will see this information as tool tips when they hover their mouse over the blue ‘i’ icon or required red asterisk at the left of each parameter.

Pairing the script with the tool
To gather the information from what the user entered for each tool parameter, you will match the lines of code in the script with the parameter index on your new tool.

Getting user input
Here you will replace the hard-coded lines used for testing to now gather the feature class path, the output folder path, and the status of the checkboxes from what the user entered on the user interface of the tool.
- Replace the feature class path with fc = arcpy.GetParameterAsText(0)—with (0) matching up to the first parameter on the tool, which is also indexed 0.
- Replace the output folder path by referencing the text from the second parameter, indexed as 1. outFolder = arcpy.GetParameterAsText(1).
- SubFolderCheckbox = arcpy.GetParameterAsText(2) returns false if the user leaves it unchecked, or true if the user checks the box to download the attachments into subfolders.
- If the user does check the check box, fieldname = arcpy.GetParameterAsText(3) will return either the ObjectID field values by default, or field values from a field selected by the user. The sample script does not prevent users from selecting a date field. Instead, we prevented date fields from selection in the script tools validation script as they presented issues and errors when creating sub-folders or filenames.
- RenameCheckBox = arcpy.GetParameterAsText(4) returns false if the user leaves it unchecked, or true if the user checks the box to rename attachments when downloading.
- getFields = arcpy.GetParameterAsText(5) returns one or more fields for renaming attachments with each fields values. This parameter is set for multiple values, and when populated, each field is separated with a semi-colon.
- AddPrefixCheckbox = arcpy.GetParameterAsText(6) returns false if the user leaves it unchecked, or true if the user checks the box to rename original filenames with a prefix.
- AddSuffixCheckbox = arcpy.GetParameterAsText(7) returns false if the user leaves it unchecked, or true if the user checks the box to rename original filenames with a suffix.
Tip: Consider commenting out the hard-coded lines and keep them in the script for reference.
In addition, you’ll add the last parameter (hidden) to the end of the script to show an output result if a user chooses to use the tool in ModelBuilder (referencing index 8 on the tool).

Load the script in the script tool
With your script updated to gather the input from the user on the tools interface, you can save a copy of it and load the script into the tool.
- Go to the Execution tab in the Tool Properties window. Browse to the location of the script file. It is highly recommended to always use a copy of your script when adding it to a script tool.
- If you plan to share this tool with others, you will need to embed the script into the tool by clicking the red toolbox script button. This will then change to a green arrow and show embedded in the Script File window.
- Further, if you want to protect the intellectual property of your code and hide it from others, you can password protect it by clicking the lock button. Note: Make sure you don’t lose the password, as there is no Forgot Password option available to reset it.


Script tool behavior
Every new script tool contains a standard validation script. Update this script with Python code to control the behavior of the tool. I like to refer to this script as making your tool a smart tool. Like error handling, one can think of this behavior as another option to mitigate errors before a user clicks the Run button. Therefore, the first parameter on the tool can return an error message for non-enabled feature classes or if it does not have any attachments to download. You can also control other behaviors of the tool, such as only showing the parameter to select a field if the check box has been selected.


The finished product
With your script finished and imported into your script tool, you can run the tool on a feature class that has attachments you want to download to a specified folder. Optionally, you can organize the download attachments into subfolders based on field values in a field name of your choice. In my case, I downloaded airport picture attachments to subfolders for each airport name.
In conclusion, I hope that this sample script and script tool provide some functionality that can be useful in your current or future workflows. I always learn something new from sample scripts and demonstrations that I can apply directly to a current project or later use. While this tool is all about downloading attachments from a feature class, you might find it to be more helpful for automating other workflows, better understanding of the Describe function or tool behavior. Either way, have fun and good luck creating your own data management geoprocessing tool to download attachments. Feel free to edit, update, improve or customize for your individual or organizational needs!
You can download the following items:
- Working copy of the sample tool (tool includes validation script)
- Sample script for the tool
- Sample data in a file geodatabase for testing

Check out the video of the tool in action!
Learn how to use the features of the Download Attachments Sample tool to export feature class attachments to a designated folder with the option to rename the files.
Licensing Information:
Basic: Yes Standard: Yes Advanced: Yes
More Information:
Additionally, check out these other helpful resources when working with attachments, geodata, Python, and custom script tools:
Creating Python Scripts for ArcGIS
Building Geoprocessing Tools with Python: Beyond the Basics
Managing Geospatial Data in ArcGIS
Introducing Attachment Viewer!

Commenting is not enabled for this article.