Attachment Viewer is a new configurable app (introduced with the June 2019 update of ArcGIS Online) that makes it easier to work with images and features in a map. You can quickly build an app that presents spatial data with an intuitive feature-by-feature browsing experience and an image-centric display. Viewers of the app can navigate through each feature and view the attribute information and attached images. Whether you already have a feature layer with images associated with features or are including image collections in your data collection process, Attachment Viewer is a great companion for any dataset that contains images, videos, or PDFs as attachments.

Images, videos, and PDFs that are stored as attachments with feature layers allow you to associate documents or photos to specific features. They are often used to provide visual information about what a specific feature looked like at the time of data collection. This is a common workflow when reporting trail conditions, pump inspections and crowdsourcing locations and images during events. In each example the images provide a richer understanding of what was occurring when the data was collected. This article walks through the steps of creating an attachment viewer app, using data that was collected by California Department of Water Resources. The goal of building the app is to create an easy way for project managers and field staff to browse and review collected data.
Build an Attachment Viewer App
Step 1. Build the map
Like many configurable apps, the creation of the app starts by creating a map in Map Viewer. The data for this app had already been collected by the DWR field technicians in a feature layer with attachments enabled. A sample subset of the data can found at this link.
Best practices to create a map (for use in Attachment Viewer)
- Choose meaningful symbology for your dataset.
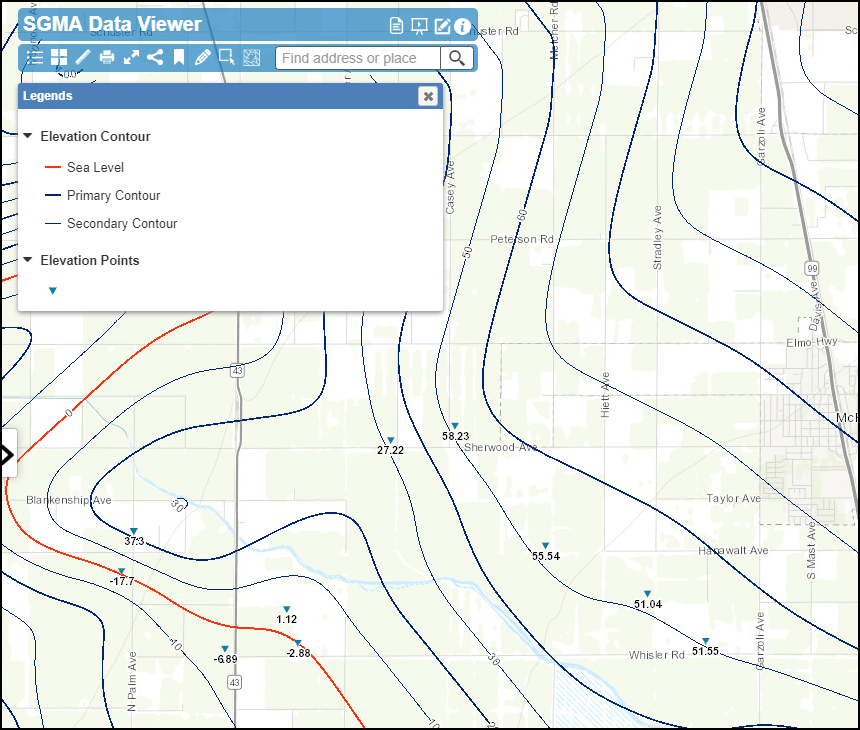
The map below (Image 2) symbolizes the wells based on the measurement status. Measurement wasn’t possible for all well locations, so blue squares indicate that no measurement was obtained, and green squares indicate that a successful measurement was taken. - Choose an appropriate basemap that enhances the map and chosen symbology.
The imagery with labels basemap was selected for this map (Image 2) because it provides visual information about where the measurements were taken. This well run is in Sunflower Valley, an agricultural area. - Configure your pop-up to display relevant information for each feature. Ensure that you select the option to show feature attachments as links.
There is a lot of information available in this dataset. Creating a well-designed pop-up lets the app viewer focus on the important values in the dataset. The pop-up in the app below uses Arcade to show only the No measurement reasons when no measurement is taken (Image 1).

- Set the extent of the map to establish the starting location of the app.
For this app, it would be ideal to show all well locations because there are only 16. This way the audience can see the entire data set. Zoom to the default extent you want and save the map. This is the initial view of the data that will be presented in the app.

Step 2. Pick the template
Once you create the map, Click Share in Map Viewer and click Create a Web App. Select Attachment Viewer as your app.

Step 3. Configure the app
Configure the app with desired options available.
- General
On the general tab (Image 4), select the layer that contains the image attachments and select a field to determine the navigation order of features (A). This provides some context for how users navigate through the features. The onboarding panel provides instructions to the user about how to use the app. You can either use the default instructions or craft your own in a custom onboarding panel (B). By default, the attachment viewer will load the first image available in your dataset. If you want a specific image available when users open the app, enter an image URL (C). On the general tab, you can also modify the title, onboarding button and custom CSS if desired.

Options
The options tab has common map tools that you can include in your map. The map in this app is small, so consider which tools will help improve the understanding of the map and which tools won’t. For this app, I chose to show the zoom controls and legend (when expanded). I also enabled the option for users to download specific images, so they can be included in a report and social sharing. I also enabled the option to display the feature’s address to provide context about the location.
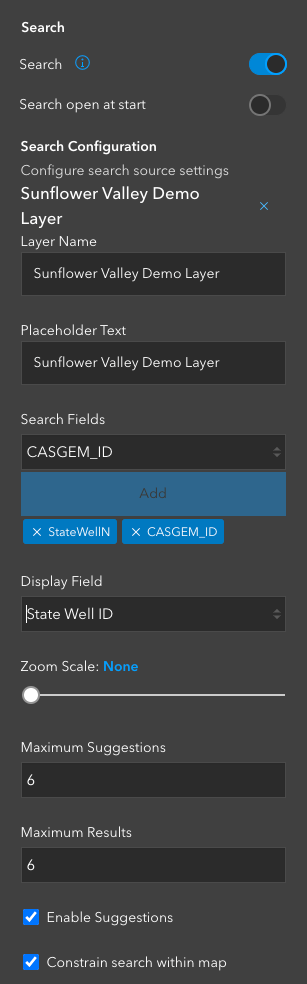
Search
The search tab (Image 5) lets you customize the map search for your needs. If you want users to search for an address in the app, select the World Geocoding Service as a source. For this app, I want my users to search for wells based on their ID, so I configured the search to check for two well ID variables in my layer.
Step 4. Share the app
Once you configure the tools, you’re ready to share the app. Share the app, layer, and map with your desired audience, either within a group or with everyone. The social sharing icons allow you to share the web app with a specific image from a feature displaying by default. As an example, there is a neat image with a rainbow for one of the features. I can easily create a sharable link so others can find the rainbow image without navigating through all the images. Attachment Viewer was built to be viewed on both mobile and desktop browsers. Explore the mobile experience by tapping this link on your mobile device.
Recap:
Attachment Viewer makes it easy to browse through feature layers with image attachments. You can display a variety of data using this configurable app… Just add a map!


Commenting is not enabled for this article.