The 300.0 release of ArcGIS Maps SDKs for Native Apps introduces an array of new functionality across our 3D stack. Alongside the introduction of the new LocalSceneView, this release also delivers a set of targeted enhancements that make working with the existing SceneView faster, smoother, and more capable.
This release introduces support for rendering KmlPhotoOverlay, a new Surface API for efficiently retrieving elevation data, and performance improvements that streamline demanding workflows—such as identifying feature layers in high density datasets. Together, these updates improve user experience while unlocking richer 3D experiences.
Below, we take a closer look at what’s new and how these improvements can benefit your applications.
A quick note: While some of the code snippets below show code from Qt Maps SDK, the principles broadly apply to .NET, Swift, Kotlin, and Flutter Maps SDKs (except KmlPhotoOverlay. Kml support will be added in a future release of the Flutter SDK).
Rendering of KmlPhotoOverlay
SceneView now supports rendering KmlPhotoOverlay when present in a KML document. A KmlPhotoOverlay allows a photograph to be precisely positioned in geographic space, aligning imagery directly with its real‑world location.
This unlocks several practical workflows, including:
- Visually correlating imagery with terrain
- Performing contextual analysis using one or more georeferenced photos
In short, you can now seamlessly integrate spatially accurate KmlPhotoOverlays into your 3D scenes.
Let’s see what this looks like in code.
if (auto *photoOverlay = findPhotoOverlayRecursive(document)) {
    m_sceneView->setViewpointCameraAsync(Camera(photoOverlay->viewpoint().location(),
          photoOverlay->viewpoint().heading(),
          photoOverlay->viewpoint().pitch(),
          photoOverlay->viewpoint().roll()));
    }

KmlPhotoOverlay *PhotoOverlayTest::findPhotoOverlayRecursive(KmlNode *node)
{
    if (!node)
        return nullptr;

    // Found PhotoOverlay. Return it.
    if (node->kmlNodeType() == KmlNodeType::KmlPhotoOverlay)
        return dynamic_cast<KmlPhotoOverlay *>(node);

    // Only container-like nodes have children.
    if (auto *container = dynamic_cast<KmlContainer *>(node)) {
        auto *children = container->childNodesListModel();
        if (!children)
            return nullptr;

        for (int i = 0; i < children->size(); ++i) {
            if (auto *found = findPhotoOverlayRecursive(children->at(i)))
                return found;
        }
    }

    return nullptr;
}

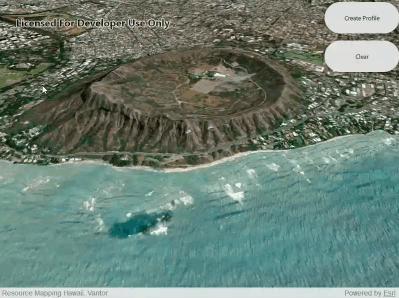
ApplyElevationAsync method on Surface class
Before the 300.0 release, retrieving elevation data required calling getElevationAsync() one point at a time, using the topmost loaded elevation source, and returning the best possible Z value per request. While functional, this approach quickly became inefficient—and cumbersome—when working with multiple points, such as generating an elevation profile along a path.
To address this, we introduced a new Surface API: applyElevationAsync().
In a single operation, this method returns a copy of the geometry with the best possible Z values populated for every vertex. The benefits are immediate:
- A simpler, more expressive API for elevation workflows
- Improved performance through batching
- Order‑of‑magnitude speed improvements in many scenarios
Pro tip: Since applyElevationAsync returns a copy of the input geometry, it might be simpler to use that instead of getElevationAsync even if your workflow involves a single point. Using getElevationAsync, if you need the same point geometry again, you need to reconstruct the point geometry with the returned Z value.
Below is a simple code example, followed by a video demonstrating the performance gains in action.
// create two point geometries
    const Point p1(-157.81576537139006, 21.264810165716789, SpatialReference::wgs84());
    const Point p2(-157.80740661838993, 21.263212689250874, SpatialReference::wgs84());

    // create a polyline using the points from above
    PolylineBuilder *pb = new PolylineBuilder(SpatialReference::wgs84(), this);
    pb->addPoints(QList<Point>() << p1 << p2);
    m_polyline = pb->toPolyline();

    // get a densified polyline with 100 vertices
    const auto densePolyline = static_cast<Polyline>(densifyPolylineGeodetic(m_polyline, 100));

    // call applyElevationAsync using the densified polyline
    auto future
        = m_scene->baseSurface()->applyElevationAsync(densePolyline).then(this, [this](Geometry g) {
              // the returned polyline has a Z value added for each of the 100 vertices.
              const auto densePolylineElev = static_cast<Polyline>(g);
              // use each vertex as your geometry to create an elevation profile...
          });

// function to create a densified polyline
Polyline ElevationProfileTest::densifyPolylineGeodetic(const Polyline& polyline, double numPoints) {

    // determines the distance between each point that will be needed to input into densifyGeodetic() based off NumPoints
    const double incrementalDistance = GeometryEngine::lengthGeodetic(polyline, LinearUnit(LinearUnitId::Meters), GeodeticCurveType::Geodesic) /
                                 (numPoints - m_vertices.size());

    return static_cast<Polyline>((GeometryEngine::densifyGeodetic(polyline, incrementalDistance,
                                            LinearUnit(LinearUnitId::Meters), GeodeticCurveType::Geodesic)));
}
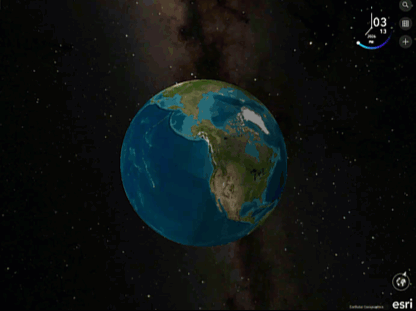
Realistic stars
We made an aesthetic improvement to the SceneView by adding realistic stars to the background. The background responds to date and time changes set on the SceneView. This adds temporal realism to scenes, enabling you to create more context-aware 3D experiences.
The video below demonstrates the visual update and how it responds to the current time of the day.
Performance improvements
Beyond the new features highlighted above, this release delivers meaningful performance gains across the scene and SceneView. These improvements significantly enhance responsiveness and overall user experience. Some of the key performance enhancements are highlighted below
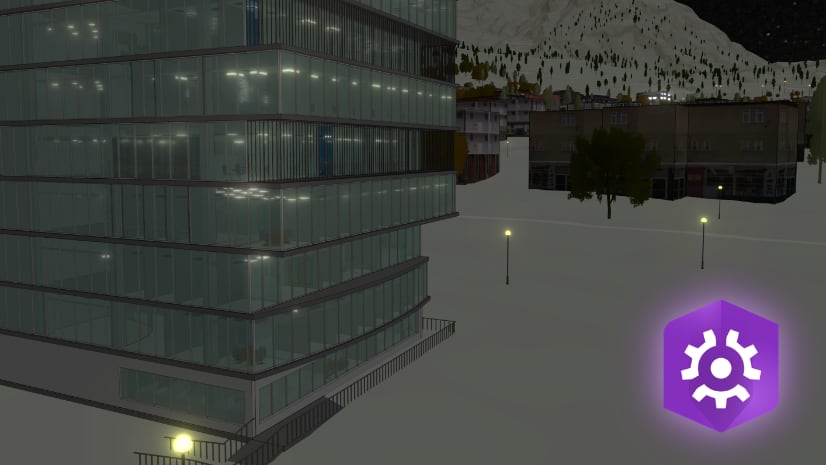
Performance of 3D Tiles layer using the Google Photorealistic Tiles
Support for 3D Tiles has been available for some time, but prior to 300.0, rendering massive datasets—such as Google Photorealistic Tiles—could become a performance bottleneck.
In this release, we made rendering optimizations that greatly improve performance and responsiveness when working with Google Photorealistic 3D Tiles. The result is a noticeably smoother, faster, and more immersive experience, even when visualizing dense, city‑scale data. With these improvements you can now confidently include Google Photorealistic Tiles in your native apps to take advantage of the rich detail they deliver.
The video below highlights this improvement in action.

Faster Identify in Scenes containing Dense FeatureLayers
Identify performance in SceneView has also been significantly improved for scenarios involving very high data density. While the change may be subtle with smaller datasets, the impact becomes clear at scale. In our testing, a scene with over 7 million features across 60 or more layers experienced up to 30% reduction in an identify response and retrieving the popup information across all the layers.
These improvements make Identify more responsive and reliable, helping users interact fluidly with even the most complex 3D scenes.
Conclusion
The 300.0 release reinforces our commitment to making SceneView faster, simpler, and more capable at scale. For you, this means better visual fidelity, simpler elevation workflows, and noticeably faster interactions—even at city scale. These improvements enhance existing SceneView workflows and complement other 300.0 additions, including the new LocalSceneView and BuildingSceneLayer support.
If you’re deciding which view best fits your use case, this blog walks through the key differences and recommended workflows. We’re excited to see the experiences you build with these improvements and look forward to continuing the conversation through your feedback.
If you are ready to put these improvements into practice explore the resources below to start building with the latest SceneView enhancements in Native Maps SDK 300.0.
- 📚 Read the documentation to learn more about the new APIs and updated workflows
- 🧪 Try the samples to see KmlPhotoOverlay rendering
- 💬 Share feedback or ask questions—we’d love to hear how these changes are working for you in our community.
Upgrade to 300.0 and start building faster, more immersive 3D experiences today.

Article Discussion: