In today’s world, the public has higher expectations for information sharing and transparency. Disasters and crises are just one example of where sharing information with the public is critical, especially for effective disaster response. Often, we see agencies share information on current evacuation zones, current incident information, road closures, shelters, and more—in other words, situational awareness information for both the affected and the curious public.
For many years, ArcGIS Web AppBuilder has been the tool of choice for GIS analysts looking to keep the public informed and safe. This has provided a blend of functionality and simplicity for the target audience. Simple layout, search by address capability, about text for communications staff or public information officers, and the ability to share and embed have been key features for this workflow.
As technology has evolved, the demand for information on mobile devices has dramatically increased. Recent updates to ArcGIS Experience Builder are designed to meet these modern challenges. Working with the Experience Builder team, we have put these new updates and lessons learned into practice and created a Public Information Template for Experience Builder, available at arcgis.com/home/item.html?id=b377ede92628415689fc9f1c91de8a4c. In this blog post, we will
- Create a new app using the Public Information Template for Experience Builder.
- Configure the template for use with your own map.
- Orient you on how to further configure this template to meet your needs.
Follow these steps to make your own Public Information app using Experience Builder.
Step 1. Sign in to your ArcGIS account, and open Experience Builder.

Step 2. Create a new app by clicking + Create new within ArcGIS Experience Builder.

Step 3. Browse for the template in ArcGIS Online by clicking the ArcGIS Online tab, and then search for this template by its name, Public Information Template, or by its ArcGIS Online item ID, b377ede92628415689fc9f1c91de8a4c.

Step 4. Explore the template. This Public Information Template is actually three apps in one. There are specific configurations of the app for large-, medium-, and small-screen devices. Click the different screen icons across the top to toggle between the different device pages.
(1) The layout for large-screen devices has sections on the right. This section has three views that each contain different widgets. The Home tab has widgets for bookmarks and legends, a Layers tab where you can turn layers on and off, and a Share tab.
 The layout for large screen devices has sections on the right. This section has three views that each contain different widgets. The home tab has widgets for bookmarks and legends, a layers tab where you can turn layers on an off, as well as a share tab.")
(2) Click the middle screen icon for Edit your page for medium screen devices, and you will see the layout change with buttons for the sections on the bottom right.
 Click on the middle screen icon for Edit your page for medium screen devices and you will the layout change with buttons for the sections on the bottom right.")
(3) Click the screen icon on the right for Edit your page for small screen devices, and you will see the layout change with buttons for the sections along the bottom.
 Click on the screen icon on the right for Edit your page for small screen devices and you will the layout change with buttons for the sections along the bottom.")
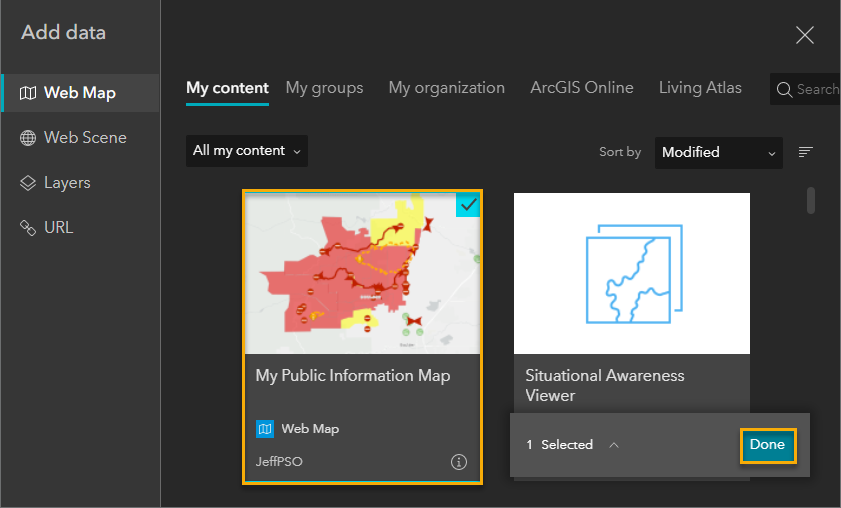
Step 5. Add your web map by clicking the Data tab on the left and clicking + Add data.

Step 6. Browse or search for the web map you’d like to use, and click Done.
Step 7. Configure the app to use your map instead of the default. Click Main Map and then Select map and browse for the web map you just added.

Step 8. Make sure that your web map is the only one selected. Be sure to save.

Step 9. Remove the default map by clicking the ellipses and then Remove.

Step 10. Now that your web map is applied, you can configure the Information window. To do this, click the Page tab on the left, then Window, and then click Information to configure this widget to meet your needs.

This concludes the main steps to configure the Public Information Template for Experience Builder. You can further configure your experience to modify elements like the title, logo, brand, and color, as well as add in any additional widgets.
If you would like to see this new template in action, we have updated the Public Information apps for Esri’s Disaster Response Program (DRP) to use this Public Information Template for Experience Builder. These have been embedded in the DRP Program page as well as hub page for each disaster type. Here are the direct links:
If you would like to learn more about Experience Builder, here are some resources:
- ArcGIS Experience Builder Product Page
- Product Gallery
- ArcGIS Experience Builder Playlist
- ArcGIS Blog: ArcGIS Experience Builder
- Learn Lessons: ArcGIS Experience Builder
This topic will be covered during a webinar on March 1, so please plan to join us! Here is the registration link—esri.com/en-us/lg/product/sharing-public-safety-information-using-arcgis-experience-builder-webinar.

Commenting is not enabled for this article.