ArcGIS Connectors for Microsoft Power Automate offers the integration of GIS operations in a low-code or no-code automation environment. For example, you can create Power Automate flows that do the following:
- Send a notification when a feature layer is updated
- Reverse geocode features in a table
- Retrieve and upload attachments to external systems such as Dynamics 365 and Dataverse
The ArcGIS connectors are available with a premium license to Microsoft Power Automate and are accessible with ArcGIS Online (ArcGIS), ArcGIS Enterprise, and ArcGIS PaaS connections. Learn more about setting up the Enterprise or PaaS connectors.

Create a flow
This blog article will show you how to find and implement ArcGIS capabilities for your Microsoft Power Automate flows. The ArcGIS connectors offer several triggers, or conditions that start a flow, and actions, or tasks that the flow will automatically perform. You can experiment with popular flows by selecting a flow template or create a flow tailored to your needs by making a flow from scratch. Explore either option in the following sections.
Explore templates
ArcGIS Connectors for Power Automate includes several flow templates you can explore from the Power Automate template menu. To browse these templates, complete the following steps:
1. Open Power Automate and sign in with your Microsoft account.
2. From the pane on the left, click Templates.

The template page displays templates from across Power Automate core apps and connectors.
3. Click Search templates and type ArcGIS.
4. Press Enter. A collection of templates will appear that use the ArcGIS connectors, sorted by popularity.
5. Click a template to view its function and integrated apps.
6. To view how the flow is configured, click Continue to see the template in the designer.
Make a custom flow
Microsoft Power Automate allows you to build your own flows in the flow designer. Choose triggers and actions to tailor a flow to your specific organizational needs.
Choose a trigger
Triggers are the conditions needed to start a flow. For example, ArcGIS Connectors for Power Automate offers a trigger that activates a flow when a record is created in a feature layer. To choose a trigger for your flow, complete the following steps:
1. From the Power Automate home page, click Create on the sidebar.
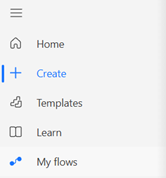
The Create page opens, showing a variety of flow types.
2. To try flows with ArcGIS triggers, select Automated cloud flow. The Build an automated cloud flow window opens.

3. Type a name for your flow.
4. To select an ArcGIS trigger, do one of two actions:
- Type ArcGIS into the search bar under Choose your flow’s trigger and select one of the results. Click Create.
- Click Skip and choose your trigger from the designer. Click Choose a trigger and type ArcGIS into the search bar of the Choose a trigger pane. Select a result.
Most triggers will require you to fill parameters to successfully run. For example, if you choose the When a record is created in a feature layer trigger, the trigger pane will prompt you to provide a feature layer to track. See the ArcGIS Connectors for Power Automate documentation for information on trigger parameters.
5. If necessary, click the trigger in the designer to open the trigger pane, and fill out the required parameters for your flow.
Choose an action
Actions are the tasks that a Power Automate flow performs. For example, ArcGIS Connectors for Power Automate offers an action to automatically retrieve and query data from a feature layer. To choose an action for your flow, complete the following steps:
1. From the Power Automate designer page, click the Insert button below your trigger card.

If no trigger is selected, follow the steps above to choose a trigger for your flow.
2. In the Add an action pane, type ArcGIS into the search bar. Select an ArcGIS action from the results.
Most actions will require you to fill parameters. For example, if you choose the Get data from feature layer action, the action pane will prompt you to provide a feature layer to fetch. See the ArcGIS Connectors for Power Automate documentation for information about action parameters.
3. Once a flow contains both a trigger and an action, check that it works by clicking Test in the header of the designer.

Actions are most useful when strung together. For example, after you have added the Get data from feature layer action to your flow, you can add a SharePoint action to automatically export the data as a .csv file, or add a Teams action that includes the data in a message.
Add notification actions
Notifications in Microsoft Power Automate allow you to stay informed about changes to or alerts for your flows. For example, an organization can receive emails or Microsoft Teams messages when a feature layer is updated. Perhaps most critically, organizations can configure a notification that informs them when a flow fails.
Add a failure notification
Complete the following steps to be notified when your flow fails:
1. From the Power Automate designer page, click the Insert button below your previous card.
2. In the Add an action pane, type Send an email into the search bar.
3. Select the Send an email (V2) action.
The Send an email (V2) pane opens and prompts you to provide the recipients.
4. Provide the following information for the required parameters:
To: Your email address
Subject: Power Automate flow failure
Body: [Your flow name] has failed.
Tip: You can copy the URL of the designer page and paste it in the email body to reopen the flow when you receive a failure message.
5. Click Settings.
6. Find the Run after section, and if necessary, expand Select actions.
7. Select the previous action in your flow.
8. Click the arrow next to the selected action and select Has failed.
9. Deselect Is successful.

10. Click Save.
Your flow will now send you an email if it fails. To condition the flow to notify you of both success and failure, continue on to the following section.
Add a success notification
While it is critical to know when your flow fails, success notifications can also be powerful additions to your automated workflows. Using dynamic content in the body parameter of these messages allows you to provide even more information, such as the name of the user that created a record in a feature layer. Complete the following steps to be notified when your flow succeeds:
1. Click the Insert button below your previous card.
2. In the Add an action pane, type Send an email into the search bar.
3. Select the Send an email (V2) action.
The Send an email (V2) pane opens and prompts you to provide the recipients.
4. Provide the following information for the required parameters:
To: Your email address
Subject: Power Automate flow success
Body: [Your flow name] has successfully run.
5. Click Settings.
6. Find the Run after section, and if necessary, expand Select actions.
7. Select the action in your flow before Send an email (V2), the email action you just created. Unselect Send an email (V2).
Send an email (V2) and Send an email (V2) 1 should now be set to run after the same penultimate action.

The flow will now send you an email notifying you when it succeeds or fails.
Additional resources
For more information on ArcGIS Connectors for Microsoft Power Automate see the following resources:


Article Discussion: