We all know that walking through a park beats a busy road any day – but what if your mobile device knew that too? Well it can with an app built using Flutter Maps SDK! In this blog I’ll walk you through how I prototyped a custom routing mobile app that finds walking routes through urban green spaces instead of just the fastest path.
On my commute to work, I’m often struck by how grey and concrete the route feels. For a city as green as Edinburgh, I wondered – what if my phone could guide me along the greenest walking route instead of the shortest route as usual?
That thought led me to build a custom routing app using ArcGIS Pro to author a custom network dataset and the ArcGIS Maps SDK for Flutter (Flutter Maps SDK) to solve routes (including geocoding for finding origin and destination addresses). Instead of optimizing for speed and directness like with typical routing solutions, it finds alternative walking routes through urban green spaces (which for me optimizes wellbeing and opportunities to enjoy nature)!
Let’s walk through building out this functionality of finding a greener walk together. I’ll show you how a customized network dataset can bring alternative routing options directly to your pocket and help bring an appreciation of nature into the city – often in places you’d never expect!

In this blog I’ll go through the key steps* of how to use ArcGIS Pro combined with the Flutter Maps SDK to build a mobile app capable of routing users preferentially through green spaces. I’ll share how I:
- Authored a customized network dataset capable of routing preferentially through urban green spaces in ArcGIS Pro
- Packaged the network dataset as a mobile map package for use in a Flutter Maps SDK app
- Configured the Flutter Maps SDK app to display routing results
- Enhanced the user experience by adding geocoding functionality
- Enabled users to compare the greenest and shortest walks to optimize their time in green space as they go about their day.
*Note, this is intended as a high-level overview of the key tools, workflows and code rather than a step by step follow-along process. You can check out the Flutter Maps SDK code for this app on my GitHub repo if you want to try it out yourself or use the code for inspiration in your own projects.
Part I – Working in ArcGIS Pro to create network dataset capable of routing through green space
Given that my end goal was to build a Flutter Maps SDK app capable of solving routes, I needed to create a mobile map package (MMPK) containing the customized network dataset that my app would use to calculate routes. I used ArcGIS Pro to author this MMPK, which involved a few steps of importing, cleaning, and managing the data which I’ll summarize below.
First, I created a feature layer containing green space data of Edinburgh as polygons. I sourced this data from various open-source datasets (including parks, trees, the river and the canal) and merged them into a single polygon. Next, I created a feature layer containing routes in Edinburgh (imported as polylines). This was also sourced from open source data, including data on roads and paths. I then added a buffer zone around the green space polygons so that they’d overlap routes to be used for calculating a green score attribute later.
⊕ *Read more on data…
Some important notes on data accuracy here – for the buffer zone addition, this ensures a tree or green space offset from the road/path would still be considered for a greener walk. But on the other hand, it would also mean a small tree behind a wall would be considered even if it wasn’t visible. Another important note here – the polyline data I used for this app wouldn’t be suitable for a production ready app as it doesn’t consider route elevation or check if a route is safe for pedestrians (e.g. if there are pavements, safe crossings etc). It’s intended purely as route inspiration only and for sharing an example of customized routing workflows.

I then split the polylines where they intersected the green space polygon so that the polylines segments were contained either within or outside the green space polygon. Then I created a new field on the polyline feature layer and set a green score attribute to each polyline part – I chose a value of 0.8 for segments within the green space polygon, and 0.5 for the remainder. Through testing different values, I found this range struck the ideal balance of encouraging greener routes without pulling the path too far off course!

I then created a feature dataset from the polylines (required to then create a network dataset, which does the heavy lifting for route analysis and impedance calculations). There are a few steps involved for this crucial step which ultimately underpins the Flutter app’s key functionality:
1. I configured the network dataset with a custom cost attribute (calculated using the green score value). Since I chose a higher score for desirable routes, the way the cost attribute calculations work means that higher score would act as a higher penalty when solving routes. So, to guide the routing engine toward greener paths, I used the formula !length! * (1 – !GreenScore!). This inverts the score so that greener areas (with a higher score) result in a lower cost, making them more attractive to the routing algorithm.
2. Configure travel modes on the network dataset, using the custom cost attribute (“GreenScoreCost”) as impedance. For my app I went for a “WalkGreen” travel mode. I also used a “WalkShortest” travel mode, which used distance as an impedance to find the shortest route.
3. Create a route analysis layer to solve for routes to check it worked as it should.
4. Create a mobile map package (MMPK) containing the network dataset, green space polygon (for displaying in the app), and basemap (for giving context in the app).
Part II – Calculate routes in the app built with Flutter Maps SDK
Now that I had the MMPK, it was time to bring it into my app. MMPKs can be loaded easily by the Flutter Maps SDK (and any of the Native Maps SDKs for that matter) and in my app’s case, can be used to display the basemap, green space feature layer, and solve routes using the network dataset. The MMPK can also be used offline, meaning if you didn’t have network signal in the city (unlikely but possible!) the app would still work.
Once I had the MMPK downloaded to my device, I used the following code to load it.
final mmpk = MobileMapPackage.withFileUri(mmpkFile.uri);
await mmpk.load();
The MMPK contains the basemap* and feature layer as operational layers, and the network dataset as a transportation network dataset. Using the following code, I created a route task with the transportation network dataset and loaded it to access the travel modes (via the route task info) that I set up in ArcGIS Pro.
*I customized the basemap for this app using the ArcGIS Vector Tile Style Editor to match my app’s green theme.
final dataset = _map.transportationNetworks.first;
_routeTask = RouteTask.withDataset(dataset);

await _routeTask!.load();
final routeTaskInfo = _routeTask!.getRouteTaskInfo();

final travelModes = routeTaskInfo.travelModes;

_walkingGreenMode = travelModes.firstWhere(
  (mode) => mode.name == "WalkGreen",
);
_walkingShortestMode = travelModes.firstWhere(
   mode) => mode.name == "WalkShortest",
);
I then created default parameters for the route task for each travel mode and used the parameters to solve the route using the following code, along with displaying the result on the map as a graphic:
shortestParams.travelMode = _walkingShortestMode!;
final shortestResult = await _routeTask!.solveRoute(shortestParams);
final shortestRoute = shortestResult.routes.first;
 final routeGeometry = shortestRoute.routeGeometry;
  _shortestRouteOverlay?.graphics.add(Graphic(geometry: routeGeometry));
Adding a geocoding element to the app
I mentioned before about the offline capabilities of an MMPK. At this stage of my app development, the workflow can be used fully offline if the user has a good understanding of Edinburgh. They could tap anywhere on the map to solve a route between two points without the need for a mobile connection. However, for this app, since the intended use is as inspiration for navigating within a city before leaving home or in a central location, it is likely they’d have access to the internet (and maybe they don’t know Edinburgh like the back of their hand). I therefore wanted to build in functionality to give the user a full routing experience including being able to find addresses. I added geocoding and reverse geocoding functionality, so that a user can either type in the address they want to travel from or to, or so that if they tapped the screen, they could see what the address was.
I used the ArcGIS Geocoding service URI to create a locator task:
final _worldLocatorTask = LocatorTask.withUri(
  Uri.parse(
    'https://geocode-api.arcgis.com/arcgis/rest/services/World/GeocodeServer',
  ),
);
For reverse geocoding (that is, when a user taps a location on the map and the address of that location is returned), after loading the locator task, I used the following code to retrieve the address:
final reverseGeocodeResult = await _worldLocatorTask.reverseGeocode(
  location: location,
  parameters: ReverseGeocodeParameters()..maxResults = 1,
);
For the geocoding (where the user types in an address to a text field and the location is displayed on the map), I created new GeocodeParameters, ensuring only results from within Great Britain and from within the searchArea (feature layer extent) were returned.
final params =
    GeocodeParameters()
      ..countryCode = 'GBR'
      ..searchArea = searchArea;
final geocodeResults = await locatorTask.geocode(
  searchText: address,
  parameters: params,
);
final location = geocodeResults.first.displayLocation;
I also used the suggestions part of the geocoding API to autopopulate results as a user types an address:
final results = await locatorTask.suggest(
  searchText: query,
  parameters: params,
);

Part III – Creating widgets with Flutter to enhance the user experience
Creating custom reusable Flutter widgets made building a simple user interface for this app easy. To handle the three key UI elements (search box, route information and floating action buttons) I created the following custom widgets:
- For the location search boxes, I wrapped a TextField (built-in Flutter widget) to provide user-friendly text input fields. Part of this widget was also built upon Flutter’s ListView builder to display the geocoding suggestions.
- To display each route summary, I built on Flutter’s built-in widgets like Row, Icon, and Text to create a reuseable interactive UI component. This component included info on how long and how far it would take to walk, and how green the route was. When a route summary is pressed, the relevant route graphic is centred and highlighted on the map.
- Finally, to display the floating action buttons on top of the map view, I created an action buttons panel widget built on Flutter’s IconButton widget. This widget provides interactive buttons for the user to edit marker locations, reset the map, and show map information.
Part IV – The fun part of sharing results!
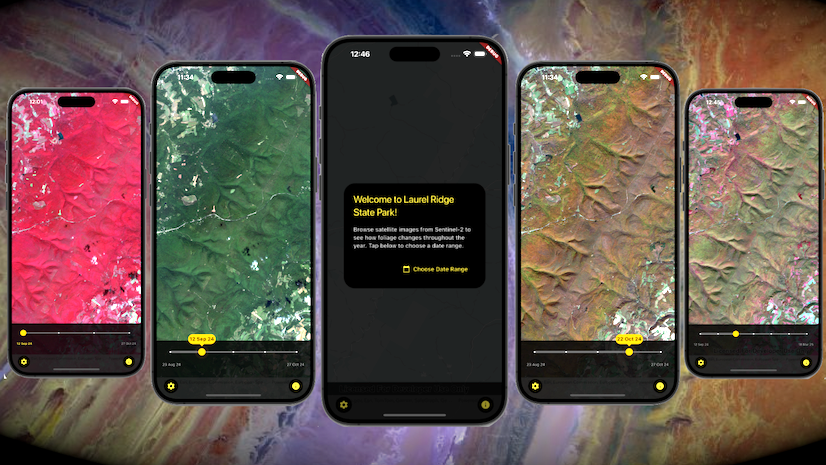
I really enjoyed seeing new routes spring up all over the city for my usual walks – and found it interesting to find areas where no optimal greener route was found, either because it was already very green, or because green space was just too far away. There are also areas where a much greener walk is available with only a few minutes walking difference. Here are some screenshots of my favorite results of greener walks around Edinburgh!

By authoring a network dataset in ArcGIS Pro and using four key classes (mobile map package, transportation network dataset, route task and locator task) I was able to use the Flutter Maps SDK to build an app I can use to help me find greener walking routes through the city and enjoy more time surrounded by nature than concrete.
Conclusions
This app combines geospatial datasets, customized routing, and mobile app development to inspire users to find greener routes while walking in Edinburgh. Being in nature and green spaces is so good for our well-being and mental health – just having a small change to a walk to add more green time can reap larger benefits across the day. Maybe you’ll see a squirrel, hear birdsong, admire the knotted textures of tree bark, or breathe in the fragrant scent of lime trees on a summer’s day. All far better than walking on a concrete pavement by a tarmacked road with heavy traffic!
Sadly my app didn’t help me find an alternative greener route to work without going wildly off track – however it has inspired me to find new greener walking routes at lunch time and to appreciate what green space Edinburgh does have (a lot!).
Where next?
The example I’ve given in this blog of building a custom router using green space can be extended or as adapted as far as your imagination goes. You could, for example, further tweak the input feature layer to weight trees over grass, or wildflower meadows over golf courses. You could also use different data sets to prioritize walking routes that prefer less elevation gains for accessibility or that prefer high elevation gains for fitness and training. It could also be adapted for avoiding polluted streets (and fed into live data sources for that), or for tourists to route through the most historical areas in a city).
Being able to author customized routing solutions is a powerful tool. While ArcGIS Pro is required to build network datasets, software developers can work with them directly via published mobile map packages or online routing services with no authoring required on their part. By combining these ready-made geospatial resources with app development skills, developers using Native Maps SDKs can create mobile apps that quietly deliver powerful spatial intelligence direct to people’s pockets.
If you’d like to learn more about some of the workflows explored in this blog, check out the following resources:
- Check out the code I used to build the app on GitHub.
- What is a network dataset?
- Publish custom routing services
- Mobile map packages in Flutter Maps SDK
- Geocoding in Flutter Maps SDK
- Routing in Flutter Maps SDK


Commenting is not enabled for this article.