ArcGIS Urban allows you to efficiently build out scenarios with different building layouts. In Urban, buildings consist of space-use types. A space-use type describes the usage of space within a building. In this blog post I will show you how you can use residential space-use types to evaluate the density of dwelling units as you consider updates to zoning codes.
A dwelling unit can be defined as a building or part of a building that is home to an individual household. While a single-family house is considered one dwelling unit, a multi-family building contains multiple dwelling units.
By following the steps outlined ahead, you will learn how to:
- Create a residential space-use type
- Develop a neighborhood with single-family houses
- Use and report on dwelling units in multi-family buildings
If you need access to ArcGIS Urban, you can try Urban free for 21-days.
Create a residential space-use type
A residential space-use type is the cornerstone for working with dwelling units. Let me show you how you can create such a space-use type:
- Create a new plan in your Urban Model.
- Click the name of the plan and select Configure plan to open the settings.
- Click the Types tab and select Space use types.
- Click Add at the upper right part of the screen and select Single item in the drop-down.
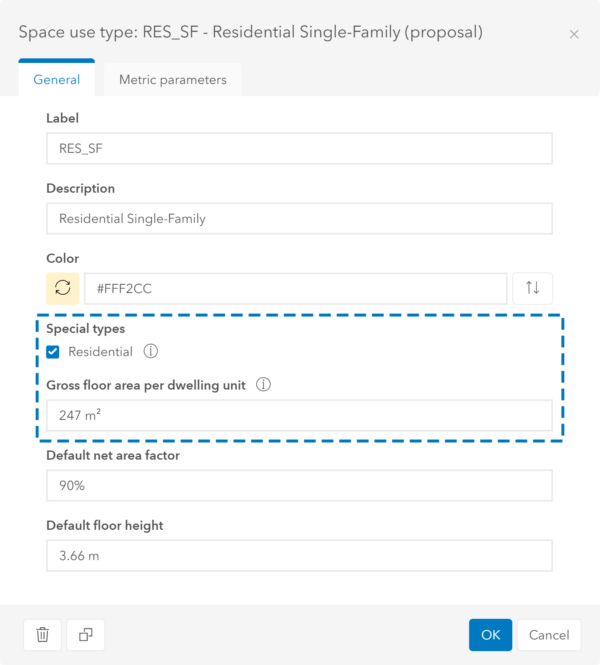
This opens the dialog to add a new space-use type. - Provide a label, description and color. You can keep the default values for the net area factor and the floor height in this example.
- Check the Residential checkbox in the Special types This defines the space-use type as residential.
- Set the Gross floor area per dwelling unit which defines the total size of a dwelling unit from wall to wall including corridors, storage rooms, etc. In my example below I used 247 m2 (approx. 2660 sqft).
- Click OK to save the space-use type. Click the little arrow at the top left to go back to the plan editor.
Develop a neighborhood with single-family housing
Some zoning plans include areas that are designated for single-family detached homes. Are you eager to learn how Urban enables you to make changes to zoning and test different development scenarios for a new single-family neighborhood? Then read on.
Create a dwelling unit building type
First, we have to create a dwelling unit building type that represents our single-family building. The dwelling unit building type allows you to build multiple single-family houses across a larger area.
- Click the name of the plan and select Configure plan to open the settings.
- Click the Types tab and select Building types.
- Click Add at the upper right part of the screen and select Single item in the drop-down.
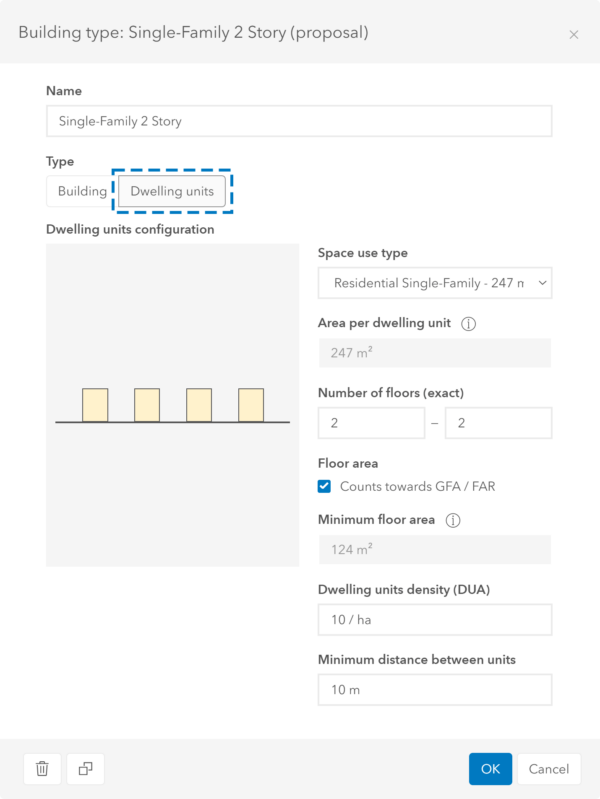
This opens up the dialog to add a new building type. - Provide a name for the building type, for example “Single-Family 2 Story”.
- Select the Dwelling units building type.
- Click the plus button in the dwelling units configuration on the left side.
- In the Space use type drop-down list, select the residential space-use type that we created in the first section of this blog.
- Set the number of floors to “2 – 2” to make sure that the buildings always have exactly 2 floors. This also adjusts the Minimum floor area accordingly as shown in the dialog.
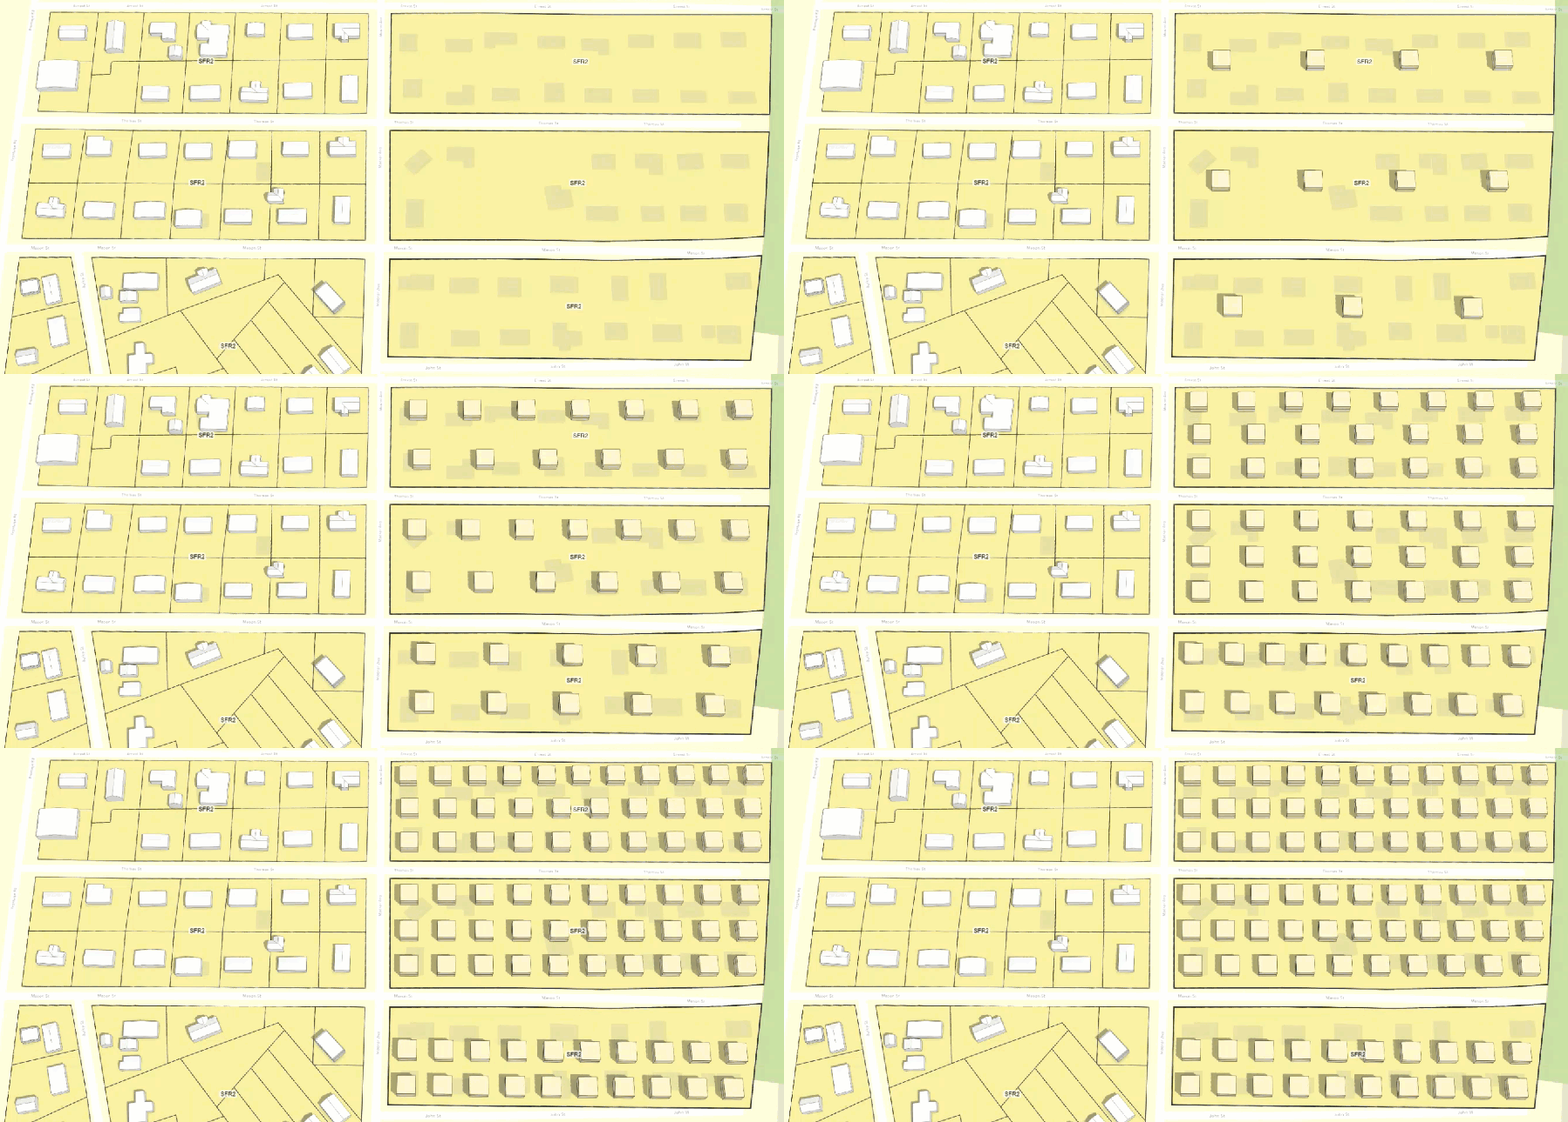
- Set the Dwelling units density according to the zoning regulations or your design idea. A higher density will place more units on your lot by building them closer together. In my example I used 10 units/ha (approx. 4 units/acre).
- Set the Minimum distance between units according to the zoning regulations or your design idea. In my example I used 10 m (approx. 33 ft). If you set the distance to 0, the buildings will be built attached to each other. Else, the buildings will be distributed evenly.
- Click OK to save the building type. Click the little arrow at the top left to go back to the plan editor.
Develop single-family houses
Now, we are ready to develop our single-family neighborhood:
- In the plan editor, select the Development mode in the top right.
- Draw a parcel that covers the whole area where you want to build single-family buildings using the Edit geometry tool.
- Select the parcel.
- Click Modify in the panel on the right side and select Apply building type.
- Find the “Single-Family 2 Story” building type you just created and select it.
This distributes multiple, evenly distributed square single family units within the parcel.
Use dwelling units in multi-family buildings
The use of residential space-use types to work with dwelling units is not restricted to single-family houses. In Urban, you can also work with dwelling units in the context of multi-family buildings.
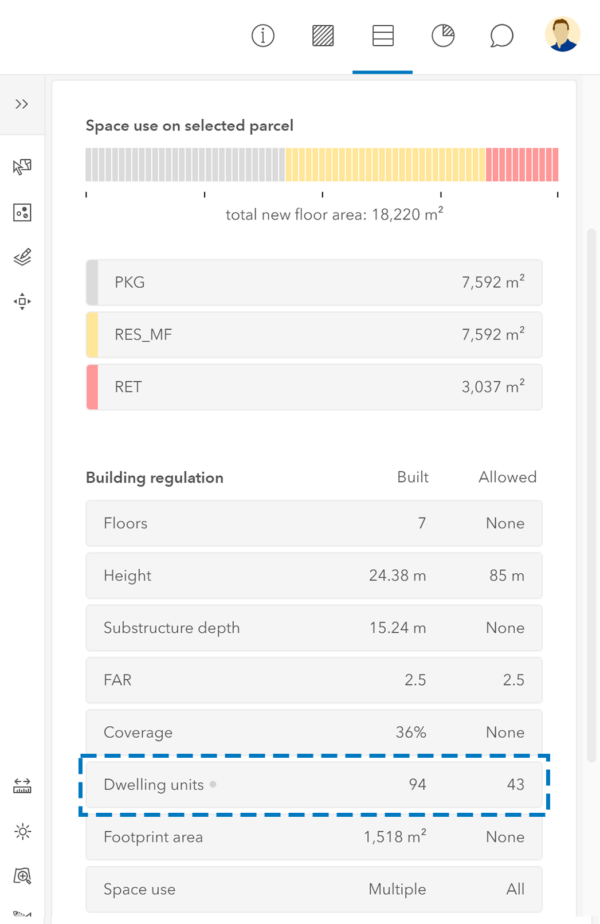
In this case, the floor area per dwelling unit does not drive the design of the building. Instead, setting the size of individual dwelling units allows you to report on the number of built units and to validate this against the zoning regulations in your city.
In this section we will plan a mixed use area with multi-family buildings. Since the city’s zoning code restricts the allowed number of dwelling units, we need to make sure that our design does not violate this limit.
Create and assign a zoning type
We need to make sure that the city’s zoning restriction on dwelling units is implemented in Urban. Let’s start by creating a zoning type:
- Click the name of the plan and select Configure plan to open the settings.
- Click the Types tab and select Zoning types.
- Click Add at the upper right part of the screen and select Single item in the drop-down.
This opens up the dialog to add a new zoning type. - Provide at least a label and description for your zoning type. In my example, I used “MFR” as a label and “Multi Family Residential” as a description.
- Set the Maximum dwelling units density according to your city’s zoning regulation. In my example I used 100 units/ha (approx. 40 units/acre). In this example, you can keep the default values for all other settings.
- Click OK to save the zoning type. Click the little arrow at the top left to go back to the plan editor.
Now we can use that zoning type in our plan:
- In the plan editor, select the Zoning mode in the top right.
- Select the zone covering the area where you want to build multi-family buildings.
If you don’t have a zone in your plan yet, you can draw one using the Edit geometry tool in the right side panel. - Click Modify in the panel on the right side.
- Find the “Multi Family Residential” zoning type you created before and select it.
Create and assign a multi-family building type
Next, we have to create a building type that represents our multi-family building:
- Click the name of the plan and select Configure plan to open the settings.
- Click the Types tab and select Building types.
- Click Add at the upper right part of the screen and select Single item in the drop-down.
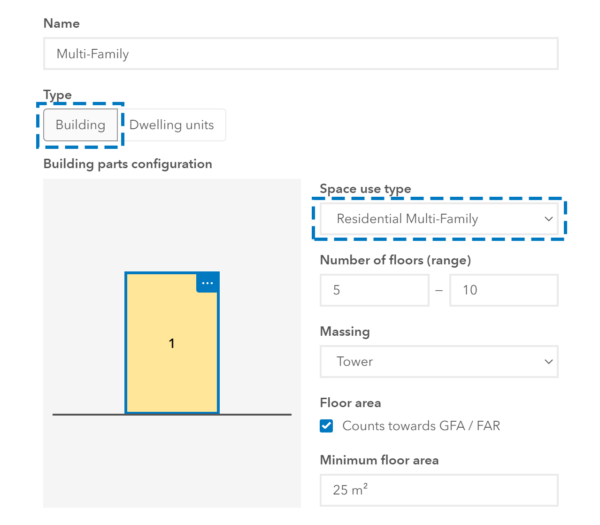
This opens up the dialog to add a new building type. - Provide a name for the building type, for example “Multi-Family”.
- Select Building as a type.
- Click the plus button in the building parts configuration on the left side.
- In the Space use type drop-down list, select a residential space-use type. You can use the space-use type that we created in the first section of this blog.
- Set the number of floors of the building to make sure that the building includes more than one floor. In my example, I used “5-10” floors. In this example, you can keep the default values for all other settings.
- Click OK to save the building type. Click the little arrow at the top left to go back to the plan editor.
Now, we are ready to develop some parcels with our multi-family building type:
- In the plan editor, select the Development mode in the top right.
- Select the parcels you want to develop.
If you don’t have any parcels in your plan yet, you can draw some using the Edit geometry tool in the right side panel. - Click Modify in the panel on the right side and select Apply building type.
- Find the “Multi-Family” building type you created before and select it.
Validate the design against zoning regulations
As a final step, we want to check if the building complies with the zoning regulation:
- Select one of the parcels you developed before.
- In the Building regulation section of the side panel, check the values for built and allowed number of dwelling units. If the built number of units exceeds the regulation, this is indicated with a warning.
Key takeaways
Residential space-use types are the basis to work with dwelling units in ArcGIS Urban. In this article I showed you how to set up a residential space-use type, how to develop multiple single-family housings using a dwelling unit building type and how to use dwelling units in multi-family buildings.
Additional Resources
- Register for our Upcoming Webinars
- Visit the ArcGIS Urban Overview Page
- Review the ArcGIS Urban offering page
- Join our LinkedIn ArcGIS Urban User Group
- Join our ArcGIS Urban Esri Community
- Read more ArcGIS Urban blog articles on ArcGIS Blog
- Follow ArcGIS Urban on Twitter
- Visit the ArcGIS Urban Resources page
- Schedule a Demo
- Request a Trial


Article Discussion: