
If your workflows involve web requests, you may be using the Send Web Request step we introduced with ArcGIS Workflow Manager 10.9.1. The step is flexible across many use cases and allows you to send a request to a web resource with custom parameters and authorization options. If you’re unfamiliar with the step, you can check out our previous blog for an in-depth description. With ArcGIS Workflow Manager 11.0, we’ve made some enhancements to the step that will further streamline your experience.
Whether you’re interacting with 3rd party resources or services within your Enterprise site, generating access tokens is a common way to authenticate your web requests. To make this easier, you now have the option to automatically generate a token when you run your Send Web Request step. This means you no longer need to configure a separate step to generate the token or take the security risk of storing a token for a long period of time. Instead, you can simply generate a short-term token and send the web request in the same step.
Configuring a web request can also be difficult if you aren’t able to test it and see if it works. Rather than switch to the Work page and create a new job solely for testing, you can now test your web request while configuring the step. This ability allows you to quickly resolve issues and make improvements without having to move between sections of the Workflow Manager webapp.
Let’s take a look at these enhancements by setting up and testing a web request to query a feature layer from our Enterprise site. I’ll be using the SampleWorldCities feature service that comes with ArcGIS Server, but feel free to substitute any available feature layer you would like to use. As you saw in our previous blog, the options for 3rd party integrations are endless with this step, but we’ll use an internal feature service as a readily available example.
First, we’ll configure a Send Web Request Step with the REST endpoint and parameters shown below. If you don’t have the SampleWorldCities feature service, you can use the query resource on any feature layer in your Enterprise site.
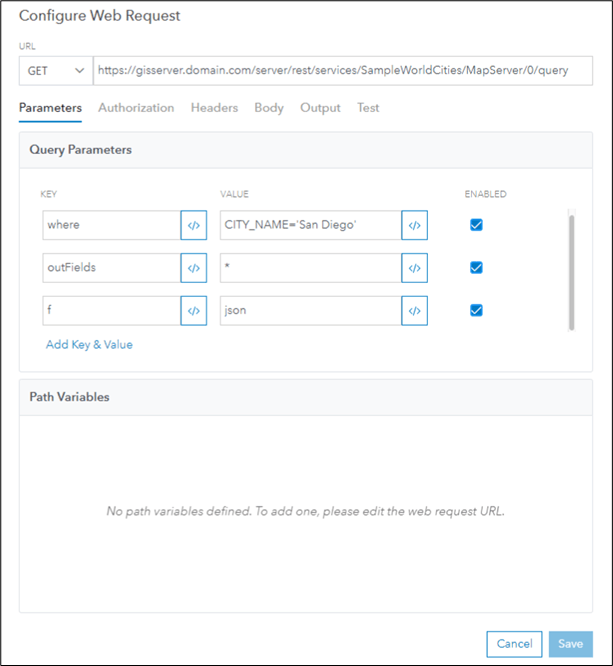
Automatically generate tokens
Now, let’s configure our step to generate an access token automatically. From the Configure Web Request dialog, we’ll navigate to the Authorization tab and select the Bearer Token option. Under the Token input, there is now an option to generate a token from an endpoint.
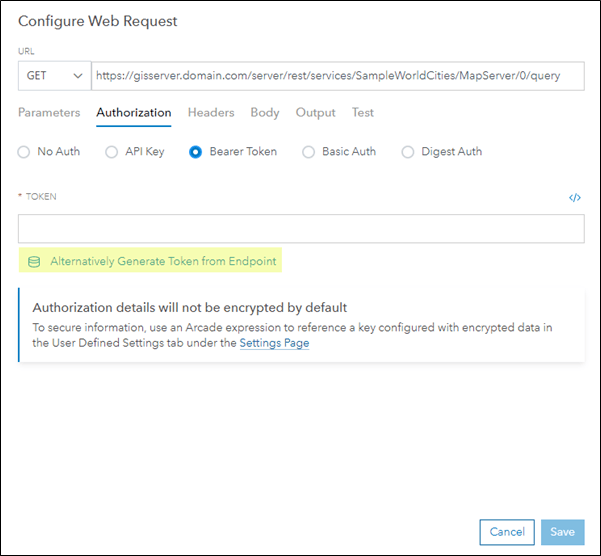
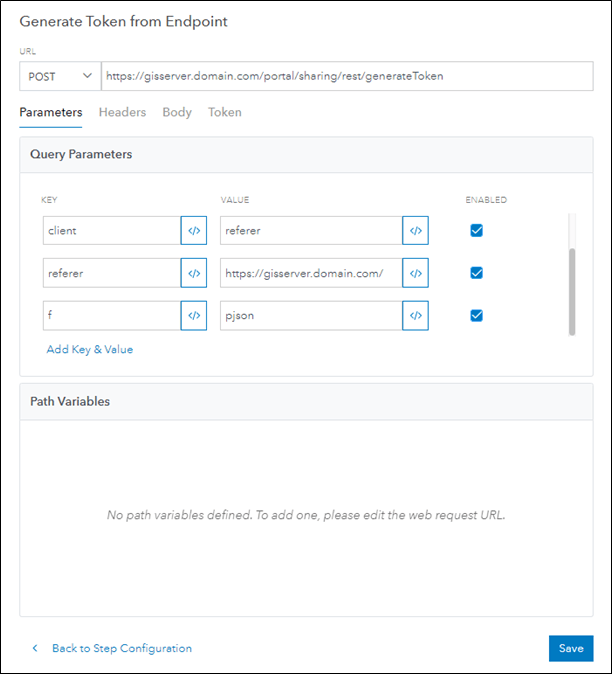
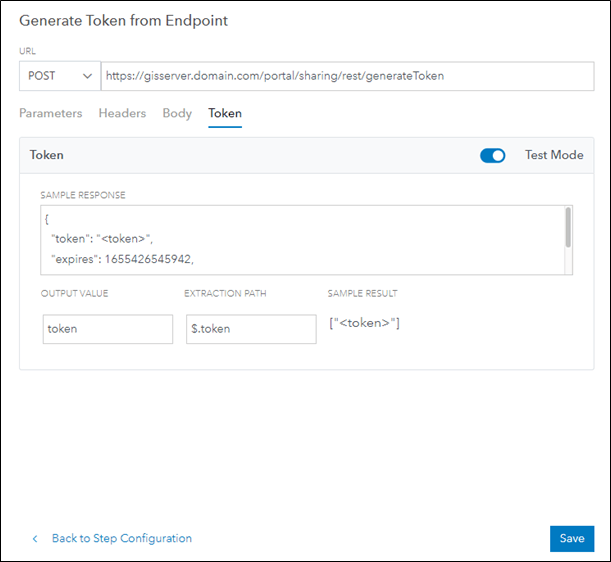
When we select the option under the Token text box, the Generate Token from Endpoint dialog opens. Configuring this option follows a similar process to configuring the Send Web Request step itself. First, we’ll enter the URL for your ArcGIS Enterprise site’s generateToken REST endpoint. Then, we’ll add the expiration, client, referer, and f (format) parameters to the Query Parameters section. For the format parameter, we must enter either json or pjson to ensure that the generateToken endpoint returns a JSON object from which we can extract the token. Remember that we aren’t limited to the Generate Token endpoint in ArcGIS Enterprise – this feature is also compatible with any 3rd party endpoint that generates access tokens.
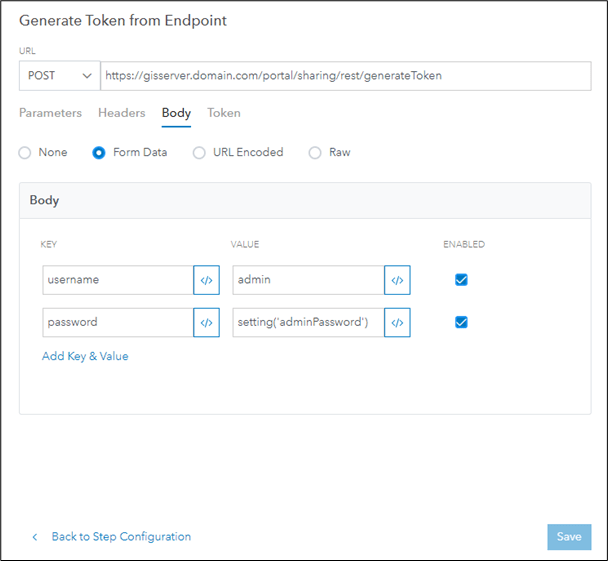
Next, we’ll add the username and password parameters to the request Body. We can protect the password or any other parameter by storing it as an encrypted User-Defined Setting, then querying the value using the setting() Arcade expression.
Finally, we’ll enter a JSONPath which the step will use to find the token in the REST response. Under the Token tab, we can enter the name of our output value and the extraction path (in this case $.token). Optionally, we can also enable Test Mode and enter a sample response from our generateToken endpoint. The sample result will appear next to our extraction path so we can verify that it works.
Test web requests from the Diagrams page
We can test our web request in the Configure Web Request dialog by selecting Test Response under the Test tab. The results will appear below.
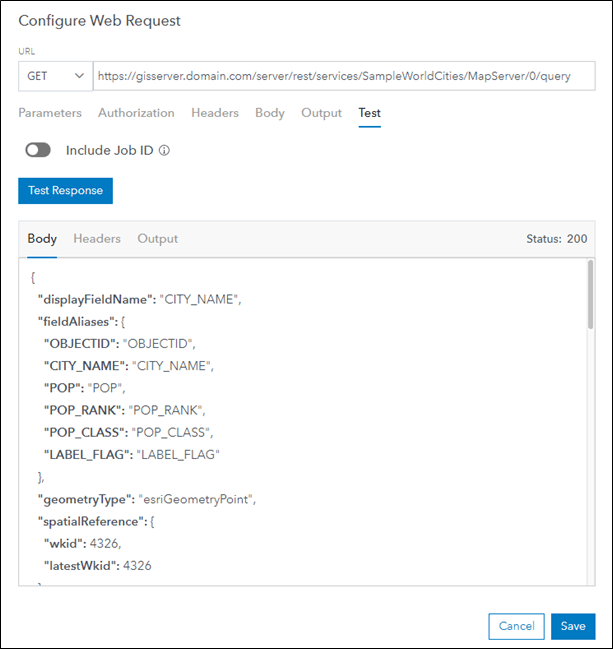
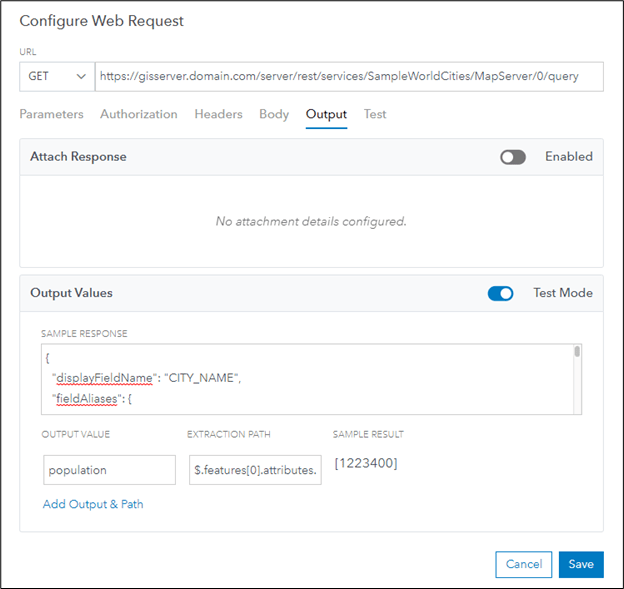
We can use this response to help us set up an output value for the step. Under the Output tab, we can configure an output value by entering a name and extraction path. With Test Mode enabled, we can also attach our sample response to verify that our extraction path worked, like how we tested our generateToken response. For the SampleWorldCities feature service, we can use the JSONPath $.features[0].attributes.POP to extract a queried city’s population.
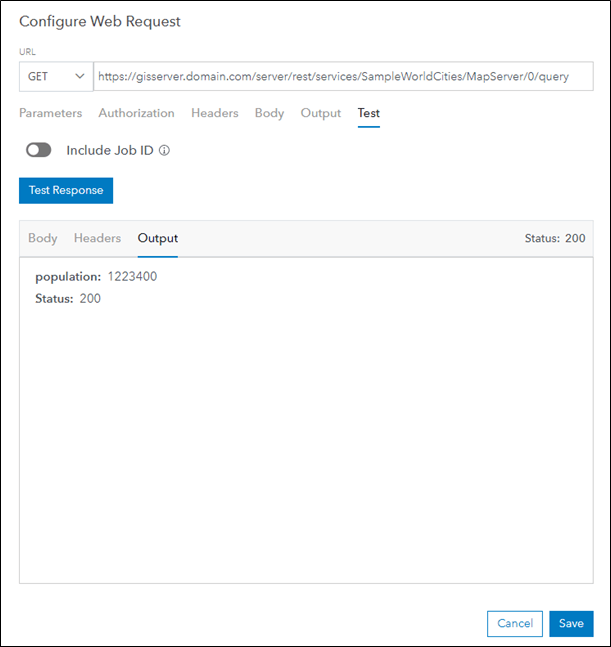
Now, let’s return to the Test tab and generate another sample response. The output value we have configured will now appear under Output. We’ve confirmed that this output value is now ready to use in other steps in our workflow.
With automatic token generation and the Test feature, configuring your Send Web Request steps just got a lot easier. We’ve covered the basics here to get you started with these new capabilities, and we hope you’ll appreciate how they improve the powerful functionality the Send Web Request already provides! If you have questions or would like to learn more about Workflow Manager, feel free to check out the resources below.
Learn More
- Learn more about the Send Web Request Step
- Connect with the ArcGIS Workflow Manager Community
- Learn more on the ArcGIS Workflow Manager product page
- Check out the Workflow Manager Learning Plan on Esri Academy
- Access Workflow Manager documentation
- Check out the Workflow Manager Getting Started video on YouTube

Article Discussion: