Did you know that, with the 10.9.1 release of ArcGIS Workflow Manager Server, you can now seamlessly integrate with your third-party systems like Jira, Cityworks, and Maximo through their REST APIs? With the introduction of the Send Web Request step, your organization can send and extract information from a third-party system and use that information to update and drive workflows.
Update: With the 11.1 release of ArcGIS Workflow Manager, Web Request Templates can be used in combination with job activities to automatically send web requests to REST endpoints when specific job activities are performed. These templates follow the same configuration pattern as the Send Web Request step.
The Send Web Request step is extremely powerful:
- It provides additional flexibility, speed, and ease of use in configuring your organizational workflows.
- It reduces the need for custom scripts and tools that need to be maintained over time.
- It helps automate information gathering and data entry from third- party systems into your workflows (or vice versa).
- It facilitates workflow automation.
Here are some real-world use cases to help you understand how to take advantage of this new functionality in your workflows:
- Your organization uses Cityworks for asset management, and service requests and work orders need to be kept in sync as your Workflow Manager job progresses. You can use output values from previous steps in your workflow as inputs in the Send Web Request step to update the information in the Service Requests and Work Orders using the Cityworks API.
- Your organization has been tasked with adding fire hydrants to a hydrants layer for a new subdivision. After reviewing the edits in a web application, you need to reconcile the branch versioned data. Instead of having to create a custom geoprocessing service, you can use the Send Web Request step to call the Version Management Service REST endpoint directly to reconcile the branch versioned data.
- Your organization has been tasked with digitizing plat files into GIS data for a new subdivision. Since the plat files are accessible via a third-party API, you can use the Send Web Request step to download a plat file as part of the workflow to update the GIS data.
In the first use case, output values from previous steps in the workflow were sent through the Send Web Request step to update a third-party system. In the second use case a custom tool was no longer necessary to reconcile branch versioned data which reduced complexity and the management of a custom tool. Finally, in the third use case, a request was sent to a third-party system to download a file that is required to be able to perform a task in the workflow.
Now that you have a better understanding of how the Send Web Request step can be used in your workflows, let’s go over how to configure the step. In our example, we’ll send a request to the Cityworks API to create a new service request in Cityworks. We’ll also go over some tips and tricks to help you configure the step for your workflows. If you’re already familiar with web requests, you can jump to the output section to learn more about the step’s output values and file attachment options.
Send Web Request basics
If you’ve never worked with REST endpoints, configuring the Send Web Request step may seem complicated. Let’s look at each section of the step’s configuration and learn more about how they work.
URL
Each REST endpoint in an API allows you to perform a specific operation and is accessed through a URL. In our example, we are using the Cityworks API which uses URLs specific to your deployment.
https://machine.cityworks.com/environmentname
Request method
Each API request uses an HTTP method to send or retrieve data. In our example use case, we’ll use the POST request method to send data to the Cityworks API to create a service request. The following table lists each of the HTTP methods and a description of how they can be used:
| HTTP Method | Description |
| GET | Read or retrieve data |
| POST | Create data |
| PUT | Update data |
| DELETE | Delete data |
| HEAD | Read or retrieve data, without the message-body in the response |
| PATCH | Modify data, generally creating new data |
| OPTIONS | Request permitted communication options for the given URL |
Query parameters
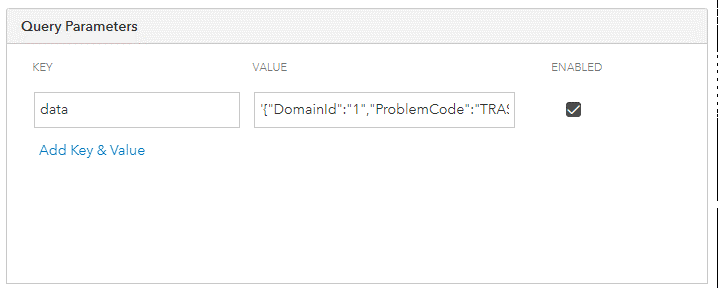
Query parameters are appended to the endpoint’s URL and are used to provide data or determine an action that needs to be performed based on the data being delivered. These parameters are optional key-value pairs that appear after the question mark (?) in the URL. When more than one parameter is included in the URL, they are separated by an ampersand (&) character. The following is an example of what a Cityworks URL might look like with query parameters:
In this example URL, ProblemSid and ProblemCode are the query parameters used to create a service request in Cityworks.
Path Variables
Path variables allow dynamic values to be inserted into parts of the path in the URL. The Cityworks API doesn’t use path variables, however, an example of where you might need to use this would be when the URL requires a unique value to be provided, such as an attachment ID or a help desk ticket ID.
Authorization
Most APIs require authorization to access data. The Send Web Request step supports the following authorization methods:
| Authorization Type | Description |
| No Auth | No authorization is required to access |
| API Key | A key-value pair is used for authorization |
| Bearer Token | A token (or access key) is used for authorization |
| Basic Auth | A verified username and password are used for authorization |
| Digest Auth | An array of data, including a username and password, are used for authorization |
| Federated Token | Use the federated token of the user performing the step. Only compatible with services published to the same Enterprise as Workflow Manager. |
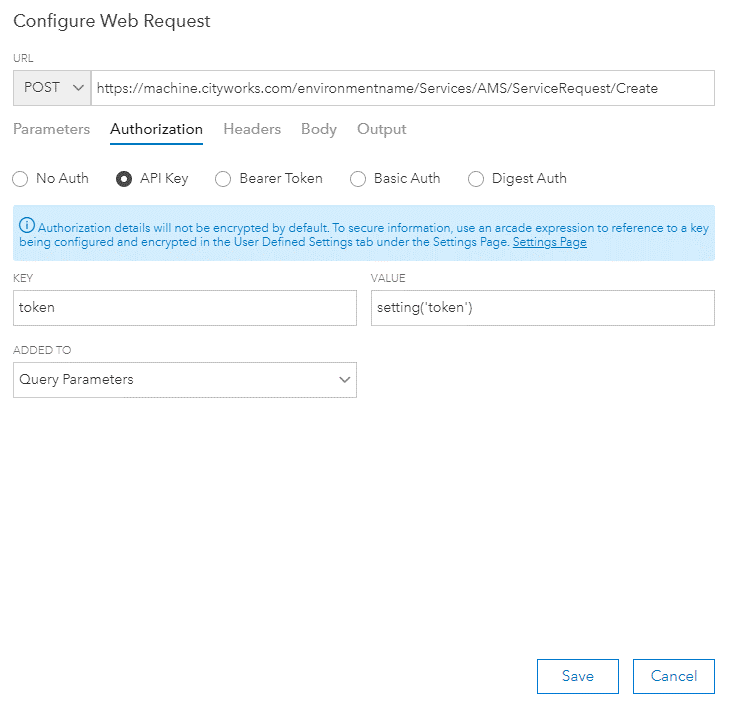
Cityworks uses a token for authentication that is passed to the API as a query parameter, so, we’ll use the API Key authorization method. To keep the token secure, it’s always a good idea to store it as a user defined setting and encrypt it.

We can then use an ArcGIS Arcade expression in the Value text box to retrieve the token in the Send Web Request step as shown below.
Headers
API headers contain the metadata associated with an API request and response. For the Send Web Request step, this section is used to specify custom headers that you want to append to a request to filter data returned by the request or add additional information to the request. Standard headers for an API request are appended by default.
Body
A request body is used when adding or updating data via the request. The request body is typically used for endpoints that use the POST, PUT, or PATCH HTTP method. In our example use case, the data being used to create the service request is passed to the API as a query parameter rather than the request body.
| Body Type | Description |
| None | No body is required with the request |
| Form Data | A key-value pair is used to send information |
| URL Encoded | A key-value pair is used to send encoded information |
| Raw | Data that can be entered as text |
Output
The Output tab of the Send Web Request step allows you to specify if you would want the response to be stored in the job as a file attachment and configure output values for information that you want to store from the response. The Output tab is only accessible with the optional ArcGIS Workflow Manager Server Advanced role which includes functionality for automating workflows.
If you enable Attach Response, you are presented with options that allow you to specify a folder in which to store the attachment and options for naming the file. Leaving the Folder Name text box blank will add the attachment to the job’s General folder by default. If you are using the Send Web Request step to download an attachment from a third-party system, the attachment name will be the file name provided by the system. Optionally, you can provide a custom name for file attachments. When the Autogenerated option is chosen the file name will be generated using the following syntax “<stepname>_<date>_<time>”.

Output values allow you to store specific information from the response and use that information to guide the workflow, update the job’s extended properties, or communicated to others in your organization. In the step configuration, you can enter a name for the output value and an extraction path to pull the specific data you would like to use. The extraction path uses JSONPath syntax.
For example, we can store the request ID of the newly created service request so that we can email it to others in the organization.
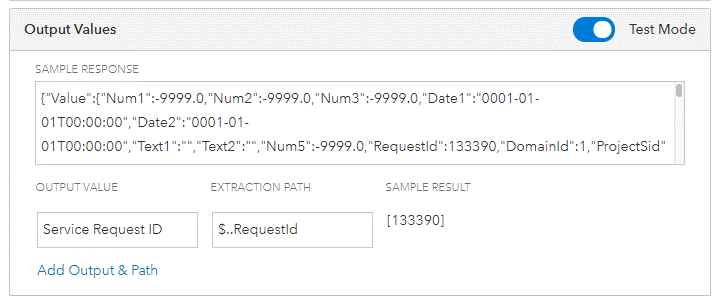
Lastly, the output value section has a test mode that allows you to provide a sample of the endpoint’s response so that you can test your extraction paths ahead of time.
Running the Send Web Request Step
With the step properly configured, you can now run it as part of a job. In our workflow, the job is being created by the submission of a Survey123 survey by a citizen that reported a trash problem. We need to review the submission to ensure that it’s valid, then we will use the submitted fields from the survey as inputs in the Send Web Request step to create the proper type of service request in Cityworks that includes the location of where the issue was reported.
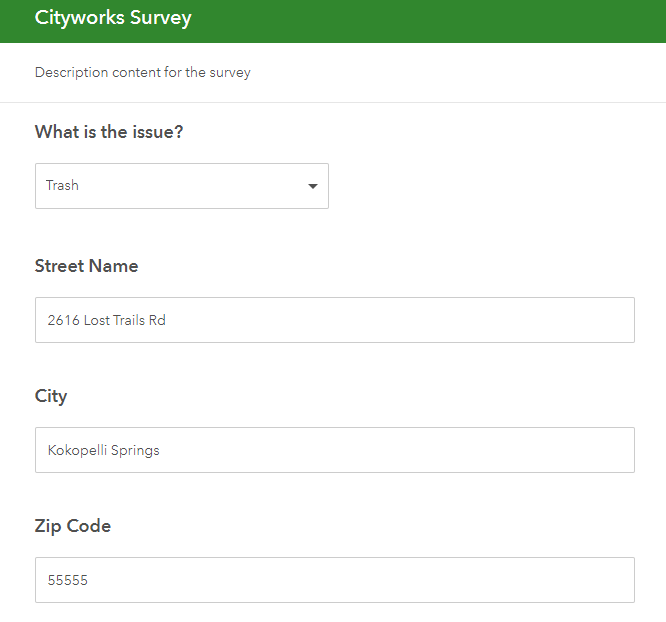
Once the citizen submits the survey, a new job is created in Workflow Manager with the survey results added to the job.

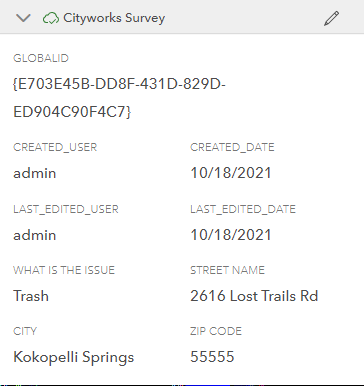
In the configuration of the Send Web Request step, we will use Arcade expressions to collect the stored survey information from the job and use it in the request that’s sent to the Cityworks API.
The Send Web Request step does not require any user input when run. Once the step finishes, we can download the attached response to ensure that the service request was created with the information included in the citizen’s survey.

Now that the service request has been created and assigned, the correct personnel can investigate and address the trash issue. This is just a basic example to help provide you with a better understanding of how this step can be used in your workflows. In addition to citizen driven service requests, you could also integrate this step into larger, internal workflows where a specific action would result in the creation of a new service request or work order in Cityworks. You can also use it to pull information from Cityworks into Workflow Manager to drive your workflows forward.
With the introduction of the Send Web Request step, your organization can now send and retrieve information from third-party systems and use that information to update and drive workflows. We’ve just covered the basics here in configuring and using this new step, but the possibilities are almost unlimited. To get started or to learn more about Workflow Manager, check out the resources listed below. We’d love to hear how you will be using the new Send Web Request step in your workflows!
Learn More
- Connect with the ArcGIS Workflow Manager Community
- Learn more on the ArcGIS Workflow Manager product page
- Access Workflow Manager documentation
- Check out the Workflow Manager Getting Started video on YouTube


Article Discussion: