This article tells how to locate, download, and process 1:24,000-scale digital elevation model (DEM) data in Spatial Data Transfer Standard
(SDTS) format. Visit the Terrain Modeling Using ArcView GIS page for links to earlier articles in ArcUser
magazine that describe how to download, convert, and model other types of data from the U.S. Geological Survey's Earth Resource Observation Systems (EROS) Web site.
This page also contains links to the EROS site, sample data sets, and data conversion utilities.
Data for this Project
Large-scale (1:24,000) SDTS data comes in two distinct types—DLG vector data and DEM grid models.
All 1:24,000-scale data is developed using the USGS 7.5' quadrangle series maps as a base.
|
The model for using the SDTS DEM described here primarily uses data found the 7.5' Moab, Utah,
quadrangle that was downloaded from the EROS site.
|
Moab, located in the heart of southeastern Utah's Canyon Country, is fast becoming a high desert vacation paradise.
Each spring, thousands of off-road enthusiasts descend on this tiny Colorado River town to participate in the world-renowned
Easter Jeep Safari.
Recent mapping of jeep trails using global positioning system (GPS) equipment has greatly improved descriptions
of the area's many jeep and mountain bike trails. The sample data set for this article includes two area jeep trails, Moab Rim and Hell's Revenge, along with the main route of the
famous Moab Slickrock Bike Trail, as well as 1:100,000-scale DLG vector shapefiles and Geographic Names Information System (GNIS)
place name points for the Moab quad.
The modeling methods described here will allow ArcView GIS users to use DEM
data to create similar models almost anywhere in the continental United States.
Downloading DEM Data
The 1:24,000-scale DEM data at the EROS site is divided just like 7.5' paper maps into 7.5 x 7.5-minute sets
indexed by the USGS quadrangle name. Use the FTP by Alphabetical List site if the name of the USGS map is known.
If the name of the map is not known, use the FTP via Graphics to search for the desired data. The data
is registered using metric UTM values according to NAD27. Grid cell elevations are presented in meters.
Now is a good time to set up the folders that will be used while building the Moab model. Using Windows Explorer or some
other file manager, create a directory called UT at or near the root of the drive that will be used for modeling. Under the UT
directory, create a subdirectory called MOAB. Under MOAB, create two subdirectories named DEMFILES and SHPFILES.
Once the Moab DEM is located at the EROS site using either FTP by State or FTP by Graphics, take a careful look at its file name.
This DEM requires a number of files that are all compressed inside a Tape Archive (TAR) file named 30.2.1.1006298.TAR.GZ.
This file may be renamed or have the name truncated by Windows-based Web browsers when it is downloaded and stored
in \UT\MOAB\DEMFILES. If the file is downloaded using Windows long file name rules, the resulting file name might be
30_2_1_1006298_TAR.GZ. Windows replaces all the decimals except the last one with an underscore character.
Unzipping DEM Data
Loading SDTS DEM data into ArcView GIS requires unzipping the TAR file and converting it to a UTM NAD27 DEM.
An unzipping utility, such as WinZip, that will accommodate both GZ and TAR files is required.
To decompress the TAR file, rename it so that the file extension (i.e., the string to the right of the "dot") includes both TAR
and GZ. Rename the TAR file MOAB1158.TAR.GZ. The use of 1158 will become apparent shortly. After renaming, open the
TAR\GZ file with the unzipping utility. When prompted to decompress one file named MOAB1158.TAR into a temporary
directory, answer Yes. The decompression utility will open 20 files. Most of these files begin with 1158.
Next, extract these into the DEMFILES directory. Use Explorer or some other file manager to verify that all 20 files were extracted.
Note that most files include the extension .DDF. The next step requires a DEM conversion utility.
Acquiring the DEM Conversion Utility
Sol Katz of the BLM in Denver, Colorado, developed a very functional and easy-to-use utility that converts the complex
SDTS DEM file set into an ArcView GIS-ready format. This conversion utility, contained in a file named SDTSEDEM.ZIP,
is available for free from the U.S. BLM FTP site.
The utility is in PKZIP compressed format that yields an
executable file named SDTSEDEM.EXE and a C program file named SDTSEDEM.C when unzipped. Store both files in a directory with other
utilities so that both files may be easily located and copied into any project directory.
Katz has developed many other DEM and DLG converters focusing primarily on the complex SDTS format that are also
available at the BLM FTP site. Look at the other utilities available and download the readme files that explain how these
utilities work. The DOS executable, SDTSEDEM.EXE, released in mid-1998, is the best DEM conversion utility he has developed.
Processing DEM Files into an ArcView GIS-Ready Format
Place a copy of SDTSEDEM.EXE in the DEMFILES directory. The number 1158 will be very important in processing the Moab file.
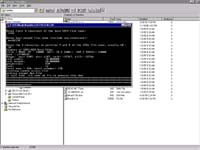
This utility requires a DOS window to run. Simply double click on the SDTSEDEM.EXE file in Explorer to bring up a DOS window
and start the program.
- As the conversion utility initiates, it requests the first four characters of the base SDTS file name. Type in 1158.
- The program requests the name of the output DEM. Type MOAB1158. Do NOT type the DEM extension (.dem) because
the program creates it.
- Finally, the program asks for the two characters in positions 7 and 8 of the CELL file name. These are usually L0, so
type L0 (the letter L and the number zero). Hit enter and watch the program process all 20 files into one file.
|
The conversion utility can be run
from Windows Explorer.
|
As the utility builds the Moab DEM, it will report its progress on-screen. In the file manager, verify that a file named
MOAB1158.DEM, 1,101 KB in size, has been created in the DEMFILES directory. Now it's time to get going with ArcView GIS
and the ArcView Spatial Analyst extension.
Importing DEM Files with ArcView Spatial Analyst
Start ArcView GIS and load either the ArcView Spatial Analyst or ArcView 3D Analyst extension, or both. Either extension
will import the DEM into ArcView GIS and create a grid. ArcView Spatial Analyst will create a two-dimensional hillshade of the
gridded DEM. 3D Analyst will post the DEM in a three-dimensional view.
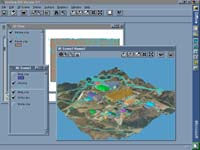
Maximize the ArcView GIS application on-screen and open a new view. Using View Properties, title the new
view 1: Moab Quad UTM NAD27 Zone12 or something else appropriate. Choose Set Working Directory from the File menu and
enter the path to the Moab data in the dialog box. Save the project.
To import the MOAB1158 DEM into ArcView GIS:
- Make the view active and select File, then Import Data Source from the File menu.
- Select the import file type USGS DEM from the drop-down box.
- When prompted for a DEM source, navigate to \UT\MOAB\DEMFILES and select MOAB1158.DEM.
- Name the output grid MOAB1158 and store it in \UT\MOAB.
- Answer Yes when prompted whether to add grid data to the view. ArcView GIS imports and grids the DEM.
- Double click on the grid legend to open the Legend Editor.
- Select Elevation #1 or Elevation #2 as the color ramp, click the Apply button, and turn on the grid.
What appears on-screen is a DEM for the Moab 7.5' quadrangle. Use View Properties to set the Map Units and Distance
Units to meters. Scale along the top and side of the model to check its size. It should be approximately 10,900 meters (6.8 miles)
wide and 13,800 meters (8.6 miles) high. With the grid active, choose Theme then Properties and Definitions. The cell size should
be 30 meters and the model dimensions should be 468 rows by 370 columns. Notice that this is an integer grid—all elevation
values are reported in whole meters. Zoom in and check the size of single grid cells; they should all be 30 meters. With the Identify
tool check the elevation, reported in meters, of various cells.
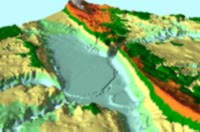
Creating a Hillshade
Accept the defaults of Azimuth 315 and Altitude 45 or experiment with different values.
After the hillshade builds, turn it on and observe a grayscale model of the heart of Canyon Country. Turn the hillshade
theme off, but don't delete it from the view. Double click on the legend for the DEM theme to open the Legend Editor.
Click on the Advanced button in the lower-left side of the Legend Editor. In the drop-down box for Brightness Theme
select Hillshade of Moab1158 and accept the default Cell Brightness Values. Apply the enhanced legend, close the Legend Editor,
and admire a 30-meter DEM of a very rugged piece of real estate. Save the project.