ArcUser
Fall 2012 Edition
A Workflow for Creating and Sharing Maps
By Keith Mann, Esri
This article as a PDF.
What You Will Need
| Item | Source |
|---|---|
| ArcGIS Online for Organizations subscription | Can use the free 30-day trial |
| ArcGIS 10.1 for Desktop (Any license level) | Can use the free 60-day trial |
| ArcGIS Spatial Analyst extension | Can use the free 60-day trial |
| ArcGIS mobile application for smartphones and tablets running iOS, Android, or Windows Phone | Free from App Store, Google Play, Windows Phone Marketplace |
| Sample dataset | ArcUser website |
| Watch a video | That demonstrates this workflow |
As more organizations adopt the ArcGIS Online platform, the web map is becoming an essential communication tool that helps GIS professionals empower decision makers and other non-GIS staff. In this tutorial, you'll learn basic workflows for generating web maps, analyzing a web map layer in ArcGIS for Desktop, publishing the analysis as a hosted service, and creating new web maps that can be shared in web map applications and with ArcGIS mobile applications.
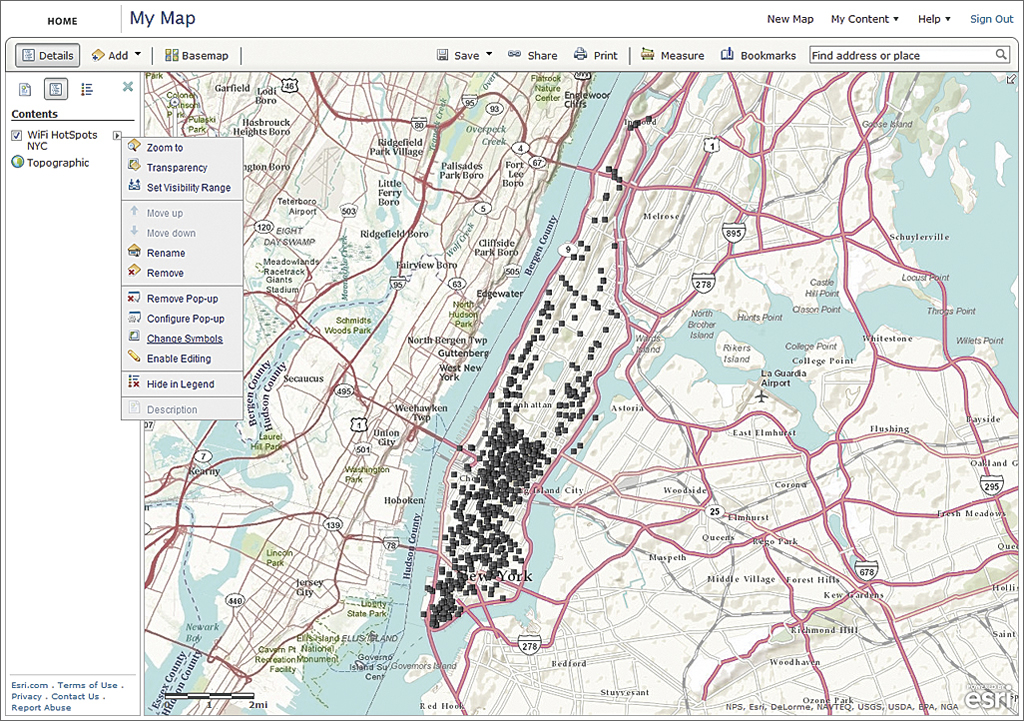
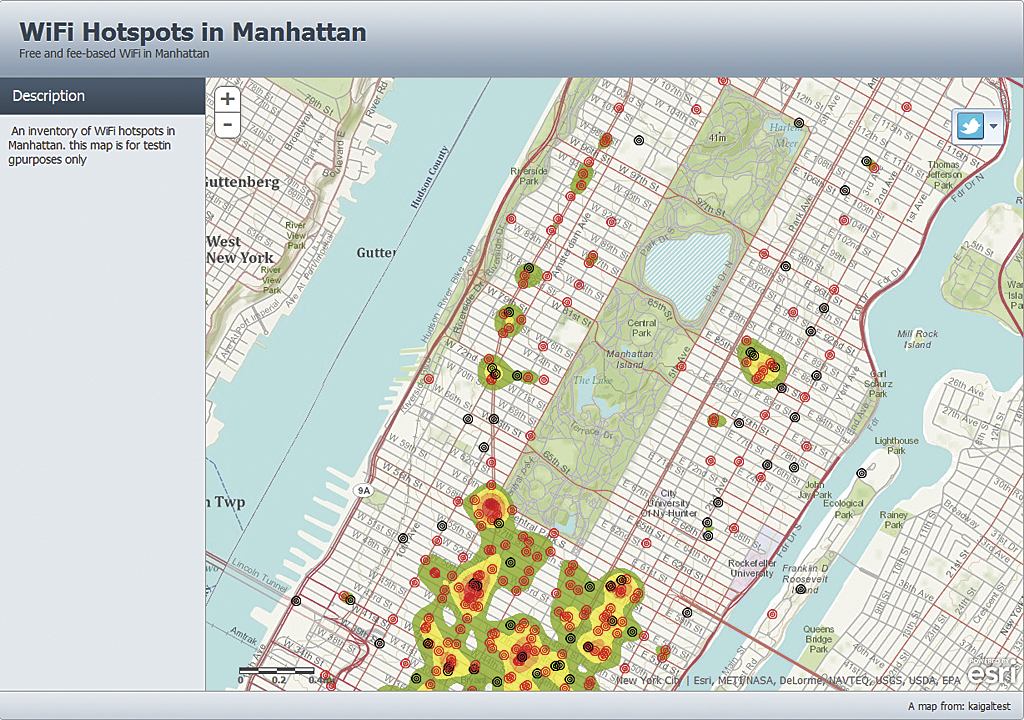
After creating a new map on ArcGIS Online, drag WiFi_HotSpots_NYC.gpx onto the map.
Getting Started
If you do not already have an ArcGIS Online for Organization subscription or ArcGIS 10.1 for Desktop and the ArcGIS Spatial Analyst extension, you can get evaluation copies from the Esri website. The free mobile application is available for iOS, Android, and Windows Phone platforms. In Windows Explorer, create a folder named Manhattan and leave Windows Explorer open. Next, download the sample dataset, WiFi.zip. Extract the files to the Manhattan folder.
Create a Web Map from a GPX File
Creating a web map using ArcGIS Online is an easy way to visualize raw data on a map and share that information with others. In this scenario, suppose that you have some Wi-Fi hotspot location data for Manhattan that was collected using a smartphone GPS application. The data is stored in the WiFi_HotSpots_NYC.gpx file in the sample dataset.
- Sign in to your ArcGIS Online for Organizations account and click Map. Create a new folder for the group called Manhattan.
- In Windows Explorer, navigate to the Manhattan exercise folder, select the WiFi_HotSpots_NYC.gpx, and drag the file onto the map.
- To symbolize the hotspots, click the Details button, then the Show Contents of Map button. Click the arrow symbol next to the Wi-Fi_HotSpots_NYC layer and choose Change Symbols from the context menu. For Use, select Unique Symbols. For To Show, select type.
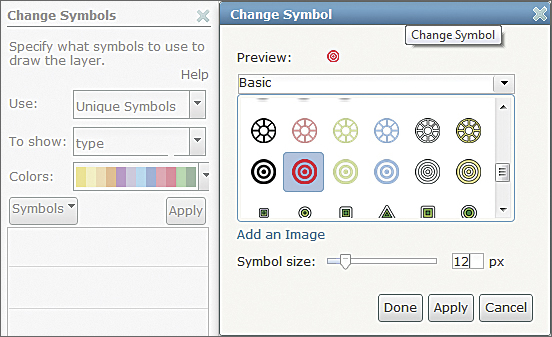
- Click Fee-based symbol. In the Change Label and Symbol dialog box, click Change Symbol. In the Change Symbol dialog box, choose a red symbol and make the symbol 12 pixels in size. Click Done and then click OK.
- Use the same process to change the symbol for the free hotspots to a black 12-pixel symbol. Click Apply in the Change Symbol dialog box to finalize these changes and close the dialog box.
- Configure the pop-ups for the Wi-Fi hotspots by clicking the arrow symbol on the Wi-Fi_HotSpots_NYC layer and choosing Configure Pop-up from the context menu. Click the Configure Attributes button and, in the dialog box, confirm that the boxes next to name and type are checked. Click OK. Click the Save Pop-up button.
- Save this web map by choosing Save As. Complete the Save Map dialog. Title: WiFi Hotspots in Manhattan Tags: New York City, Manhattan, WiFi Summary: Free and fee-based Wi-Fi hotspots in Manhattan. Save the map.
- Click My Content and choose Groups. Click Create a Group and complete this page as follows: Name: Manhattan Internet Access Project; Summary: Public Internet access in Manhattan interest group; Description: This group provides inventory and analysis of public Internet access in Manhattan. Make sure Status is Public. Add the following tags: NYC, Manhattan, WiFi, Internet. Complete the Description section.
- Click the thumbnail image area to the left of Name, click the Choose File button, navigate to the Manhattan exercise folder, and choose MIAP_logo.png. Select it and click Open. Click OK. Click Save.
- Click the Manhattan folder and then click WiFi Hotspots in Manhattan. Click the Edit button. Complete the description page as specified in Table 1. Click Save.
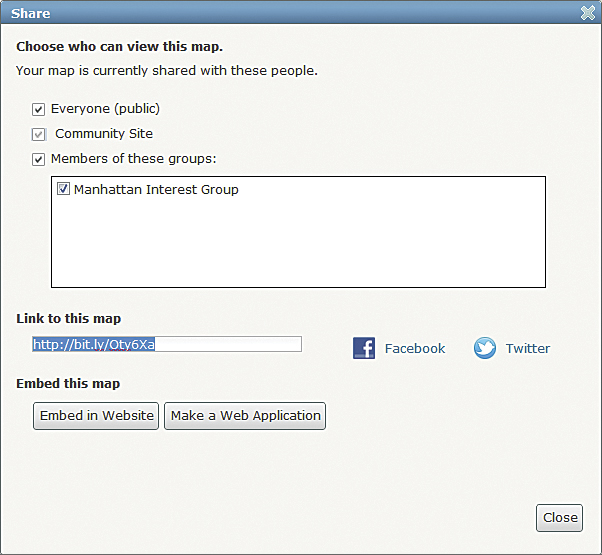
- Click the Share button. In the Share dialog box, check Everyone (public) and These groups. Check Manhattan Internet Access Project. Click OK. Leave ArcGIS Online open.
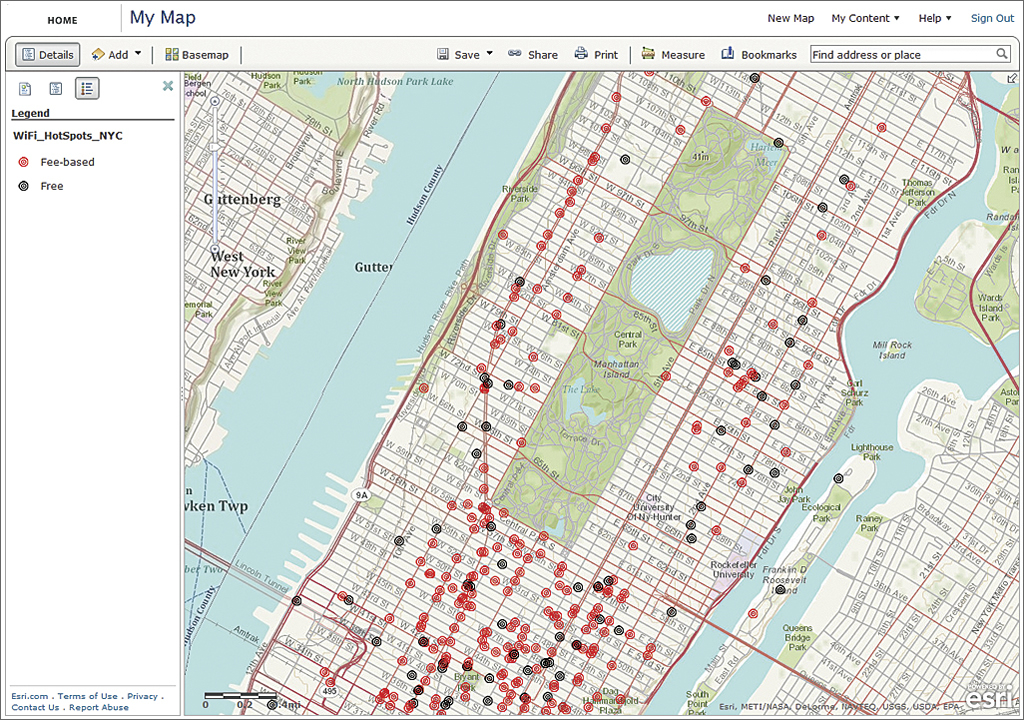
Change the symbology to indicate fee-based and free Wi-Fi hot spots.
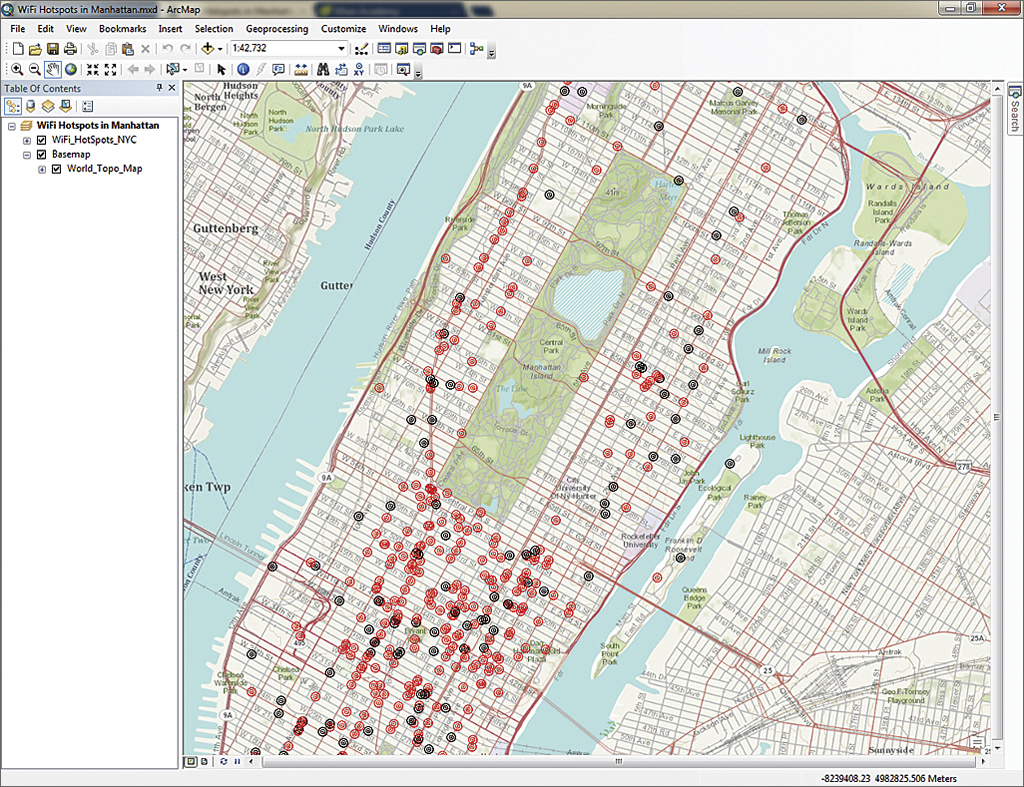
Open the WiFi Hotspots in Manhattan map in ArcGIS 10.1 for Desktop. Create the WiFi_HotSpots_NYC feature class in the new Manhattan file geodatabase to enable spatial analysis on the hot spot locations.
| Title | WiFi Hotspots in Manhattan |
| Summary | Free and fee-based Wi-Fi hotspots in Manhattan |
| Description | An inventory of Wi-Fi hotspots in Manhattan. This map is for testing purposes only. |
| Access and Use Constraints | None |
| Credits | New York City |
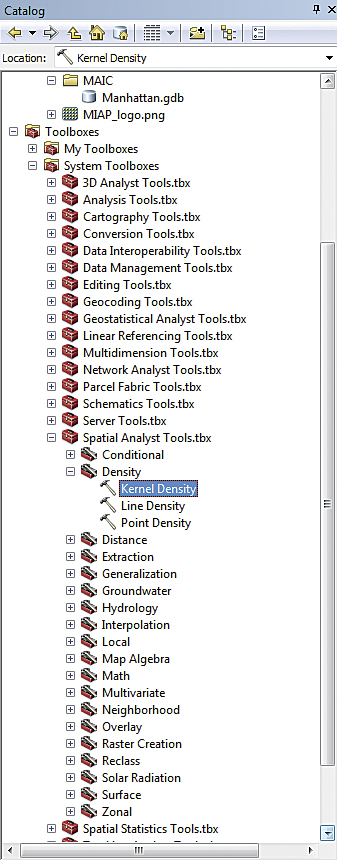
Activate the ArcGIS Spatial Analyst extension and locate the Kernel Density tool in the Density toolset in the Spatial Analyst toolbox.
Use ArcGIS for Desktop to Analyze Wi-Fi Hotspots
In this next step, you'll analyze the Wi-Fi hotspot locations in ArcGIS 10.1 for Desktop. You can use features in a web map as inputs for spatial analysis using ArcGIS for Desktop.
- On the WiFi Hotspots in Manhattan Details page in ArcGIS Online, click Open > Open in ArcGIS 10 for Desktop. This will create a map package and download it to your browser. Double-click the downloaded package to open it in ArcGIS 10 for Desktop.
- In ArcMap, choose Customize > Extensions from the menu. Check Spatial Analyst and click Close.
- In ArcMap, open the Catalog window and click Connect to Folder. Navigate to the location of the Manhattan folder created earlier and click OK.
- In the Catalog window, select the Manhattan folder and choose New > File Geodatabase. Name the geodatabase Manhattan.
- Still in the Catalog window, expand Toolboxes and expand System Toolboxes, then Spatial Analyst Tools, then Density and double-click the Kernel Density tool. Drag the WiFi_HotSpots layer from the ArcMap table of contents (TOC) and drop it on the Input point or polyline features field of the Kernel Density dialog box. Leave Population field as NONE. For Output raster, click the folder icon and navigate to the Manhattan geodatabase and name the output raster WiFi_density. For Output cell size, enter 10. For Search radius, enter 300. For Area units, choose SQUARE_METERS. Click OK.
- Once the WiFi_density raster is added to the map, right-click the layer and choose Properties. Click the Symbology tab, choose Classified, set the number of classes to 5, and choose the Slope (Green to Red) color ramp. Click Apply.
- Double-click the symbol for the first value range, choose No Color, and click Apply. Click the Display tab. Click the Resample drop-down and choose Bilinear Interpolation. For transparency, enter 30 percent and click OK.
- In the TOC, uncheck the WiFi_HotSpots_NYC layer to turn it off so you can inspect the WiFi_density layer. Save the map and leave ArcGIS for Desktop open.
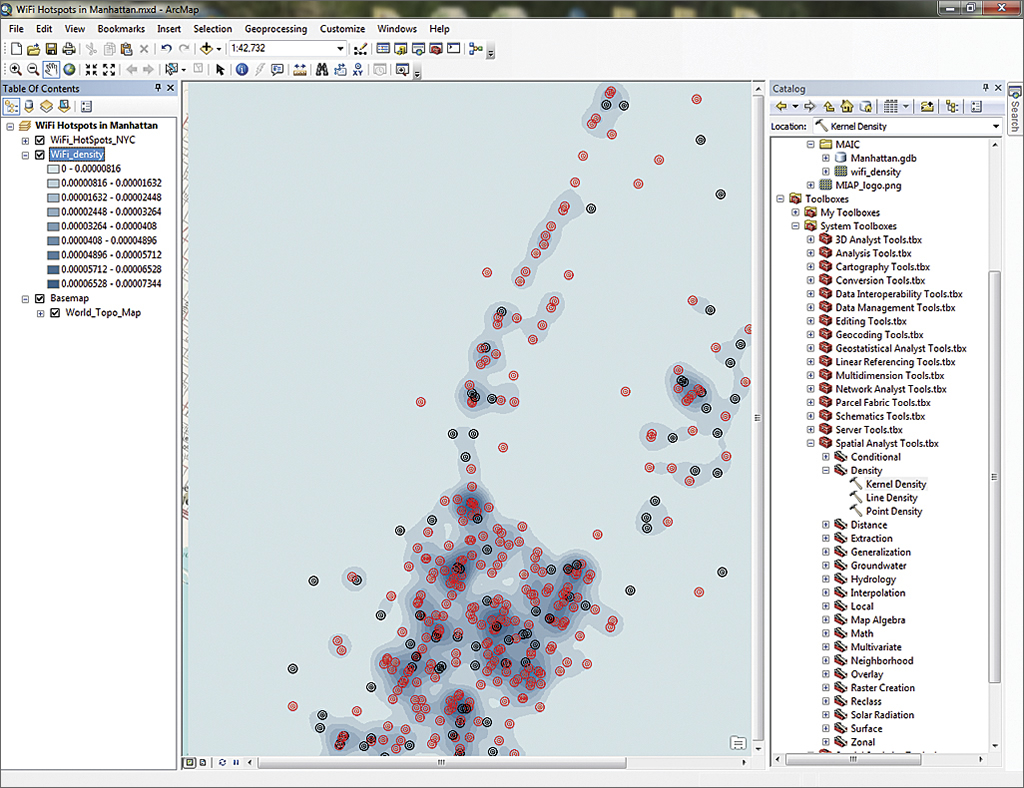
Place the raster created by the Kernel Density tool in the Manhattan file geodatabase.
Publish Your Analysis to ArcGIS Online
- In ArcMap, remove the WiFi_HotSpots_NYC layer and any basemaps from the TOC, leaving only the WiFi_density layer.
- Choose File > Sign In and log in to your organizational account if necessary.
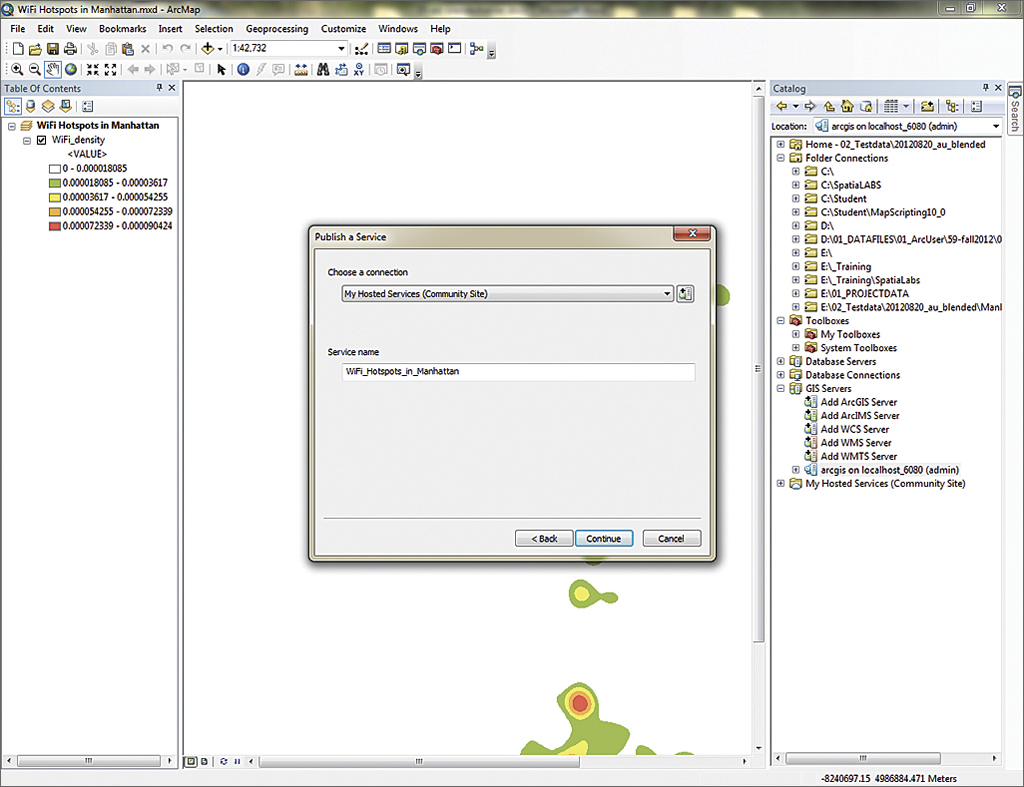
- Click File > Share As > Service and click Next. In the Publish a Service dialog box, your organizational account should be listed under Choose a connection. For Service name, enter WiFi_Hotspots_Analysis. Click Continue.
- In the Service Editor panel, click Sharing and check the name of your organization, Everyone (public), and the Manhattan Internet Access Project group.
- Click Analyze and review any messages. If you get an error that tells you that basemaps cannot be published, right-click the error and choose Remove layer, then analyze again. If you get a message that the raster layer does not have pyramids, right-click the message and allow ArcGIS for Desktop to build pyramids. Click Analyze again. Click Publish.
- Once the service is published, open ArcGIS Online. If your WiFi Hotspots in Manhattan map is still open, go to the next step. Otherwise, click the My Content drop-down and then My Content. Click the Manhattan folder and then click the WiFi Hotspots in Manhattan item to open the web map. Click Open > Open in ArcGIS.com map viewer.
- In the map viewer, click the Add drop-down and then Search for Layers from the web, and enter wifi. Click Go. Click Add to add WiFi_Hotspots_Analysis to the map. Zoom in to see both the layers. Choose Save As and complete the Save Map dialog box. The title is WiFi Hotspots in Manhattan and enter tags for New York City, Manhattan, WiFi. Under Summary, type in Free and fee-based Wi-Fi hotspots and Wi-Fi density analysis in Manhattan. Click Save Map.
After using a green to red color ramp to symbolize the raster, remove all but the raster layer from the map and publish it to ArcGIS Online as a hosted service.
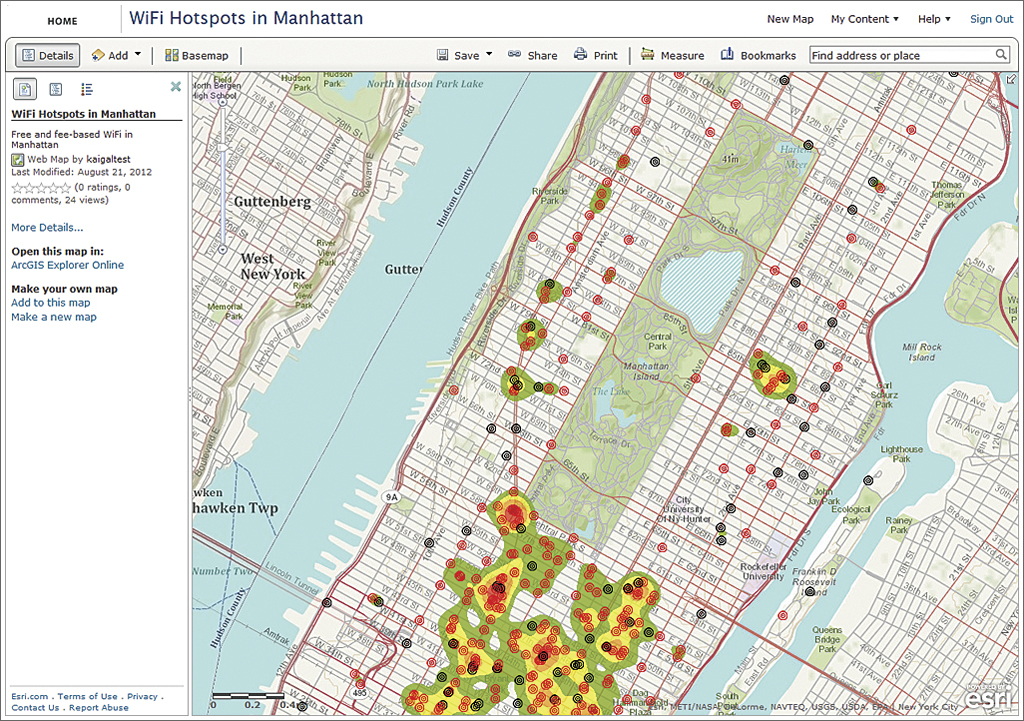
Open the WiFi Hotspots in Manhattan map in the ArcGIS.com map viewer and the WiFi_Hotspots_Analysis service to the map.
Sharing Your Web Map Using a Template
- Click Share and make sure that your map is shared with Everyone (public), your organization, and the Manhattan Interest Group.
- In the Share dialog box, click the Make a Web Application button. Choose the Chrome Twitter map template, click the Publish drop-down, and then click Preview to see what the map looks like in the template. Close the preview.
- Now click the Publish drop-down and choose Publish. Enter the title, WiFi Hotspots in Manhattan. For Save folder:, choose the MIAP folder. Click Save & Publish.
- But wait…your new templatized web map application isn't shared yet. Go back to My Content. Check the WiFi Hotspots in Manhattan web map that you just created. Click Share and share the item with Everyone, including the Manhattan Interest Group. Click OK. Note: You can configure the map application further by clicking on the item in My Content and then clicking Configure App.

Make sure the map is shared with Everyone. Then create a web application from the map and share the application with everyone.
Share Your Web Map Using E-mail
This time, you'll share the map so it can be used with the ArcGIS mobile application.
- Go back to the WiFi Hotspots in Manhattan Details page on ArcGIS Online and open the map in the ArcGIS.com map viewer.
- Click Share. Under Link to this map, copy the shortened URL. Close the Share dialog box.
- Open your e-mail program. Paste the URL into the body of a new e-mail, enter a subject line, and send the e-mail to yourself.
- On your smartphone (iPhone, Android device, or Windows Phone), open the e-mail and click the URL. This will automatically open the ArcGIS application and display your map.
Conclusion
ArcGIS Online provides a new way to access GIS maps and analyses. Web maps can become an essential communication tool for you and your organization. Not only can you quickly create web maps without any programming or development, you can share them with everyone or with specific group members through application templates and the ArcGIS mobile application. You can use operational layers in the web map as inputs for analysis in ArcGIS for Desktop and then turn that analysis layer into a hosted service on ArcGIS Online.
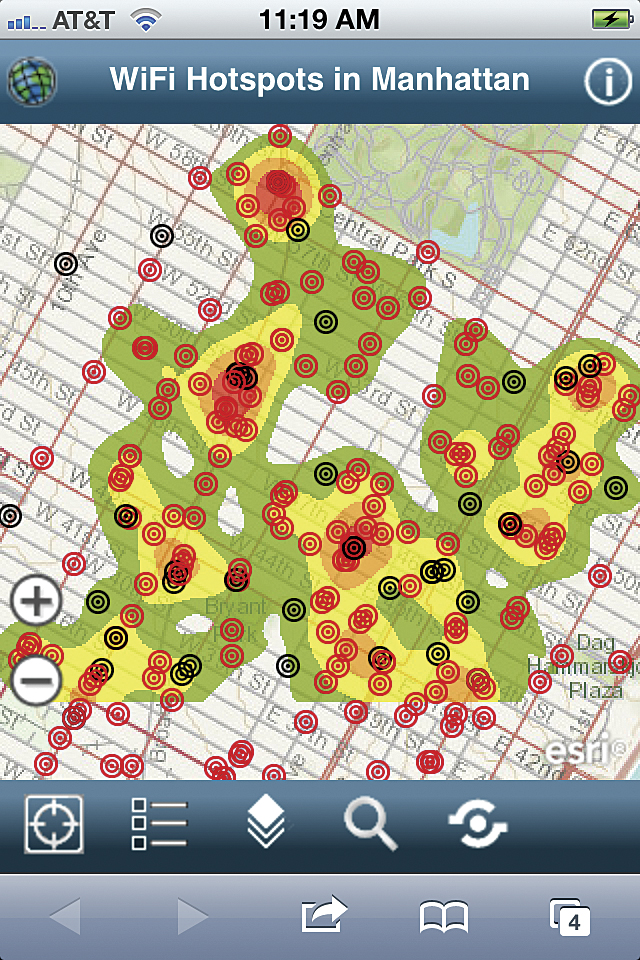
Open the map in the ArcGIS.com map viewer, click Share, and copy the shortened link to the map. Mail it to yourself and open it using the ArcGIS mobile application for smartphones.