Imagine this scenario—your supervisor just left your office after delivering some news: you’ve just been tasked with administering your company’s ArcGIS Online organization. You have account credentials and not much else because the previous administrator didn’t leave documentation, and you’re not sure how to get started.
If this sounds familiar, then look no further for answers. This article provides a checklist of tasks, broken down by time frame. These tasks are organized by what you’ll want to accomplish soon after taking over administration of the organization, then later on when you are more comfortable in your new role, and finally things you’ll need to do to ensure everything’s running smoothly.
While it may also be helpful to think of this list as tasks to accomplish within the first week, month, and quarter after taking ownership of the administrator role, these tasks can be done mostly at your own pace. These tasks will help you start understanding how your ArcGIS Online organization runs, then teach you tricks you need to keep it running.
Getting Started with Your New Administrator Role
Your first step as a new administrator is to ensure you have the correct administrator account and necessary permission settings.
- Ensure that you can sign in to the organization.
- Ensure that you have the default Administrator role (not a custom role with administrative privileges).
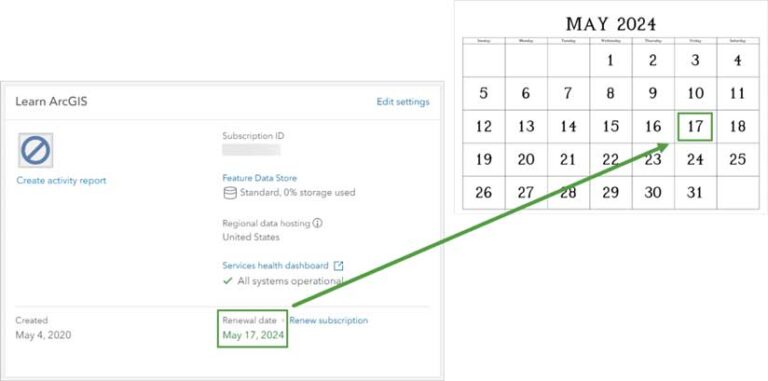
- Find your organization account’s renewal date and mark it on your calendar.
- Set yourself as the organization’s administrative contact.
Being the administrative contact will ensure that you receive important notifications about the organization, such as renewal, credit consumption notices, and notifications about releases and other product news. This is also how you will receive password reset requests. If a user in your organization hasn’t set up their security questions, you may have to manually reset their password.
Initial Member Management
Now, you can start to explore the users in your organization and how they’re currently organized. Once they have a named user account in the organization, members are granted permissions through user types and roles.
Custom roles and member categories provide the two methods that the previous administrator may have used to manage the organization’s members. Roles are a method of giving privileges and access to features of ArcGIS that can be customized as necessary for different users or work requirements. Member categories are a hierarchical structure that can be set up based on jobs, level of access, or other characteristics that act as a filter when searching for users. Learn more by reading “User types, roles, and privileges.”
Getting to Know Your Members
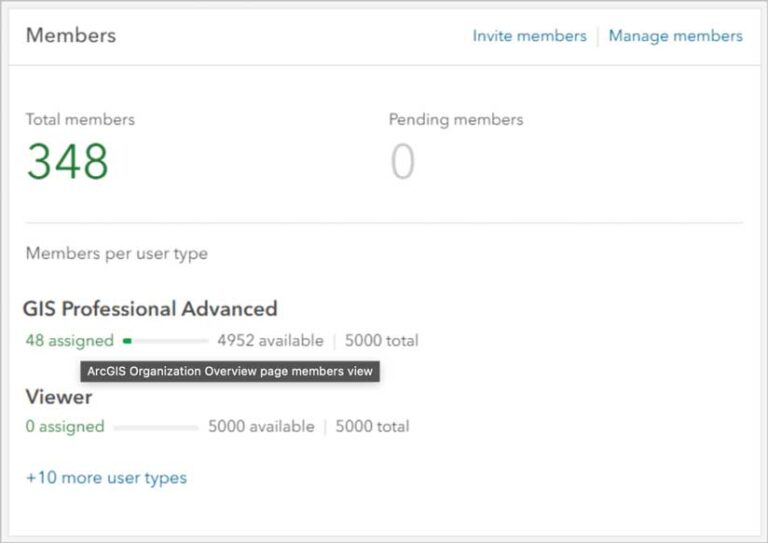
You’ll start by looking at how many members your ArcGIS Online organization has and how many could be added. Some organizations are very small with just 1–5 active members, while others are very big with 50,000 or more users. Understanding the size of your organization will help you understand how frequently you’ll want to check in on it. More members and more activity mean you’ll want to keep a closer eye on credit expenditure, content storage, and other categories.
On the Organization > Overview tab, view the Members box to see how many members you have and what user types are available. Explore member categories or custom roles. These are especially important for member management in larger organizations. Member categories act most simply like a filter, and member roles can additionally give specific privileges and permissions to users.
On the Organization > Members tab, see what member categories or custom roles the previous administrator set up. Click through them to understand how these groupings are used and who is assigned to which user type and role. Note: If you have a large organization, it might be impractical to view every role or grouping. To help understand what kinds of permissions have been assigned, try to select users with a variety of job titles or categories. For example, a supervisor can have the Viewer user type, while a GIS professional can have the GIS Professional user type and a custom Publisher role.
Create a Report
Usage reports are an important tool for monitoring your organization. The reports help you identify how members are using, sharing, and contributing resources. In this case, the reports you’ll generate will act as a snapshot of the organization when you took it over. Member reports are most helpful if you have a high turnover in your organization, and show details such as how many credits the member is using, their role and user type, and how many items they own. Choose Settings > Member roles tab to view any custom roles that have been set up.On the Organization > Status > Reports tab, click Create a report. Choose Single Report, and for Report type, choose Member.
Schedule a Quarterly Report
When generated consistently, reports can represent a history of events that occur in your organization over time. Scheduling reports ensures they’ll be automatically created at regular intervals and can help with end-of-year reporting or other long-term tracking you may need to do.
Credit Management
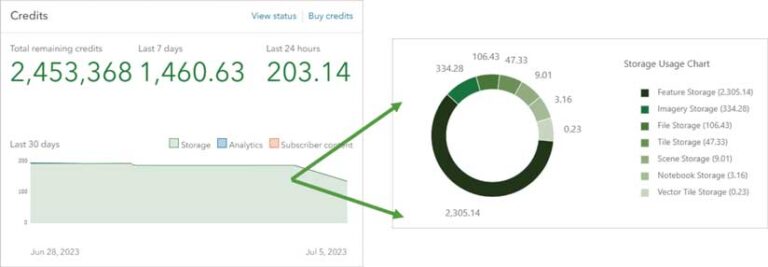
Credits are the currency of ArcGIS. They are managed at the organization level and can be spent by users on actions such as geocoding and analysis, or on general management operations such as content storage. It’s important to understand which activities use credits and keep tabs on credit levels. Running out of credits can lead to your organization being placed in restricted status. You want to understand your organization’s baseline credit usage so you can determine how to manage it. Do that by clicking on the Organization section.
- Click the Overview tab and use the Credits box to see how many credits your organization has available.
- Click the Status tab to see how your organization’s credit usage over the last few weeks breaks down by storage, analytics, subscriber content, and published content.
- Click the Members tab to look at the Credits remaining column to see the credit budget for each member in your organization.
Content Management
Understanding your organization’s content is important, especially if your organization publishes public-facing content. Depending on whom you want to see your content, you can share it in four primary ways:
- By default, content is private to the account that created it (and viewable by the administrator).
- Content can be shared with a specific group.
- Content can be shared with the organization.
- Content can be shared publicly so it can be viewed by anyone. Organizations can benefit from content categories, which act similarly to member categories in that they allow sorting and filtering.
To learn more about your organization’s content, start on the Organization tab and click Status, then Content to see how many items your organization has, how many items have been created recently, what the breakdown of items is by type and sharing status, and other metrics. To see if your organization has content categories set up, on the Content tab and click My Organization tab and sort the items by View Count to see the most popular items.
To get a snapshot of your organization as it is currently, create a report. Go back to the Organization tab and choose Status and click the Reports tab. Click Create a report, then choose Single Report. For Report type, choose Item. Item reports show details such as the storage size of each item, its usage or popularity, and its sharing status. Now, schedule a Quarterly Item report.
Tasks for When You’re Becoming More Comfortable
Now is a good time to dig deeper into some of the management tasks you addressed earlier. For example, if your organization publishes content publicly, take time to understand the development, quality assurance, and publishing tasks. If your organization has frequent member turnover, spend time learning about the separation process for users. Tasks will largely depend on your organization’s structure and usage. Before making changes to your organization’s existing processes, talk to all stakeholders, including management and any ArcGIS users who might be impacted by the changes.
Member Management
Check in on member usage and credits regularly and then figure out what your most time-consuming member management tasks are and determine whether there’s a way to simplify them. For example, if you’re adding a lot of new members to your organization each month, investigate strategies such as using New Member Defaults and batch adding users. If you’re consistently having to reset passwords or credits for users, ensure your organization members have their profiles configured with security questions and know how to check their credit budget and delete unused content.
Here are some things you can do to identify ways to simplify your work:
- Learn about the onboarding procedures for new members by choosing Settings and click New Member.
- Defaults from the left-hand menu to see the role and licensing assigned by default to new members.
- Learn how to add new users, either individually or in a batch, by reading the ArcGIS Online documentation.
- Learn about your organization’s separation procedures for removing members from the organization.
Employee separation procedures can vary depending on the reason an employee is leaving. For example, employees who are retiring should be treated differently than someone in the company who’s transitioning to a new job role. Decide whether the user account needs to be removed from the organization, disabled, or downgraded to a user type with fewer permissions. You will also need to decide whether content, group ownership, and other aspects of the user’s account need to be transferred to another user account or deleted.
Content Management
Depending on how much content your organization publishes and maintains, whom it is shared with, and what kinds of work it is used for, your content management procedures can vary. Work with organization members to understand what kind of content they’re creating, how, and for whom.
Long-Term Maintenance and Reporting Tasks
Now that you understand your organization’s management procedures, you can decide how frequently to check back in on your organization to ensure things are running smoothly. Your cadence may be monthly or quarterly or even more frequently, depending on your organization’s activity level. Again, before making changes, check in with the appropriate stakeholders. For example, don’t downgrade an inactive user or delete content without first checking with the owner.
Review your quarterly administrative reports and check if there are:
- Inactive members who should be removed or be downgraded to user types with fewer privileges.
- Old or unused content items that should be deleted from the organization.
- Content items consuming a lot of the organization’s credits for storage.
- Items performing well that need to be updated or reviewed.
Check the organization’s credit usage to determine:
If members are staying within their credit budget.
- What your organization credits are being spent on.
- Follow Esri’s ArcGIS Online product release cycle to keep up with changes to administration workflows and other functionality that may impact you and your members.
Continuing in Your Role
At this point you’re feeling confident about administering your ArcGIS Online organization. As your administration skills improve and your organization’s needs change, keep in mind that there are many ways you can extend and automate your administration routines.
Implementation guides can help you at different stages of your role as administrator. ArcGIS Online Implementation Guide is a guide for administrators setting up new ArcGIS organizations, beginning with account activation. Extend the Reach of Your GIS is a guide for administrators who are comfortable with the day-to-day operation of their organization and looking for more information about long-term management and best practices.
There are some other resources from Esri that will help you:
- Best practices for organization management
- Time-saving tips for managing members in ArcGIS Online
- Get started with ArcGIS Notebooks
About the author