Starting from the ArcGIS Online June 2018 release, it is possible to change the way numbers and dates are displayed. For instance, if you set English or Spanish in you profile, you will see a new setting “Number and Date format” under your selected language. However, this setting is not reflected in how values are displayed in attribute tables, map labels, or temporal animations. I.e. everything based on attribute values and pop-ups.
Here is a simple workaround on how to apply any date or number format you want using Arcade expressions. For this example, we have set English – Great Britain in the user profile, but you can follow similar workflow to set any other language formatting. This workaround even supports languages that are not supported currently by ArcGIS Online’s user interface.
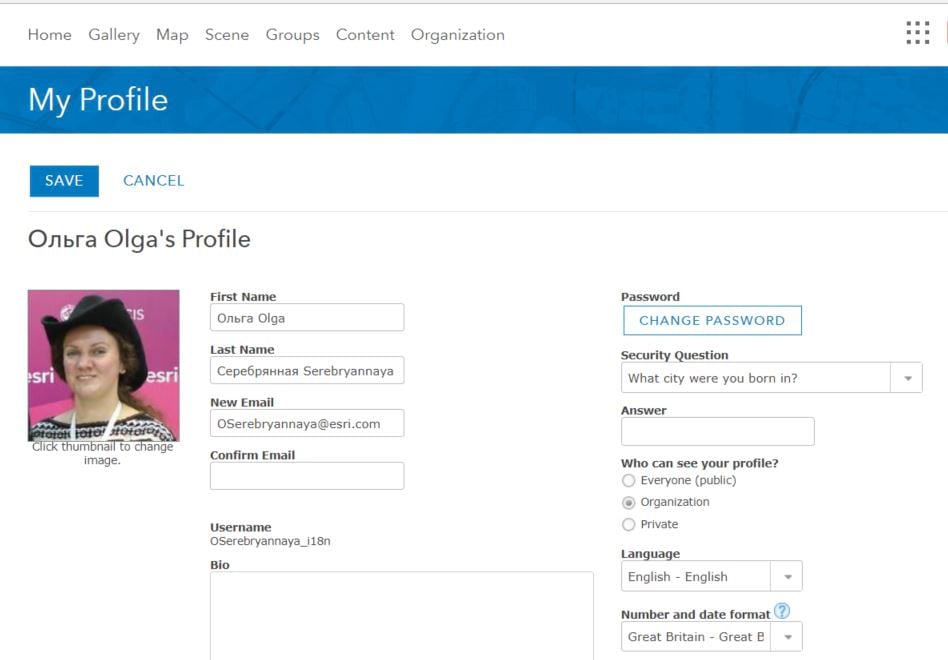
To set the language settings: sign in, go to your profile, click “Edit Profile”, then set your “Language” and, if available, “Number and date format” (in 6.2 release for English and Spanish only). Then click Save.
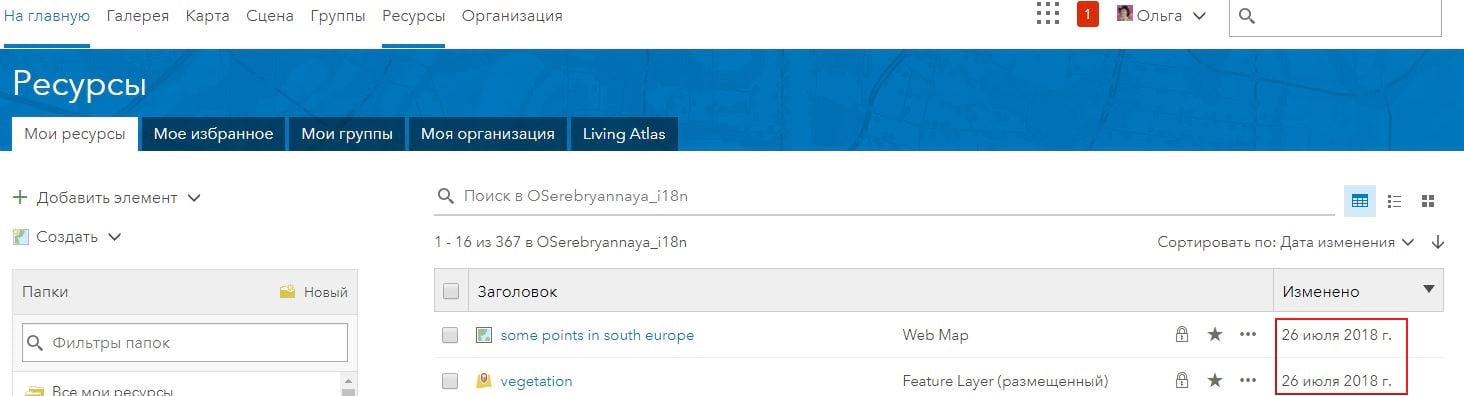
Now if you go to Content tab, you will see that formatting of Date Modified has changed, according to new ‘Great Britain’ settings.
Let’s open the map and see if something has changed there.
On Item details page date format also looks fine.

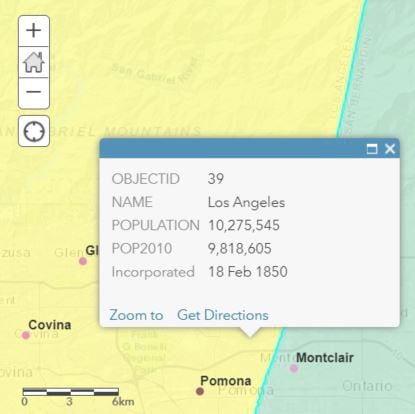
Now click Open to see this map in Map Viewer. There are some points (cities) and polygons (counties). They have attributes. Hovering a mouse on layer name allows to open their attribute tables with some data.
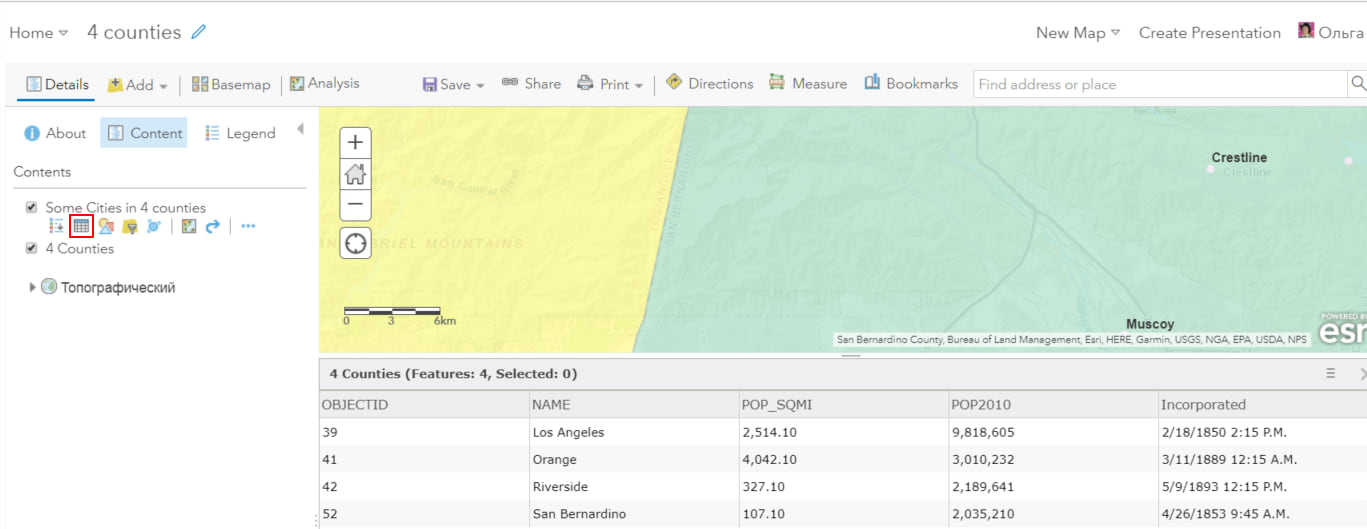
For 4 counties layer we see a text field with county names, numeral fields with Population in 2010, Population density per square mile and Date when county was incorporated. Numeral attributes look good, with comma-separators for thousands and point-separators for decimals. But dates have month before day, it does not work for Great Britain date format! Also they have time component, that is currently unnecessary.
Let’s try to improve the situation.
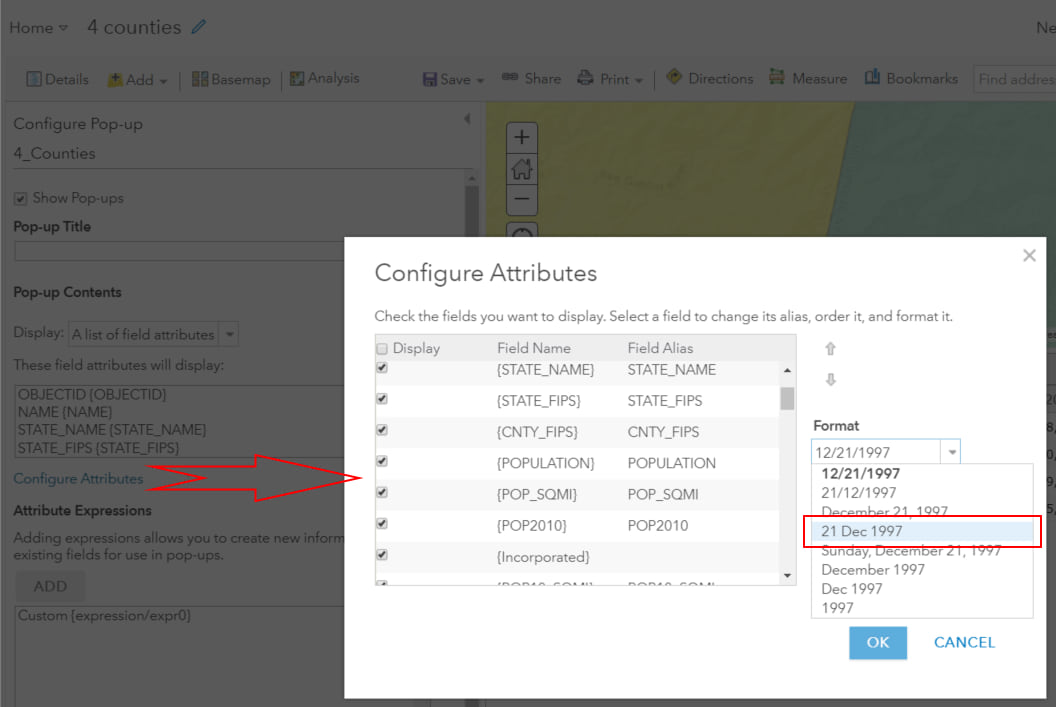
Configure Popup window
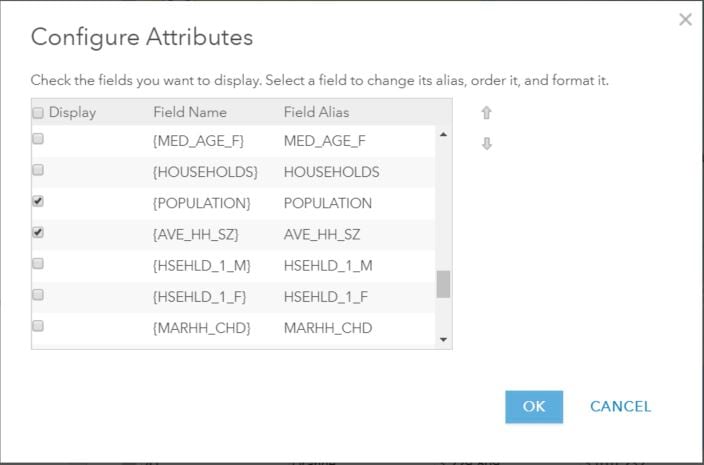
The most easy way to do it is to configure popup. Hover the mouse on the layer name, click ellipsis and select Configure popup. On the Configure Pop-up panel click the link Configure attributes.

In the Configure Attributes window uncheck Show time and select date format that better fits your needs, for instance ’21 Dec 1997’:
Click OK twice to close Configure Attributes and Configure Pop-up panels. Click some of your features and observe the new popup. Looks much better, isn’t it?
But what if the list of possible formats does not provide a format suitable for your language? For instance, the most commonly used date format in Japan and China is “year month day”, with the hieroglyphs meaning “year”, “month” and “day” inserted after the numerals.
Example: 1893年5月9日
This format is not available yet in the predefined list, but you can easily build any format you want with a simple Arcade expression!
How to build a date format in pop-up with Arcade expression
Note: More detailed information about Arcade functions is provided in the help system.
Hover the mouse on the layer name, click ellipsis and select Configure popup. On the Configure Pop-up panel click the link Configure attributes.
Under Attribute Expressions click ADD.
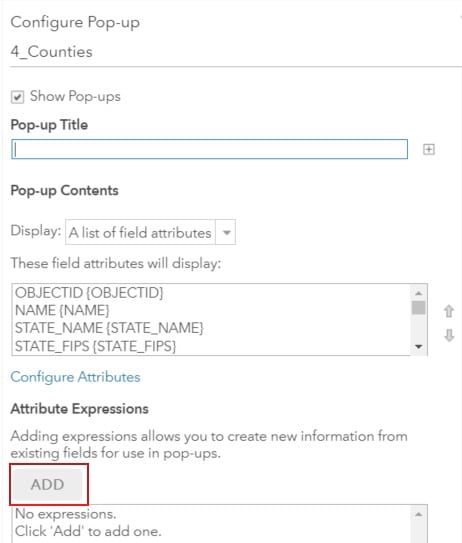
In the Custom dialog build your own or copy the following expression (Date field name in my example is ‘Incorporated’, you will use your own field name):
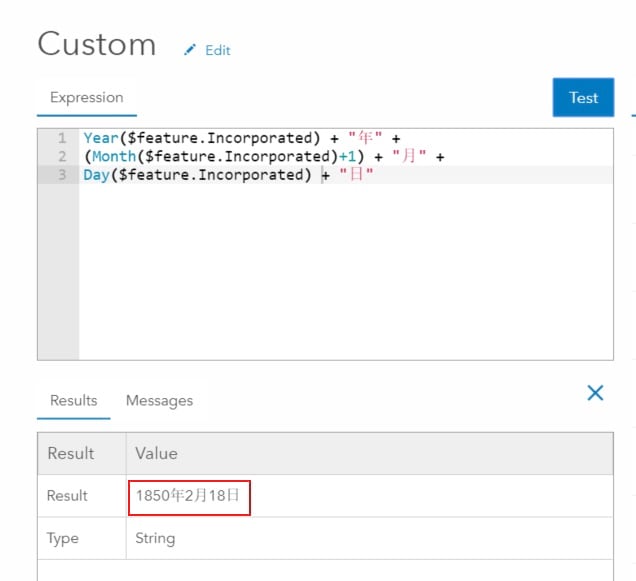
Year($feature.Incorporated) + "年" + (Month($feature.Incorporated)+1) + "月" + Day($feature.Incorporated) + "日"
Note: Months are stored in database from 0 for January to 11 for December, that is why you need to add ‘+1’ to have proper Month number displayed.
Click Test and observe how your date format will be looking like.
You can change this expression according to date format which is required for your language. For instance, if you want it in form ’18-1-1850’ type the following expression (don’t forget to change the field name), where “-” is separator between Day, Month and Year. You can use “/”, “. ” or any other symbol instead:
Day($feature.Incorporated) + "-" + (Month($feature.Incorporated)+1) + "-" + Year($feature.Incorporated)
Click OK to close Custom dialog, then click Configure Attributes link and in the list of fields uncheck your date field and check Custom to display your formatted date instead of software-defined date format.
Click OK twice to close Configure Attributes and Configure Pop-up panels.
Click some of your features and observe the updated popup. If you open attribute table, you will see that date format is updated there as well.

Probably you don’t like to see the word ‘Custom’ instead of the actual field name or alias, let’s build more user-friendly popup.
Creating custom attribute display in pop-up
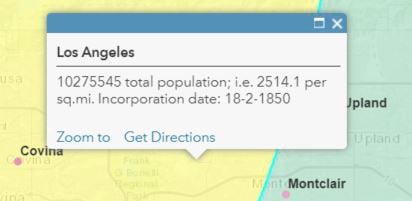
Open Configure Pop-up panel. For Pop-up Title choose {NAME} field. It will display the county name in title. Edit Custom expression (click a small gear icon next to it) and change it to the following:
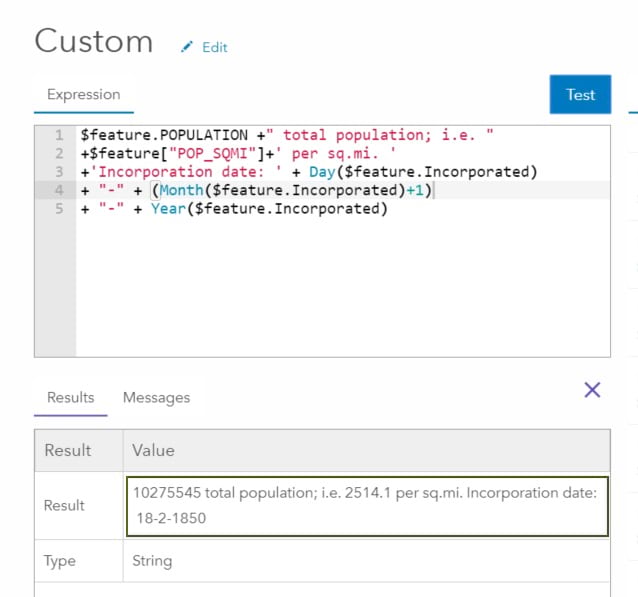
$feature.POPULATION +" total population; i.e. "+$feature["POP_SQMI"]+' per sq.mi. '

+'Incorporation date: ' + Day($feature.Incorporated) + "-" + (Month($feature.Incorporated)+1)

+ "-" + Year($feature.Incorporated)
Click OK to close Custom window.
In the drop-down Pop-up Title select {NAME} field if you want to see the actual county name instead of the ‘County information’ text.
For Pop-up Contents select A description from one field and choose your Custom {expression…} to be used.

Click OK to close the Configure Pop-up panel. Click any county to observe it’s popup.
Note:
In this demo I simplified the popup text to show you only formatting possibilities for Number and Date fields. More detailed information about custom attribute displays in pop-ups can be found in our blog:
Crafting custom attribute displays in pop-ups
Looks good, but the value for Population lost its formatting. It happened because Arcade is using ‘pure’ value, as it is stored in the database, no language-specific formatting.
Apply locale-specific Number format
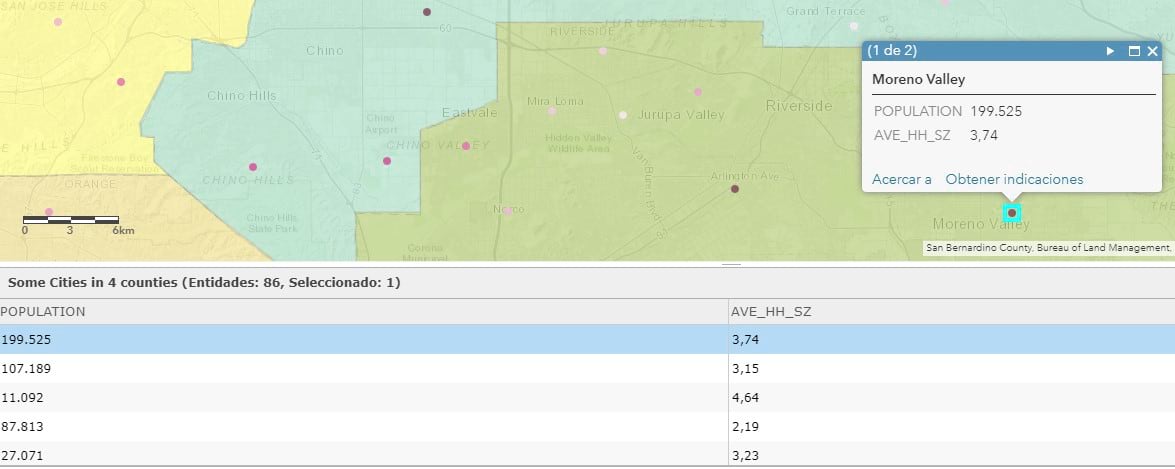
Let’s take another scenario. For instance, we have set Spanish language and Spain format in user Profile (or any other language which uses comma-separators for decimals). To simplify the code, we want to display only following field values: Population and Average household size for each city.
To do it, in Cities layer just uncheck all other fields in Pop-up settings:
Now we see comma-separators for decimals and point-separators for thousands, both popup and attribute field values are looking good:
Now click Manage labels and select Custom (expression) for Text:

Click a pencil button at the right side and type the following expression:
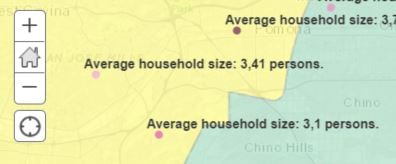
$feature["NAME"] + ": " + $feature.POPULATION + " total population; " + $feature["AVE_HH_SZ"] + " average household size."
Click Test:
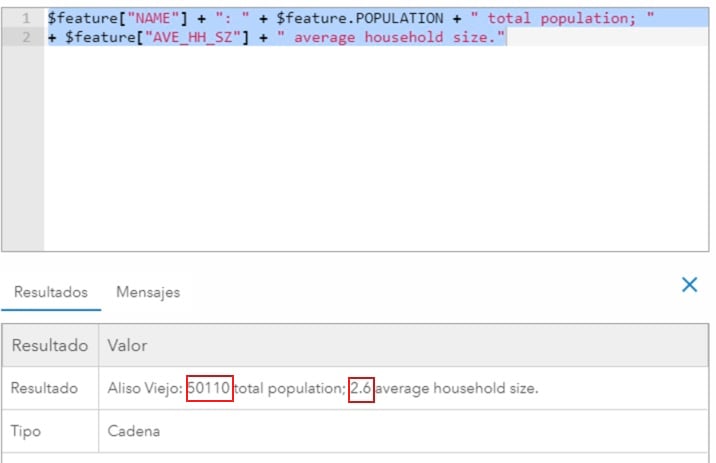
Oops, number format does not look as expected, the same as it was for counties in previous step.
The only thing that can be done here is separating field values into parts ‘before the separator’ and ‘after the separator’, convert into text and concatenate them back, inserting the proper separator sign between them.
To simplify the example, I will format the value for only one field with Average household size values.
Please find the sample code for decimal separators below. Take it as is, just change the field name and desired separator.
var statictext = ($feature.AVE_HH_SZ)var splitarray = Split(statictext, '.')var splitleft = splitarray[0]var countleft = Count(splitleft)var revstring = ""var commastring = ""var finalstring = ""for(var i=countleft-1; i>=0; i--) { revstring = text(revstring) + text(splitleft[i])}// loop through the revesed string and add the commasfor(var k = 0; k < countleft; k++) { if ((k+1) % 3 == 0) {//if the position is a multiple of 3 then we add a comma//and account for whether it’s the last rowif (k < countleft){commastring = " " + text(revstring[k]) + text(commastring)} else {commastring = text(revstring[k]) + text(commastring)}} else {commastring = text(revstring[k]) + text(commastring)}}if (Count(splitarray) == 2)// here you can change the separator finalstring = commastring + "," + splitarray[1]elsefinalstring = commastringreturn finalstringWhat if you want to have a verbal string, as in previous example? Just change the last string:
Return "Average household size: " + finalstring + " persons."
Similar Arcade expressions may be used in ArcGIS Pro and other parts of esri software where customized number and date formatting is needed.
Commenting is not enabled for this article.