Have you always wanted a 3D Print from an ArcGIS Pro Local Scene? Download this Add-in and follow these instructions to bring your data to life!
In this post, I’ll show how to export watertight, 3D-printable STL files directly from ArcGIS Pro and walk through real-world examples like the Lincoln Memorial, Crater Lake, and Hawaiian bathymetry.
You can now export an STL file directly from ArcGIS Pro! Thanks to the Graphics team’s effort in ArcGIS Pro 3.5 they introduced the ExportSceneContentsFormat Class into the ArcGIS Pro SDK. This class enables developers to export Local 3D Scene content programmatically as either a GLTF or STL file. This shipped as a backend implementation with no functional user interface to access it. This gap gave me the opportunity to create a simple ArcGIS Pro add-in that uses this class to export STL files and post-process the open mesh into a watertight, 3D-printable model.
Github for the tool and how to download/install
I built an open-source tool that lets you use the ExportSceneContentsFormat class to create your own 3D-printable models in ArcGIS Pro. Visit the GitHub repo for the source code and download the latest .esriAddinX release to install the add-in in ArcGIS Pro. The GitHub README walks you through setup and first use.

How to create your own 3D Printing Ready STL
- Install the STL Export add-in (double click on .esriAddinX)
- Open a Local Scene in ArcGIS Pro
- Set the basemap to Open Street Maps
- Switch to the new STL Export ribbon tab
- Choose extent method (screen / drawn / manual)
- Set output folder and filename
- Choose:
-
- Single STL vs per-object STLs
- Base extrusion depth (feet)
- Click Export
- Import STL into slicer (Bambu Studio, Snapmaker Orca, PrusaSlicer, etc.)
Current Limitations
- The tool currently supports only Local Scenes.
- Cannot export Google Basemaps
- Large extents may produce very dense meshes
- STL exports are geometry-only (no textures or colors)
Showcase of what can be printed


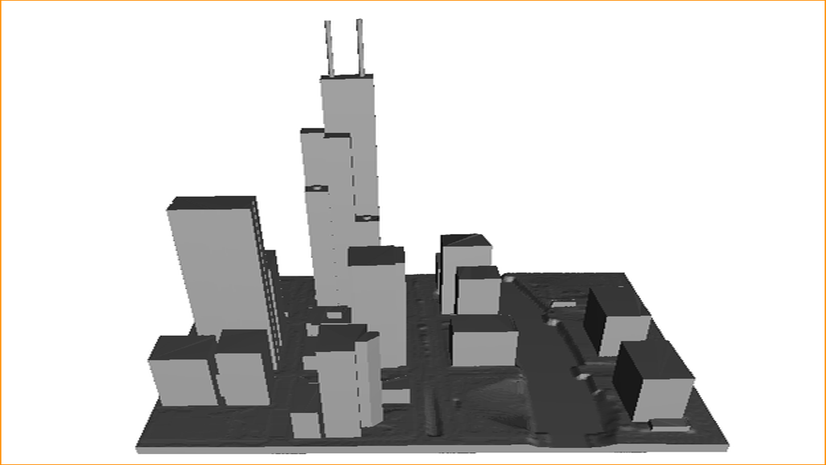
Here’s a single building—the Jefferson Memorial—sourced from the OpenStreetMap (OSM) 3D basemap. We use OSM as they allow the public to freely download their data, remember it is always important to have the correct permission or license to create a 3D Model. I used the tool to just draw the extent around the building and included a base. As you can see, the printed model matches the 3D scene exactly, down to the smallest architectural details. Most 3D printers can handle this print; the most challenging part is bridging the interior roof of the monument.


Here is the Lincoln Memorial in four colors! This time using the OSM Basemap I exported a larger extent that included some roads and a bit of water. I have a 3D Printer that has four Different Tool Heads allowing for four different color filaments to be used. White, Green and Blue are PETG whereas Black is PLA. Mixing PETG and PLA caused the road surfaces to lose some visual quality as the two materials do not stick well to one another. I manually painted the filament colors in the slicer software to control where each filament is extruded.
Vertical Exaggeration is important


As we are working with a geographical scale when it comes down to it most of the surface is pretty flat when you zoom out to a large extent. Because of this to get more dramatic 3D prints that are representative of elevation we need to introduce some vertical exaggeration. Both Crater Lake and Hawaii prints use exaggeration to aid in their visualization.
The Half Dome print shows vertical exaggeration is not always needed if there is enough of an elevation difference within the exported extent.


Create your own 3D Data with ArcGIS Pro
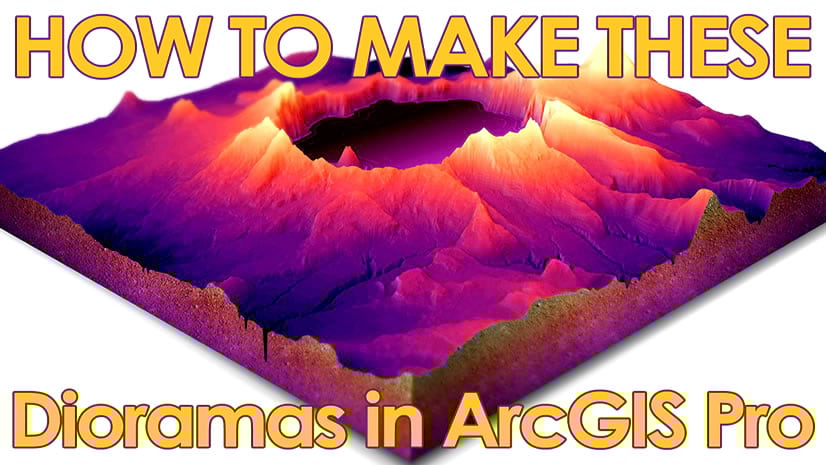
Now, basemaps are just the starting point. Custom data and cartography workflows open up a much wider range of printable scenes, and John Nelson’s tutorials are a great place to learn those techniques. Following John’s How to Make a 3D Diorama in ArcGIS Pro, I built a 3D scene of Crater Lake, exported it with the STL Export Tool, and added a base for printing. In the slicer, the black road I painted manually, and the “Crater Lake” label didn’t adhere during the print—another reminder that mixing PETG and PLA can be finicky. I used 5× vertical exaggeration for this model.

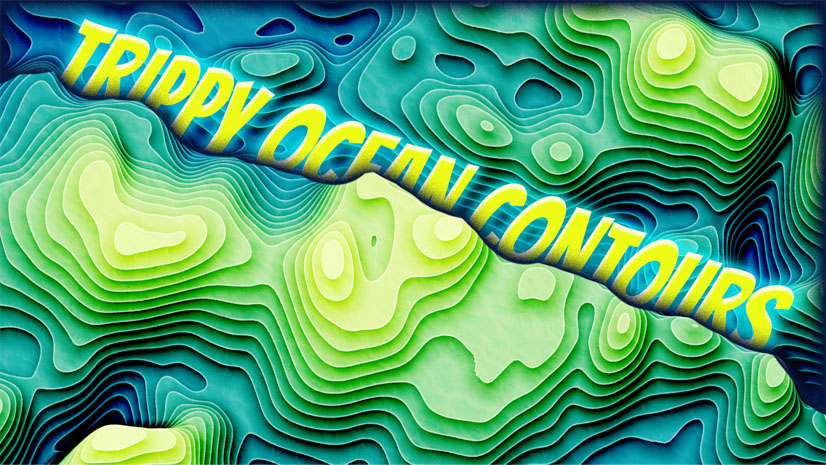
Since John asked (very politely) for “trippy bathymetry slices,” that’s exactly what I made—and then used the same workflow to build a more accurate bathymetry print for Hawaii. The first model uses sparkle PETG and follows John’s video closely up through generating contour polygons. After creating the contour polygons, extrude them using the Contour Min value to form a stacked 3D surface, then export the result with the STL Export Tool. This print shows off 3D printing’s layer-by-layer nature in a way that feels a lot like a contour map: both are built from stacked layers.
Combining what we have learned


Finally. to move from “trippy” to more realistic bathymetry, I pulled Hawaii-area raster data using the GEBCO app and combined it with Esri’s 3D Elevation Source service as an elevation source. With a 25× vertical exaggeration applied, the ocean features became dramatic and highly printable. This model lands in the intermediate difficulty range, and most printers can handle it if you add a filament stop at a specific height—pause, swap filament, and continue. Keen-eyed viewers will notice the wipe tower detached partway through, but the printer still finished the model successfully.
Download the STL Export Tool from GitHub and try exporting your first ArcGIS Pro scene today!
If you give the tool a spin, I’d love to see what you create—share your results on LinkedIn or in the GitHub repo. When issues pop up, feel free to reach out; I’m happy to help troubleshoot. Like most 3D printing projects, the process comes with highs and lows, and nearly every print I’ve shown here has at least one defect somewhere. The key is to iterate, tweak, and run it again.
Ever since joining Esri in mid-2021, turning ArcGIS scenes into real, physical 3D prints has been a personal goal—so it’s exciting to finally share a workflow that makes it practical. I’ll leave you with a question: what do you want to see 3D printed?
FAQ (click to expand)
1. What is 3D Printing?
PLA (Polylactic Acid) or PETG (Polyethylene Terephthalate Glycol) is extruded through a hot end to build a single
2D slice of a 3D object. Once a layer is complete, the machine moves up a set layer thickness (such as 0.2mm)
and prints the next layer. Layer by layer, the 3D object is constructed.
2. What data can I 3D Print?
because it provides data that can be reused as long as it is properly attributed.
3. I don’t have a 3D printer but have an idea to print, where can I find one to use?
mainstream as the technology has been optimized and simplified. These spaces often offer courses on how to use
the printer. There are also online services that will print models you provide.
4. What 3D Printer and slicer were used in this blog?
and A1 Mini which I used for the trippy bathymetry slices and Jefferson Memorial, respectively.
The goal was to show that a wide variety of 3D printers can be used.
5. Will official support for exporting an STL be coming to ArcGIS Pro?
Attribution for Data
© GEBCO 2024
© OpenStreetMap contributors

Article Discussion: