Table of Contents
- Why 3D Printing?
- 3D Printing within the ArcGIS System
- Tutorial: Create 3D City and host as 3D Object Feature Layer
- Sourcing Data: Have to start somewhere
- Data Preparation: Getting data ready for printing
- Eliminating Overlaps: Removing extraneous buildings
- Publish your data to your portal
- Load the Data into City Download Portal: Our Final Step
- Frequently Asked Questions
Why 3D Printing?
When I bought my first 3D printer for $100 in 2022—right after joining Esri—I immediately wondered how I could 3D print GIS data. Open-source tools existed, but I wanted to work inside the ArcGIS System. At the time, there wasn’t a built-in way to export a printable STL file.
Now there are two workflows. One uses the ArcGIS Maps SDK for JavaScript and the other uses ArcGIS Pro, which I will cover in a future blog. As 3D printing grows, it offers a hands-on way to explore GIS data by turning a digital 3D visualization into a physical model.
3D Printing within the ArcGIS System: A start
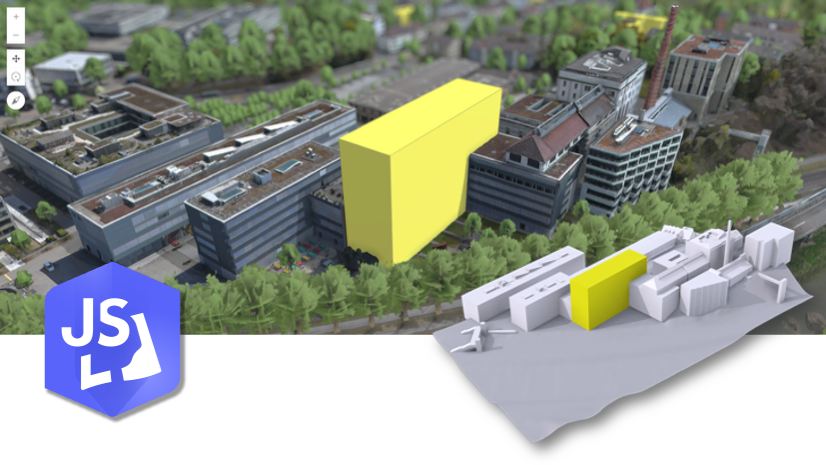
The ArcGIS Maps SDK for JavaScript team within Esri earlier this year released the City Download Portal as an open-source project. It’s a browser tool that exports 3D-printable city models from a web scene. The tool first queries the ground mesh and 3D buildings, then exports the result as a GLB file. GLB is the binary form of glTF, the JSON-based 3D asset format.
Since slicers typically expect a triangle-mesh format, such as STL, I extended the application so it converts GLB to STL directly in the browser. I also added an optional base extrusion to create a flat print surface. As a result, the forked version of City Download Portal can export 3D-printable STL models directly through the ArcGIS Maps SDK for JavaScript.
How the Workflow Operates
The City Download Portal works by performing two key queries:
-
Surface elevation, to retrieve the ground mesh.
-
3D Object Feature Layer, to retrieve the buildings associated with the scene service.
Because the app loads a web scene hosted in ArcGIS Online or ArcGIS Enterprise, you may see an authentication prompt depending on how the content is shared.
In this tutorial, I will walk through how to create your own 3D-print-ready 3D Object Feature Layer using ArcGIS Pro with building data from the Overture Maps Foundation.
Tutorial: Create 3D City and host as 3D Object Feature Layer

Sourcing Data: Have to start somewhere
First we open the Overture Maps Explorer and follow these steps
- Turn on Buildings (and Building Part if needed).
- Pan/zoom to your area of interest.
- Zoom in to ~level 15+ until Download visible activates.
- Click Download visible.
- In the dialog, choose GeoJSON and download the files.
- Keep the buildings and building-part GeoJSON for this workflow (they include height attributes you’ll use to generate 3D models).
- This will download 8 GeoJSON files but the two we are interested in are buildings and building-part
Data Preparation: Getting data ready for printing
We have our data sourced so we can open ArcGIS Pro, create a new local scene, and lets place our two GeoJSON files within the project folder. First tool we will run is JSON To Features for both buildings and parts. Select the GeoJSON, provide an output name, and choose Polygon as the geometry type.
At this point, you should have a feature layer for Buildings and Building Parts. If the layers are not visible, adjust their elevation settings in layer properties. Set for both absolute height.
Next, select each layer. On the feature layer sub ribbon at the top, you can now select extrusion type, select base height, then for field select height and leave unit to meters.
Eliminating Overlaps: Removing extraneous buildings
After extrusion, you should see 3D buildings in the scene, but Buildings and Building Parts are overlapping. To start click on the map tab at the top, click select by location, use buildings as input features, relationship as intersect, selecting features as parts, and selection type as new selection. Run this and now you should have all of the intersecting buildings selected, then in the edit tab we delete these features. This will handle most overlap but if any are missed feel free to also delete any overlapping buildings.

After fixing overlaps, run Merge (Data Management Tools) to combine Buildings and Parts into a single feature class. Use both datasets as inputs and enable Add source information to output.
Convert 2D Data to 3D: Making extrusions solid
Currently you have a polygon feature layer that is extruded to create a 2.5D representation, the data is 2D but we extrude it out to symbolize it as 3D hence 2.5D. Now we need to run Layer 3D to Feature Class which takes the extruded polygons and creates multipatch features so they are true closed 3D Models. Run the tool with our all_buildings layer and output an all_buildings_3D feature class.
We have one final step before publishing and that is converting our multipatch feature layer to be a 3D Object Feature Layer by running the add 3D Formats to Multipatch tool. Select all_buildings_3D as the input features and we are going to add the 3D Formats .glb and .gltf. After the tool completes, you’ll have a 3D Object Feature Layer with true 3D Objects as the feature class. Then use add 3D Formats to Multipatch instead of Export 3D Objects as we are wanting to convert our Feature Class to become a 3D Object Layer Feature class which is what the tool expects as input with Export 3D Objects.
Publishing our 3D data: Making it ready to share
Next, follow these steps to publish the 3D Object Feature Layer as well as the 3D Scene.
- In ArcGIS Pro, open Share > Web Layer > Publish Web Layer.
- Name the layer and add Summary, Tags, and (if applicable) Categories per your org standards.
- Set Layer Type to Feature (or Scene for 3D object layers).
- Open the Configuration tab → Operations and enable Export Data (if you want users to export).
- Click Analyze, resolve any messages, then Publish.
Note: Publishing 3D content can create a related scene layer and build cache in your organization, which may take additional time.
Load the Data into City Download Portal: Our Final Step
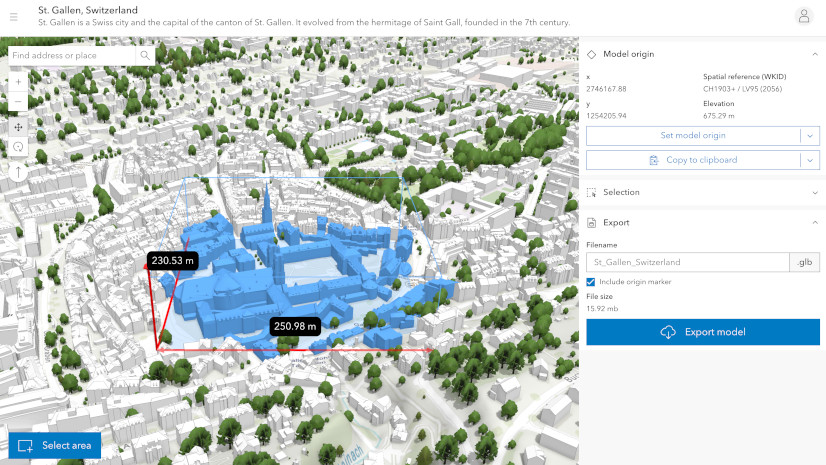
Then as soon as the cache finishes, open the scene in Scene Viewer and switch to a 2D basemap to avoid visual confusion.
When the scene is ready, copy the item id from the URL at the top of the browser and paste it at the end of the URL of the forked City Download Portal.
My fork of the City Download Portal already has this item id.

The web scene should appear after authentication depending on sharing level. Then we can go ahead and query what we would like to print.
Finally, set an origin, draw out the bounding box, then we are able to select GLB or STL, give the file a name, select if we want to include the origin marker, select if we want to extrude the terrain base downward and if so how much.
Click download to get the STL file that you can 3D print. Be sure to share with us what you create and print!

Frequently Asked Questions
What is 3D Printing?
What is a Scene?
What is open source?
What makes Paul’s version of City Download Portal different?
What is a Slicer?
What are the limitations of this workflow?
You mentioned a second workflow using ArcGIS Pro?
If I don’t have a 3D printer, where could I print something I make?
What printer was used? What material?
Data Attribution
Licensed under ODbL and CC BY 4.0, as applicable.

Article Discussion: