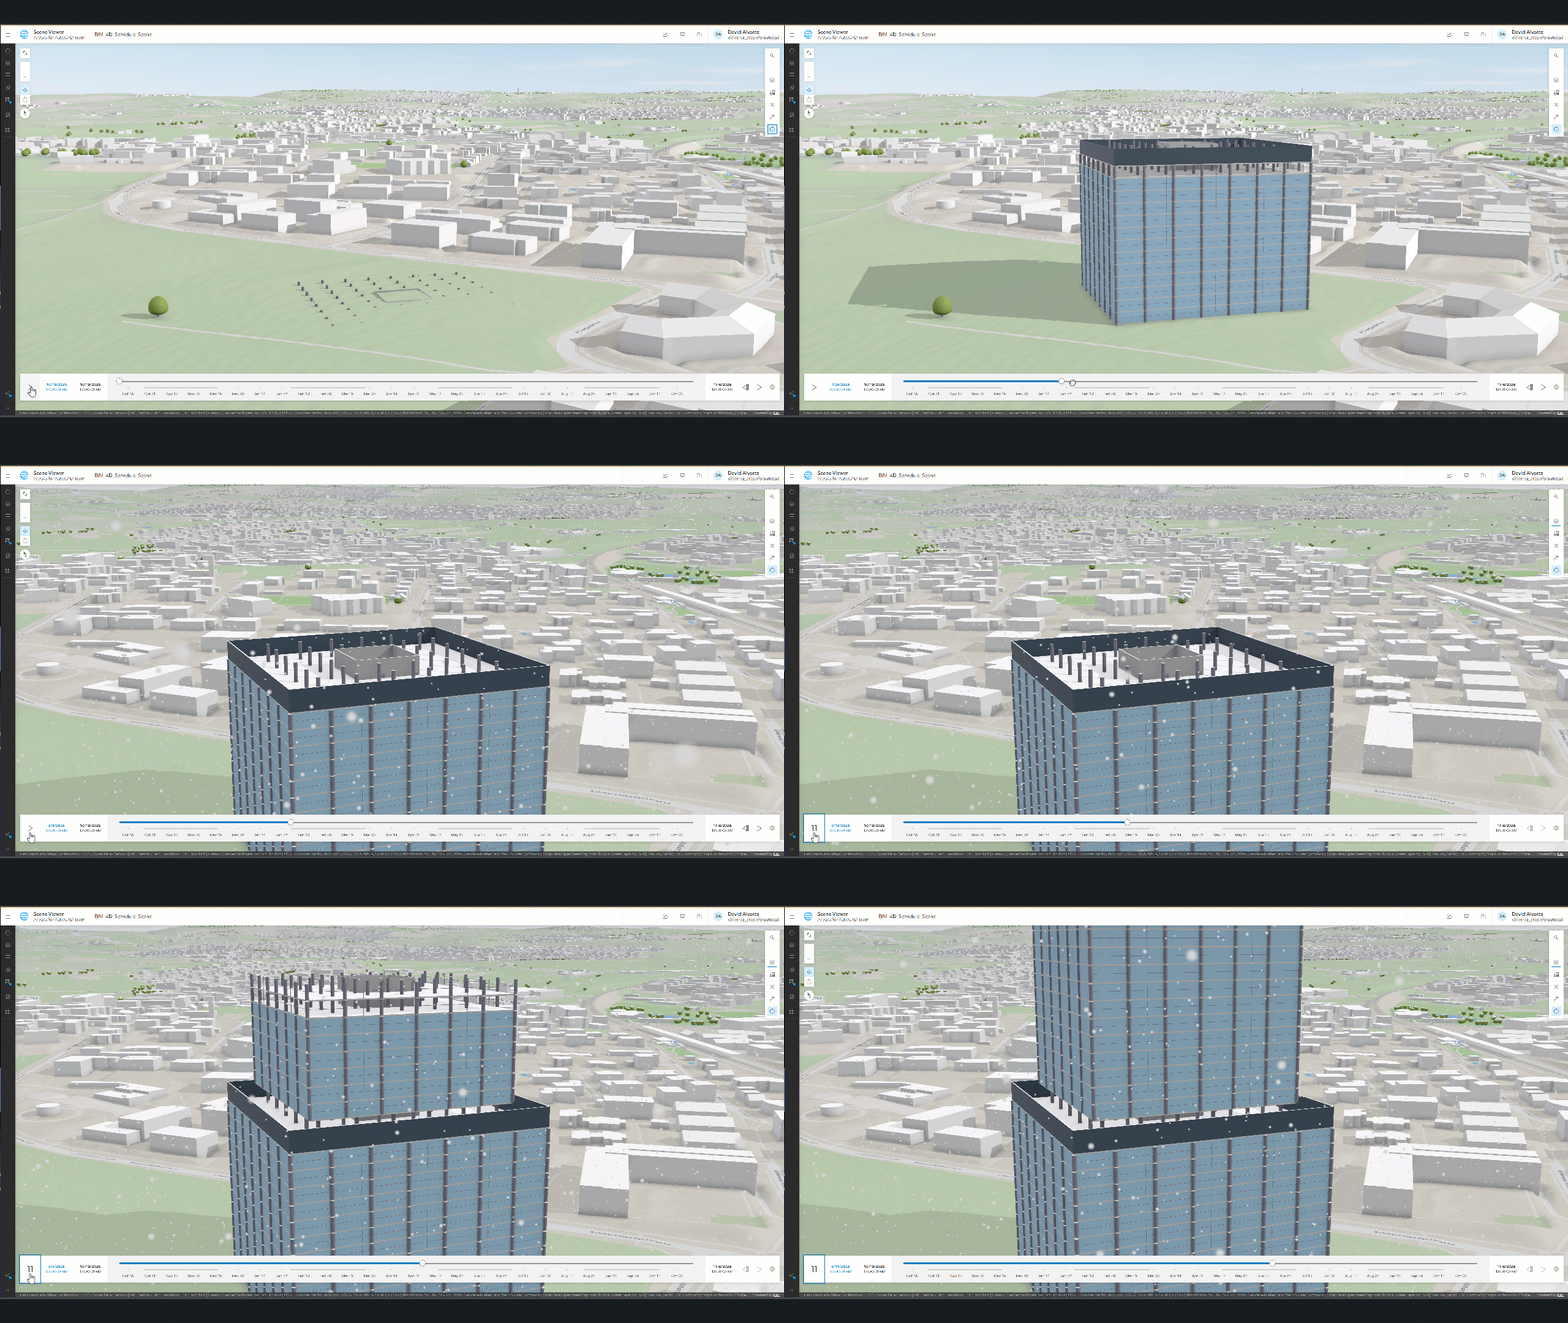
As outlined in Part 1 of this blog series, 4D simulation integrates time‑based data into a building information model (BIM), transforming a static 3D model into a dynamic representation of the construction process. By linking the model to the project schedule, teams can visualize how activities progress over time and gain deeper insight into sequencing, dependencies, and potential risks.
In this scenario, we focus on a schedule delay caused by a severe weather event. This disruption impacts Phase Two and all subsequent phases, shifting the overall timeline by several weeks. Through the 4D simulation, we can clearly illustrate how this delay propagates through the project and affects downstream activities.
Key points of 4D simulation
- Improved planning—4D simulation turns static schedules into dynamic visuals, helping teams spot sequencing issues and create more accurate timelines.
- Better communication—Visual schedules make it easier for all stakeholders to understand the construction process.
- Risk mitigation—By simulating activities in advance, teams can detect clashes and conflicts early, reducing rework and delays.
- Optimized resources—More accurate sequencing leads to better allocation of labor, equipment, and materials.
Before you begin
- Ensure that all models are already georeferenced.
What you need
- ArcGIS Notebook included with this post
- ArcGIS Pro 3.2 or later
- ArcGIS Online
The core of 4D simulation lies in synchronizing BIM models with the project schedule. By importing detailed 3D models and linking them directly to timeline data, 4D BIM enables a step‑by‑step visualization of how construction will progress. This alignment ensures that planned activities correspond with actual construction sequences, ultimately improving coordination and overall project efficiency.
Updated the 4D simulation with schedule changes manually
1. Data preparation
- Start ArcGIS Pro.
- Navigate to your portal. Add and open scene created in Part 1.
Repeat this step for each layer.
- Using the Add Join geoprocessing tool, join the service to the spreadsheet using Sched_TaskID as the primary key and Task ID on the spreadsheet as foreign key.
The schedule coming from the spreadsheet must be formatted so each column represents each of the fields added on the prior step.
- Populate the fields with schedule information using the Calculate Fields (multiple) geoprocessing tool.
2. Rebuild the cache
- Go to ArcGIS Online.
- Navigate to the scene that was created in Part 1.
- Click the scene.
- Navigate to the content section.
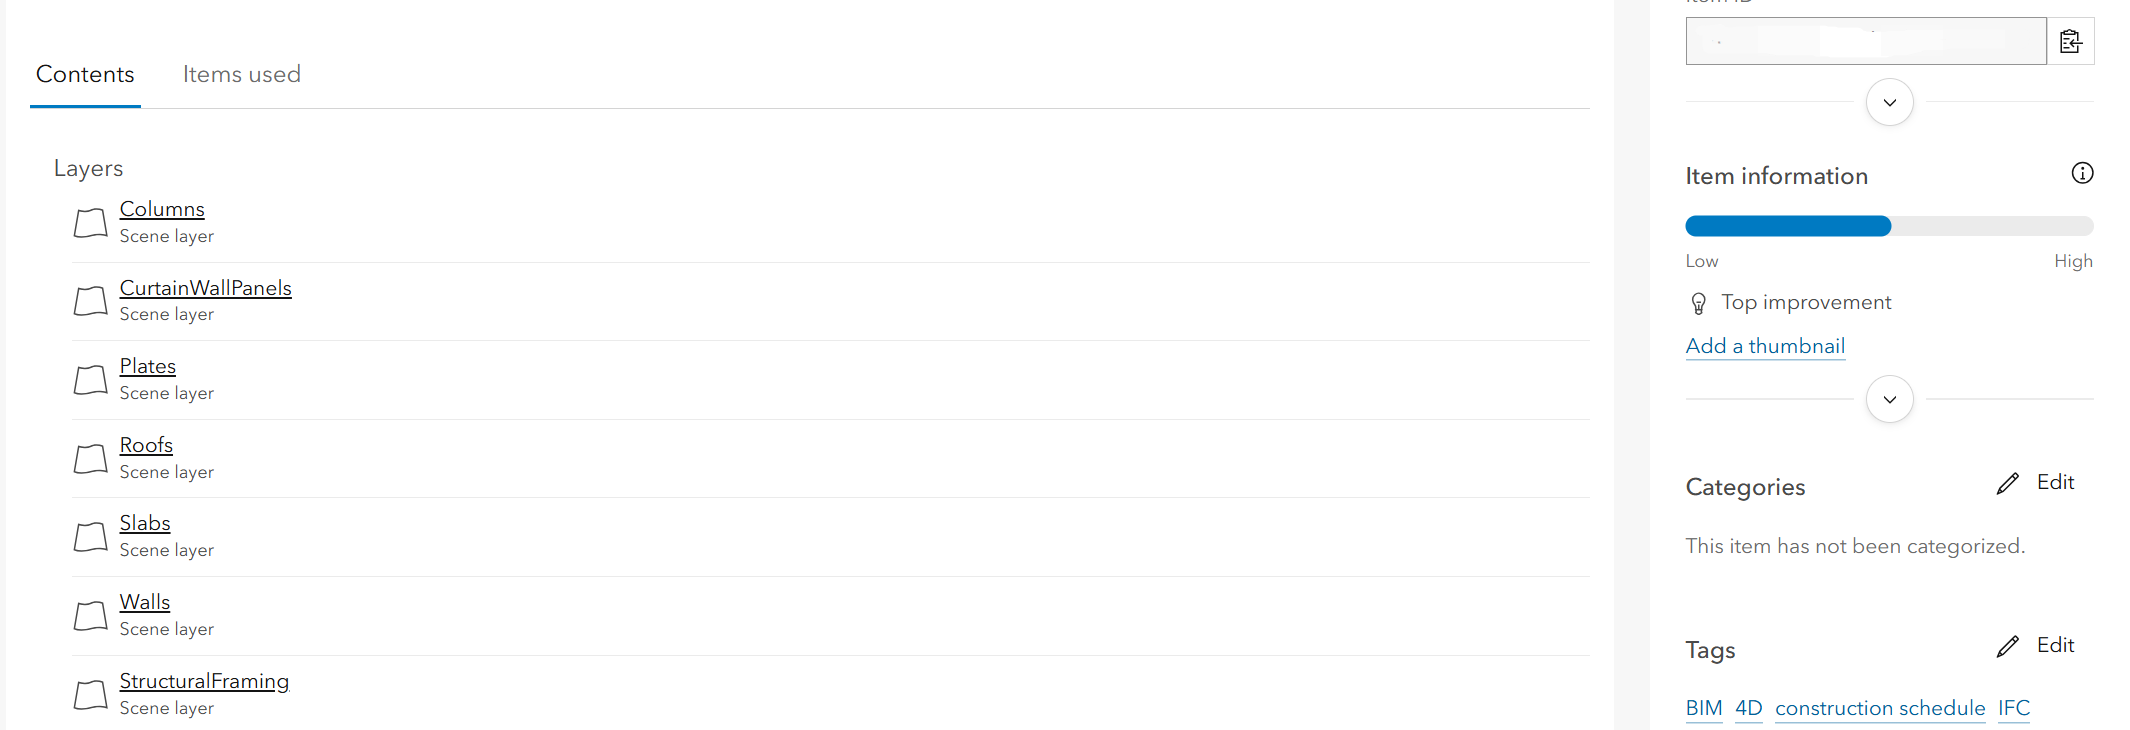
Repeat the flowing steps for each of the layers.
- Click the Roof Scene layer.
- Click Settings.

- Click Scene layer – 3D object (hosted).
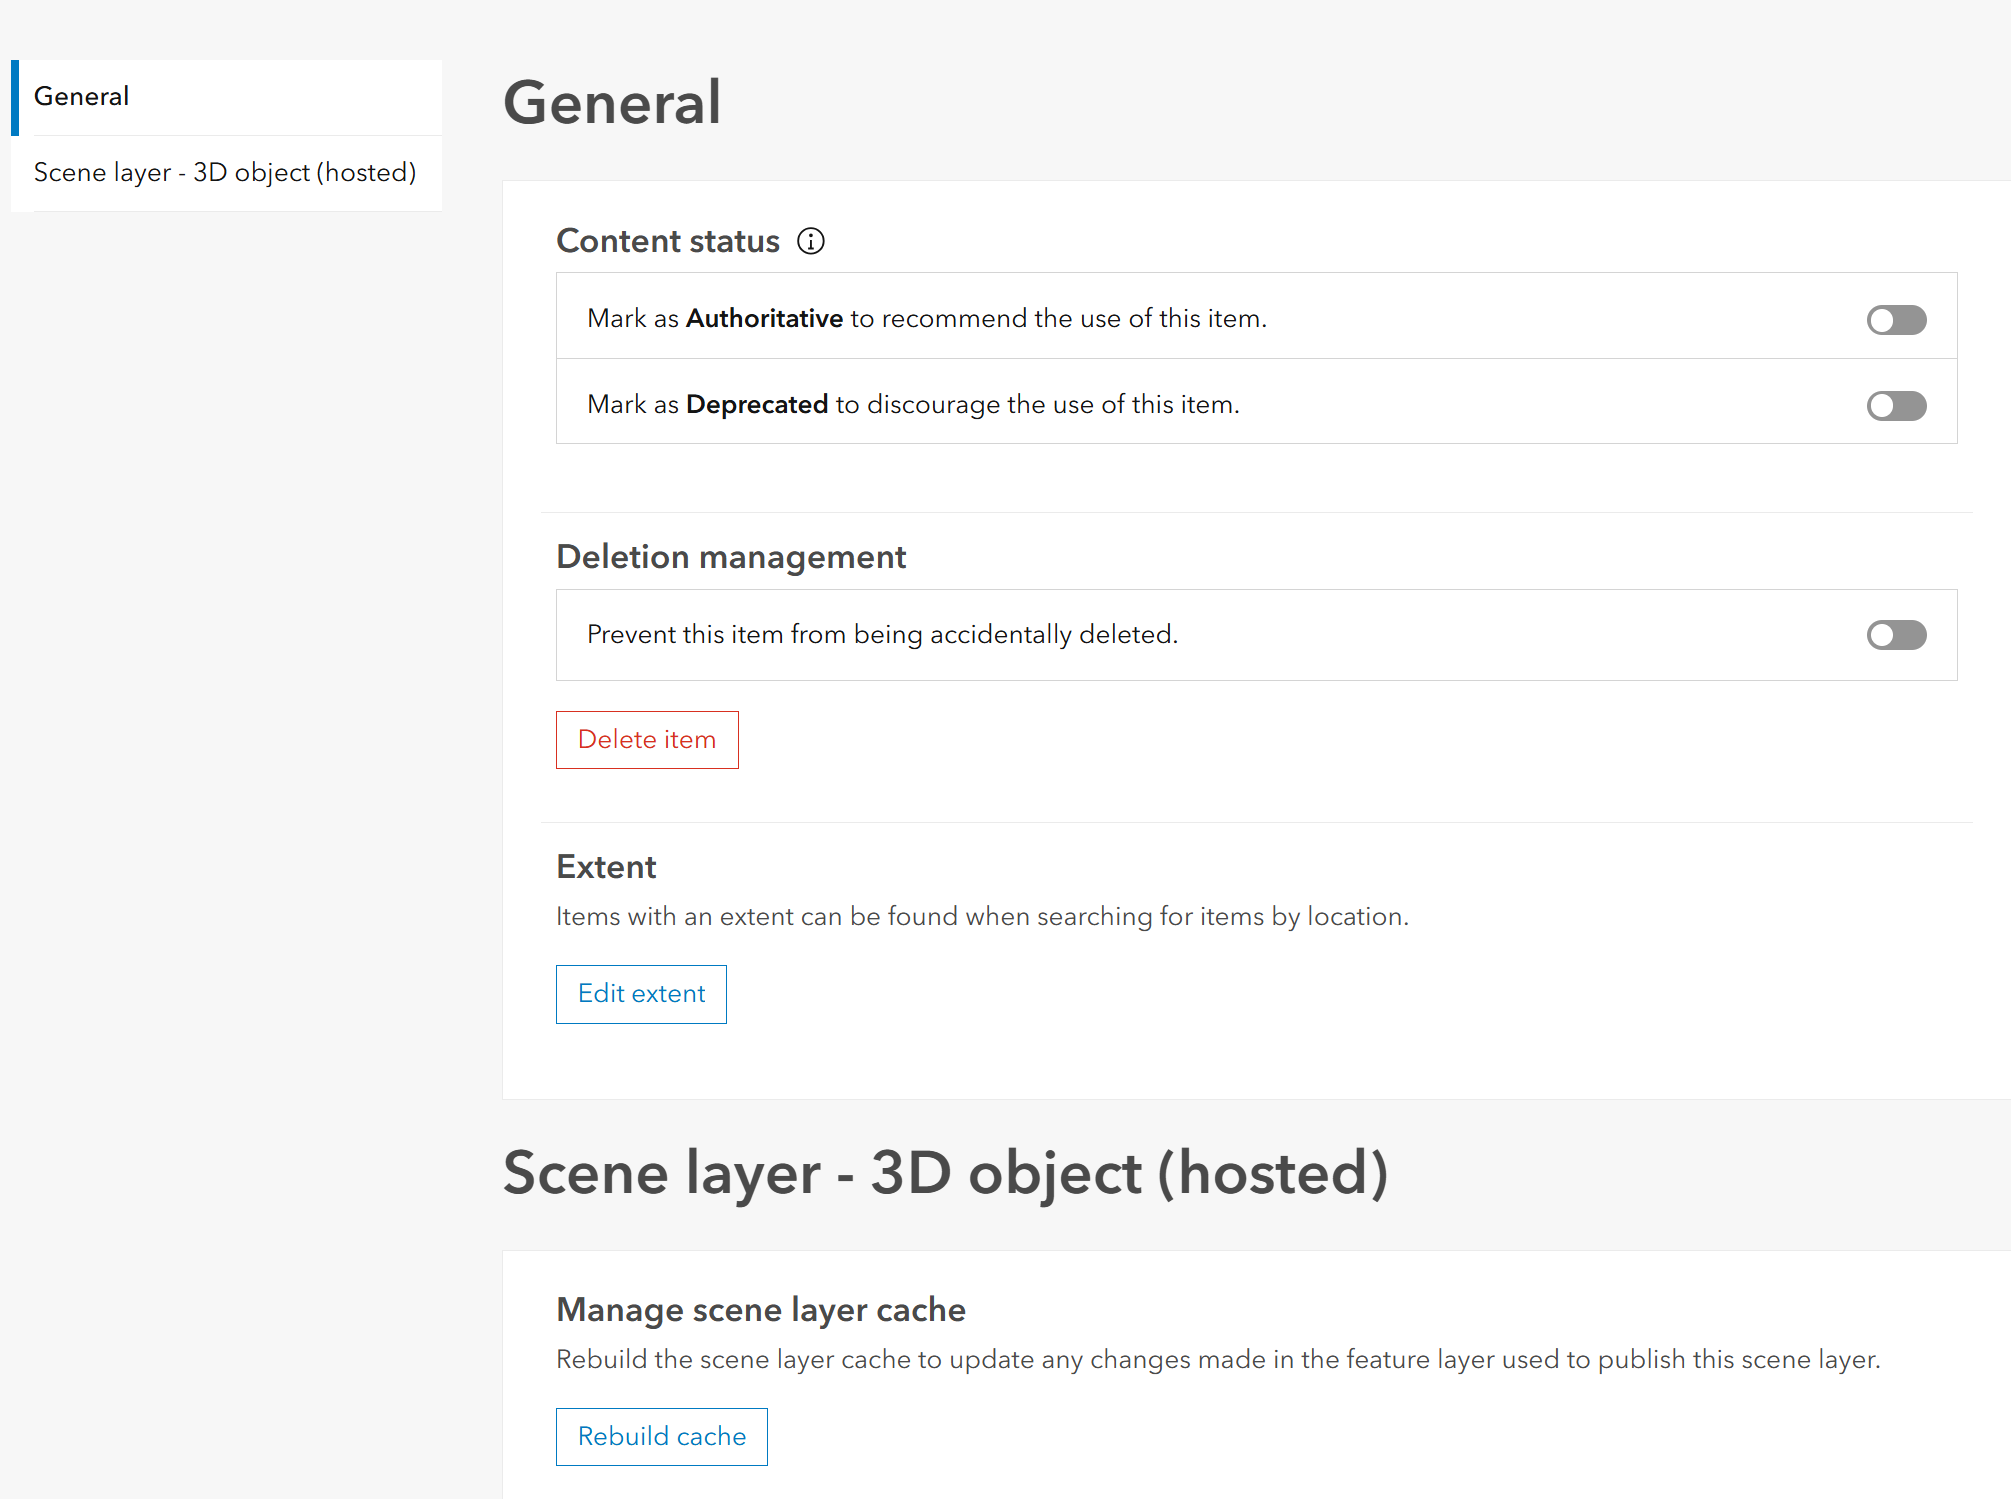
- Click Rebulid Cache.
- Select Full cache.
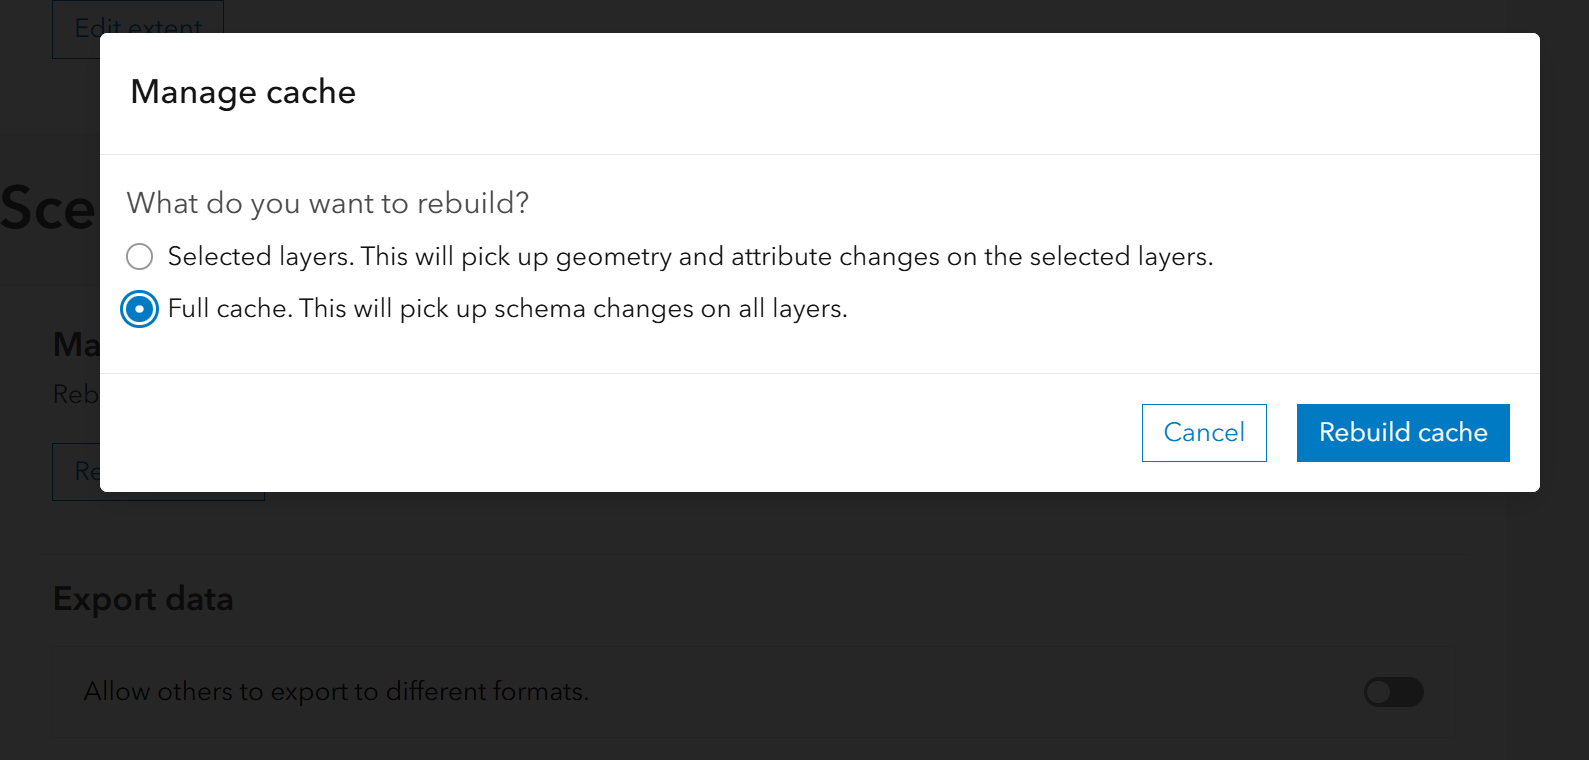
- Click Rebuild cache.
After the cache has been rebuilt for each of the scene layers, the scene will display the updated 4D simulation.
Updated the 4D simulation with schedule changes automatically
The following code shows the workflow updated with the 4D simulation using a Scene layer – 3D object (hosted) and a construction schedule. This is an overview of the code, and the provided ArcGIS Notebook contains further details and explanations of the code.
"""4D BIM Schedule Update
This notebook pushes schedule updates from an Excel spreadsheet into the hosted feature layers backing a Web Scene, then refreshes the associated Scene Layer caches.

**Workflow:**
1. Load the updated construction schedule from Excel
2. Connect to ArcGIS Online
3. Read the Web Scene JSON to find all scene layers it contains
4. For each scene layer, discover its associated feature layer via `related_items`
5. Update feature layer attributes (start date, end date, duration)
6. Refresh the scene layer cache
"""

import re
import datetime as dt

import openpyxl
from arcgis.gis import GIS
from arcgis.features import FeatureLayer
from arcgis.layers import SceneLayer

# User Configuration
# Set the path to your Excel schedule and the Web Scene item id.


# Excel schedule file
EXCEL_PATH  = r"Schedules\tower_schedule_updated.xlsx"  # update to your file path
SHEET_NAME  = "Construction Schedule"
HEADER_ROW  = 4   # 1-based row containing column headers

# Web Scene item id on ArcGIS Online
WEB_SCENE_ITEM_ID = "your_web_scene_item_id_here"

# Field Definitions
# Column names in the Excel sheet and their corresponding field names on the hosted feature layers.

# Excel column names
TASK_ID_COL   = "Task ID"
START_DATE_COL = "Start Date"
END_DATE_COL   = "End Date"
DURATION_COL   = "Duration (d)"

# Feature layer field names
FIELD_TASK_ID    = "Sched_TaskID"
FIELD_START_DATE = "Sched_StartDate"
FIELD_END_DATE   = "Sched_EndDate"
# Duration field name varies per layer — we search for any field containing "duration"

# Rows to skip in the Excel sheet
PHASE_HEADER_PATTERN = re.compile(r"^\s*\u25b6")   # rows starting with ▶
SKIP_TASK_IDS = {"TOTALS"}

# Step 1 — Load Schedule from Excel
# Read the Construction Schedule sheet and build a lookup by Task ID.

wb = openpyxl.load_workbook(EXCEL_PATH, data_only=True)
ws = wb[SHEET_NAME]

# Read headers from the configured header row
headers = {}
for col in range(1, ws.max_column + 1):
    val = ws.cell(row=HEADER_ROW, column=col).value
    if val:
        headers[val.strip()] = col

# Build schedule lookup: {task_id: {start_date, end_date, duration}}
schedule = {}
for row in range(HEADER_ROW + 1, ws.max_row + 1):
    task_id = ws.cell(row=row, column=headers[TASK_ID_COL]).value
    if task_id is None:
        continue
    task_id = str(task_id).strip()
    if PHASE_HEADER_PATTERN.match(task_id) or task_id in SKIP_TASK_IDS:
        continue

    schedule[task_id] = {
        "start_date": ws.cell(row=row, column=headers[START_DATE_COL]).value,
        "end_date":   ws.cell(row=row, column=headers[END_DATE_COL]).value,
        "duration":   ws.cell(row=row, column=headers[DURATION_COL]).value,
    }

print(f"Loaded {len(schedule)} task rows from schedule.")

# Step 2 — Connect to ArcGIS Online
# Sign in using the active ArcGIS Pro session.

gis = GIS("pro", verify_cert=True)
print(f"Connected as: {gis.properties.user.username}")

# Step 3 — Discover Scene Layers from the Web Scene
# Read the Web Scene JSON and extract the scene layer item ids from its operational layers.

def to_epoch_ms(value):
    """Convert a date or datetime to epoch milliseconds (UTC) for AGOL date fields."""
    if value is None:
        return None
    if isinstance(value, dt.datetime):
        d = value
    elif isinstance(value, dt.date):
        d = dt.datetime(value.year, value.month, value.day)
    else:
        return None
    return int(d.replace(tzinfo=dt.timezone.utc).timestamp() * 1000)


# Get the Web Scene item and read its JSON
web_scene_item = gis.content.get(WEB_SCENE_ITEM_ID)
web_scene_data = web_scene_item.get_data()

# Extract scene layer item ids from the operational layers
scene_layer_items = []
for lyr in web_scene_data.get("operationalLayers", []):
    item_id = lyr.get("itemId")
    if item_id:
        item = gis.content.get(item_id)
        if item and item.type == "Scene Service":
            scene_layer_items.append(item)
            print(f"  found scene layer: {item.title} ({item.id})")

print(f"\n{len(scene_layer_items)} scene layers found in Web Scene.")

# Step 4 — Update Feature Layers & Refresh Caches
# For each scene layer, discover its associated feature layer, push the schedule updates, then refresh the scene cache.

summary = []

for scene_item in scene_layer_items:
    print(f"\n=== {scene_item.title} ===")

    # Discover the associated feature layer
    related = scene_item.related_items(rel_type="Service2Service", direction="reverse")
    fl_item = next((i for i in related if i.type == "Feature Service"), None)

    if fl_item is None:
        print("  [warn] no associated feature layer found — skipping")
        summary.append({"layer": scene_item.title, "status": "feature layer not found"})
        continue

    print(f"  feature layer: {fl_item.title} ({fl_item.id})")
    flayer = FeatureLayer.fromitem(fl_item)
    oid_field = flayer.properties.objectIdField

    # Find the duration field (name varies per layer)
    duration_field = next(
        (f["name"] for f in flayer.properties.fields if "duration" in f["name"].lower()),
        None
    )
    if duration_field:
        print(f"  duration field: {duration_field}")
    else:
        print("  [warn] no duration field found — duration will be skipped")

    # Query all features and build updates
    fset = flayer.query(where="1=1", out_fields=[oid_field, FIELD_TASK_ID], return_geometry=False)
    updates = []
    for feature in fset.features:
        task_id = feature.attributes.get(FIELD_TASK_ID)
        if not task_id:
            continue
        row = schedule.get(str(task_id).strip())
        if row is None:
            continue

        attrs = {
            oid_field:        feature.attributes[oid_field],
            FIELD_START_DATE: to_epoch_ms(row["start_date"]),
            FIELD_END_DATE:   to_epoch_ms(row["end_date"]),
        }
        if duration_field and row["duration"] is not None:
            attrs[duration_field] = row["duration"]
        updates.append({"attributes": attrs})

    if updates:
        flayer.edit_features(updates=updates)
        print(f"  updated {len(updates)} features")
    else:
        print("  [warn] no matching records found")

    # Rebuild the scene layer cache
    print("  rebuilding scene layer cache...")
    scene_layer = SceneLayer(scene_item.url, gis=gis)
    cache_job = scene_layer.manager.rebuild_cache(layers=0)
    print(f"  cache rebuild submitted: {cache_job}")

    # Poll for completion
    if hasattr(cache_job, 'url'):
        job_id = cache_job.url.rsplit("/", 1)[-1]
        import time
        for _ in range(60):  # up to 10 minutes
            detail = gis._con.get(f"{scene_layer.manager.url}/jobs/{job_id}", {"f": "json"})
            status = detail.get("status", "unknown")
            if status in ("Completed", "Failed"):
                print(f"  cache rebuild {status}")
                break
            time.sleep(10)
        else:
            status = "timeout"
            print("  cache rebuild timed out (10 min)")
    else:
        status = str(cache_job)

    summary.append({"layer": scene_item.title, "status": "ok", "updates": len(updates), "cache": status})

# Step 5 — Update Web Scene Time Slider
# Patch the Web Scene JSON with a time slider reflecting the schedule's date range.

import json

# Compute time range from schedule
all_starts = [v["start_date"] for v in schedule.values() if v.get("start_date")]
all_ends   = [v["end_date"]   for v in schedule.values() if v.get("end_date")]
start_ms = int(min(all_starts).timestamp() * 1000) if all_starts else 0
end_ms   = int(max(all_ends).timestamp() * 1000)   if all_ends   else 0
total_days = (end_ms - start_ms) / (1000 * 60 * 60 * 24)
interval_days = max(1, int(total_days / 40))

# Patch the web scene JSON
data = web_scene_item.get_data()

data["widgets"] = {
    "timeSlider": {
        "properties": {
            "startTime": start_ms,
            "endTime": end_ms,
            "currentTimeExtent": [None, end_ms],
            "thumbCount": 1,
            "thumbMovingRate": 300,
            "timeStopInterval": {
                "interval": interval_days,
                "units": "esriTimeUnitsDays"
            }
        }
    }
}

if "initialState" not in data:
    data["initialState"] = {}
data["initialState"]["timeExtent"] = [None, end_ms]

web_scene_item.update(item_properties={}, data=json.dumps(data))
print(f"Time slider updated: {min(all_starts)} → {max(all_ends)} ({interval_days}-day intervals over {int(total_days)} days)")

# Summary
# Review the results for each layer.

print("\n=== SUMMARY ===")
for entry in summary:
    layer  = entry["layer"]
    status = entry["status"]
    if status != "ok":
        print(f"  {layer}: {status}")
    else:
        updates = entry["updates"]
        cache   = entry.get("cache", "not attempted")
        print(f"  {layer}: {updates} features updated, cache → {cache}")
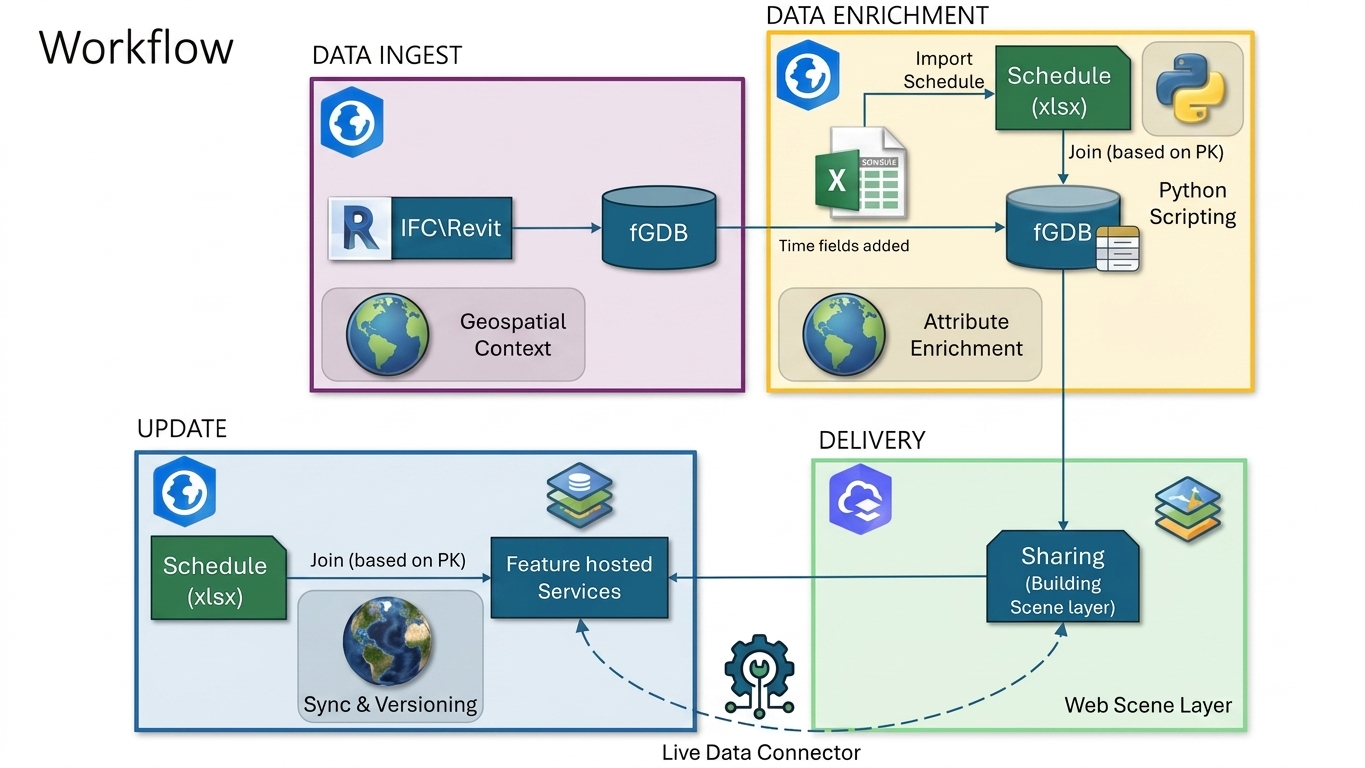
Figure 1 shows an overview of the steps necessary to create the 4D simulation using Scene layer – 3D object (hosted) and how to keep it up to date.
Conclusion
The schedule stops being a spreadsheet someone must interpret and becomes something the whole team can watch, the structure rising phase by phase, right where it will stand. By using ArcGIS Online for a dynamic and interactive representation of the construction process, 4D simulation enables project teams and stakeholders to have a more up-to-date vision of the execution of the project.
This illustrates how 4D simulation can enhance BIM projects and provide significant advantages in project planning and scheduling, communication and collaboration, risk mitigation, and resource management.




Article Discussion: