Are you collecting GPS location data along routes? Is your data noisy as a result of GPS drift? Do you dream of a tool that can clean up your noisy location data? If you answered yes to any of those questions, keep reading to learn about your new favorite tool: Snap Tracks.
What can Snap Tracks do for you?
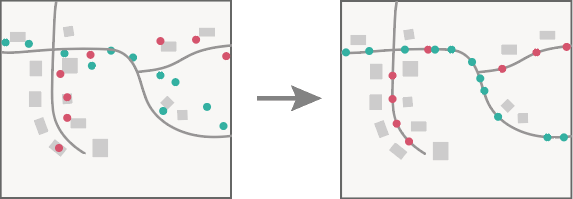
Snap Tracks takes time-enabled points (e.g., GPS movement data with a timestamp) and snaps them to lines (e.g., roads or paths) so you can gain a clearer understanding of which lines the points traveled along. To match the points to lines, the tool considers the distance between points and the candidate lines, as well as the points’ ability to move along the lines. That means, for example, if your points are moving in one direction, they won’t snap to lines that only support movement in another direction; this will make more sense later when we walk through the tool parameters.

What do you need to run the tool?
To use the Snap Tracks tool you need two specific types of input datasets:
- Points with a timestamp that represent movement. For example, GPS locations for delivery trucks or ride share vehicles.
- Lines that represent traversable paths. For example, roads, trails, pedestrian walk ways… you get the idea.
However, not every line dataset will work; the tool requires the following attribute information:
- From and to node (i.e., vertex) identifiers each stored in their own field
- Direction of travel stored in its own field
The tool needs this line information to turn the lines into a “network”. For more specifics on what these attributes mean and how they’re used I suggest checking out the tool doc.
How can you create a line dataset that’s ready for analysis?
Easy! You can create ready-to-use lines with the sample toolbox available for download on ArcGIS Online. The toolbox contains a tool called Create Streets Layer which takes Open Street Map data (free and downloadable!) and turns it into a line feature layer that can be used as-is in ArcGIS Pro, or can be shared to ArcGIS Enterprise for use there. Just follow the instructions in the sample toolbox description, and when you’re done, you’ll be set up for snapping success.
Example workflow to snap points to lines
In this sample workflow I use the GeoAnalytics Desktop version of the Snap Tracks tool. For inputs I use ride share movement data in San Francisco and my newly created OSM roads dataset.
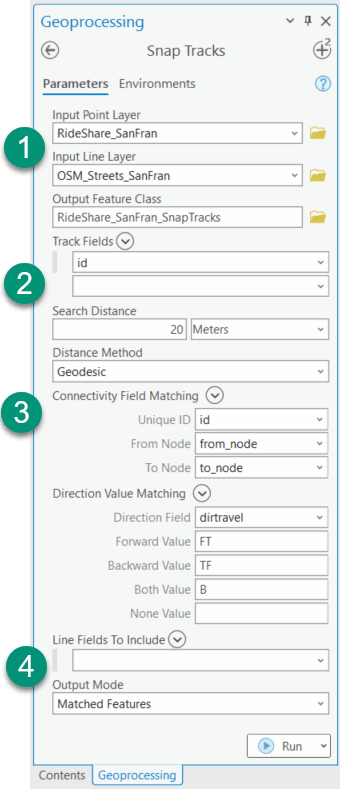
1. Specify the input layers and give your output dataset a name
Input points: Make sure the input points have time enabled. I’m using a multifile feature connection to easily set time, but you can also add your layer to the map and enable time that way.
Input lines: Specify the line dataset you want to use. I’m using OSM streets data that I created with the sample toolbox I downloaded from ArcGIS Online
Output name: Any name works!
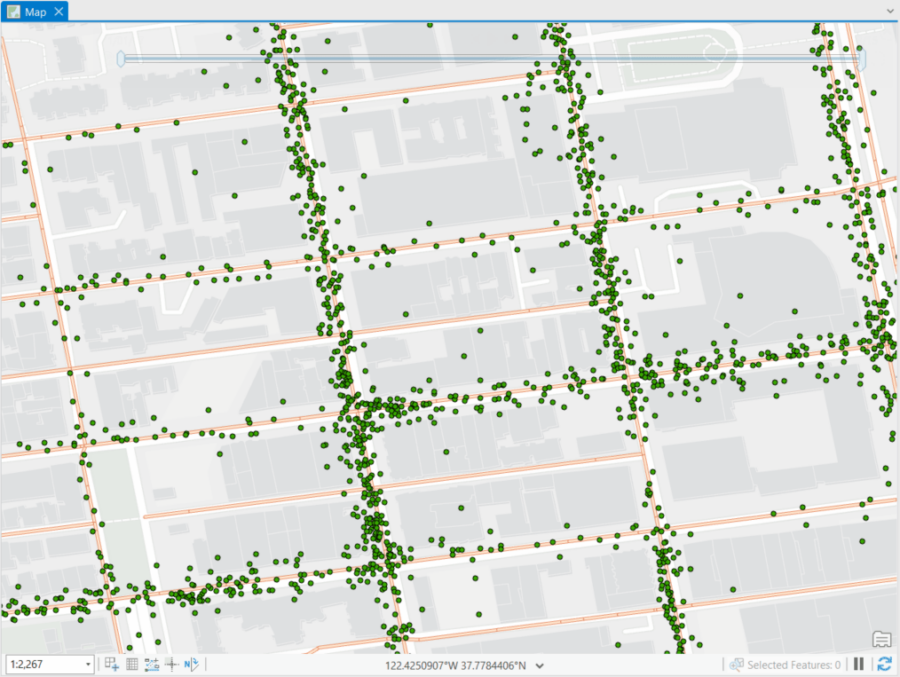
Here’s what the input OSM lines, and the unmatched input points look like:

2. Specify the search parameters
Track fields: Use the field from the point layer that identifies unique tracks. In my case, that’s the field id.
Search distance: This is the maximum distance allowed between a matching point and line. If the distance between a point and a line exceeds the distance, the point and line won’t match. For performance and accuracy, it is highly recommended to use a small search distance value. I’m using a value of 20 Meters to account for the GPS drift in my dataset.
3. Specify the road dataset parameters
Connectivity field matching: This tells the tool how the lines are connected, and how points can travel in order to match to a line. Unique ID is the road identifier, From Node indicates where the line starts, To Node indicates where the line ends. The tool stitches together lines based on node values. I’m using the OSM data which uses the following fields:
- Unique ID:
id - From Node:
from_node - To Node:
to_node
Direction value matching: an optional but highly recommended parameter that tells the tool which directions a point can travel along a line. If you don’t use this parameter, all lines will be assumed to be bi-directional. For the OSM data I used the following values:
- Direction Field:
dirtravel - Forward Value:
FT(think of this like From->To, so you’re moving from an origin to a destination) - Backward Value:
TF(think of this like To->From, so you’re moving from a destination to an origin) - Both Value:
B - I left None Value empty; in my dataset all of the lines have a dedicated direction value. If your dataset has lines that cannot be travelled on in any direction, specify the value that indicates that.
4. Specify the output result parameters
Line Fields To Include: I left this empty, but you can choose fields from the line dataset that will be joined to the output matched points.
Output Mode: I chose Matched Features to eliminate noisy, unmatched points from my dataset. If you want to keep all points even if they do not match with a line, choose All Features.
The image below shows what the tool looks like with my input values specified (the numbers next to parameters indicate the steps outlined above):

5. Run the tool!
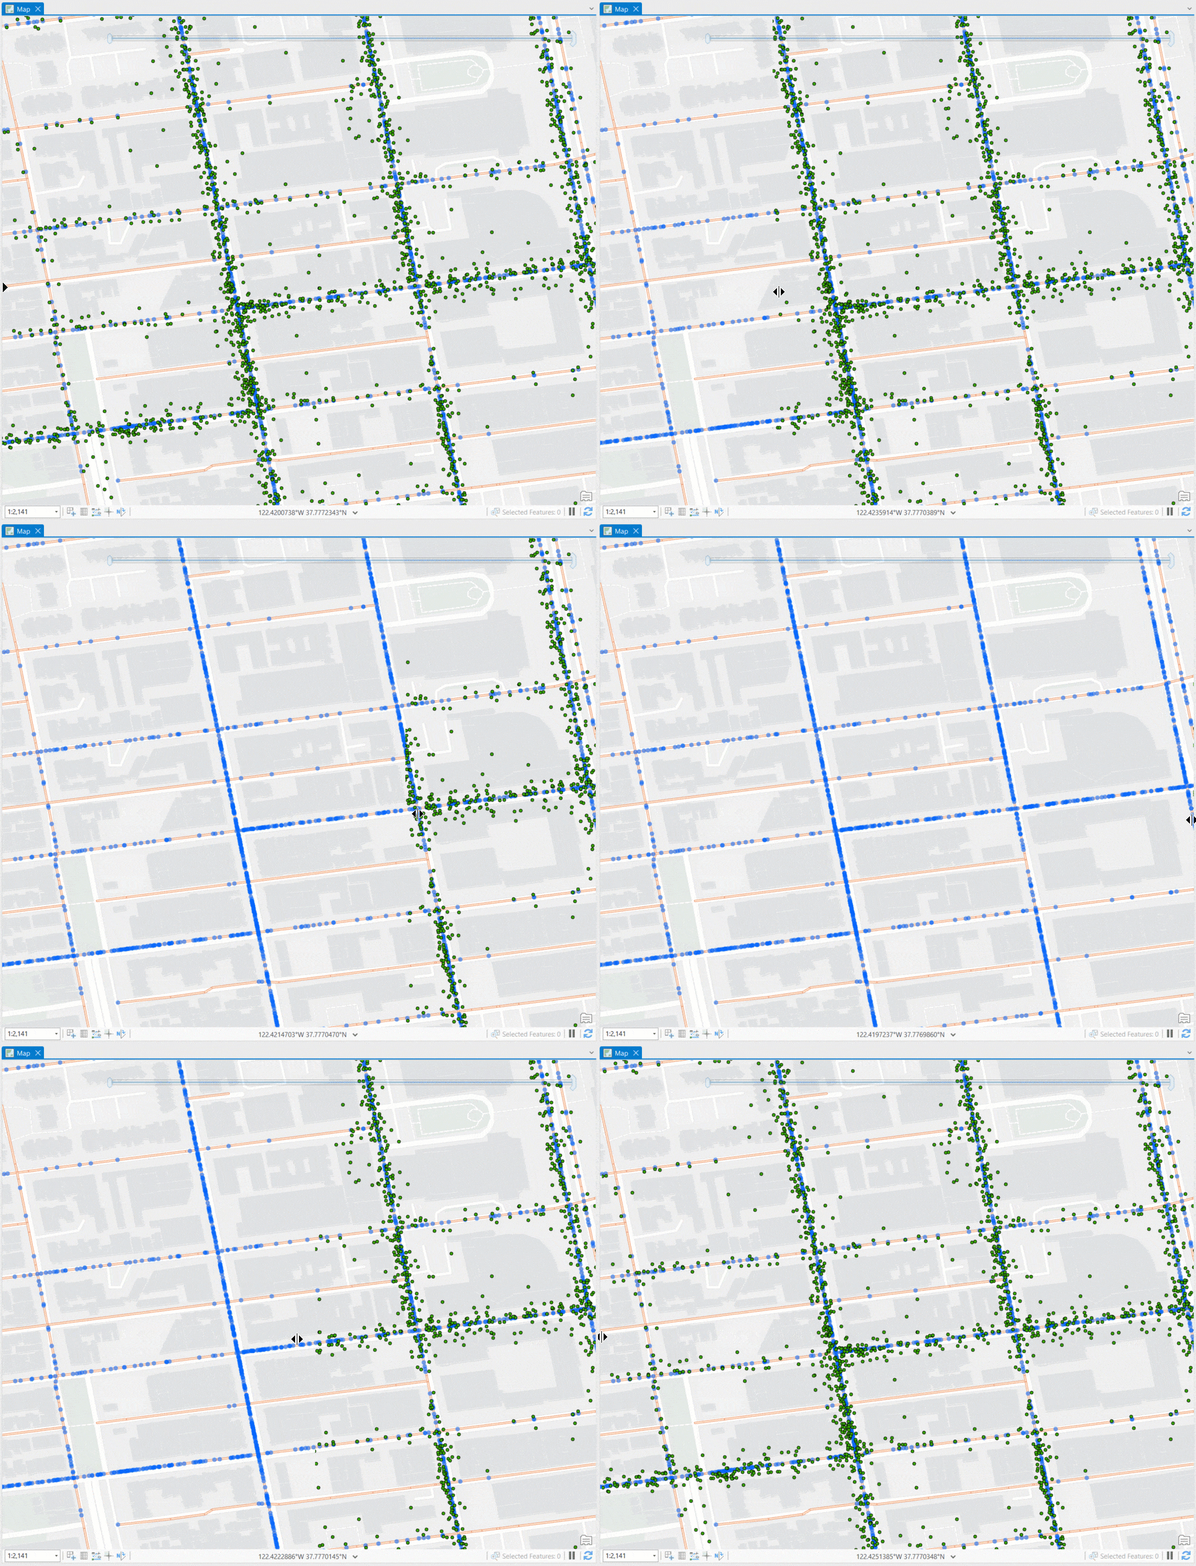
Below you can see the results from my tool run (nice, right?):

Summary
Using the sample toolbox provided via ArcGIS Online you’re able to create line features ready for Snap Tracks analysis. Snap Tracks cleans up noisy movement data, like vehicle GPS tracks, by matching the GPS points to lines.
If you’re using ArcGIS Enterprise, be on the lookout for the ArcGIS Enterprise 11.0 release where Snap Tracks will be available to you in the REST API and Python API.
If you have any questions or want to share your workflow with us, please email us at geoanalytics-pes@esri.com.

Article Discussion: