The Special Event Operations solution delivers a set of capabilities that help public safety agencies inventory special events, create operational maps, monitor event operations, and share event maps with the public.
To improve their ability to monitor event operations and maintain situational awareness, agencies frequently extend the solution with real-time location tracking of their personnel. In this blog, you’ll learn how extend the Special Event Operations solution with location tracking using either ArcGIS Field Maps or ArcGIS Mission.

Extend solution with location tracking using ArcGIS Field Maps
To get started with enabling location tracking using ArcGIS Field Maps, first verify that you are a member of the default administrator role in your ArcGIS organization and have deployed the Special Event Operations solution to your organizational portal. Then, complete the following prerequisites:
- Enable location sharing in your ArcGIS Online or ArcGIS Enterprise organizational portal.
- Assign a mobile worker user type (or an ArcGIS location sharing license) to each user in your organization whose location you wish to track.
Create and Add a Track View to Solution Maps
Next, you will use track layers in your ArcGIS Online organization or ArcGIS Enterprise portal to capture and share information about the real-time location of mobile users. In your organizational portal, you have a single track layer that you can use to create track views to support various real-time tracking needs. Each track view contains three sublayers, Last Known Location, Tracks, and Track Lines.
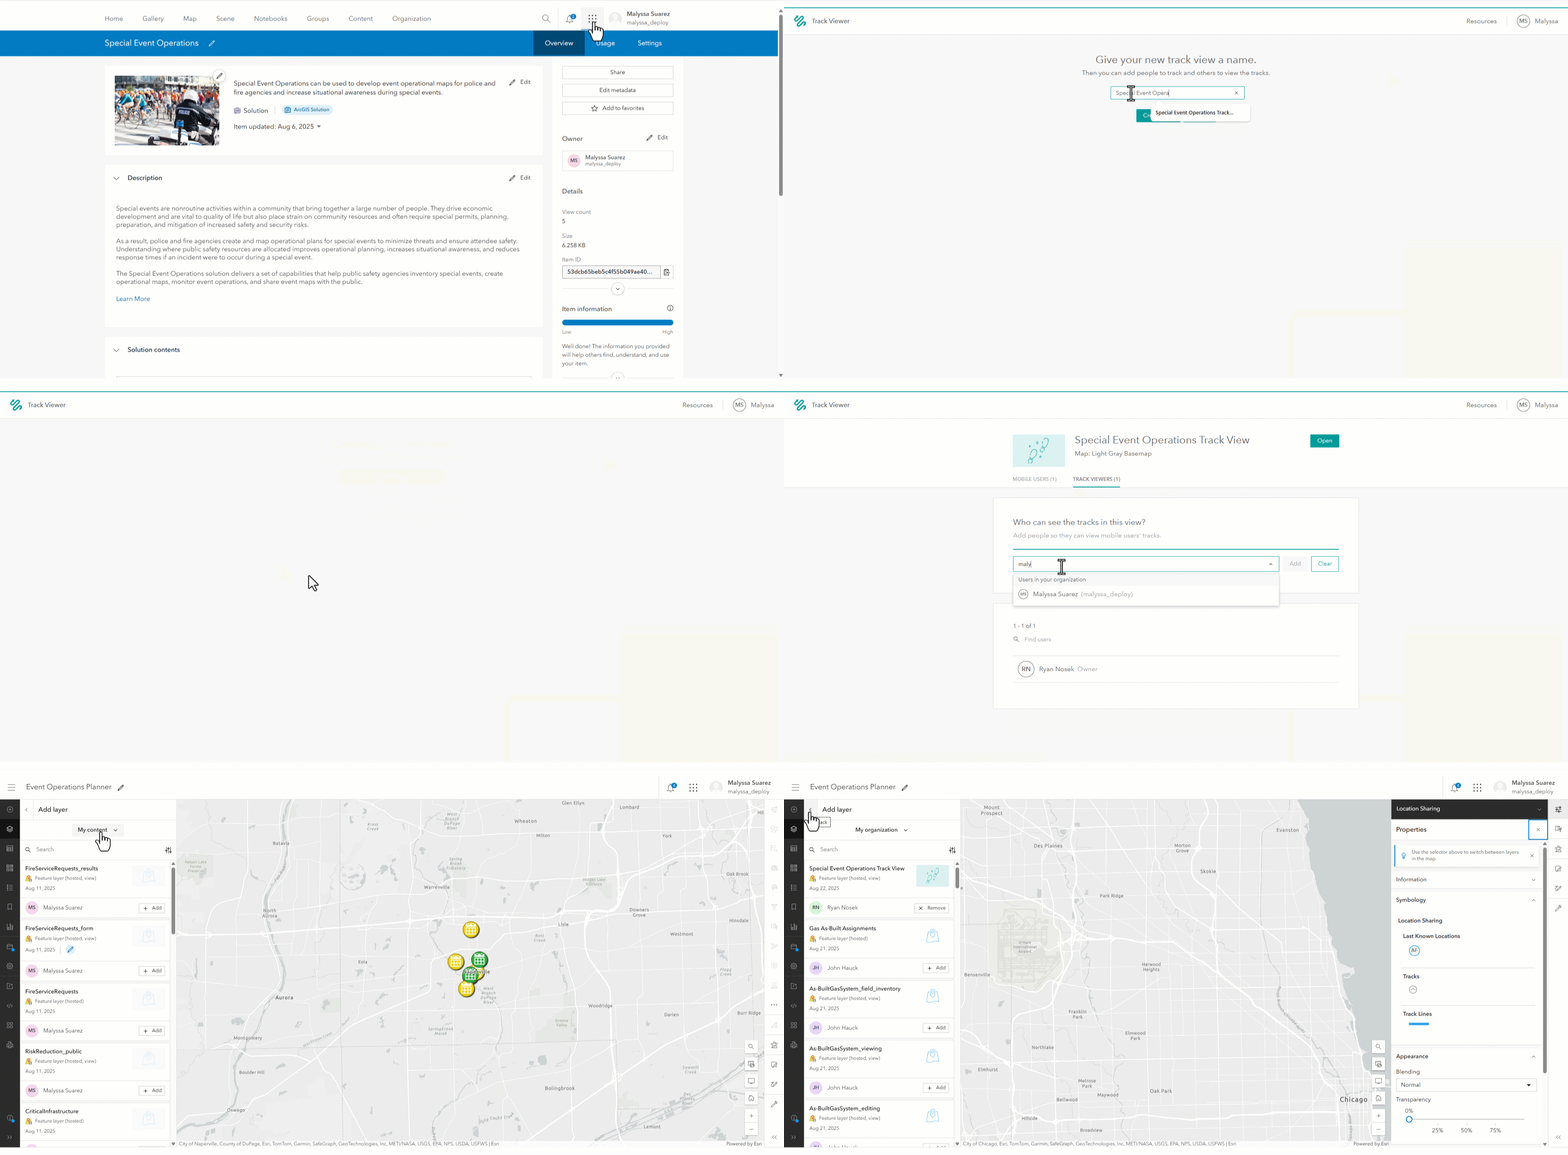
To create a track view to track your mobile special event personnel, follow these steps:
- In your organizational portal, ensure that any personnel who will be tracked are added as mobile users and that anyone who needs to view the real-time tracks (including your mobile users) are added as track viewers.
- Open ArcGIS Track Viewer from the app launcher and create the track view (in ArcGIS Online or ArcGIS Enterprise).
- Add the track view to the Event Operations Map Editor and Event Operations Maps web maps and turn off visibility of the Tracks and Track Line sublayers.
Note: Track views are stored in the organizational portal content of the user that first enabled location sharing for your organization.
Update Solution Apps
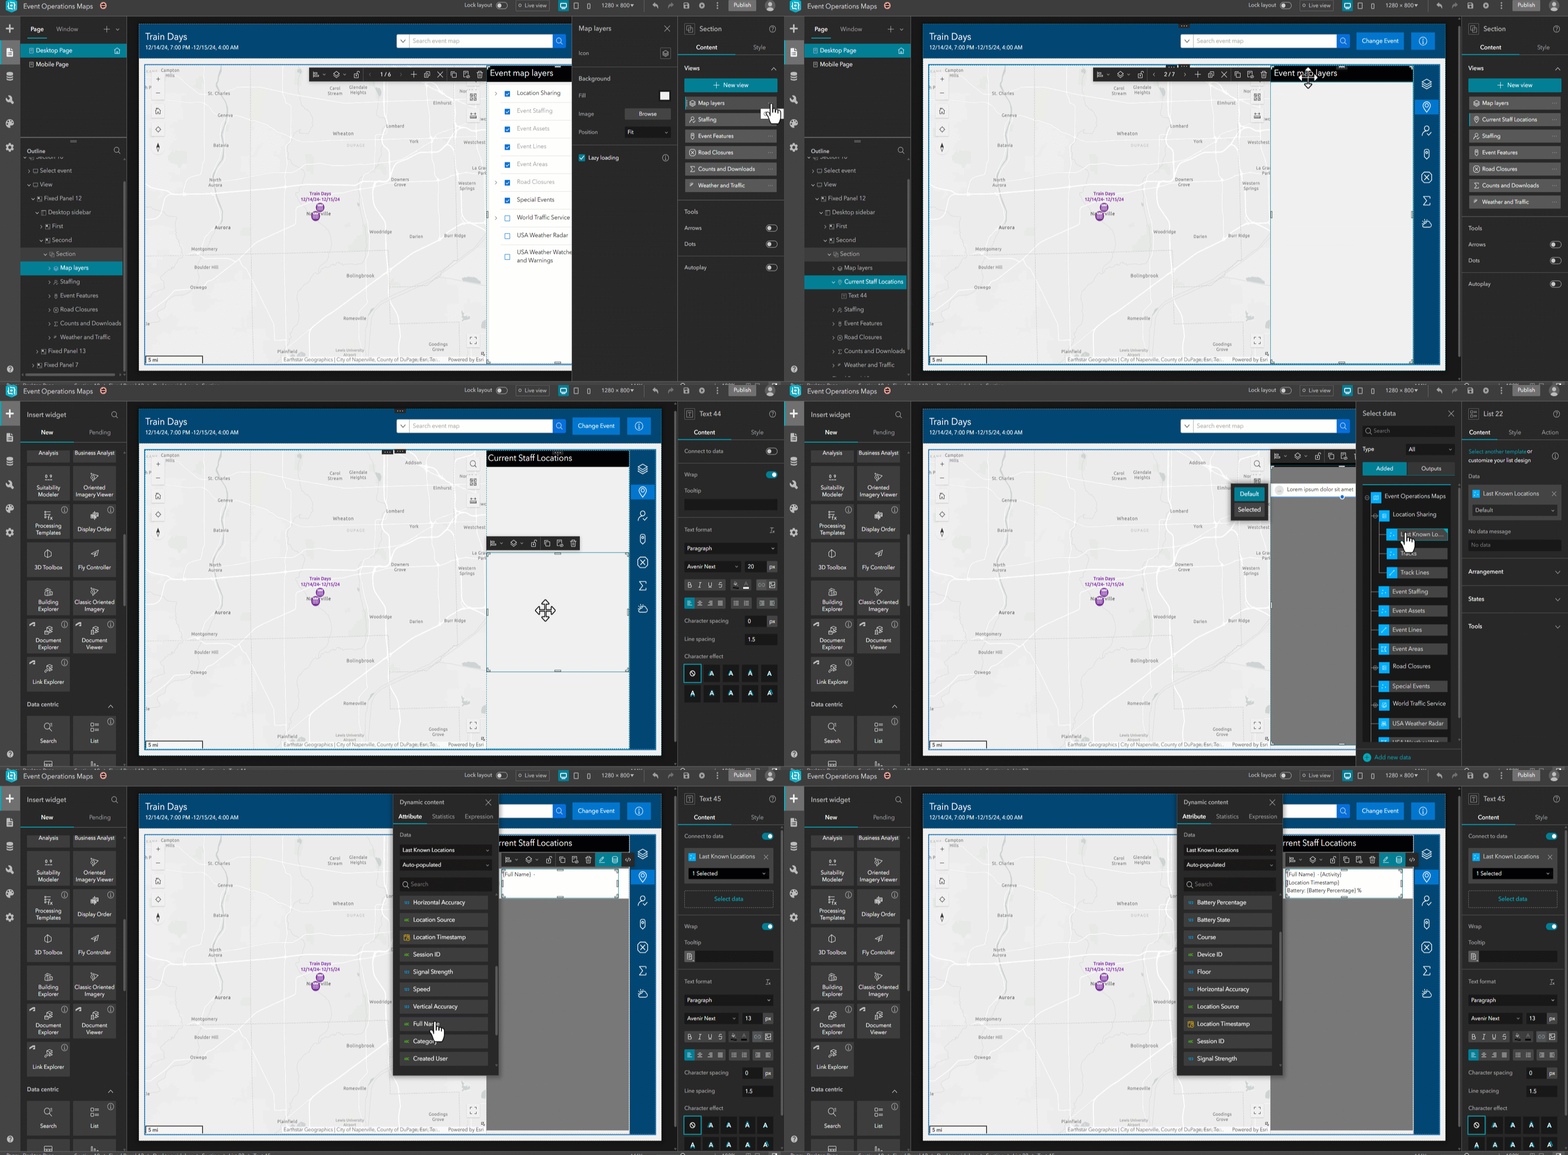
After you add the track view layer to your web maps, you can add a list widget to the existing Event Operations Maps and Event Operations Planner apps to visualize information about the last known locations of event staff.
To add a list widget to these apps, follow these steps:
- Duplicate an existing map control and reconfigure it to include a list widget.
- Set the data source for this widget to the Location Sharing – Last Known Location.
- Optionally, customize the list widget with dynamic field attributes and enable map actions.
After you republish the apps, each app will include a list of all currently tracked personnel.
Track Event Personnel with ArcGIS Field Maps
Now that location tracking has been configured, you can use the Event Operations Planner app to create a web map that can be used in ArcGIS Field Maps for location tracking and situational awareness.
To set up an event-specific map for tracking personnel using ArcGIS Field Maps, follow these steps:
- Open the Event Operations Planner app and select your event.
- Create an event-specific map using the Create Mission Map web tool.
- Share the map to the Event Operations Staff group.
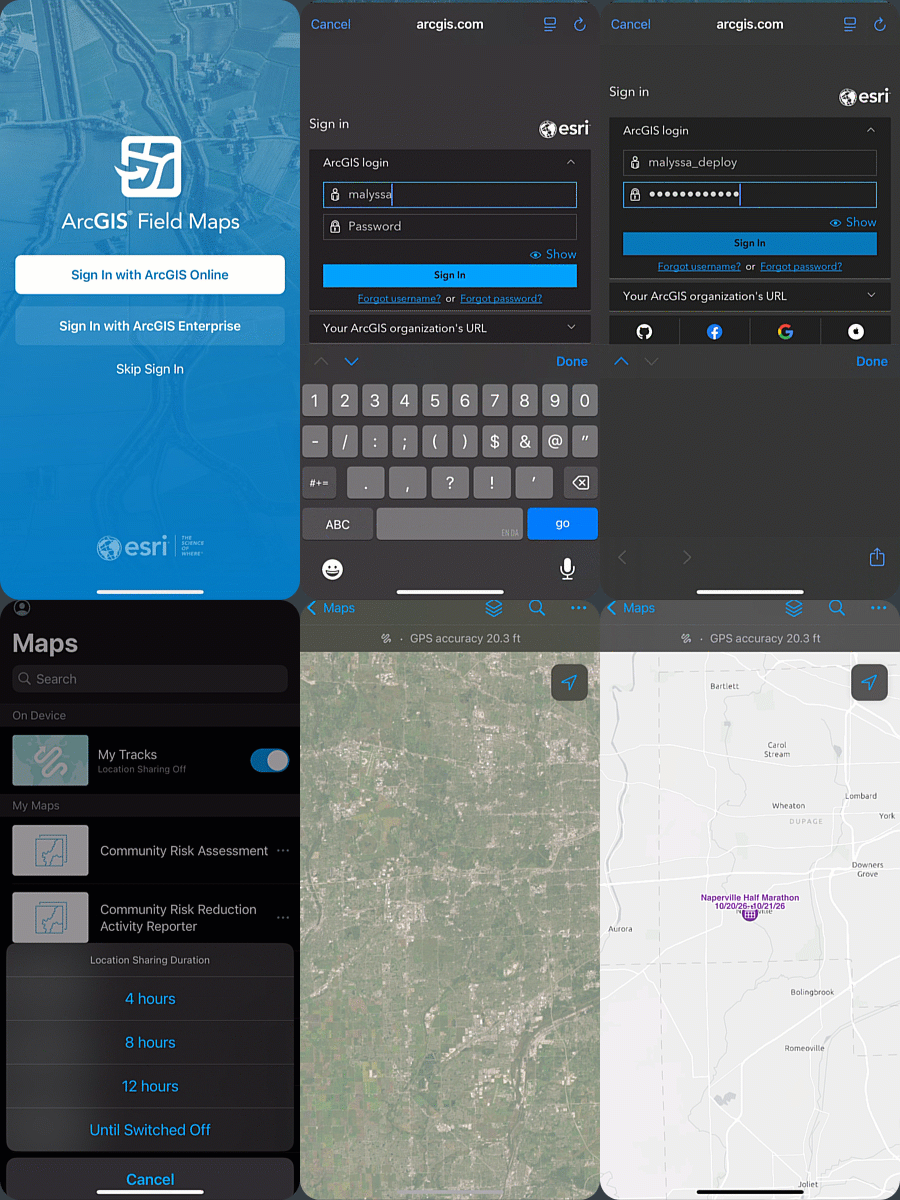
Now, your event personnel can sign in to ArcGIS Field Maps on their mobile devices, turn on My Tracks, select the event map, track their locations, and view the locations of other staff working the event.
Extend solution with location tracking using ArcGIS Mission
In ArcGIS Enterprise, you can extend the Special Event Operations solution even further with a suite of mobile team collaboration capabilities using ArcGIS Mission. Together, they provide a holistic situational awareness experience, combining a live operational map, location tracking, chat, taskings, and report generation to optimize your ability to protect events and keep attendees safe.
To get started with enabling location tracking using ArcGIS Mission, first verify that you are a member of the default administrator role in your ArcGIS organization, have deployed the Special Event Operations solution to your organizational portal, and have ArcGIS Mission licensed and deployed in your ArcGIS Enterprise environment. Then, complete the following prerequisites:
- Enable location sharing in your ArcGIS Enterprise organizational portal.
- Assign a mobile worker or contributor user type to each user in your organization whose location you wish to track using ArcGIS Mission Responder.
- Assign a creator user type to staff that will be using ArcGIS Mission Manager to plan, create, and manage missions.
To use ArcGIS Mission with the Special Event Operations solution, follow these steps:
- Open the Event Operations Planner app and select your event.
- Create an operations map for your event
- Run the Create Mission Map web tool. This tool will create a standalone web map in your content folder. Each layer in the map is pre-filtered for your selected event.
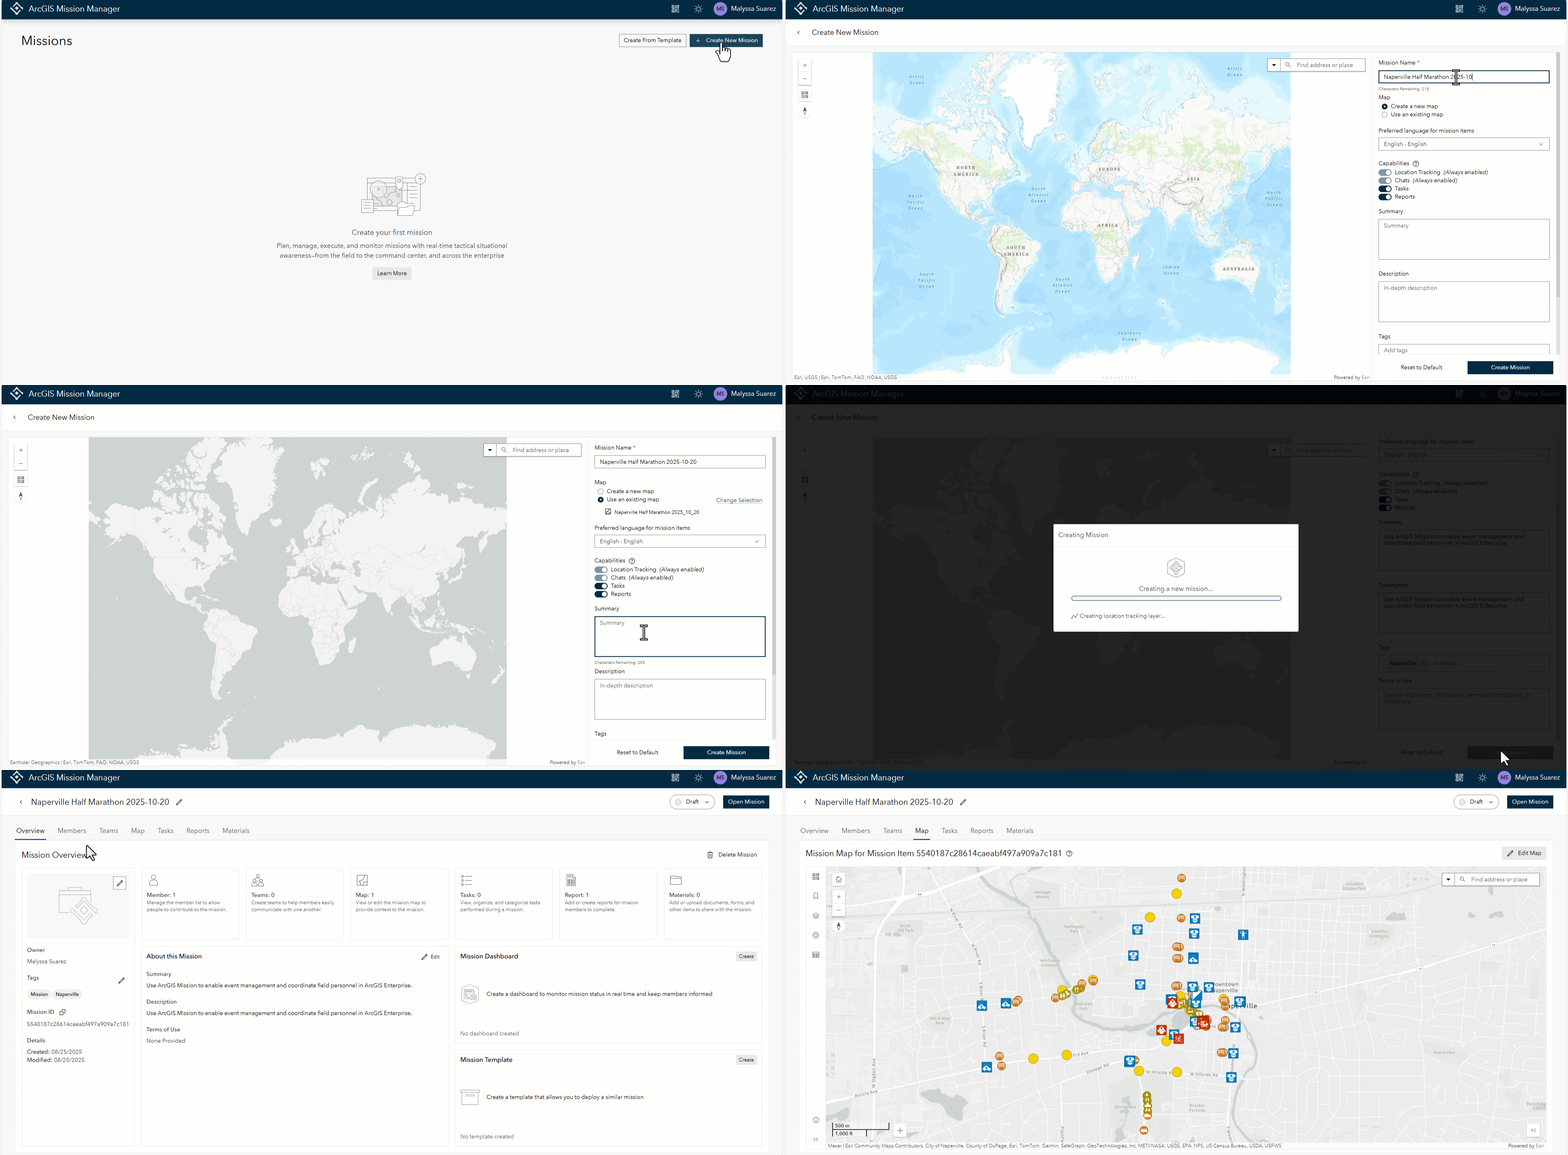
- Open ArcGIS Mission and begin creating a new mission.
- When configuring the new mission, select Use an existing map, select using the map generated by the web tool.
- Complete the mission configuration, and then click Create Mission.
Your event operations map will now be available for users of the mission in the Mission Manager and Mission Responder apps. As you continue to update your operational map using the Event Operations Planner app, any changes to the event plan will automatically be visible to all participants in the mission.
Learn more
For more information about the Special Event Operations solution and products mentioned in this article, check out the following resources:
- Learn how to deploy, configure, and use the solution.
- Learn more about ArcGIS Solutions, ArcGIS Track Viewer, ArcGIS Mission, or ArcGIS Field Maps.
- Chat with us on Esri Community.



Article Discussion: