Apps you create with ArcGIS Maps SDKs for Native Apps can allow users to edit data. In the past, you might have created a Popup that contains some editable fields. This approach works, but it requires a good deal of coding on your part.
The modern way to create an editable form is to use feature forms, which are also known as smart forms in other ArcGIS products. Feature forms are both powerful and easy to include in your app. This blog applies generally to Kotlin Maps SDK, Swift Maps SDK, and .NET Maps SDK, but the code snippets use Kotlin for demonstration purposes.
Trees for All
In this blog, you are the head of a volunteer group named Trees For All that will be performing a health-check survey of historically- and botanically-significant trees designated as Heritage Trees by your city. The city has published on its ArcGIS Hub a feature service showing the heritage trees as point features. Your volunteers will visit the trees and provide updated information. To meet this data collection need, you decide to create an Android app in Kotlin that uses a feature form for collecting tree updates.
The city’s feature service for the heritage trees does not allow public data collection, so you download the city’s data as a shapefile and use it to create an editable feature layer in your ArcGIS Online organization. You then create a web map, add the editable feature layer to it, and include a feature form to aid your volunteers in their work.
Feature form
The feature form provides a familiar UI for your volunteers to edit feature attributes, without you needing to create your own UI from scratch. Some of the key features of the feature forms include:
- Pre-defined UI elements: Feature forms can have a variety of field elements, such as editable text and number fields, radio buttons, combo boxes (dropdowns), switches (toggles), and attachments such as photos or documents.
- Automatic data binding: The feature forms automatically bind to the feature layer’s attributes, making it easy to display and edit attribute values without having to write custom code.
- Validation and error handling: The feature forms include built-in real-time validation and easy-to-code error handling, ensuring that user input is valid and providing feedback when errors occur.
Tour of a mobile feature form
Let’s take a brief tour of a feature form suitable for your Trees for All app. The form’s layout, color scheme, and typography are consistent with UI elements on a mobile device. The feature form displays, typically in a bottom sheet, when the user taps a feature on the map.
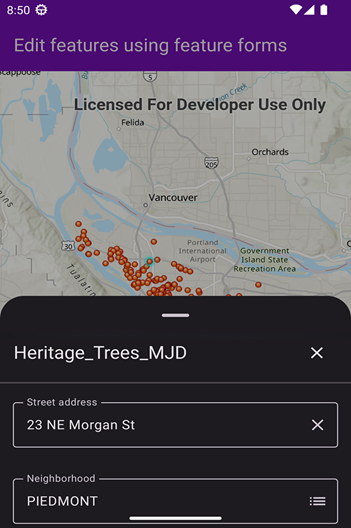
Text box, combo box, text element, and text area
To see the full form and interact with the field elements, the user swipes up. In the image below, the first five fields are visible.

Let’s take a closer look at the elements of the feature form shown above, noting that a border identifies a field as editable and an asterisk identifies a field as required.
- Street address: An editable text box, which is a single-line text input field for short answers, such as names or addresses.
- Neighborhood: A dropdown list that allows users to select from a predefined set of options. When the user taps on the Neighborhood field, the Neighborhood list appears, occupying the entire vertical space if the list is long, as it is here.

- Tree id #: A read-only text box that displays information but does not allow user input.
- Record your assessment…: A read-only text element that provides instructions or context for the user, introducing the two editable text area fields that follow. The
- Volunteer’s assessment: A required text area, which is a multi-line text input field for longer answers, such as descriptions or comments.
Date time picker, radio buttons, group element, and combo box
If you swipe up further, you can see other types of form elements.

- Date of volunteer assessment: A date and time picker that allows users to select a date and time for their visit. When the user taps the field, a date and time picker appears.

- Status: Radio buttons that allows users to select the official recognition status of the tree: Heritage, Removed, or Merit.
- Tree statistics: A collapsed group element that contains multiple related fields, including the tree’s height, spread, and circumference. The group element can be expanded by tapping the chevron icon to the right of the title.

Real-time form input validation
Another feature that comes with feature forms from the toolkit is real-time input validation. If the user enters a value that violates the validation rules, an error message immediately appears next to the field. For example, in the dataset schema, the Street address field is defined with a maximum length of 31 characters. When the user taps in the field, the constraint “Maximum 31 characters” automatically appears below the field.

If the user proceeds to enter more than 31 characters, the field border and the violated constraint turn red/orange.

Built-in dialog for validation errors
When the user taps in a form element, a top bar with a Save and a Discard button automatically displays at the top of the form.

If there are any errors when the user taps Save, the following default validation error dialog displays:

If there are no errors when the user taps Save, the edits will be saved to the local storage on the device.
Use a feature form in your app
1 – Create a feature form
To create a feature form, you simply need a feature:
import com.arcgismaps.mapping.featureforms.FeatureForm

val featureForm = FeatureForm(feature)
The feature can be from any layer that implements the FeatureFormSource, which includes:
If the feature is from a layer, the feature form will automatically use the layer’s feature form definition. If no feature form definition has been provided for the layer, the feature form will use a default form that includes all editable fields.
For instructions on how to create your own feature form definition, see Feature form definition below.
2 – Display the feature form
To display the feature form, you must make the FeatureForm instance available to your app’s UI. The ArcGIS Maps SDK for Kotlin Toolkit provides composables suitable for your Compose-enabled Android apps. The toolkit includes a FeatureForm() composable that you use to display the feature form you created. This stateless composable requires a FeatureFormState instance, which you create by passing in the FeatureForm instance and a coroutine scope. Then you can call FeatureForm(), passing in the FeatureFormState instance.
import com.arcgismaps.toolkit.featureforms.FeatureForm
import com.arcgismaps.toolkit.featureforms.FeatureFormState

 FeatureForm(
     featureFormState = FeatureFormState(featureForm, scope),
     modifier = Modifier.fillMaxSize().padding(top = 20.dp)
)
⚠️ Important note: In the Kotlin Maps SDK, there is a distinction between the FeatureForm() composable, which is part of the toolkit, and the FeatureForm class, which is part of the ArcGIS Maps SDK for Kotlin. The FeatureForm class represents the form itself, while the FeatureForm() composable is used to display the form in your app’s UI. In your actual app, of course, you will need to call FeatureForm() from an appropriate UI composable such as a bottom sheet.
3 – Discard or save edits
When a user is finished with the current editing sessions, they can either discard the edits or save them. Starting with release 200.8, the ArcGIS Maps SDK for Kotlin toolkit includes a default action bar that has Save and Discard buttons.
To provide behavior when the user taps these buttons, pass a lambda to the onEditingEvent parameter of the FeatureForm composable. The lambda tests which event has been received and handles each appropriately, taking actions like hiding the sheet state, hiding the bottom sheet itself, and clearing the selection of the current feature on the map.
FeatureForm(
    featureFormState = FeatureFormState(featureForm, scope),
    modifier = Modifier.fillMaxSize().padding(top = 20.dp),
    onEditingEvent = { featureFormEditingEvent ->
        when (featureFormEditingEvent) {
            is FeatureFormEditingEvent.SavedEdits -> {
                applyEditsToFeatureService()
                scope.launch {
                    sheetState.hide()
                    showBottomSheet = false
                    val featureForm = featureFormEditingEvent.featureForm
                    (featureForm.feature.featureTable?.layer as FeatureLayer)
                        .clearSelection()
                }
            }
            is FeatureFormEditingEvent.DiscardedEdits -> {
                scope.launch {
                    sheetState.hide()
                    showBottomSheet = false
                    val featureForm = featureFormEditingEvent.featureForm
                    (featureForm.feature.featureTable?.layer as FeatureLayer)
                        .clearSelection()
                }
            }
        }
    }
)
Tapping the Discard button causes the edits to be discarded.
Tapping the Save button can result in two actions:
- If there are errors on the feature form, the default validation errors dialog appears. The edits are not saved to local storage on the device.
- If the are no errors on the feature form, the
FeatureFormEditingEvent.SavedEditscode is executed, which usually persists the edits from the local storage to a feature service.
Save to feature service
In the onEditingEventcallback, the FeatureFormEditingEvent.SavedEdits case requires additional code to persist the feature’s edits. In the code example above, note the custom function applyEditsToFeatureService(). You might create this function and code it as follows:
- Call
featureForm.finishEditing(), which saves edits of the current feature to the local store. - Get the service feature table from the form’s current feature. Then get the service geodatabase from the feature table.
- Apply the edits from local storage to the feature service associated with the Trees_For_All layer.
fun applyEditsToFeatureService() {
    val serviceFeatureTable = featureForm.feature.featureTable as? ServiceFeatureTable
        ?: return showMessage("Cannot save feature edit without a ServiceFeatureTable")
    coroutineScope.launch {
        // Commits changes of the edited feature to the database.
        featureForm.finishEditing().onSuccess {
            serviceFeatureTable.serviceGeodatabase?.let { database ->
                if (database.serviceInfo?.canUseServiceGeodatabaseApplyEdits == true) {
                    // Applies all local edits in the tables to the service.
                    database.applyEdits().onFailure {
                        return@launch showMessage(it.message.toString())
                    }
                } else {
                    // Uploads any changes to the local table to the feature service.
                    serviceFeatureTable.applyEdits().onFailure {
                        return@launch showMessage(it.message.toString())
                    }
                }
            }
            // Resets the attributes and geometry to the values in the data source.
            featureForm.feature.refresh()
        }.onFailure {
            return@launch showMessage(it.message.toString())
        }
    }
}
Feature form definition
So far, we have learned that the feature form in an Android app is formatted and styled to harmonize with standard Android UI elements. Then we saw some code to integrate the feature form into your app. But where does the actual structure and behavior of the form come from?
The answer is the feature form definition—a JSON object that specifies the structure and behavior of a feature form. It defines the fields that will be displayed in the form, the input type for each field (a single-line text string, a multi-line text area, combo box, etc.), constraints on input values (such as max/min values or coded value domains), and expressions that are evaluated as the user interacts with fields.
⊕ JSON for feature form definition in a web map …
{
"operationalLayers": [
{
"id": "1991776ee8c-layer-2",
"title": "Trees_For_All",
"url": "https://services2.arcgis.com/ZQgQTuoyBrtmoGdP/arcgis/rest/services/Trees_For_All/FeatureServer/0",
"itemId": "5dff911ee35a455aa5e44fcdfaa027d2",
"layerType": "ArcGISFeatureLayer",
"formInfo": {
"formElements": [
{
"label": "Neighborhood",
"type": "field",
"editableExpression": "expr/system/true",
"fieldName": "Neighborho",
"inputType": {
"type": "combo-box",
"showNoValueOption": false
}
},
{
"label": "Street address",
"type": "field",
"editableExpression": "expr/system/true",
"fieldName": "SITE_ADDRE",
"inputType": {
"type": "text-box",
"maxLength": 31,
"minLength": 0
}
},
{
"label": "Tree ID #",
"type": "field",
"editableExpression": "expr/system/false",
"fieldName": "TREEID",
"inputType": {
"type": "text-box",
"minLength": 0
}
},
{
"type": "text",
"text": "Record your assessment, if any, of the site in **Volunteer's assessment**. For example: branches blocking sidewalk, signs of fungus or infestation, decline in vigor associated with advanced age.",
"textFormat": "markdown"
},
{
"label": "Volunteer's assessment ",
"type": "field",
"editableExpression": "expr/system/true",
"fieldName": "Volunteer_Assessment",
"inputType": {
"type": "text-box",
"maxLength": 1000,
"minLength": 0
}
},
{
"label": "Date of volunteer assessment",
"type": "field",
"editableExpression": "expr/system/true",
"fieldName": "Date_Volunteer_Assessment",
"inputType": {
"type": "datetime-picker",
"includeTime": true
},
"requiredExpression": "expr"
},
{
"label": "Status",
"type": "field",
"editableExpression": "expr/system/true",
"fieldName": "STATUS",
"inputType": {
"type": "radio-buttons",
"showNoValueOption": false
}
},
{
"label": "Tree statistics",
"type": "group",
"formElements": [
{
"label": "Height",
"type": "field",
"editableExpression": "expr/system/true",
"fieldName": "HEIGHT",
"inputType": {
"type": "text-box",
"minLength": 0
}
},
{
"label": "Date height measured",
"type": "field",
"editableExpression": "expr/system/true",
"fieldName": "Date_Heigh",
"inputType": {
"type": "datetime-picker",
"includeTime": true
}
},
{
"label": "Spread",
"type": "field",
"editableExpression": "expr/system/true",
"fieldName": "SPREAD",
"inputType": {
"type": "text-box",
"minLength": 0
}
},
{
"label": "Date spread measured",
"type": "field",
"editableExpression": "expr/system/true",
"fieldName": "Date_Sprea",
"inputType": {
"type": "datetime-picker",
"includeTime": true
}
},
{
"label": "Circumference",
"type": "field",
"editableExpression": "expr/system/true",
"fieldName": "CIRCUMF",
"inputType": {
"type": "text-box",
"minLength": 0
}
},
{
"label": "Date circumference measured",
"type": "field",
"editableExpression": "expr/system/true",
"fieldName": "Date_Circu",
"inputType": {
"type": "datetime-picker",
"includeTime": true
}
}
],
"initialState": "expanded"
},
{
"label": "Plaque condition",
"type": "field",
"editableExpression": "expr/system/true",
"fieldName": "Plaque_not",
"hint": "The current condition of the Heritage Tree plaque",
"inputType": {
"type": "text-box",
"maxLength": 84,
"minLength": 0
}
},
{
"label": "Date plaque condition noted",
"type": "field",
"editableExpression": "expr/system/true",
"fieldName": "Plaque_adj",
"inputType": {
"type": "datetime-picker",
"includeTime": true
}
}
],
"expressionInfos": [
{
"expression": "false",
"name": "expr/system/false",
"returnType": "boolean",
"title": "False"
},
{
"expression": "true",
"name": "expr/system/true",
"returnType": "boolean",
"title": "True"
},
{
"expression": "!IsEmpty($feature[\"Volunteer_Assessment\"])",
"name": "expr",
"returnType": "boolean",
"title": "RequiredIfVolunteerAssessmentMade"
}
],
"title": "Trees_For_All"
}
}
],
"baseMap": {
"baseMapLayers": [
{
"id": "World_Hillshade_3805",
"opacity": 1,
"title": "World Hillshade",
"url": "https://services.arcgisonline.com/arcgis/rest/services/Elevation/World_Hillshade/MapServer",
"visibility": true,
"layerType": "ArcGISTiledMapServiceLayer"
},
{
"id": "195012aeb31-layer-2",
"opacity": 1,
"title": "World Topographic Map",
"visibility": true,
"layerType": "VectorTileLayer",
"styleUrl": "https://cdn.arcgis.com/sharing/rest/content/items/27e89eb03c1e4341a1d75e597f0291e6/resources/styles/root.json"
}
],
"title": "Topographic"
},
"applicationProperties": {
"offline": {
"syncDataOptions": 8204
}
},
"authoringApp": "ArcGIS Field Maps Designer",
"authoringAppVersion": "25.2.2+3a58332",
"initialState": {
"viewpoint": {
"targetGeometry": {
"spatialReference": {
"latestWkid": 3857,
"wkid": 102100
},
"xmin": -13670503.85703468,
"ymin": 5685535.233677609,
"xmax": -13631941.376264859,
"ymax": 5723218.688622151
}
}
},
"spatialReference": {
"latestWkid": 3857,
"wkid": 102100
},
"timeZone": "system",
"version": "2.34"
}
An existing feature form definition
If you are using a feature layer designed by someone else, such as a data specialist, then that person might have already defined a feature form definition in a web map that contains the layer. To use the feature form, you simply follow the instructions in Using a feature form in your app.
No feature form definition
In the event that the web map has no feature form definition, your code will still display a feature form—one showing all the fields in the feature layer schema. For datasets with a simple schema, that might be of some use to you. Fields will have visibility and editability properties as set in ArcGIS Pro or on the Data tab of a feature layer’s items page in ArcGIS Online or ArcGIS Enterprise.
New feature form definition
In the case of the Trees for All feature layer you created, however, the dataset contains dozens of fields. You will want to create your own feature form definition to ensure your form is small enough to be practical for your volunteers to use. The quickest way to create a feature form definition is to use The Field Maps Designer, which you can access from ArcGIS Online or ArcGIS Enterprise.
The online web map used in your Trees For All app has the following item page in ArcGIS Online. You should click the Open in Field Maps Designer button.
⚠️ Important note: You will see that button only if you own the feature layer. You cannot access the Field Maps Designer for data you do not own.

To define a feature form, you specify the form elements that you want to include in the form. These elements correspond to the attributes of the feature layer that you want to edit.
Evaluate expressions
Expressions are automatically evaluated when the user interacts with the form. This means that as the user fills out the form, any expressions defined in the form will be re-evaluated, allowing for dynamic updates to the form’s data.
For example, if you have a field that calculates the total price based on the quantity and unit price fields, the total price will be updated automatically as the user changes the quantity or unit price.
In the Trees for All app, for example, you might decide that the Volunteer’s assessment and Date of volunteer assessment should not be required elements. But you also decide that if the volunteer enters a Volunteer’s assessment, they must enter the Date of volunteer assessment as well. To add this behavior, you can create an Arcade expression for Date of volunteer assessment.
- Click the gear icon next to the Required check box.
- In the Calculated expressions popup, click + New expression.
- In the New expression dialog, name the expression and input the following Arcade expression:
!IsEmpty($feature.Volunteer_Assessment)
JSON in a feature layer
In this blog, we have explored how to store a feature form definition in a web map using Field Maps Designer. If multiple web maps contain the same feature layer, each web map could specify a different feature form definition. Sometimes, however, it may be advantageous to store a feature form definition in the feature layer itself. This allows for a single source of truth for the form definition, making it easier to manage and update. Each web map that includes that feature layer will automatically use the same form definition.
⊕ JSON for feature form definition in a feature layer …
{
    "layers": [
        {
            "id": 0,
            "formInfo": {
                "formElements": [
                    {
                        "label": "TREEID",
                        "type": "field",
                        "editableExpression": "expr/system/true",
                        "fieldName": "TREEID",
                        "inputType": {
                            "type": "text-box",
                            "minLength": 0
                        }
                    },
                    {
                        "label": "STATUS",
                        "type": "field",
                        "editableExpression": "expr/system/true",
                        "fieldName": "STATUS",
                        "inputType": {
                            "type": "combo-box",
                            "noValueOptionLabel": "No value",
                            "showNoValueOption": true
                        }
                    },
                    {
                        "label": "HEIGHT",
                        "type": "field",
                        "editableExpression": "expr/system/true",
                        "fieldName": "HEIGHT",
                        "inputType": {
                            "type": "text-box",
                            "minLength": 0
                        }
                    },
                    {
                        "label": "SPREAD",
                        "type": "field",
                        "editableExpression": "expr/system/true",
                        "fieldName": "SPREAD",
                        "inputType": {
                            "type": "text-box",
                            "minLength": 0
                        }
                    },
                    {
                        "label": "DIAMETER",
                        "type": "field",
                        "editableExpression": "expr/system/true",
                        "fieldName": "DIAMETER",
                        "inputType": {
                            "type": "text-box",
                            "minLength": 0
                        }
                    }
                ],
                "expressionInfos": [
                    {
                        "expression": "false",
                        "name": "expr/system/false",
                        "returnType": "boolean",
                        "title": "False"
                    },
                    {
                        "expression": "true",
                        "name": "expr/system/true",
                        "returnType": "boolean",
                        "title": "True"
                    }
                ],
                "title": "Trees_For_All"
            },
            "popupInfo": {
                // Popup elements would go here

            }
        }
    ],
    "tables": []
}
You can create a feature form definition for the feature layer using the Form builder in Fields Map Designer. When you’re finished, don’t forget to save the feature form definition to the layer, using the Layer pane in the Map Viewer. You don’t need to worry about saving the Untitled map.
Conclusion
You have seen how a feature form displayed using the FeatureForm component in the ArcGIS Maps SDK for Kotlin toolkit contains a variety of form elements, all of which look and behave like standard Android UI without any coding on your part. You then saw how little code is required to create and display a feature form in your code. The final section showed how to create a feature form definition for either a web map or a feature layer, using Form builder in Field Maps Designer.
Next time you are crafting a mobile application using an ArcGIS Maps SDK for Native Apps, remember feature forms are the solution for enabling users to edit attributes in feature layers.


Article Discussion: