Deprecation Notice: With the November 2024 update of ArcGIS Online, utility network tools are now deprecated in all apps and will not be supported in future releases of ArcGIS Online. Utility Network tools remain available in ArcGIS Enterprise and Developer SDKs. Learn More in the Esri Community post.
Since both the Utility Network Trace widget and the Branch Version Management widget are now available in ArcGIS Experience Builder, you can run traces on different branch versions of your utility network feature service.

Create a utility network and a web map
First, you will need to create a utility network feature service and publish a web map with trace configurations that can be used with the Utility Network Trace widget.
Review the prerequisites and follow the steps to create a utility network and a web map for tracing in this blog:
")
Create an Experience Builder application
The Utility Network Trace widget is available in Experience Builder starting at Enterprise 11.1 and in the Developer Edition 1.8 or later.
Step 1. Sign in to the organization where you’ve published the web map.
Step 2. From the web map’s item details page, choose Create Web App and select ArcGIS Experience Builder.
Step 3. Select a Map centric template to start, such as Launchpad.

The new template loads with your web map already set as a data source.
Add the Branch Version Management widget
Add the Branch Version Management widget to your application to take advantage of the version management service capabilities, such as switching between different versions of your data. The version changes will affect data across your application, so other widgets that use the same service will also read these changes.
Step 1. Unlock the layout and open the Insert widget panel. Choose the Branch Version Management widget from the Data centric widgets section and drop it at the top of your page.

Step 2. From the Branch Version Management widget Content pane, use the Basic arrangement style. This will allow switching between versions but not creating and deleting versions.

Step 3. Under Version management services, click Select data and click Add new data at the bottom of the panel.
If you’re working with your ArcGIS Enterprise Portal, you will be able to select your utility network feature service layer item from the Layers option. Otherwise, you will need to add data from a URL. Use the same feature service you are using in the web map.
For example: https://<your-domain>/server/rest/services/<service-name>/FeatureServer

Keep the other default settings for this widget.
Step 4. Optionally, change the display to resize automatically based on the widget’s content. Open the Style panel. Under Size & Position, change the Width and the Height to “Auto”.

Turn on the Live view for the app and switch between the different versions in the list. The map will update to reflect the version you’ve activated.

You may need to create a new version and make changes to the data in your feature service to clearly see the changes in the map. Perform edits with ArcGIS Pro where full utility network editing capabilities are supported.
While editing data in a version is supported in Experience Builder, keep in mind the following functionality is not currently available:
- Reconcile and post edits to the Default version
- Manage branch version conflicts
- Preview historical moments of your data
- Preview and compare differences in the data between versions
- Validate the network topology when editing utility network dataTherefore, we recommend editing the data in your utility network feature service using ArcGIS Pro.
Add the Utility Network Trace widget
Add the Utility Network Trace widget to your application to run traces in a utility network based on connectivity and traversability.
Step 1. Open the Insert widget panel (you may first need to turn off the Live view mode) and choose the Utility Network Trace widget from the Map centric widgets section. Drop it onto the Widget Controller at the bottom of the page. The new widget icon will appear next to the Table widget icon.
Step 2. Click the Utility Network Trace widget icon in the Widget Controller. In the Content panel, select the Map widget under Source.

The widget will now read the utility network and the trace configurations stored in the web map.
Run traces on a branch version
First, save and publish your application. Open the published application in a new browser tab and proceed with the next steps:
Step 1. Using the Branch Version Management widget, switch to the version of the network you would like to trace.
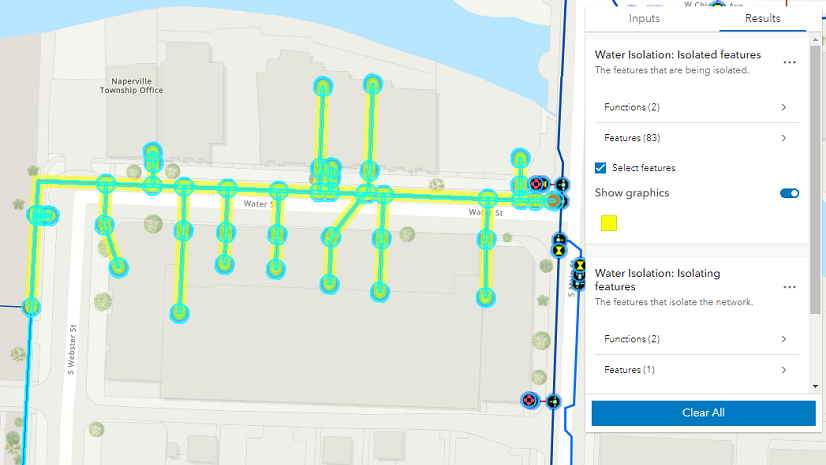
Step 2. Open the Utility Network Trace widget.
Step 3. On the Inputs tab, select traces to run from the Trace types dropdown.
The trace parameters are preset for each specific trace type. This widget allows you to run one or multiple traces concurrently.

Step 4. Add a starting point to the map where you would like the trace to begin. Optionally, you can also add barriers where the trace must stop.
Step 5. Click Run.

Visualize the highlighted results on the map and as a list of selected features organized by asset groups and asset types.

Optionally, further customize your application and add widgets to explore the trace selection results.
For example, in the application below, the Table and the Text widgets were added to display the selected features and statistics. The option to export the selected features is also provided.

To learn more, see how to configure widgets to explore trace results.

Article Discussion: