Deprecation Notice: With the November 2024 update of ArcGIS Online, utility network tools are now deprecated in all apps and will not be supported in future releases of ArcGIS Online. Utility Network tools remain available in ArcGIS Enterprise and Developer SDKs. Learn More in the Esri Community post.
The UtilityNetworkTrace widget is available in ArcGIS Instant Apps and ArcGIS Experience Builder since March 2022.
Read along to learn about the prerequisites and how to publish a web map for tracing. Otherwise, jump directly to one of the topics below.
- Prerequisites
- Create a utility network and a web map for tracing
- Trace with the Sidebar Instant App template
- Trace with ArcGIS Experience Builder
- Build custom apps
Prerequisites
The following requirements must be met to use UtilityNetworkTrace widget:
- The web map must be published with trace configurations (available at Enterprise 10.9) and a feature service that supports the utility network (version 5 or later).
- The network topology must be enabled and validated to reflect the most recent edits or updates made to the network. The results of a trace are not guaranteed to be accurate if dirty areas are traced.
- The ArcGIS Utility Network user type extension is required for users who wish to run a trace on the feature service published to Enterprise 11.1 or earlier.
- For feature services published to Enterprise 11.1 or earlier, the services must be secured to allow users to log in with their Enterprise accounts.

Create a utility network and a web map for tracing
The Utility Network Trace widget leverages the named trace configuration capability which allows you to add and store complex traces in a utility network service. These traces can be shared across an organization through web maps. Follow these steps to get started:
Step 1. Publish a feature service with the utility network to ArcGIS Enterprise
First, you need to create a utility network and publish a feature service using an Enterprise deployment (10.9 or later). Follow the steps for utility network creation and configuration.
If you need sample data and step-by-step guidance to publish your first utility network service, deploy one of the ArcGIS Solutions listed here.
Step 2. Add and share trace configurations
Once you’ve published the feature service to your Enterprise Portal, you can use ArcGIS Pro to trace the utility network and add named trace configurations.
First, add the utility network feature service to a new map in ArcGIS Pro and add trace configurations. To ensure your trace configurations are working as expected, test them in ArcGIS Pro before sharing them in your web map.
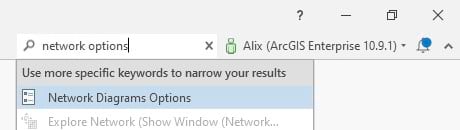
To include trace configurations in the definition of the map, set the named trace configurations as active from the Sharing pane of the Network Options dialog box.

Can't find the Network Options dialog box? Use the Command Search in the top ribbon.
Step 3. Publish a web map for tracing
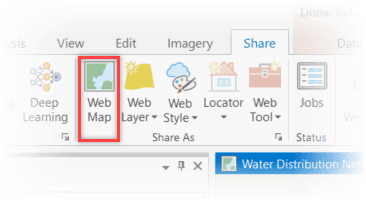
Once you are ready to publish your map, make sure you are signed in to your targeted organization in ArcGIS Pro.
Click the Share tab and click Web Map on the ribbon in the Share As group.
You are now ready to start building applications with the Utility Network Trace widget.
The Utility Network Trace widget is available in the Sidebar template of the Instant Apps starting at Enterprise 11.0 (July 2022) and in Experience Builder starting at Enterprise 11.1 (April 2023).
You can also use your web map and the Utility Network Trace widget in custom applications built with the ArcGIS Maps SDK for JavaScript (2.22 or later) or the developer edition of ArcGIS Experience Builder (1.8 or later). See Build custom apps.

Trace with the Sidebar Instant App template
Use the Sidebar template in the ArcGIS Instant Apps if you want to set up a quick application to start tracing.
Step 1. Create a new app
- Sign in to the organization account where your web map was published.
- On the My Content tab of the content page, click Create app and choose Instant Apps.
- Search for the Sidebar template and click Choose.

Step 2. Add the web map and the widget
- In the Map settings, select the web map you published (must have a utility network feature service and trace configurations).
- In the Sidebar settings, enable the Utility network trace setting.
- Publish your app and start tracing!


Trace with ArcGIS Experience Builder
Use ArcGIS Experience Builder if you want to configure an application with a customized layout and do more with the trace results.
Note: Subtype Group Layers are supported in ArcGIS Experience Builder starting at Enterprise 11.4.
Step 1. Create a new app
- Sign in to the organization account where your web map was published.
- From My Contents, click Create app and select Experience Builder.
- Click Create new and start from Blank, or select a template that is Map centric such as Launchpad.

Step 2. Add the web map and the widget
- For the Map widget data source, select the web map you published (must have a utility network feature service and trace configurations).
- Add the Utility Network Trace widget to the Widget Controller at the bottom of the page.
- Set the Source for the Utility Network Trace widget to the Map widget.
- Save and publish your application to start tracing now or configure more widgets to explore the trace results.
 and the Utility Network Trace widget to the application.")
Step 3. Configure widgets to explore trace results
- Select the Table widget from the controller and click New sheet in the settings panel.
- Click Select data and choose a layer from your utility network feature service.
- Choose to display the Selected features for that data source and set which fields to show in the table.

4. To allow exporting the selected feature using the Table widget, you must Allow export for the feature layer data source on the Data panel and Enable data action in the Table widget Data action panel.

5. Unlock the layout and add a Text widget.
6. Configure expressions to show statistics from the trace results.

7. Click the Widget Controller and set the Behavior to Multiple and the Display type to Side by Side. This will allow you to open the Table and the Utility Network Trace widgets simultaneously.

8. Further customize your application and explore the results when you run traces.
Build custom apps
To create a custom application using the ArcGIS Maps SDK for JavaScript and import the UtilityNetworkTrace widget (available at 2.22 or later), check out this blog.
To get started with the latest ArcGIS Experience Builder Developer Edition (the Utility Network Trace widget is available at 1.8 or later), download and install the SDK.


Hi Alix,
Great article.
It seems there is a bit of a process for publishing a webmap that is suitable for the trace widget in Experience Builder. We are using the ExB Dev .Ed. v1.8 against an Enterprise 10.9.1 implementation with UN. We are having problems with the Trace widget accepting our webmap and I have been able to debug to the point that the widget is looking for the UtilityNetworks property in the WebMap and is not finding it. We have created named trace configurations and checked them in the share dialog. Can you confirm that ArcGIS Pro creates that UtilityNetworks property on the WebMap it publishes? Or is this property automatically generated by the load method in the Javascript API?
Do you have any tips that may assist me with working out why I can’t get the trace widget to work with our webmap?
Thanks
@Mark Turnbull That process sounds correct. If you ever opened that webmap in the classic viewer and clicked save, it will remove the UN layer from the webmap. Can you try publishing a new webmap from ArcGIS Pro, use a tool like the AGO-Assistant to view the json and see if the UN layer is in there. Also, are you using ArcGIS Pro 2.9.x?
Hi Alix,
When will the Sidebar Template and Utility Network Trace Widget come to the Enterprise?
Thanks,
Hi @Bekir Küçükağa, the Utility Network Trace widget will come to the Sidebar template in ArcGIS Enterprise in 11.0.
Hi Alix,
Please help me understand something about licensing.
You wrote, that the Utility Network user type extension is required for users who wish to run trace on feature service. However, with nem 11.2 version of Enterprise, Esri changes the UN user type extension to Advanced Editing user type extension.
In the future, if useres want to use the UN Trace widget, do they need the Advanced Editing user type extension? For someone who doesnt want to edit anything at all, jus trace, is it necessary to purchase the Advanced Editing userty?
Thanks,
Robert
Hi Robert,
Starting at 11.2, you no longer need a User Type extension to run a trace.
Hello @Alix Vézina
I have a question regarding ArcGIS Web Editor for creating and editing for Utility Network feature services particularly for electric lines. Because i have been trying to create an electric line as low voltage service but it can’t be create and also the browser get stack immediately. It seems this editing for electric line is not supported. I wanted to hear your view or any guidelines would be very helpfully.
Hi, for any questions related to ArcGIS Web Editor, I would recommend reaching out through the Esri Community: ArcGIS Web Editor