Would you like to be notified when a mobile worker completes an inspection? How about an automatic report that’s generated after new data is collected or updated in the field? You can automate both of these tasks with the help of webhooks.
In this article we’ll introduce key concepts and then guide you through the ins and outs of configuring a webhook that works with ArcGIS Field Maps and Integromat to improve and automate key workflows.
Update September 15th 2021: The Field Maps team has released an Integromat app which significantly simplifies most the steps in this blog post.
What is a webhook?
If you’ve used services like Slack or GitHub you may be familiar with webhooks. A webhook is a way for an application to provide other apps with near real-time information via callbacks. This functionality enables automated workflows, such as sending an email notification when an inspection is completed. Webhooks are user-defined HTTP requests that are trigged by an event. When that event occurs, the configured app or service sends an HTTP POST request to the configured webhook URL. In the case of ArcGIS Online hosted feature services, such events include when features are created, updated, or deleted (among other things). For more information about ArcGIS Feature Service Webhooks, check out this blog post.
There are a few key concepts to understand regarding webhooks:
- Trigger – starts the webhook task/process
- Action – something the webhook does
- Provider – third party software that enables webhooks
- Payload – content sent to the webhook
When a webhook is triggered, a payload of information is sent to the specified URL. Then the provider that maintains that URL can take an action with the provided information. There are many providers such as: Integromat, Microsoft Power Automate, and Zapier that can be configured to consume webhooks.
What is an automation workflow?
Workflow automation is technology that uses a set of defined rules to automate a manual process. It is common to develop an automation workflow for tasks that are well defined, complex, and repeatable. A few examples of automation workflows in the context of ArcGIS Online are:
- Sending an email notification when a new feature is collected
- Updating the information in a third-party system (e.g., Google Sheets, SAP) when a feature is edited
- Creating or updating features when another feature was modified
In this tutorial, we are going to automate a workflow using Integromat – software that supports incoming webhooks and other services to support automating tasks without code. We’ll focus on creating a webhook workflow that emails a supervisor when a fire hydrant is installed or inspected.
Let’s get started!
Create a feature service and map
In ArcGIS Online, navigate to the content page and create a new layer using the Hydrant Maintenance Inspections feature layer template.

Select both layers and choose an extent that makes sense for your area. When prompted, provide a name for your new feature service and continue through the dialogs until it’s successfully created. Once the layer has been created, open the settings tab and scroll to the Editing settings. Check the Keep track of created and updated features and click Save. This will enable change tracking for the feature service which is a prerequisite for enabling webhooks.
Next, let’s add this new layer and table to a new map. On the Overview tab click the overflow button near Open in Map Viewer and click Add to new map. In Map Viewer, save the map. Later on, we will use this map in ArcGIS Field Maps to collect features.
Create scenario in Integromat
Now we are going to use Integromat and create a new scenario that can consume the webhook we will enable. At a high-level these are the steps that we need to do:
- Configure an incoming webhook for Integromat
- Configure an outgoing webhook for the feature service
- Create a new ArcGIS Online application for authenticating with ArcGIS Online within Integromat
- Create a scenario to process the new hydrant and inspection features
At the end of the tutorial, the scenario should look like this:

In Integromat (after signing in), click + Create a new scenario in the upper right corner. When prompted for a service, search for and select Webhooks; then click Continue. You should see something like this:

Click on the Webhooks row and select Custom webhook. When prompted to select a webhook, click Add and provide a Webhook name; you can leave the other settings alone and click Save. Click Copy address to clipboard. You should now see a URL. We are going to use this URL to configure our feature service webhook.
Create and activate a webhook in ArcGIS Online
Back in ArcGIS Online, open the feature service URL using the URL on the Overview tab. In the URL add “admin” between “rest/services” so that you can access the feature service admin APIs. The URL should be similar to:
https://services.arcgis.com/<redacted>/arcgis/rest/admin/services/Hydrant_Maintenance_Inspections
At the bottom of the admin page, click Web Hooks.

Next, click Create. Provide a Name for your webhook. Set the Change Types to FeaturesCreated so that this webhook only will trigger when new features are created. Leave the Signature Key empty. If defined, a Signature Key can be used as an additional layer of security by allowing the webhook receiver to verify the sender – for simplicity we will not do this in the tutorial. Paste the URL you copied from Integromat into the HookUrl text box. This URL will be where ArcGIS Online sends information when features are created. Leave the remaining options alone. It should look similar to this:

Click Create. Next, click Edit, set Active to True, and then click Edit to activate the webhook. Your feature service webhook is now activated and ready to use in Integromat.
Now let’s verify it works, in Integromat click Run Once. In your ArcGIS Online map add a new hydrant feature. ArcGIS Online will now send a request to your Integromat scenario. FYI: It may take a bit for it to work because ArcGIS Online batches and schedules webhook events and the default interval is 30 seconds.
Now that we’ve verified that ArcGIS Online can actually send an event to our scenario, let’s build out the rest of our logic with Integromat.
Configure Integromat scenario
If you click on the “1” bubble you can view the data that was sent or received by a module from a previous run. In our case we can see that the payload that was received looks like this:

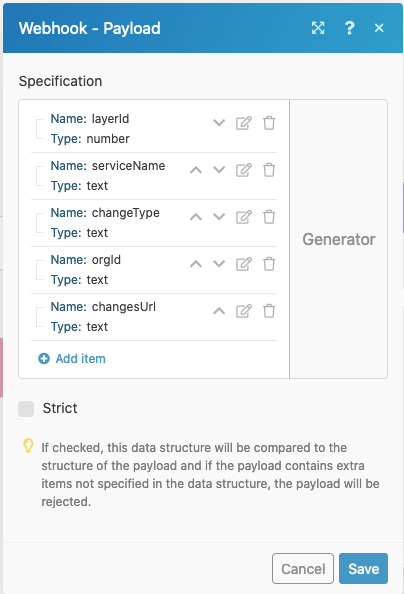
From looking at the payload documentation we can see that the expected format is:
Notice how the payload is small and does not contain any actual features. This is a security feature. There is a changesUrl that is returned. We need to make a request to that URL to get the actual changes. In order to make that request we first need to parse the JSON so that we can extract the URL. In Integromat, add a new module using the + button.

Search for and select Json. Then select the Parse JSON transformer. Connect the new module to the Webhooks module. It will prompt for a Data structure, click Add and then click Generate. Paste in the sample payload listed above. Integromat will now parse that and generate a data structure for you. You can provide a useful Data structure name if you like.
Click Save. For the JSON string field, click the text box and then click the payload chiclet to use the output from the webhook as the input to this module. Click OK. We are now ready to make our request to that changesURL but wait, what if our feature service is not shared publicly? We will need to provide a token for authentication.
Register a new ArcGIS Online app
Luckily for us, Integromat supports many authentication models including OAuth 2.0, an industry standard protocol for authorization that many products including ArcGIS Online support. In order to authenticate with ArcGIS Online via Integromat, we need to create a new application in ArcGIS Online. You can do this by navigating to the Content page and clicking Add -> An Application. When prompted, set the Type to Application. Enter a Title and Tags.

Click Add Item to create the application. Once it is created, navigate to the Settings tab of the application. Under the Application section click Update and add this Redirect URI:
https://www.integromat.com/oauth/cb/oauth2
This will allow list Integromat so that we can sign into ArcGIS Online via Integromat. Back on the Settings tab, click Registered Info so you can view the App ID and App Secret (these parameters will help with the authentication process). We are going to need those values when configuring the OAuth connection.

Making an authenticated request in Integromat
Back in Integromat add a new HTTP module and select the Make an OAuth 2.0 request action when prompted. Connect the request to the JSON module. Click Add to add a new Connection. This connection will enable you to sign into ArcGIS Online from Integromat. Once the connection is configured, you will be able access private content from ArcGIS Online.
In the dialog enter a Connection name and set the Flow type to Authorization Code. On developers.arcgis.com you can find the Authorize URI (https://www.arcgis.com/sharing/rest/oauth2/authorize) and Token URI (https://www.arcgis.com/sharing/rest/oauth2/token/) to enter. Use the App ID and App Secret of your ArcGIS Online Application as the Client ID and Client Secret respectively.
Open the advanced settings and set Token placement to In the query string. Set the Query string parameter name to token. This will ensure the token is sent in a way that ArcGIS Online will recognize. Click Continue to save the connection. This will launch a new window and ask you to sign in using ArcGIS Online Credentials. These are the credentials that will be used for all future requests. The OAuth module will handle generating new access and refresh tokens automatically from here on out.
Generate a server token
It seems like we should be good to go now that we have an access token, however that token is not valid for accessing feature services. We are going to make our first request to generate a new server token so that we can interact with the hosted feature service APIs. In the HTTP module set the URL to https://www.arcgis.com/sharing/rest/generateToken, the Method to POST and add two Query String parameters:

Next, we need to parse the response, so add a new Parse JSON transformer and connect it to the previous HTTP request. Set the JSON string to be the data from the HTTP request. You will have to define a new data structure; use this sample json which is modified from the REST API documentation.
At this point your scenario should look like this:

It’s probably a good idea to test it to make sure you can actually obtain a server token at this point. Click Run Once in the scenario. Then in Map Viewer add a new feature. If everything works correctly, the scenario will execute within 30 seconds and a token will be available as the output of the last module.
Request and extract the changes
Let’s continue to build out our scenario in Integromat. Add a new HTTP module using the Make a request action. Configure it as follows using the parsed changesUrl and token objects. Notice that we are requesting the results as latitude and longitude – this will be used later.

Next, we need to parse the results. So, add a new Parse JSON transformer and connect it. The changesUrl will trigger a job that runs asynchronously and returns a statusUrl of the job. We can use the following sample json to generate the object:
Since the changes are generated asynchronously, we will add a Sleep module and set the Delay to 30 seconds. This will allow for the server to generate the changes.
Next, we will make another http request to the status URL that was returned previously. Add another HTTP module using the Make a request action. Configure it as follows:

Next, add a Parse JSON transformer to parse the response. You can generate the Data structure using this sample json:
The response contains a resultUrl. This is a json file that contains the actual changes. It needs to be downloaded and then parsed. So, add a new HTTP module using the Get a file action. Configure it using the resultUrl and token query param as follows:

Integromat will interpret the file as a binary file so we need to convert the encoding to text. Add a Convert the encoding of a text module and configure to be a UTF-8 file as follows:

Now that the file is read as plain text, we can parse it. Add another Parse JSON module. The data structure to use will vary based on the feature service and layers that you are working with. In this tutorial our feature service has a layer and a table. We want to process the layer and table separately so instead of parsing the full json we will only parse it to identify the different layers. Generate a Data structure using this sample json:
It’s important that we do not parse the specific features that may appear in the adds, updates, and deleteIds arrays. This is because Integromat will assume that all objects inside the edits object will be of the same structure which is not the case because our two layers have different sets of attributes.
At this point your scenario should resemble this where the highlighted modules were the new ones we added.

It’s probably a good idea to test your scenario again by clicking Run Once and adding a new feature in Map Viewer. If everything works correctly, the output of the last module will contain data similar to the json provided above.
Email the new features
Now we can finally get to the fun part – processing the new features! First, we want to iterate over the set of layers/tables that were returned. Add an Iterator and set the Array to be the edits property as follows:

Next, we are going to add a Router module so that we can define two different paths – one for each layer.
We want to iterate over all of the features that were created, but we don’t have any data structures to represent the hydrants or inspections yet. We need to do a little trick here to generate these. We are going to transform the object to JSON and then re-parse it with different data structure specific for each layer and the features they contain.
Add a Transform to JSON module and use the Features object from the iterator:

Next, add a Parse JSON module and use the previous JSON string property as the JSON string. For the Data structure generate it using the following example json:
This represents a new Hydrant feature that was added. Since our webhook was configured to only push changes on new features, we don’t need to worry about the updates or deleteIds arrays.
We are going to repeat the previous 2 steps and add another Transform to JSON and Parse JSON module. These are also going to be connected to the router and will be used for the inspections table. Configure the Transform to JSON module the same as the previous one. For the Parse JSON module use the following sample json to generate the Data structure:
At this point the new modules we’ve added should look like this:

Currently changes in both layers will be routed to both paths – which is not desired. Let’s add a filter to fix that. Click the wrench icon between the Router and the JSON module and then click Set up a filter. Add a Label of Hydrant Layer Edits and set the condition so that only layer id 0 edits are passed through. Repeat this for the other route but configure the filter so that only layer id 1 edits are passed through.


Let’s test our scenario before we move on. In the Field Maps mobile app, collect a new hydrant and add a new inspection as well. If everything works correctly, there should be a JSON object output from each of the last two modules.
Now we want to iterate over the actual features and generate some text that we can email. Add another Iterator and connect it to the Parse JSON module. Set the Array to the adds array that was parsed. Do this for both routes.

Next, add a Text Aggregator module and connect it to the Iterator. We’ll use this to combine the features into a single HTML document that we will email. Open the advanced settings and set the Row separator to <br><br> – this will insert two line breaks between features. Also ensure you check Stop processing after an empty aggregation.
For the Text we are going to build an HTML table so that the new hydrants are nicely formatted. We’re also going to create a hyperlink to open the map (in the new Map Viewer) at that location. You can copy and paste this sample but will need to update the referenced objects and map accordingly:

Do the same thing for the inspections route. Here’s some sample HTML to use:
Finally let’s configure the email module. In my case I’m going to add the Microsoft 365 Email module to my scenario, but you could use the GMAIL module as well. Add the Create and Send a Message action and connect it to the Text Aggregator module. You will need to Add a new connection – this will prompt you to sign into Microsoft 365 using your account. Once the connection is created, add a Subject like “New Hydrant(s)” and set the Body Content to be the generated text. Add one or more Recipients and click OK.

Add another Microsoft 365 Email module for the inspections route and configure it accordingly. At this point, your two routes should look similar to this:

Here is what the full scenario should look like:
It’s time to test it! Turn on your scenario so it’s ready to accept incoming webhooks. Then open your map in ArcGIS Field Maps and collect a new hydrant and add a related inspection. You should receive two emails after a minute or so that look similar to this:

Summary
In summary, we started from nothing and were able to:
- Create a hosted feature layer
- Create a map
- Configure an incoming webhook for Integromat
- Configure an outgoing webhook for the feature service
- Create a new ArcGIS app for authenticating within Integromat
- Create a scenario to process the new hydrant and inspection features and send an email
- Send an email when a new feature or related record was collected by a mobile worker.
Where do we go from here? There are many options beyond just emailing features. For example, we could expand this to support detecting a problem reported in the inspection and then create a new assignment for ArcGIS Workforce. The nice thing is that a lot of what we built can be re-used.
Webhooks open up a lot of opportunities for automation without the need for coding and are a great way to streamline many workflows. We look forward to seeing what you come up with!
If you have specific requirements related to webhooks, we’d love to hear about it. Please email us at arcgisfieldmaps@esri.com.


How would you change this scenario if you only wanted to be emailed if a particular field was edited?