Did you know you can create a new webhook in ArcGIS Online? This blog article explains how to create and enable a webhook from a hosted feature service, but first, a little background?
Support: Only ArcGIS Online offers support for this operation.
What is a webhook?
A webhook allows web services to provide other services with near real-time information using HTTP POST requests. Webhooks are user-defined HTTP callbacks that are usually triggered by an event, such as editing or syncing a feature or changing the layer metadata. When that event occurs, the configured source such as a hosted feature service makes HTTP request to the URL configured for the webhook.
Webhooks allow you to build or set up ArcGIS applications which subscribe to certain events on ArcGIS services. When one of those events is triggered, the configured service will send a HTTP POST payload to the webhook’s configured URL.
Why use webhooks
Webhooks are an incredible tool to save you a lot of work.
- You can use a webhook to receive email/SMS message notification for updates.
- You can use a webhook for feature service view (tile, scene, etc.), to receive notification for updates.
- You can use a webhook for a web application. For example, if you want the web page to be updated as updates happen.
Events
Events are at the core of the feature service webhooks. These webhooks are fired whenever a certain action is taken on the feature service (as scheduled). When configuring a webhook, you can choose which events you would like to receive payloads for. You can even opt-in to all current and future events.
Each event corresponds to a certain set of actions that can happen to your organization. For example, if you subscribe to the edit event you’ll receive detailed payloads every time a feature is added, updated, deleted, etc.
Note: For more information, you can check out the supported events.
Below are examples of supported events.

Webhook Payloads
Each event type has a specific payload format with the relevant event information. In addition to the information relevant to each event, all event webhooks payloads include information about the layer and the feature service which the event occurred on.
Note: For more information, you can check out webhook payloads.
Below are examples of event type specific payload.
FeaturesCreated

FeaturesUpdated

FeaturesDeleted

Webhook Integration
Webhooks typically are used to connect two different applications. There are companies that provide tools to help you bring together your application with other applications to provide them with real-time information.
One such company is Integromat that can help you automate your processes that you currently handle manually.
Pre-requisites
Webhooks can be turned on in an organization or a specific ArcGIS service such as a hosted feature service. Once it’s configured, the webhook is triggered each time one or more subscribed events occurs.
Note: Only an owner or administrator of the hosted feature service can create webhooks.
The feature service editing and change tracking capability must be enabled to track layer changes.
To enable or disable editing and change tracking on an existing feature service, add or remove the Editing and ChangeTracking capability to or from the feature service.

Creating a webhook

The Create operation allows administrators to create a webhook. You can specify the trigger events for this webhook and the URL to which the payloads are delivered when the webhook is invoked.
Below are the webhook properties.
- Name—Enter your webhook name.
- Change Types—Enter the trigger event values that you want to track.
- HookUrl—Enter the payload URL.
- Payload Format—JSON or PJSON. The default is JSON.
- Active—True or False. The default is False.
- Schedule Info—Default values are provide, but you can modify them to your specifications.
- Format—HTML or PJSON. The default is HTML.


Congratulations! You created a webhook!
Set up a webhook in Integromat
Integromat is an online automation platform that can help you automate your processes that you currently handle manually. Sign up for a free account to get started.
1) Go to Integromat and sign in.
2) Click the Create a new scenario button.
3) Search for and select Webhooks. Click Continue.
The Webhooks module is listed as a favorite in your scenario.
4) Click the module icon in the middle of the screen and select Webhooks from the menu.

5) Choose the Custom Webhook trigger module. This module is designed to run the scenario each time the webhook receives data.
6) Click Add and name your webhook. Click Save.

7) Click Copy address to clipboard and add the URL to the ESRI webhook HookUrl property field.

8) You need to send some data to the webhook in order to determine the data structure. Make some edits to your feature service and wait for the webhook to validate the data structure.

9) Click OK.
You now have your Webhook module configured.
10) Click the side of the Webhook module to connect another module to it.
11) Search for and select Email.
12) Select the Send me an Email action.
13) Click in the subject text box and enter a subject description or use the module settings panel to construct your email subject.
14) Click in the content text box. Use the module settings panel and select payload to construct your email content.

15) Click OK. Your webhook is now created.
16) This scenario will send an email when edits are detected on your feature service. The email will contain the payload information.

17) Let’s look at the payload information, the payload will contain the name of the webhook, layer id, organization id, service name, last updated time and changes URL, as well as the ServerGens and change type trigger events.
Note: For more information, you can check out webhook payloads.

18) What do we do with the payload information? The payload will contain the changes URL and this information will be used to extract the changes of the feature layer.
Copy and paste the changes URL to a browser and click Enter. This allows you to use the extractChanges API to retrieve the objectids of the inserts, updates and deletes that have happened based on the server generation number of the changes. Click the statusURL link.
Note: For more information, you can check out Extract Changes.

19) The statusURL response is the extract changes job. Make a web request to the statusURL to access the Result Url. Click the Result Url to open the JSON file that contain the feature layer changes.
Congratulations! You have successfully extracted your feature layer changes!
Beyond the basics: Accessing attribute information
The previous steps outlined how to set up a notification when events are triggered for your feature services. But what if you want more granular control or to access the attribute data? For example, it’s possible to do the following:
- Create a more readable notification message.
- Generate a detailed notification that includes important attribute information.
- Receive notification on only the important changes by applying filters to the attribute values.
- Push attribute data to third-party services such as Google sheets.
- And much more.
All of this requires attribute data that is contained in the webhook payload. The steps in the next section go beyond the basics to help you access this information. You can also download this Integromat blueprint that allows you to import all the modules into your scenario.
Context
Before we you build a scenario in Integromat, it is helpful to understand how attribute data is accessed from the webhook payload. Accessing the data is a multi-step process. The steps look like this as follows:
1. Get the changeUrl from the webhook payload

2. Make a web request to the changeUrl to receive the statusUrl.

3. Make a web request to the statusUrl to access the resultUrl (.json file) that contains the attribute information.

The JSON file contains the attribute data of the record that was added or updated.

Now that we you understand the steps to access the attribute data manually, you’ll automate these steps using Integromat.
The steps
At the fundamental level, everything we do on the web is a series of requests and responses. Leveraging this understanding, you will use HTTP and JSON modules to make requests and work with your desired information. Make sure to complete the steps in the Set up a webhook in Integromat section above before proceeding.
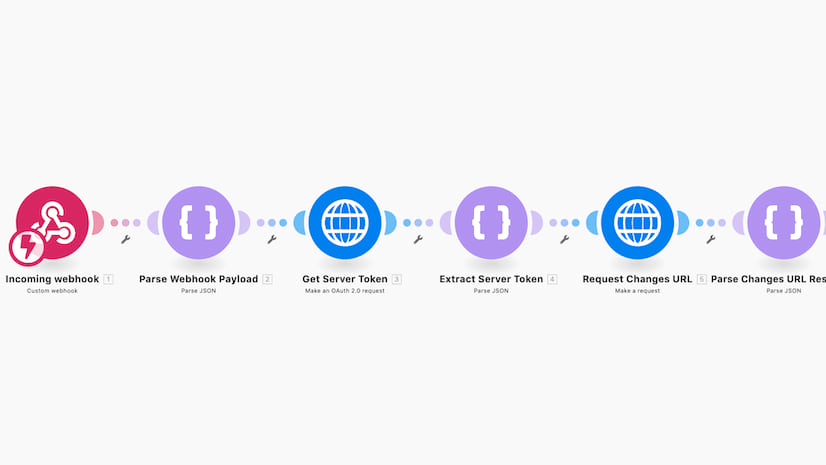
Step 1: Parse the Webhook Payload
The Webhook module sends a payload in JSON that includes the ‘changeUrl.’ To programmatically select and work with the JSON response, you will configure the JSON module.

1. Search JSON and select Parse JSON. Connect it to the Webhook module. For JSON string, select payload from the Webhook module.
2. Select the JSON module. Click Add and select Generator.

3. Copy the payload information that was sent to your email to the Sample data text box. The generator automatically specifies the JSON structure.

Step 2: Request and Parse response from changesUrl
In this step, you will make a HTTP GET request to the changesUrl from the Webhook payload.

4. Search HTTP and select Make a Request. Connect it to the JSON module. Configure the module as outlined below.
- URL—changesUrl (output from the previous JSON module)
- Method— GET
- Query String
- Name: f
- Value: json
This makes an HTTP request to the changesUrl and receives a response in JSON.

5. Add the JSON module and select Parse JSON. For JSON string, select Data from the previous HTTP– Make a Request module. Then click Add and specify the structure as follows:
- Name: statusUrl
- Type: text

In the next step, you’ll insert a delay. The delay is required because it takes time for the .json file to be generated by ArcGIS Online. As a result, you need to give ArcGIS Online time to generate the file before proceeding with the next request.
6. Add the Tools module and select Sleep. Set the appropriate delay.

For this feature service, 10 second gave ArcGIS Online ample time to generate the .json file. Depending on the size and complexity of the feature service, additional time might may be required. Adjust the delay accordingly if the .json file is not captured in the following steps.
Step 3: Request and parse response from statusUrl
Now that you parsed the response from the changesUrl, you can make a request directly to the statusUrl. You’ll repeat the steps from Step 2 with different parameters.

7. Search HTTP and select Make a Request. Connect it to the Tools module. Configure the module as outlined below.
- URL—statusUrl (output from the previous JSON module)
- Method— GET
- Query String
- Name: f
- Value: json
This makes an HTTP request to the statusUrl and receives a response in JSON.

8. Add the JSON module and select Parse JSON. For JSON string, select Data from the previous HTTP– Make a Request module. Then click Add and specify the structure as follows:
- Name: submissionTime // Type: number
- Name: lastUpdatedTime // Type: number
- Name: status // Type: text
- Name: responseType // Type: text
- Name: resultUrl // Type: text

Step 4: Request and parse response from resultUrl
The resultUrl is the JSON file that contains the attribute data. This is the last step of the process, and it follow the same pattern of making an HTTP request and parsing the response. Because you are parsing the JSON file, as opposed to the HTTP response, the modules you use will be slightly different.

9. Search HTTP and select Get a File. Connect it to the JSON module. Configure the module as outlined below.
- URL—resultUrl (output from the previous JSON module)

Integromat reads the JSON file as binary, not as a plain text. As a result, you need an intermediate step to convert the binary output to plain text before you parse the JSON.
10. Search Tools, select Convert the Encoding of a Text, and configure the module as outlined below.
- Input data—Data (output from the HTTP–Get a File)
- Input data codepage—UTF 8
- Output data codepage—UTF 8

Unlike the previous steps of specifying the JSON structure, this step is unique tin that it is dependent on the data schema of your feature service. The easiest way to specify the structure is to copy the content of the JSON file to the Generator to automatically create the data structure.
11. Add the JSON module and select Parse JSON. For JSON string, select Data from the Tools – Convert the Encoding of a Text. Then click Add and specify the JSON structure so that it matches your schema.
That’s it! Now you are ready to integrate attribute data to other apps! You can create a more readable notification email by including the attribute data in the body of your message or even push the attribute information to third-party apps such as Google sheets.


Commenting is not enabled for this article.