Some people prefer to take the route less travelled by, while others prefer the shortest route possible. Whatever path you choose, version 4.23 of the ArcGIS API for JavaScript has a routing solution for you.
Prior to version 4.23, we had two ways to do routing: route (which replaced the deprecated RouteTask) and the Directions widget. The route module is great for low-level routing functions, where developers can configure the behavior in the app’s code. The Directions widget is ideal for quickly and easily adding a great routing experience to an app, with minimal coding.
The RouteLayer
Now we have another choice, the RouteLayer. The RouteLayer is a layer for solving advanced routing problems. A solved route can be displayed on a map, and stored and retrieved from a portal, either as a route portal item, or as part of a webmap.
A RouteLayer consists of two or more stops, and optionally, point, polygon, and polyline barriers. Results of a solved route are accessible from the directionLines, directionPoints, and routeInfo properties. Results include overall travel time, distance, and turn-by-turn directions.

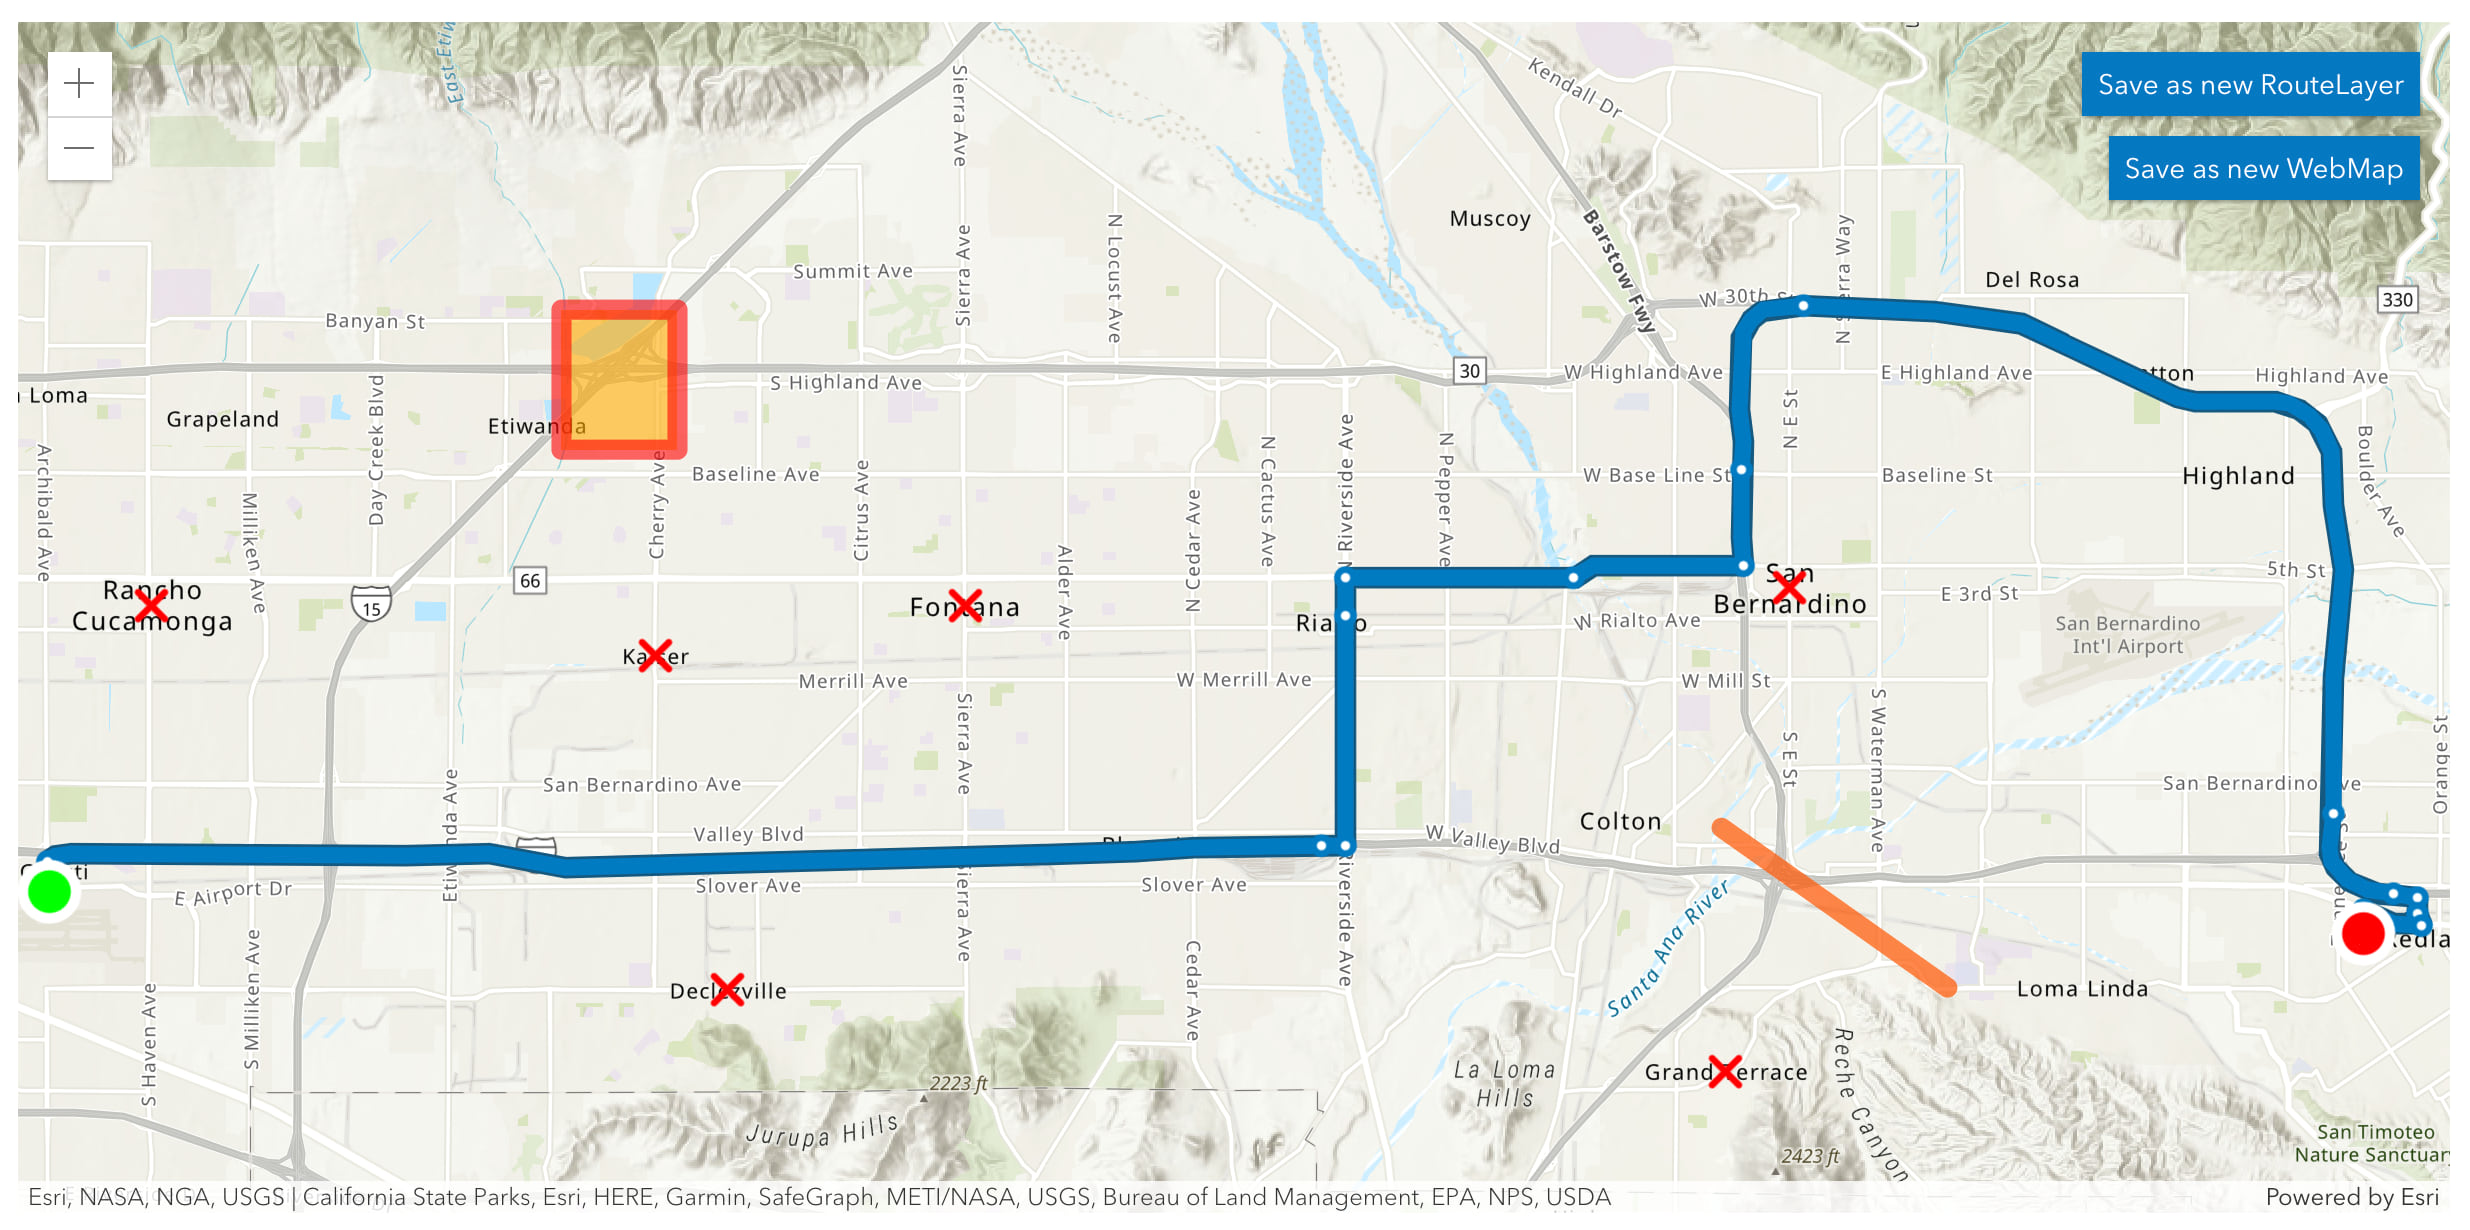
The above sample shows how to create and persist a RouteLayer containing stops, point barriers, a polygon barrier, and a polyline barrier. Because these are now dedicated classes in the API, creating a new RouteLayer is simple and straightforward. Skip to the end of this blog to see all the new routing classes we added at 4.23.
Only geometries are required here, which we can handle manually if we already know them, or we could also use an existing layer to generate them. In this example, we’ll create everything manually to make it clearer.
Creating a new RouteLayer
Let’s look at the code below for creating a new RouteLayer.
// create new stops for start (Ontario) and end (Esri)
const stops = [
  new Stop({
    geometry: { x: -117.59275, y: 34.06200 },
    name: "Ontario Airport"
  }),
  new Stop({
    geometry: { x: -117.19570, y: 34.05609 },
    name: "Esri Campus"
  }),
];

// create new point barriers
const pointBarriers = [
  new PointBarrier({ geometry: { x: -117.43576, y: 34.10264 } }),
  new PointBarrier({ geometry: { x: -117.29412, y: 34.10530 } }),
  new PointBarrier({ geometry: { x: -117.30507, y: 34.03644 } }),
  new PointBarrier({ geometry: { x: -117.57527, y: 34.10282 } }),
  new PointBarrier({ geometry: { x: -117.48886, y: 34.09552 } }),
  new PointBarrier({ geometry: { x: -117.47636, y: 34.04798 } })
];

// create new polygon barrier
const polygonBarriers = [
  new PolygonBarrier({
    geometry: {
      rings: [[
        [-117.49497 - 0.01, 34.13484 - 0.01],
        [-117.49497 - 0.01, 34.13484 + 0.01],
        [-117.49497 + 0.01, 34.13484 + 0.01],
        [-117.49497 + 0.01, 34.13484 - 0.01],
        [-117.49497 - 0.01, 34.13484 - 0.01]
      ]]
    },
    name: "Street festival, Etiwanda"
  })
];
// create new polyline barrier
const polylineBarriers = [
  new PolylineBarrier({
    geometry: {
      paths: [[
        [-117.30584, 34.07115],
        [-117.26710, 34.04838]
      ]]
    },
    name: "Major highway closure"
  })
];

// create a new RouteLayer with stops and barriers
const routeLayer = new RouteLayer({
  stops,
  pointBarriers,
  polygonBarriers,
  polylineBarriers
});
We can see that creating a new RouteLayer is similar to creating any other layer with multiple properties. One caveat is that because this layer requires a call to a routing service to generate results, it’s best to use either .then() statements, or an asynchronous function for solving routes.
Note that the start of the sample is: (async () => {. This means that the entire application will run asynchronously, which makes it easier to work with the results of a solved RouteLayer by using await methods for resolved promises. Let’s look at how the above app handles that.
// wait for the view and the RouteLayer to load
await Promise.all([view.when(), routeLayer.load()]);

// once the RouteLayer is loaded, solve the route
// use the optional RouteParameters parameter to provide the apiKey
// and other settings like directions language and travel mode
const results = await routeLayer.solve({ apiKey });

// the `solve()` method returns a routing solution
// it contains the computed route, stops, and barriers
routeLayer.update(results);

// after the solved route has been applied to the layer
// zoom to the route’s extent
await view.goTo(routeLayer.routeInfo.geometry);
These await statements pause the code’s execution so that all relevant resources will be available. Now you may ask yourself, why doesn’t RouteLayer.solve() immediately update the layer? Why do we also have to call RouteLayer.update()?
Solving routes
When you have two or more stops, the RouteLayer can be solved. As explained above, this is a two step process. The route is solved based on information in the RouteLayer, and optionally, information in the RouteParameters. The solve() method returns a solution that can be queried, and applied to the layer if you want to view the results.
However, before displaying the route, you may want to make some comparisons or calculations to ensure you are visualizing the optimal route for your app. For example, say you’re at the Esri Dev Summit, and you want a route to the nearest restaurant for dinner after a long day at the conference. So you add the convention center as the starting point, then add a variety of decent looking restaurants as end points. But, you only want to display the route to the closest restaurant.
Which restaurant is closest? Easy, submit several solve() requests, and then only display the shortest route. Like this:
// show me the routes to the nearest yummy restaurants
// from the convention center
const solutions = await Promise.all([
  routeLayer.solve({ stops: [convention, thaiFood] }),
  routeLayer.solve({ stops: [convention, mexicanFood] }),
  routeLayer.solve({ stops: [convention, italianFood] })
]);

// now sort the results to find the shortest route
solutions.sort((a, b) => a.routeInfo.totalDuration - b.routeInfo.totalDuration);

// once we have the shortest route, then update the RouteLayer
// so we can see the route on the map
routeLayer.update(solutions[0]);
After you’ve updated the route, you can now save it for future use. If you’re curious about persistance, the RouteLayer sample also demonstrates how to persist a solved RouteLayer as a route portal item, or as part of a webmap.
Persisting a RouteLayer
A unique feature of RouteLayer is that it has it’s own save() and saveAs() methods. This means that the RouteLayer can be persisted as a route portal item, so saved routes can be re-opened in apps like MapViewer or ArcGIS Navigator. Additionally, if added to a webmap, the RouteLayer will be automatically embedded when WebMap.save() or WebMap.saveAs() methods are used. The code for both options look very similar:
// save solved route as a route portal item
const portalRouteItem = await routeLayer.saveAs({
  title: "Route from Ontario Airport to Esri Campus",
  snippet: "Route created using the ArcGIS API for JavaScript"
});

// save solved route as part of a webmap
const portalItem = await map.saveAs({
  title: "WebMap with route from Ontario Airport to Esri Campus",
  snippet: "WebMap created using the ArcGIS API for JavaScript"
});
Thus far we’ve been introduced to the new RouteLayer, seen how it works, and learned how to persist it’s results. Now let’s take things one stop further.
RouteLayer visualization
We haven’t discussed the visualization of RouteLayer yet. That’s because all the symbology we’ve seen has been defined by default in the API. While we have many plans for future enhancements for the RouteLayer, we do have some options that we can use today. For example, we have support for both blendMode and effect properties. This means that we can enhance our visualizations to make more impressive looking routes.
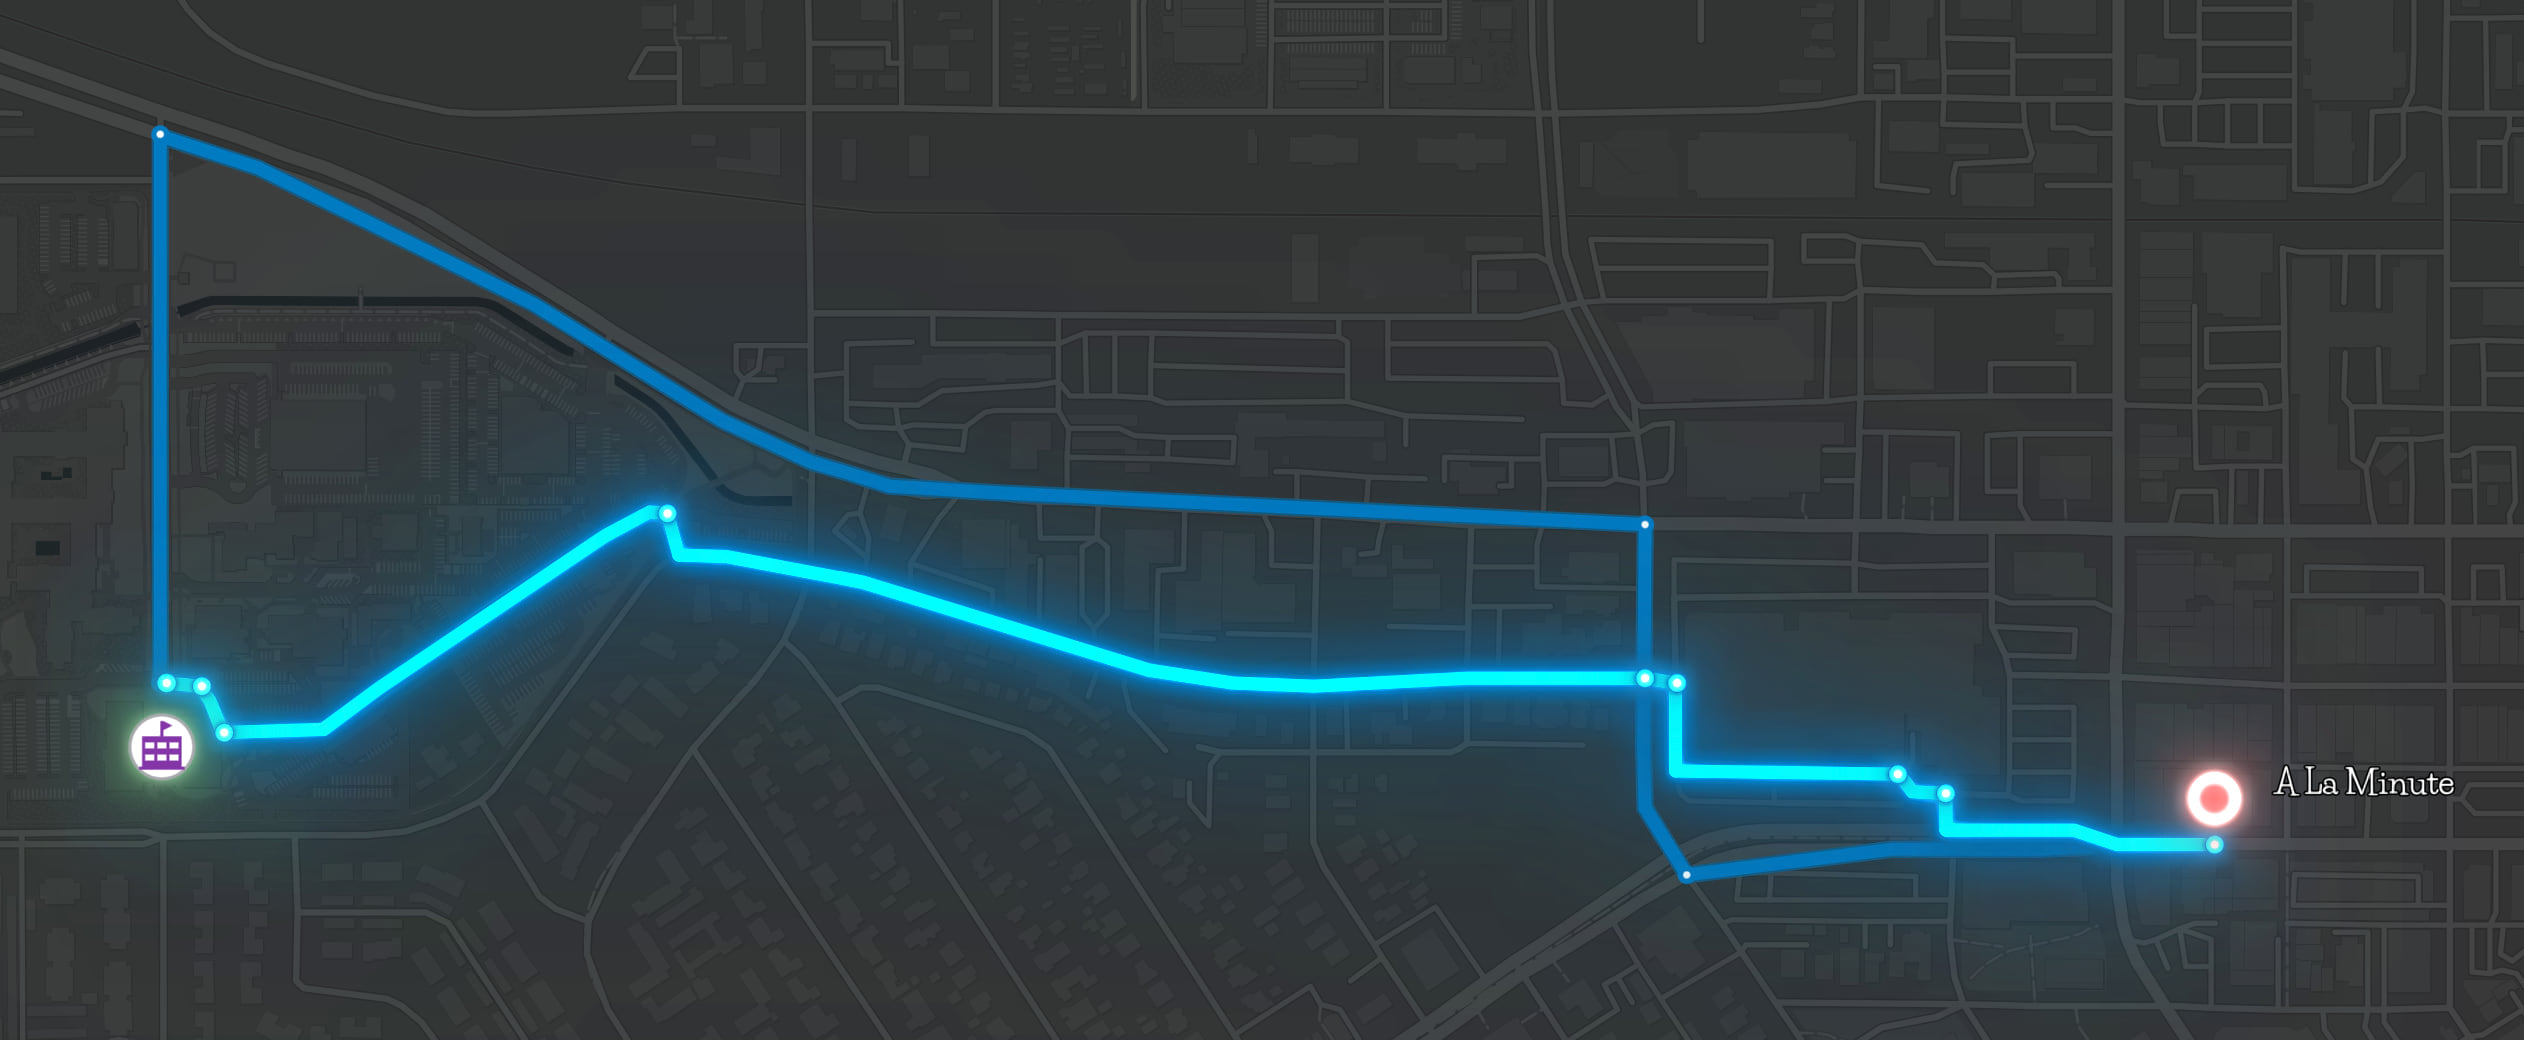
A great use case for this is when displaying two or more RouteLayers on a map. For example, say we wanted to make an app for people visiting the Esri office in Redlands, California. To welcome our guests, we pick some of our favorite spots in the area, and then provide walking and driving routes to their locations. Now we want to give precedence to walking routes, because walking is a healthier and (arguably) more fuel-efficient travel mode than driving. Open the Multi RouteLayer app and click on a point of interest from the buttons in the top right.

The code here looks similar to the sample app we looked at earlier, with two exceptions.
First, we have to get all the information about our desired travel modes. To do this, we call the networkService.fetchServiceDescription() method on our routing service to return available travel modes (amongst other information, like the service version). The previous app relied on the routing service’s default travel mode, but now we want to pick specific ones. You can learn more about travel modes in the Configure travel modes documentation.
Second, we apply a bloom effect on our second RouteLayer to accentuate the layer. We do this because we want to encourage people to walk when possible and practical.
Note that both RouteLayers have the same start and end, but take (mostly) different routes and are visualized differently.
// the routing service URL
const url = "ROUTING_SERVICE_URL";

// API key from developer's account
// https://developers.arcgis.com/documentation/mapping-apis-and-services/security/api-keys/
const apiKey = "YOUR_API_KEY";

// get the information about our routing service
const {supportedTravelModes} = await networkService.fetchServiceDescription(url, apiKey);

// get the travel mode details for "Driving Time"
const driveTravelMode = supportedTravelModes.find((travelMode) =>
  travelMode.name === "Driving Time");

// get the travel mode details for "Walking Time"
const walkTravelMode = supportedTravelModes.find((travelMode) =>
  travelMode.name === "Walking Time");

// create a RouteLayer for "Driving Time"
const drive = new RouteLayer({
  stops: [
    { geometry: esri },
    { geometry: destination }
  ]
});

// Solve and update route for "Driving Time"
// and zoom to results
drive.solve({ apiKey, travelMode: driveTravelMode }).then((results) => {
  drive.update(results);
  const extent = results.routeInfo.geometry.extent.clone();
  view.goTo(extent.expand(1.5));
});

// create another RouteLayer for "Walking Time" with bloom
const walk = new RouteLayer({
  stops: [
    { geometry: esri },
    { geometry: destination }
  ],
  effect: "bloom(2, 0.5px, 0)"
});

// Solve and update route "Walking Time"
walk.solve({ apiKey, travelMode: walkTravelMode }).then((results) => {
  walk.update(results);
});

// add both RouteLayers to the map
map.addMany([drive, walk]);
The road ahead for RouteLayer
We hope you’ve enjoyed learning about the new RouteLayer, and all it’s exciting capabilities. But this is just the beginning of our journey. We have some known limitations that we are working hard on addressing, such as adding more visualization options, and support for labeling, popups, and 3D SceneViews (currently RouteLayer only works in 2D MapViews).
We are also thinking about the layer’s behavior, and it’s ability to update stops and waypoints with drag and drop, or on-click events.
We’d love to hear your feedback about the new RouteLayer, and how future enhancements could help with your routing workflows. Leave us a comment below!
References
Classes added at 4.23, for your routing convenience:
DirectionLine
https://developers.arcgis.com/javascript/latest/api-reference/esri-rest-support-DirectionLine.html
DirectionPoint
https://developers.arcgis.com/javascript/latest/api-reference/esri-rest-support-DirectionPoint.html
PointBarrier
https://developers.arcgis.com/javascript/latest/api-reference/esri-rest-support-PointBarrier.html
PolygonBarrier
https://developers.arcgis.com/javascript/latest/api-reference/esri-rest-support-PolygonBarrier.html
PolylineBarrier
https://developers.arcgis.com/javascript/latest/api-reference/esri-rest-support-PolylineBarrier.html
RouteInfo
https://developers.arcgis.com/javascript/latest/api-reference/esri-rest-support-RouteInfo.html
RouteLayer
https://developers.arcgis.com/javascript/latest/api-reference/esri-layers-RouteLayer.html
RouteSolveResult
Stop
https://developers.arcgis.com/javascript/latest/api-reference/esri-rest-support-Stop.html
Thank you for reading until the end of this blog! Stay tuned for more routing developments in the future.
Article Discussion: