ArcGIS Monitor provides observability into your ArcGIS Enterprise deployments by collecting metrics on the health, performance, and usage of your enterprise GIS. It is designed to help administrators and managers ensure their ArcGIS Enterprise deployments are working efficiently by reducing and preventing system downtime, resulting in operational cost savings.
One of the advantages offered by ArcGIS Monitor is that it provides comprehensive status information for all registered assets in the enterprise GIS. Assets can include: enterprise portals, GIS servers, web services, the ArcGIS Data Store (relational), databases, geodatabases, and host machines. This allows admins to assess the health of GIS deployments and quickly identify potential issues. For example, in the ArcGIS Enterprise deployment below, GIS Server 1 has a warning status indicating there may be an issue and an admin should check its metrics, see Figure 1.
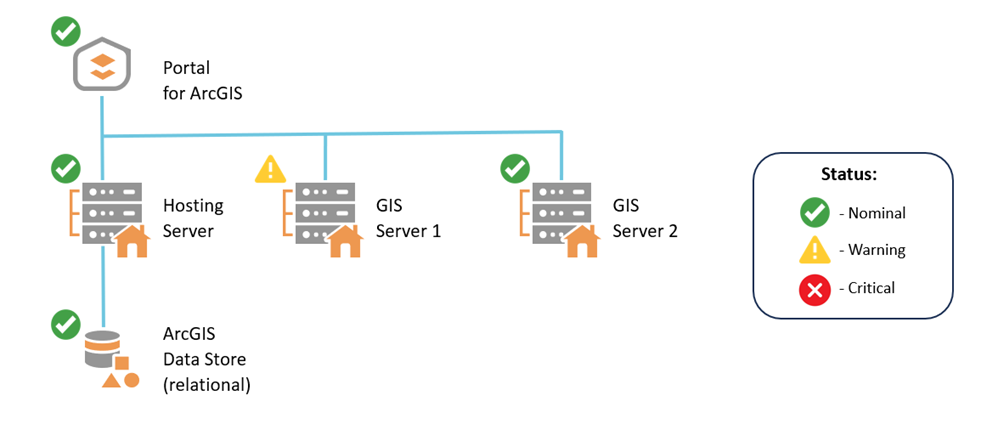
Figure 1: Conceptual diagram ArcGIS Enterprise deployment with one of its GIS Servers showing a warning status.
When an enterprise GIS asset such as an ArcGIS Server site is registered with Monitor, it becomes a component. Each component’s status is shown on the Monitoring page in the components table:
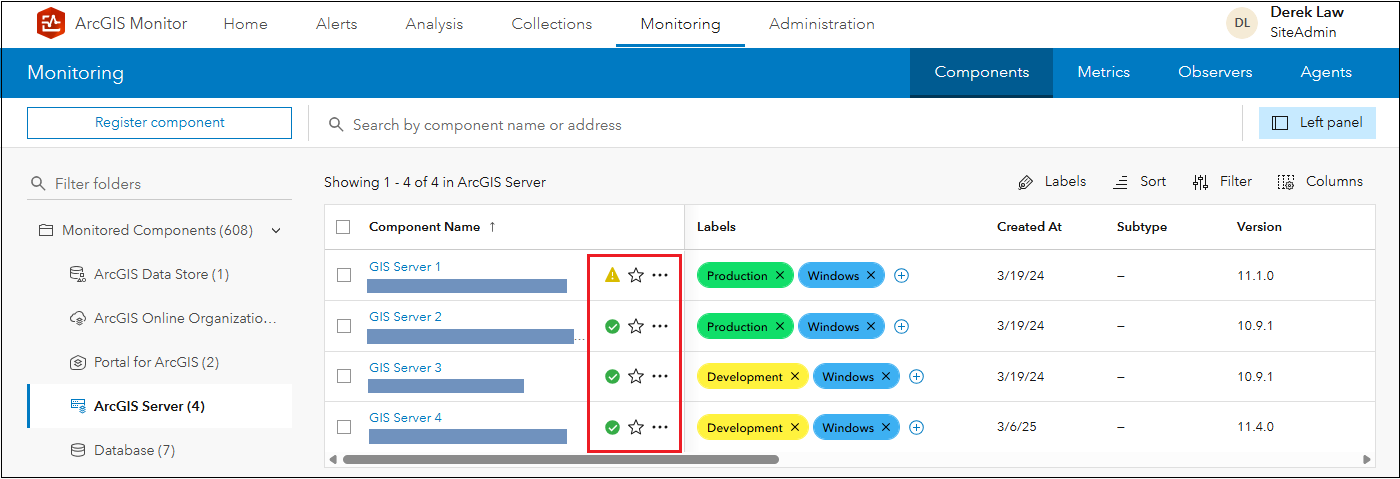
Figure 2: Component status displayed on the Monitoring page.
The status of a component is determined by its metrics and reflects the state of the metric with the most severe status. A component can have one of eight possible statuses: nominal, info, warning, critical, incident active, monitoring off, alerting off, and no data. The first four statuses (nominal, info, warning, and critical) reflect if the most recently collected metrics data violates the alerting rules set for a metric. The next three (incident active, monitoring off, and alerting off) indicate that the component is part of an active incident configured in Monitor (i.e., a time period where reporting is turned off, such as a scheduled maintenance window) and metric data collection is paused. And the last status: no data indicates Monitor was unable to collect data. To learn more about each status type, see the Manage components help topic.
It would be optimal for all registered Monitor components to have nominal status, which implies that the system is working normally (as configured). This blog discusses how a registered component’s status is determined and explains how alerts work in Monitor.
Component Status
Selecting a component in the components table will display its Overview subtab, which shows key metrics for the component. If you were to select GIS Server 1 from the components table in Figure 2, its status is shown in the pill indicator in the upper left corner of the Overview subtab.
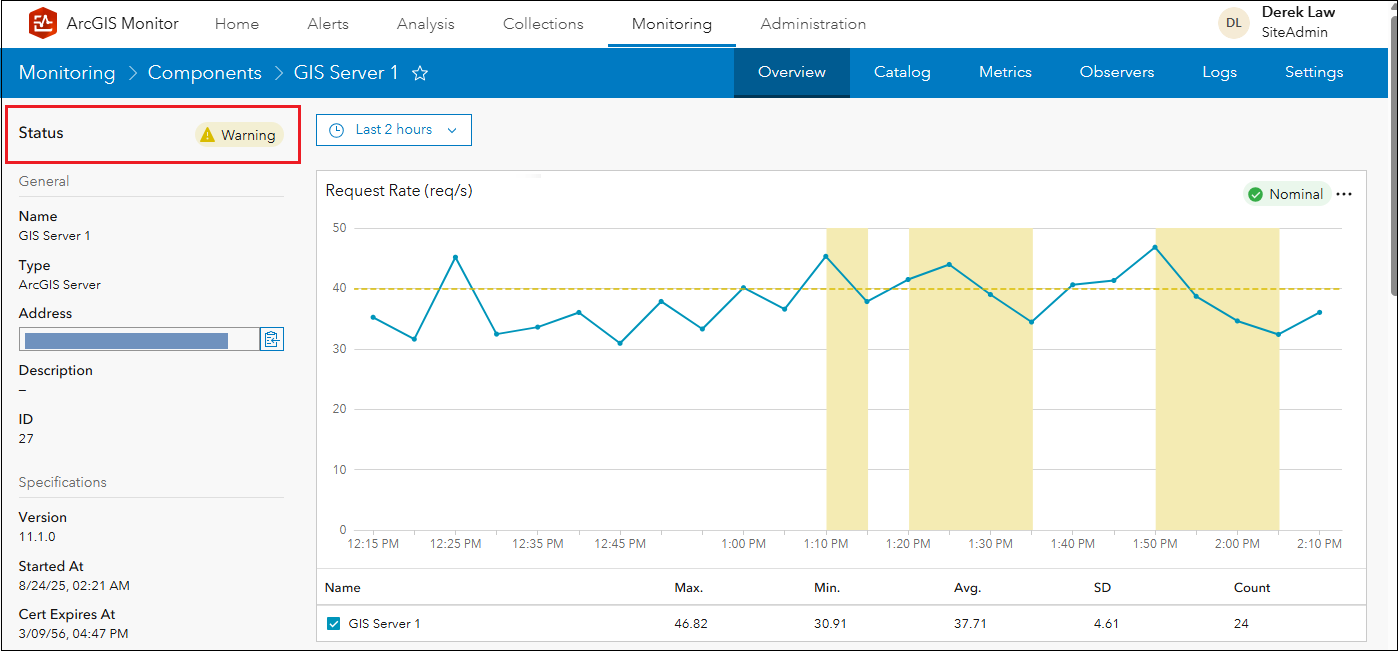
Figure 3: GIS Server 1 component Overview subtab with warning status.
GIS Server 1’s current status is warning. While it may seem like the request rate metric may have triggered the component warning status, it did not. In the request rate serial chart, the yellow dotted line represents the warning alert threshold value set to 40 requests per second for the metric. There are three time periods where the collected data exceeded the warning threshold and they are shown as yellow regions in the chart. Note the chart’s status pill indicator in the upper right shows nominal.
You can click GIS Server 1’s status pill indicator to quickly view the cause of the warning status.
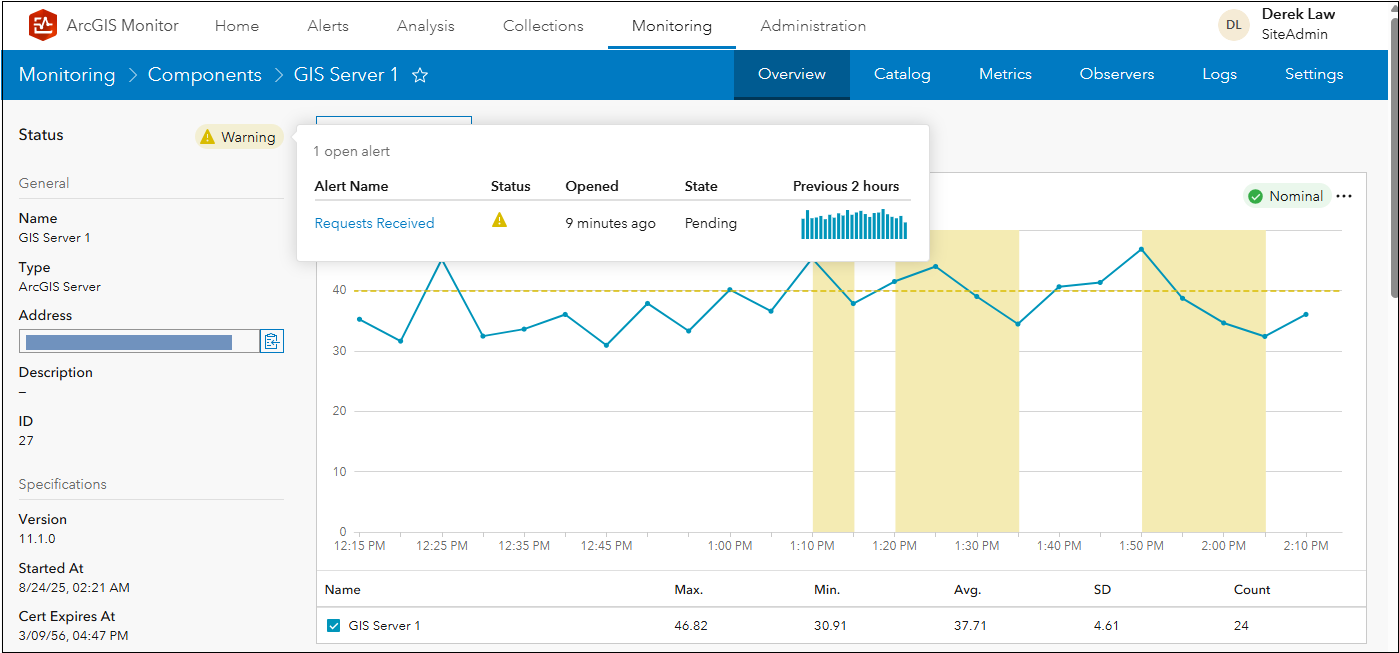
Figure 4: Displaying the cause of the GIS Server 1 warning status.
The pop-up window that appears displays the source of the component’s current status. In this example, a warning alert was triggered on the requests received metric, which changed the status of GIS Server 1 to warning.
In some cases, a component may have several metrics with active alerts, but the component’s overall status is always determined by the metric with the most severe status. In the next example, GIS Server 1’s component status is critical and clicking the status pill indicator shows that it has two active alerts.
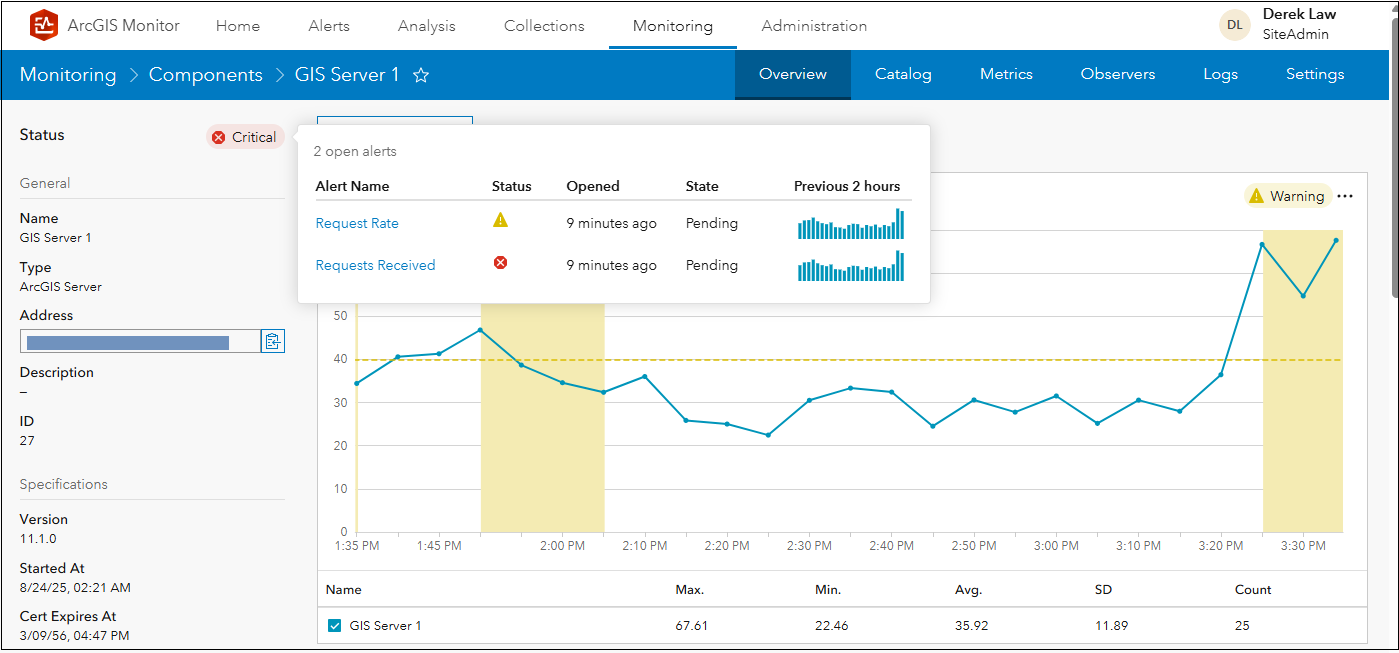
Figure 5: GIS Server 1 has two active alerts; its status is determined by the metric with the most severe status.
The request rate metric has a warning alert, but the requests received metric has a critical alert. Therefore, the GIS Server 1 component has a critical status, because its status is determined by the metric with the most severe status. You can click the requests received metric in the pop-up window to examine the source of the critical alert.
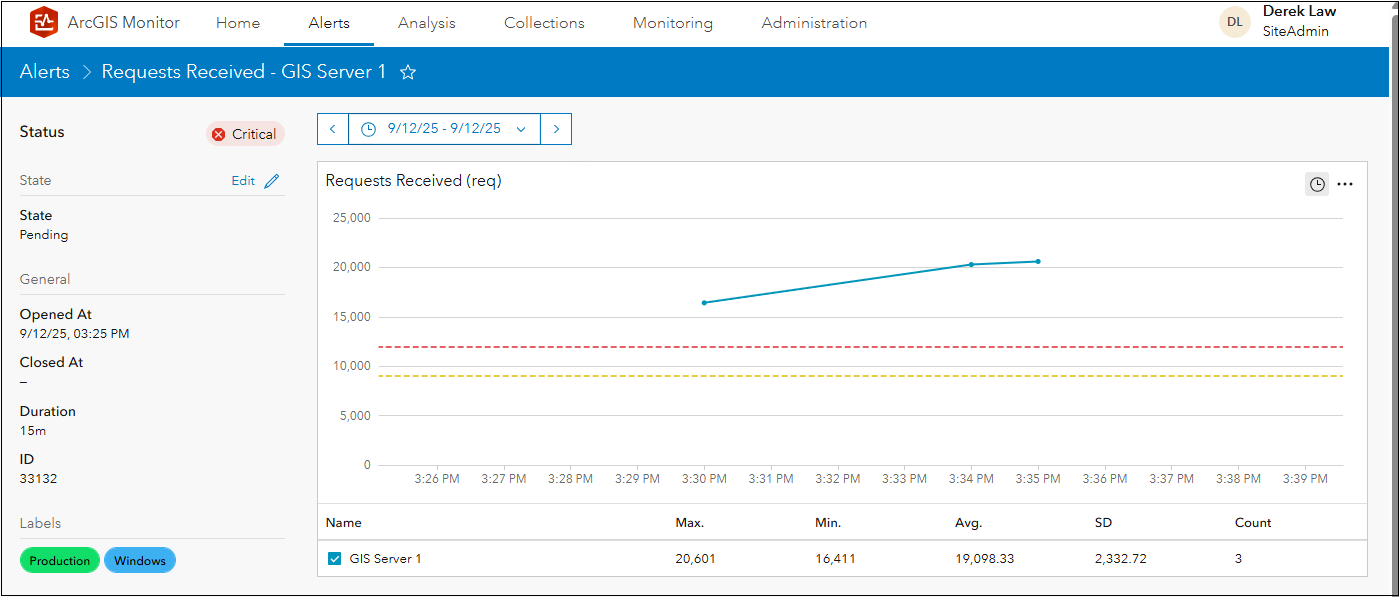
Figure 6: Alerts page showing the requests received critical alert on GIS Server 1.
Monitor navigates to the Alerts page and displays the requests received metric with the active alert in more detail. Note that the collected data for the metric has exceeded the critical alert threshold (represented by the red dotted line in the serial chart). This triggered the critical alert and changed GIS Server 1’s component status from warning to critical. On the left side panel, note the critical alert was opened on 9/12/25 at 3:25 pm.
Side note: The time range displayed in Figure 6 does not include 3:25 pm, so its data point does not appear on the serial chart. The blue solid line represents the collected data, it does not extend earlier than 3:30 pm in the chart, because the 3:25 pm data point is not shown.
On the Alerts page, underneath the serial chart, the option to add comments is available (not shown in Figure 6). This is meant for admins to add a comment about the alert if desired. Comments can be useful for record keeping purposes or for admins that work in a collaborative setting.
How do Alerts work?
For all registered components in ArcGIS Monitor, admins can configure and enable alerts for any collected metric. You can view all the metrics for a component and their respective alert rules by navigating to the Monitoring page > select a component > Metrics subtab. For example, the metrics for GIS Server 1 are shown in Figure 7; you can learn more about each metric in the ArcGIS Server metrics help topic. Each component type’s metrics are explained in the Monitor help.
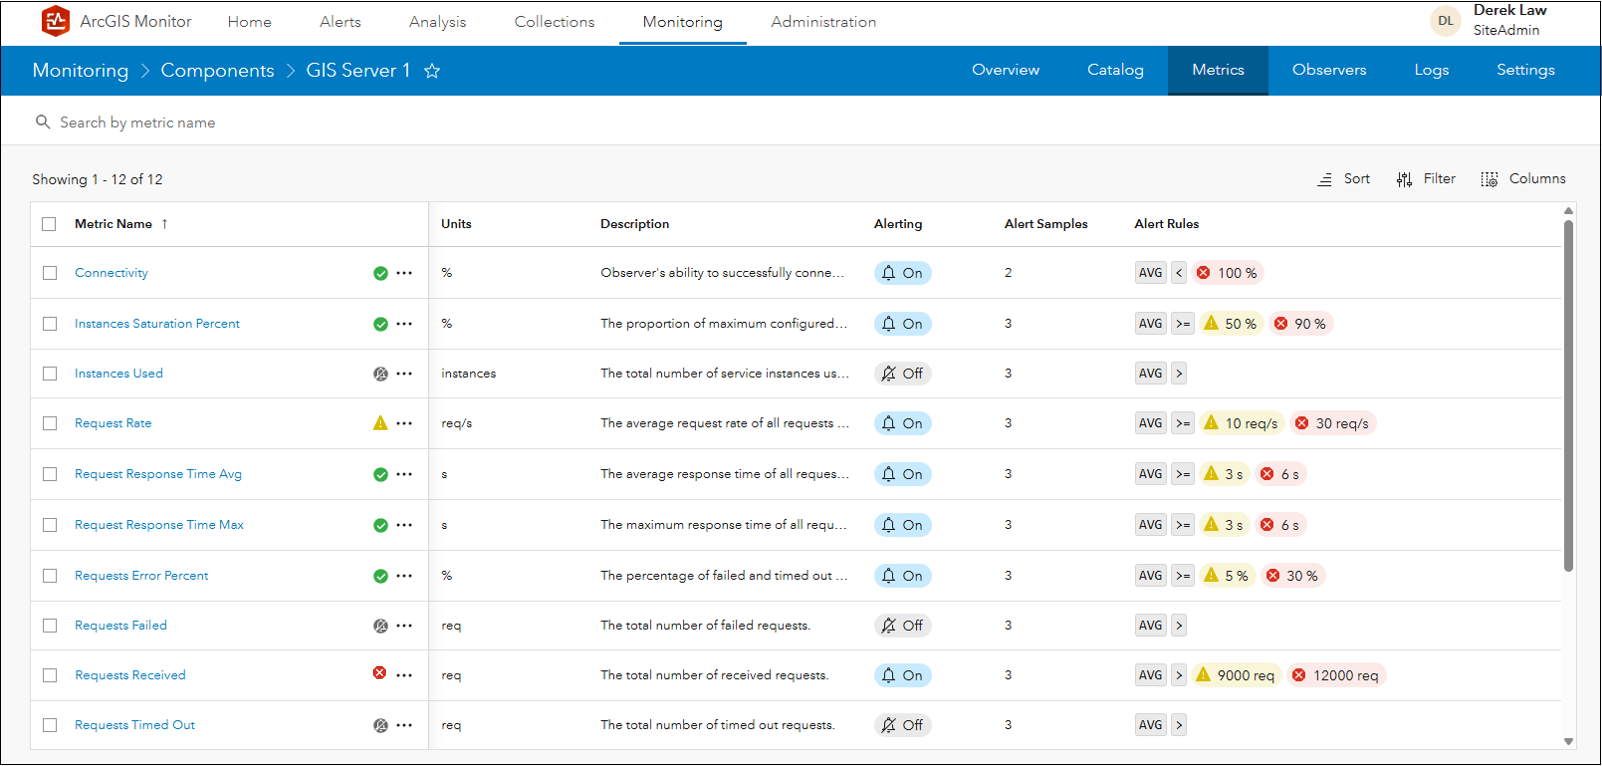
Figure 7: ArcGIS Server component type metrics.
For the requests received metric, note it has two alert rules: 9,000 requests will trigger a warning alert and 12,000 requests will trigger a critical alert. These explain the alert behaviors seen in Figures 5 and 6. Also note that alerting is off for the instances used, requests failed, and requests timed out metrics.
Monitor includes preconfigured alert rules for some metrics. These were determined based on project experiences by Esri Professional Services, but are only meant as a starting point. The default alert thresholds may need to be adjusted for different enterprise GIS deployments and based on your organization’s specific business requirements.
Alerts are triggered on a component metric when a threshold value is exceeded. You can observe this behavior by examining a metric’s serial chart. From the GIS Server 1’s Metrics subtab, you can display the requests received metric by clicking it in the table.
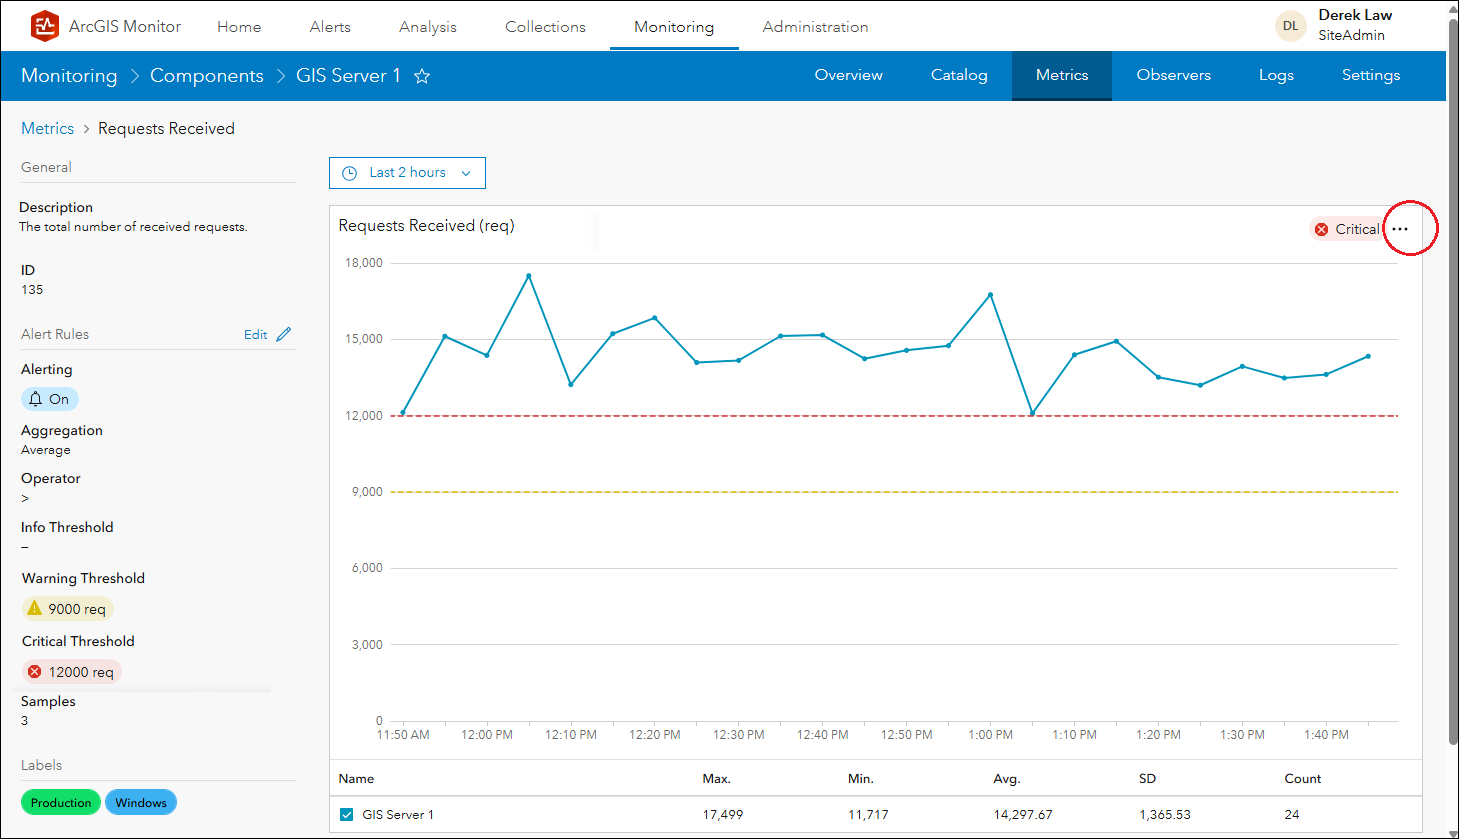
Figure 8: GIS Server 1’s requests received metric.
On the left side panel, note the warning and critical alerts configured for the requests received metric. These are represented in the chart by the yellow and red dotted lines, respectively. The blue solid line represents the collected data and its data points are clearly higher than the critical alert threshold value of 12,000 requests, which is triggering a critical alert on the metric. The chart’s status pill indicator in the upper right shows critical.
Configuring Alerts
To configure alerts for a metric, click the options ellipsis button (shown by the red circle in Figure 8) > Edit alert rules. This displays the Edit Alert Rules window.
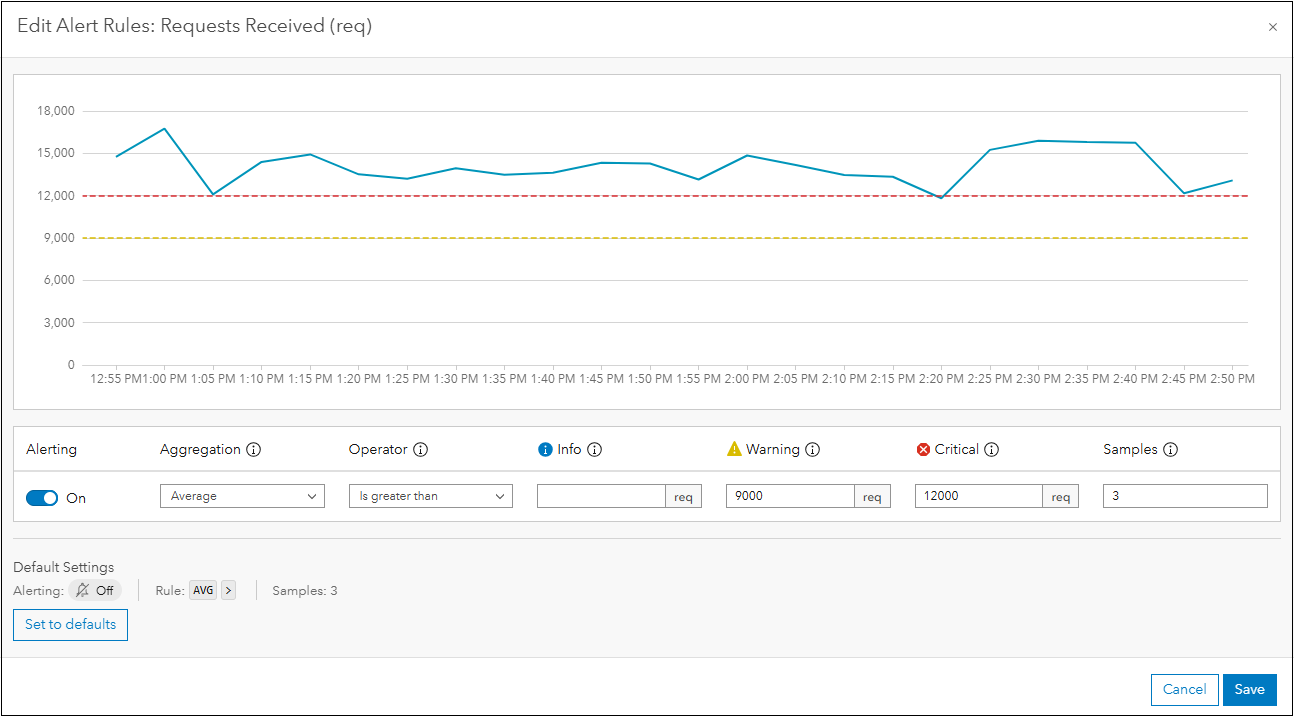
Figure 9: Edit Alert Rules window for GIS Server 1’s requests received metric.
In the Edit Alert Rules window, you can turn alerting on/off for the metric and you have several options to configure alerts. First, you specify the condition which would cause the alert(s) to trigger which is a combination of aggregation – the mathematical function that will be assessed, and the operator – applied to the threshold value(s) for the alert condition. The different aggregation and operator options are shown in Figure 10.
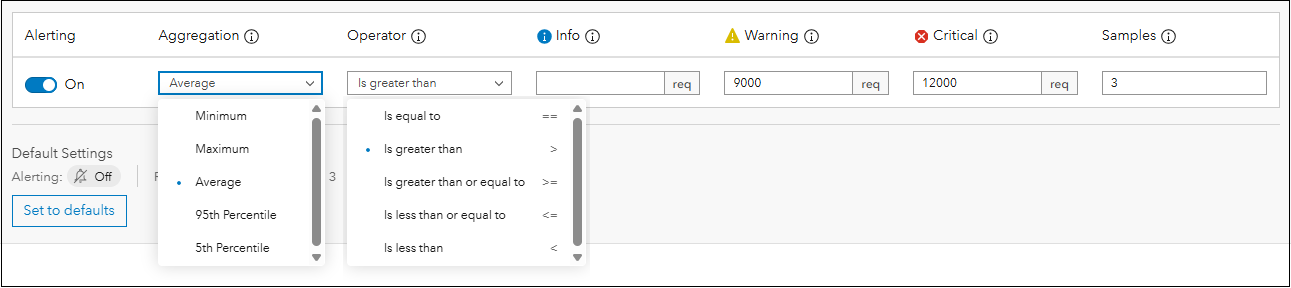
Figure 10: The aggregation and operator options that can be set for an alert condition.
Next, you have the option to set three alert types: info, warning and critical, where each type has a different threshold value to indicate different severity levels. The samples parameter defines the number of data point samples the alert threshold value(s) is compared against, to trigger an alert. The default samples value is three, this means Monitor will use three data points when comparing the data against the alert condition. You can configure alerts to use between 1 to 10 data points for the samples parameter. Learn more about configuring alerts in the Configure alert rules help topic.
Since the samples parameter is set to three, Monitor assesses the alert condition based on a “trailing assessment” – this means Monitor will use the three latest data points and apply the alert condition set. In Figure 9: when the “average” value of the three latest data points “is greater than” the warning (9,000 requests) or critical (12,000 requests) threshold values. It is a “trailing assessment”, because Monitor will assess for alerts based on the last three data points collected from the component.
To elaborate on the “trailing assessment” concept, examine GIS Server 1’s requests received metric for the last hour (starting at 3:00 pm) in Figure 11.
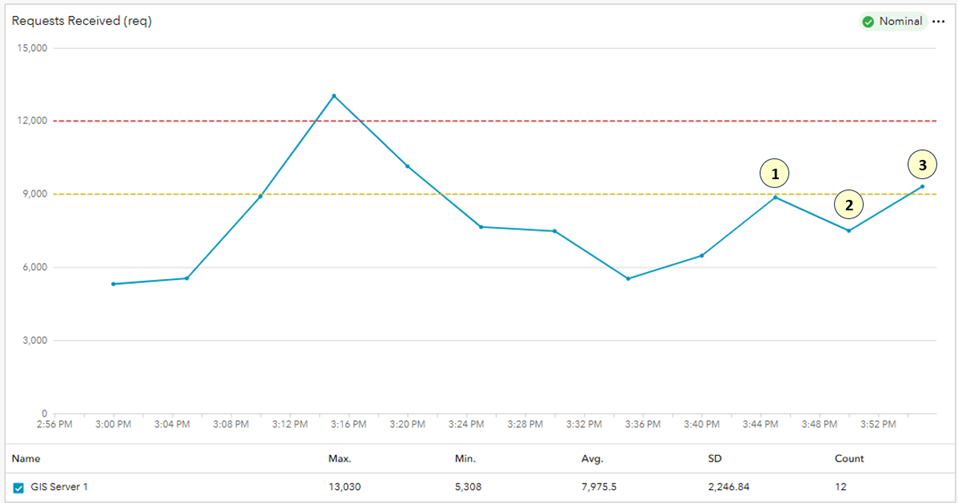
Figure 11: GIS Server 1’s requests received metric is nominal.
Note the three most recent data points labeled 1, 2, and 3. Their values are used by Monitor to compare against the alert condition(s) set for the metric. If the “average” value of the three data points “is greater than” the warning (9,000 requests) or critical (12,000 requests) threshold values, an alert is triggered. Currently, their average value is below the alerts set. The chart’s status pill indicator in the upper right shows nominal.
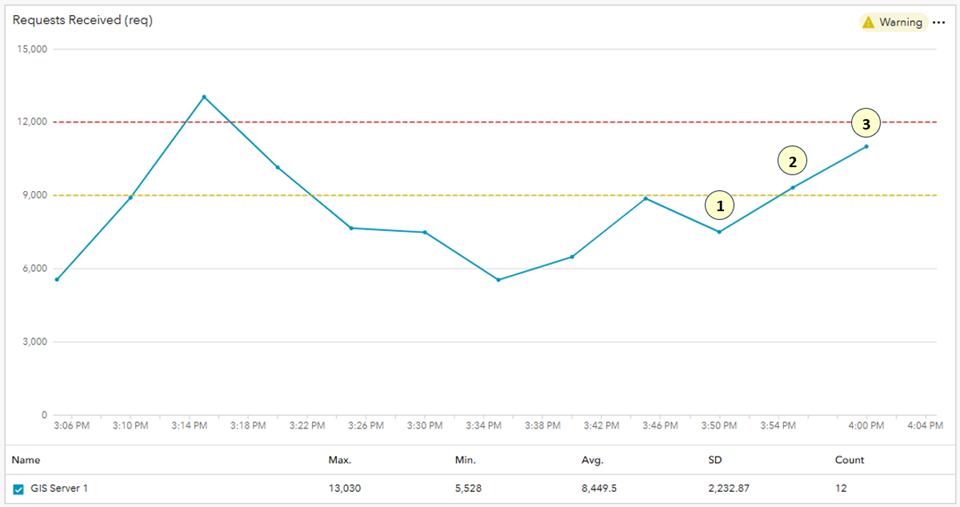
Figure 12: GIS Server 1’s requests received metric has a warning alert.
Five minutes later, a new data point is collected at 4:00 pm in Figure 12. The “trailing assessment” shifts to include the three most recent data points labeled 1, 2, and 3. Their values are used by Monitor to compare against the alert condition(s) set for the metric. In this case, their average value is greater than the warning (9,000 requests) alert, which triggers the alert. A warning alert is opened for the metric. The chart’s status pill indicator changes to warning. This also changes the component’s status to warning (assuming there are no other alerts on the component). The warning alert will continue to remain active as long as the “trailing assessment” alert condition is met.
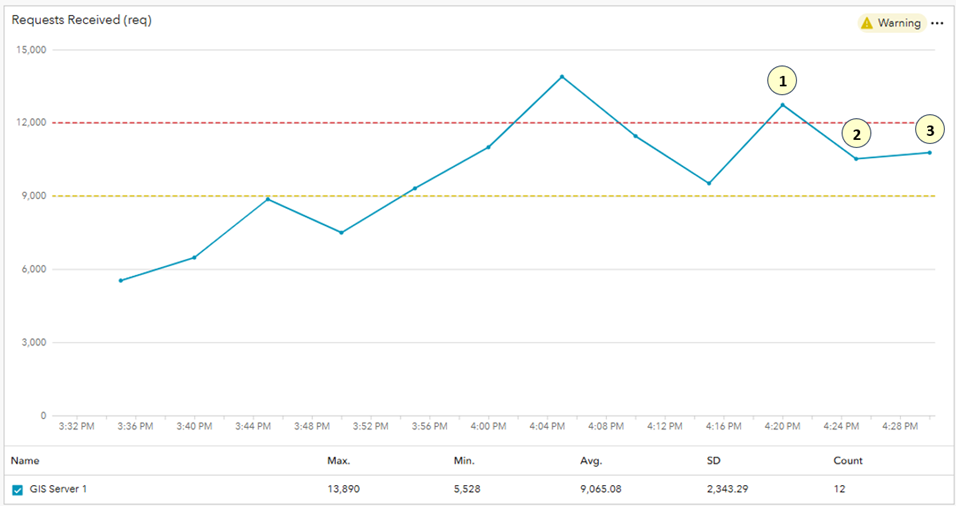
Figure 13: GIS Server 1’s requests received metric continues to have a warning alert.
Collected data for the requests received metric approximately 30 minutes later is shown in Figure 13. The “trailing assessment” shifts to include the three most recent data points labeled 1, 2, and 3. Their average value is greater than the warning (9,000 requests) threshold, so the warning alert continues to remain open. The component continues to have a warning status.
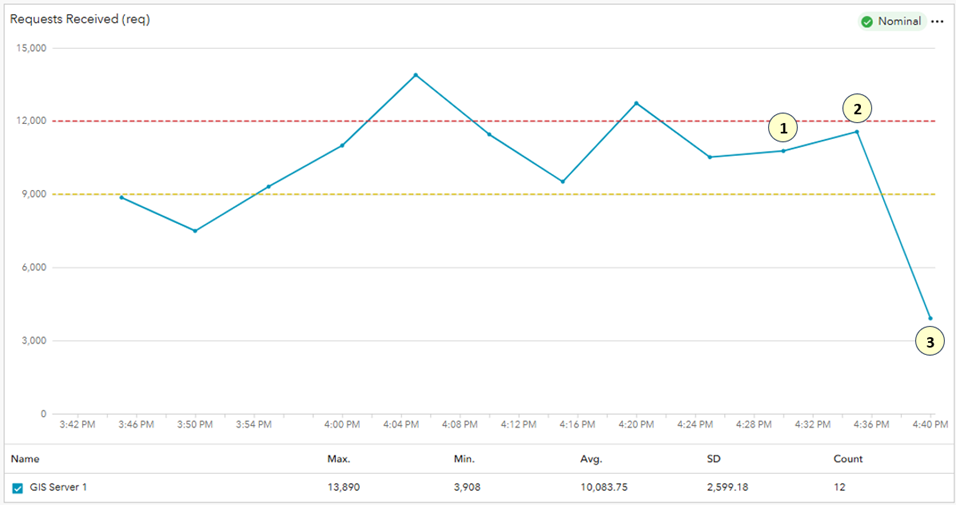
Figure 14: GIS Server 1’s requests received metric returns to nominal.
In Figure 14, 10 minutes later (at 4:40 pm) the “trailing assessment” shifts to include the three most recent data points labeled 1, 2, and 3. In this case, their average value is not greater than the warning threshold, so the warning alert closes. An alert only closes when the alert condition is no longer met. The chart’s status pill indicator changes back to nominal and the component status returns to nominal.
Side note 2: The number of data points used by the “trailing assessment” is determined by the samples parameter for the alert condition. For example, if the alert condition’s samples parameter was set to 6, then the “trailing assessment” would use the 6 latest data points.
In addition to the samples parameter, alerts can also be affected by a component’s observer interval. Every registered Monitor component has observers which are responsible for collecting attribute and metric information about the component. In this case, the metrics observer for the GIS Server 1 component has an interval of 5 mins (the default), which is the frequency at which the observer collects data from the component. You can adjust the observer interval (to be more or less frequent) and this would affect the time periods for the sample data points.
All of these factors: alert condition aggregation and operator, alert threshold values, samples, and metric observer interval can affect how and when alerts are triggered on a component metric. Setting appropriate alert rules for metrics will depend on your business use cases and what is important to you.
Configure Alerts for Multiple Components
You can also configure alert rules for the same metric for multiple components of the same type in ArcGIS Monitor. Under the Administration page > Metrics subtab > select a metric in the table, then click Edit defaults.
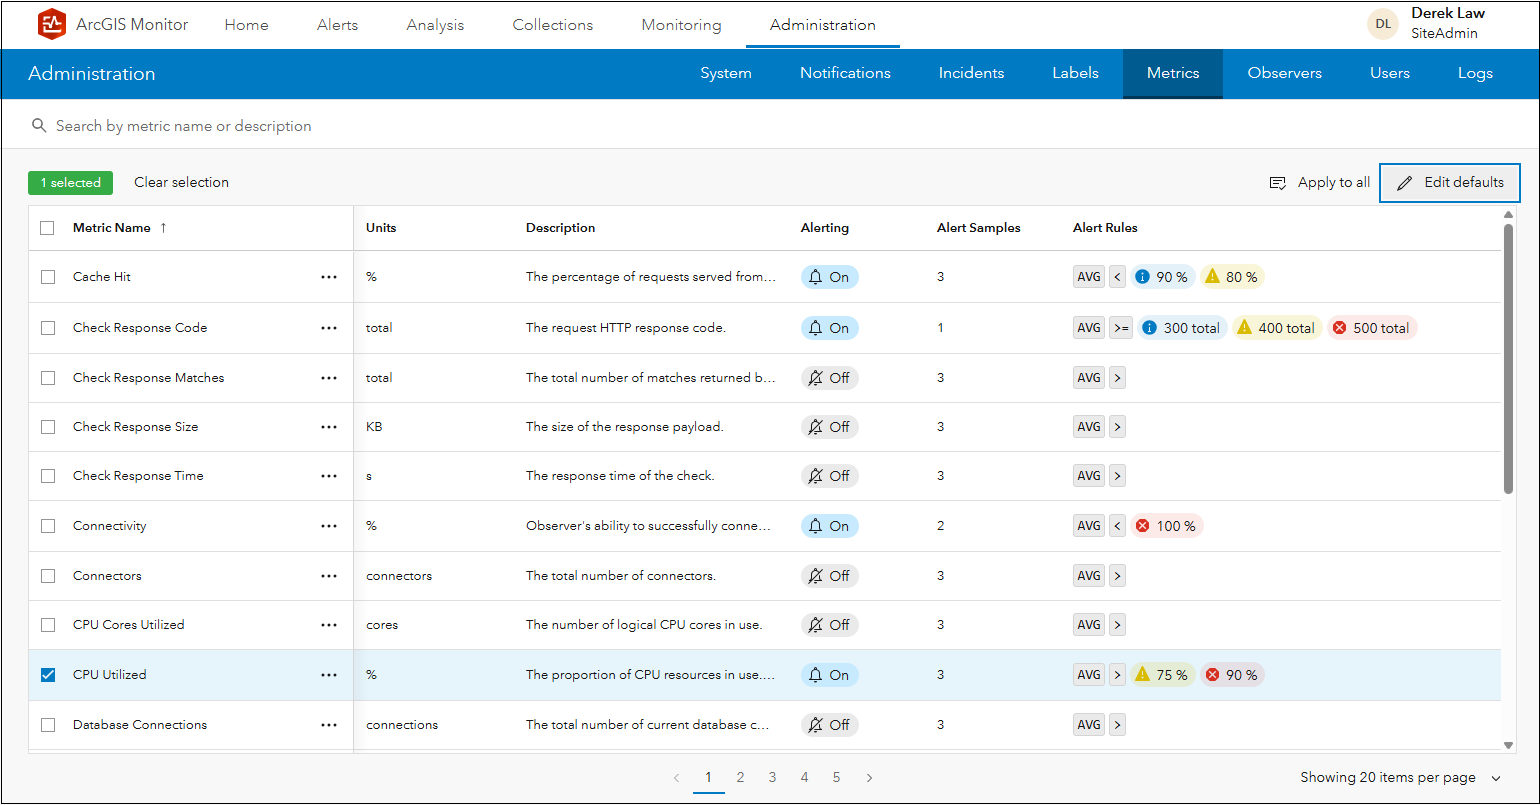
Figure 15: Table showing all reported metrics in ArcGIS Monitor.
This displays the Edit Default Alert Rules window, where you can set and apply alert rules for the selected metric for future components that are registered with Monitor. This option can help save time when registering multiple components of the same type. Learn more in the Configure alert rules across multiple components help topic.
Monitor Alerts Page
The Alerts page helps admins by aggregating and summarizing all reported alerts in your enterprise GIS. Four indicators at the top of the page denote all open alerts and the three different alert types: info, warning, and critical. The alerts table displays all alert occurrences listed alphabetically. You can easily focus on any open alerts via the filter on the left side of the page, see Figure 16.
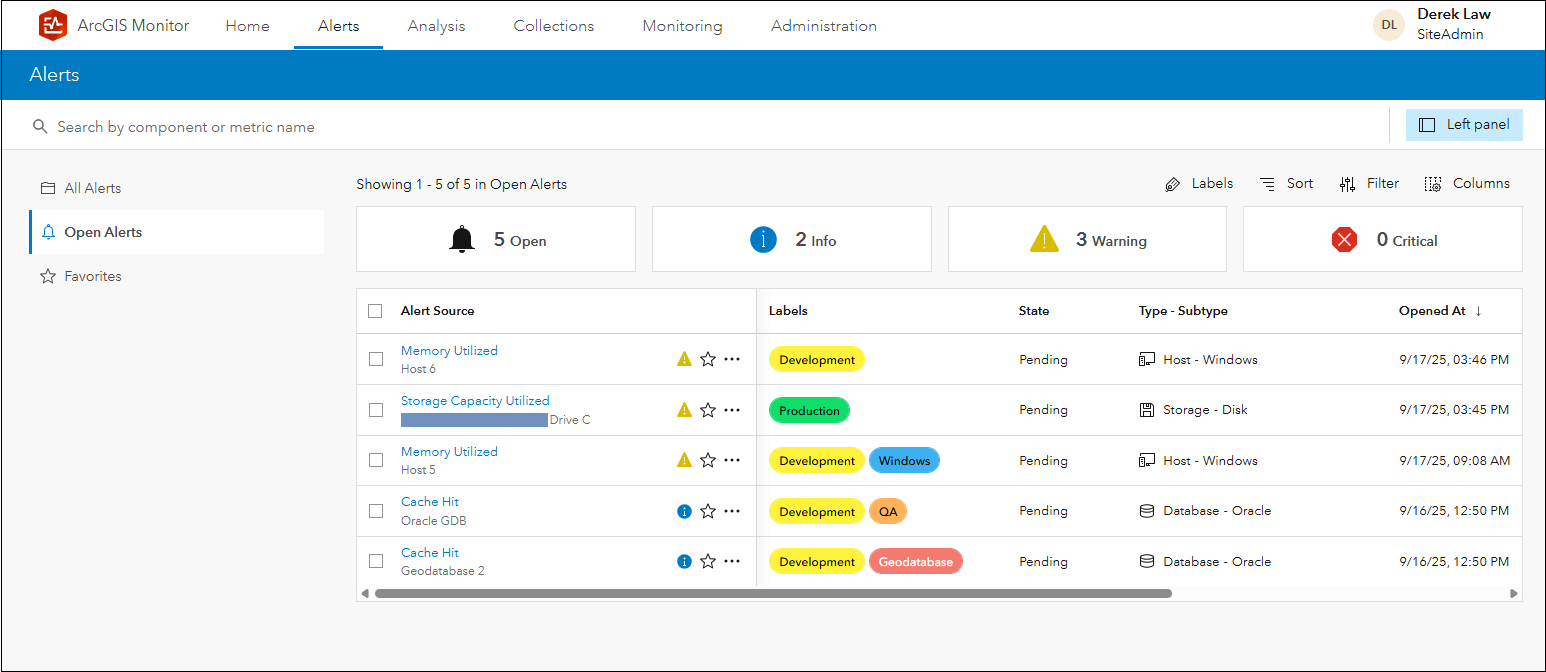
Figure 16: Alerts page showing current open alerts.
For every alert: the component, metric that triggered the alert, and the time it became active are shown. You can click any alert in the table to view more information; see Figure 6 for an example.
One additional property for alerts is alert state. This is simply metadata for an alert and may be useful for admins to help manage alerts. When an alert is opened, it has a pending state, see Figures 4, 5, 6, and 15. You can change an alert’s state from pending to acknowledged or resolved. This enables admins to denote that they have reviewed the alert, however, this is just metadata and does NOT close the alert in Monitor. Changing an alert’s state from pending to acknowledged or resolved does not remove the alert from the open alerts table. This property may be helpful for admins who work collaboratively.
Some strategies:
One notable metric found in most registered components is connectivity. This metric is an indicator of whether or not Monitor can connect to the component to collect data. For example, GIS Server 1’s connectivity metric reports 100% connectivity with a nominal status in Figure 17.
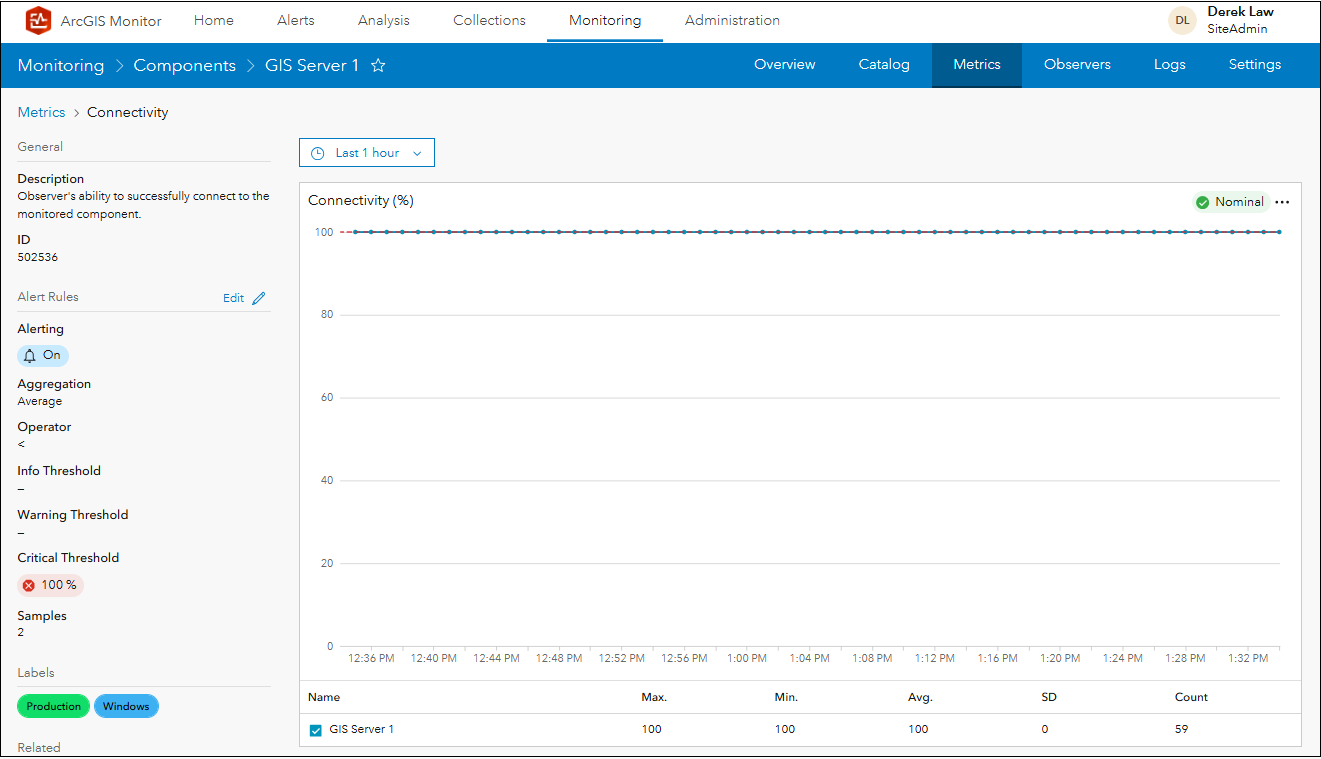
Figure 17: GIS Server 1’s connectivity metric.
Note the critical alert threshold is 100% with a samples count of 2. This means that if the reported connectivity metric data falls below 100% using two data points, then a critical alert will trigger. This is an important alert metric to check for when viewing open alerts on the Alerts page, see Figure 18. If Monitor is unable to connect to the component, admins should investigate immediately to find out why and resolve. Possible causes might include: the component could be disabled, firewall and/or security software interference, and changes in network connectivity.
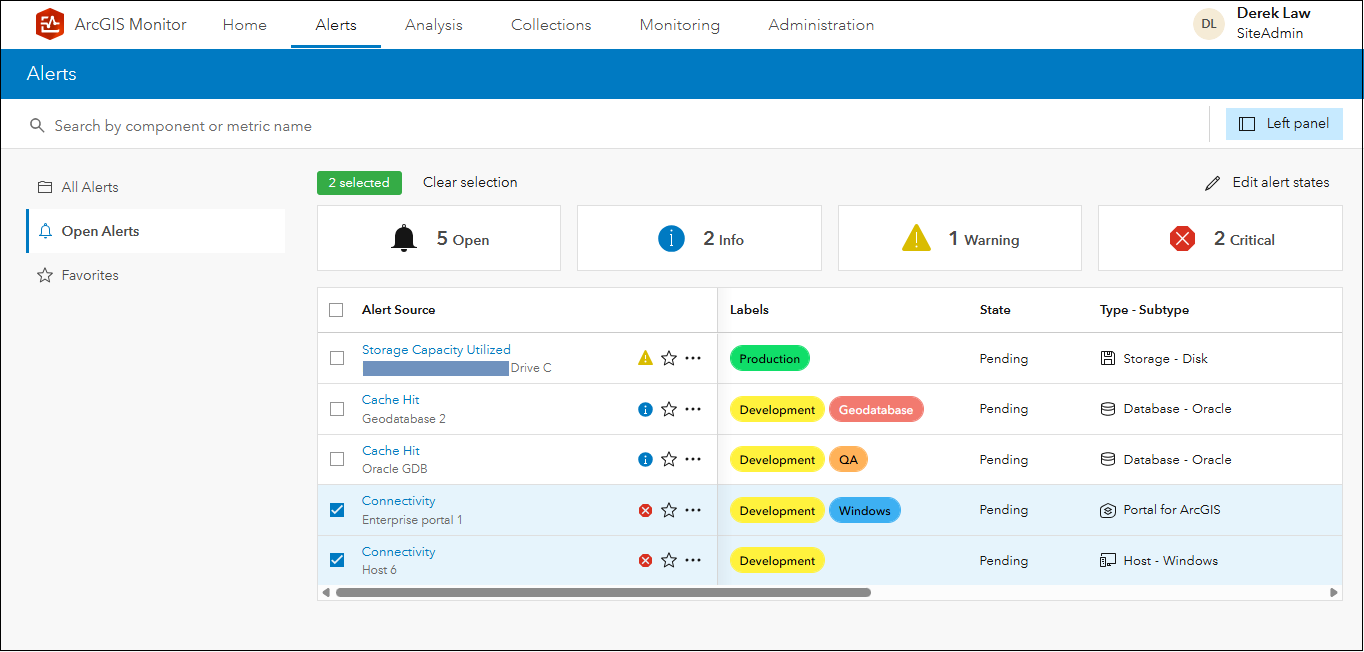
Figure 18: Alerts page showing two open connectivity critical alerts.
It can be overwhelming to configure alerts for all registered components in your enterprise GIS. We recommend that you start by identifying the top 5-10 most important assets that need to be monitored, then configure alert rules on their key metrics. For example, which are your top 10 web services that need to be continually up and running (because they support your important GIS applications)? For these essential services, you should probably configure custom alert rules on these metrics:
- Instances saturation percent – You may want to adjust alert rules to lower threshold values so alerts are triggered earlier to prevent service downtime.
- Request response time avg – What is your organization’s acceptable average response time for a service?
- Requests failed – This metric shows the number of failed requests on the service, something you want to avoid.
- Requests timed out – This metric may indicate poor network connectivity.
Setting appropriate alert rules that meet your organization’s specific requirements can help ensure these essential services remain available to support your GIS applications.
Summary:
- The status of a registered Monitor component is determined by its metrics and reflects the status of the most severe metric.
- Alerts are configured on component metrics. Alerts can help admins be aware of possible issues when collected metric data exceed alert threshold values.
- Alerts are triggered based on a combination of: alert condition aggregation and operator, alert threshold values, samples count, and metric observer interval.
- There are three alert types: info, warning, and critical – they have different threshold values representing different severity levels.
- Alert state is metadata about the alert and does not affect the status of an open alert.
- Setting appropriate alert rules for metrics will depend on your business use cases and what is important to you.
To learn more and connect with us about ArcGIS Monitor 2025.0, please visit:
- Product Page
- ArcGIS Monitor – Essential Resources
- ArcGIS Monitor help documentation
- ArcGIS Monitor help topic – Alerts
- Esri Community
Sincerely,
The ArcGIS Monitor team


Article Discussion: