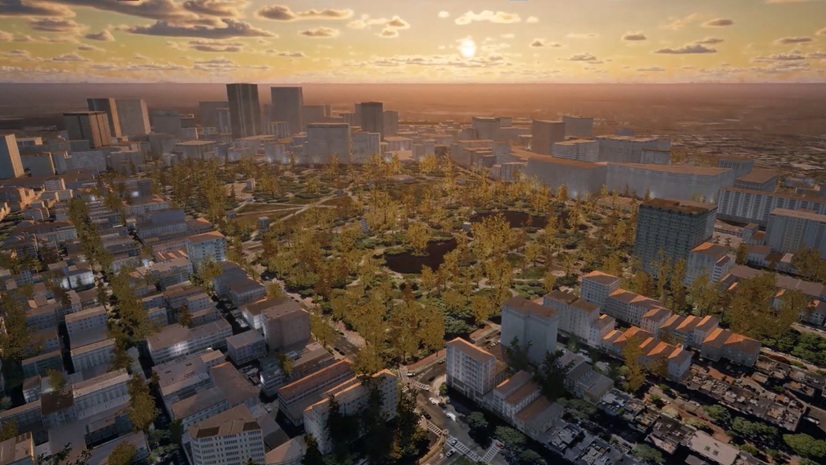
When creating interactive or cinematic 3D scenes grounded in real-world locations, integrating geographic context is an essential part of storytelling and visualization. ArcGIS Maps SDK for Unity allows developers and creators to bring real-world geospatial data—like satellite imagery, terrain, buildings, and roads—directly into Unity. Whether you are building urban simulations, immersive XR experiences, data visualization tools, or cinematic flythroughs, ArcGIS Maps SDK for Unity enables you to start with a geographically accurate foundation.
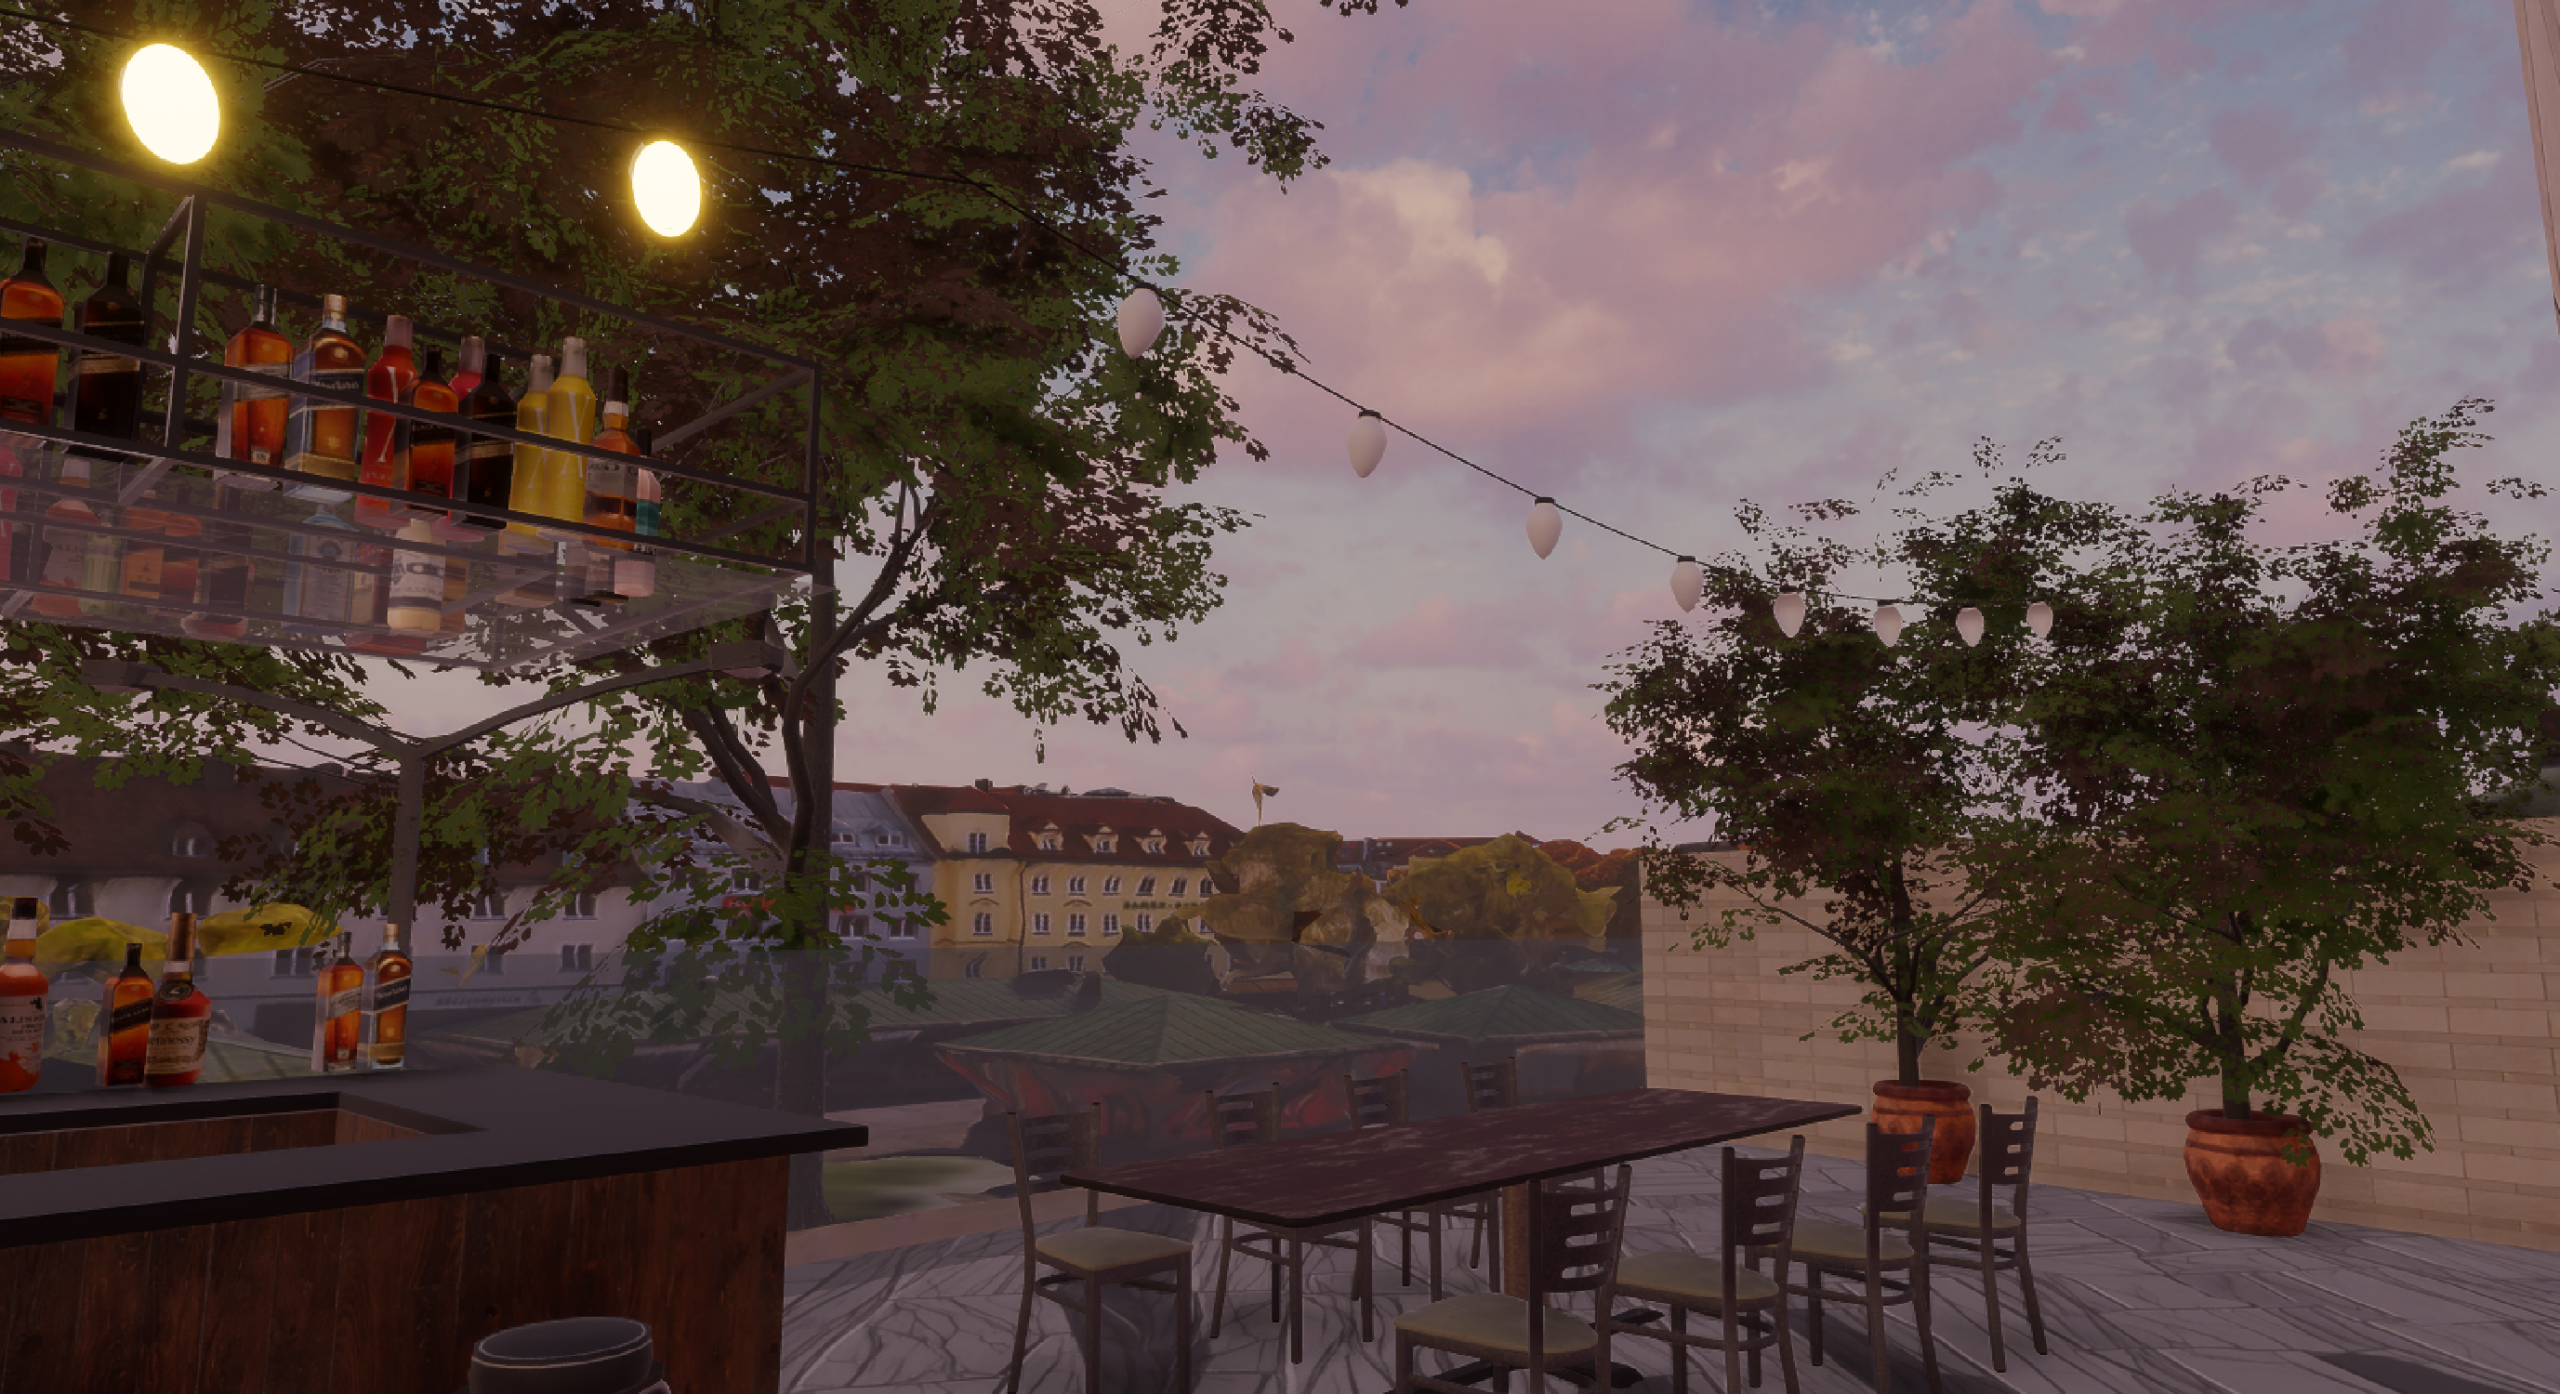
While the SDK provides a robust foundation for streaming and visualizing authoritative data, creating a compelling, cinematic experience requires additional refinement. This blog post outlines a complete workflow for transforming GIS layers into a narrative-driven 3D scene within Unity (I also described the Unreal companion workflow in Creating a Cinematic Scene with ArcGIS Maps SDK for Unreal Engine). This Unity scene can be deployed to Windows, macOS, Android, iOS, and XR devices. I’ll walk you through my entire workflow to create a realistic rooftop scene with animated characters in a portion of Munich.
2. Lighting and other VFX: Crafting a Misty Morning Tone
3. Integrating Game Engine Assets
6. Cinematic Camera Flythrough
This blog is intended for:
- GIS practitioners and urban modelers with some Unity knowledge who want to learn Unity content creation workflows.
- Unity developers who wish to incorporate spatial context into storytelling or simulation-based applications.
1. Importing GIS Data
For this project, I’m using Unity 6.0 with HDRP and ArcGIS Maps SDK for Unity 2.1. I chose a beautiful autumn dataset in Munich, which is a 3D Tiles layer. You can just as easily use other supported data layers, such as 3D object scene layers, integrated mesh scene layers, and building scene layers depending on the type of data you are working with. You can find additional information on supported data layers in our documentation. I enabled Local mode to focus on a specific region. Using local mode enables you to use projected coordinate systems that preserve spatial accuracy and is suitable for smaller-scale scenes.
🔧 Tip: If your data does not align with terrain, try adjusting the vertical coordinate system, a function that ArcGIS Maps SDK for Unity has supported since 2.0. In this case, I’m using the Munich dataset with the default Terrain 3D and Imagery basemap. I set the Horizontal Coordinate System to Web Mercator (3857) and the Vertical Coordinate System to WGS 84 (115700).
I also used a tree dataset. For a generic dataset, you can search in ArcGIS Living Atlas of the World. For regional or city-specific data, a good place to find data is a local government GIS website. I found a Bavaria tree database in Landesamt für Digitalisierung, Breitband und Vermessung. I downloaded the data in GeoJSON format. This dataset contains all the trees in Bavaria, so I used ArcGIS Pro to quickly filter the dataset for just the data I needed. If you have the city-extent shapefile, you can directly clip the area. For me, I use the Select Tool to select a portion of the city, which is just a small area surrounding my scene. Because this region falls into two feature classes, I first use the Append Tool to append the two datasets, then use Export Features to export it. I also reproject the dataset from WKID 4326 to 3857, since my Unity project is using 3857. If you find yourself having to do this process repeatedly, you can use ModelBuilder or write a python script.
I then zipped this dataset (required) and published it on ArcGIS Online. In Section 3.2 I will discuss the process of visualizing this dataset using the REST API.

2. Lighting and other VFX: Crafting a Misty Morning Tone
Usually, the first thing I do with scene creation is set up the sky and atmosphere to establish overall tone and mood of the scene. Since the asset color will shift based on lighting, this step should ideally be done before asset placement.
In HDRP, to customize the sky, you need to create a Global Volume in your scene. In ArcGIS Maps SDK for Unity, we have included the global volume in the sample scenes. You can just change the Volume Profile within the Global Volume. I’m using free third-party sky assets (8K Skybox Pack Free and AllSky Free – 10 Sky / Skybox Set). I created the Volume Profile by right click->Create->Rendering->Volume Profile. In this Volume Profile, I added Override by clicking Add Override > Sky > HDRI Sky. In HDRI, I selected the cube map that this asset provides. I then went back to my Global Volume and assigned the Volume Profile I just created. In my case, I found this volume profile to be too dark and dramatic. To make it brighter, I added the Exposure override, and you could also adjust the Intensity Mode in combination. For tuning the color, I added a White Balance override and adjusted the Temperature and Tint values. To enhance the experience, I like to add the Fog override to introduce atmospheric effects, along with Volumetric Clouds and ambient occlusion for more depth and realism.
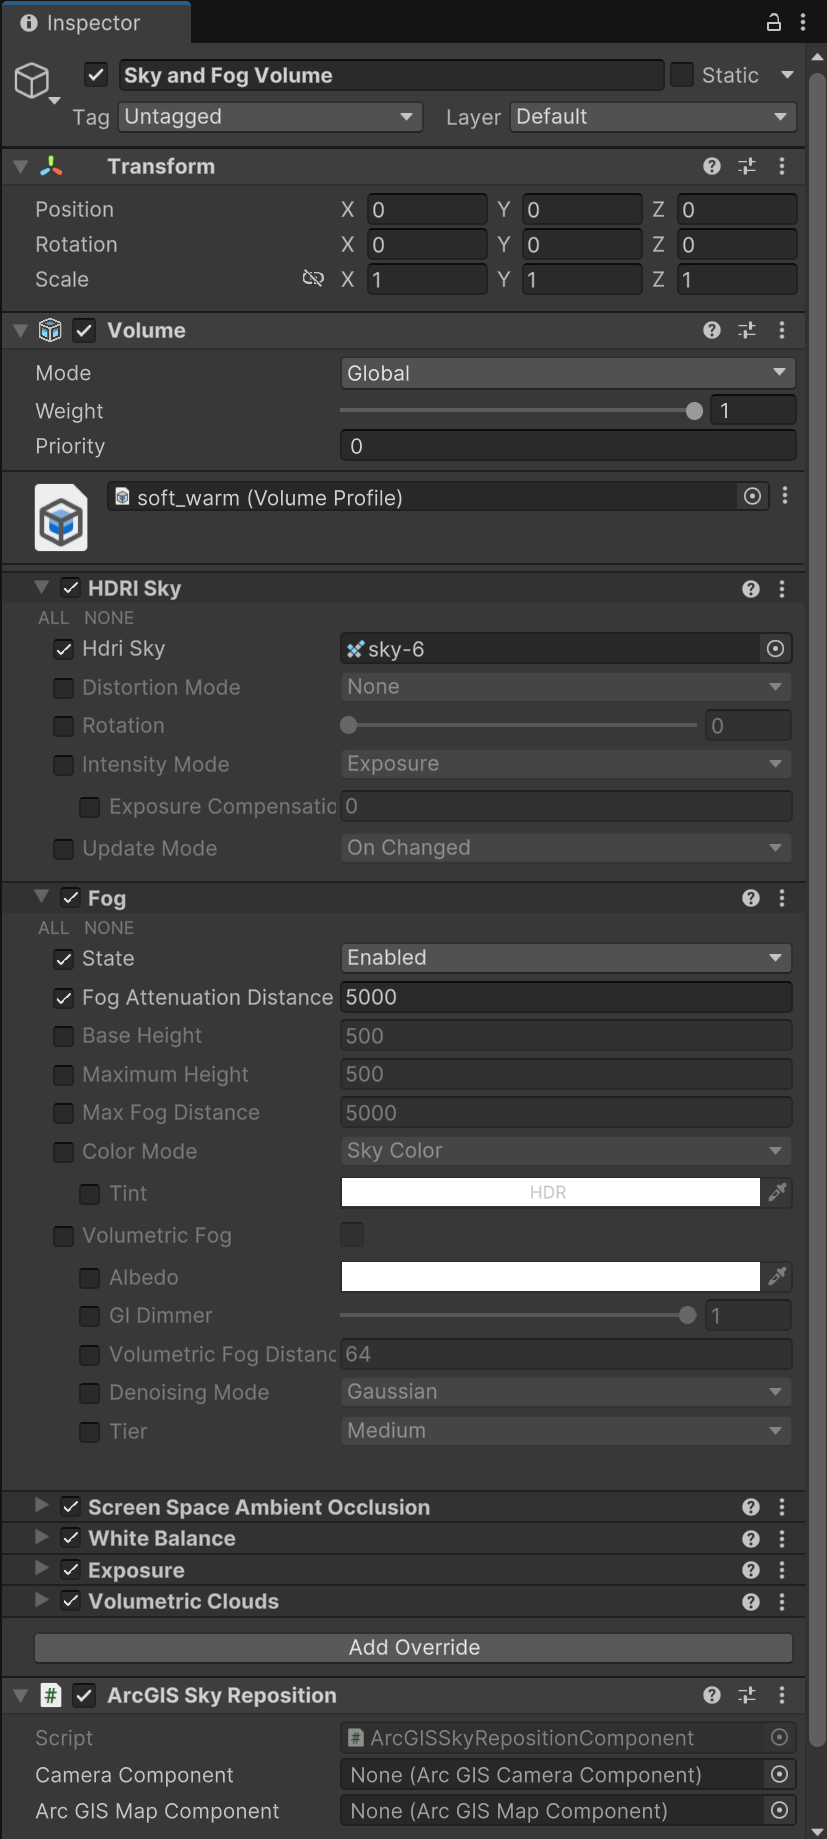
In URP, the workflow is different. You can simply assign a skybox material (e.g., panoramic or cubemap). To do this, you can create a skybox material and then go to Window > Rendering > Lighting. In the Lighting window, navigate to the Environment tab. Drag your newly created Skybox Material into the Skybox Material slot. Don’t use volumes—just create a Skybox Material and assign your HDRI.
You can also add particle systems for smoke, steam or falling leaves, and sound cues (city ambience, footsteps, chatter).

3. Integrating Game Engine Assets
3.1 Finding and placing assets
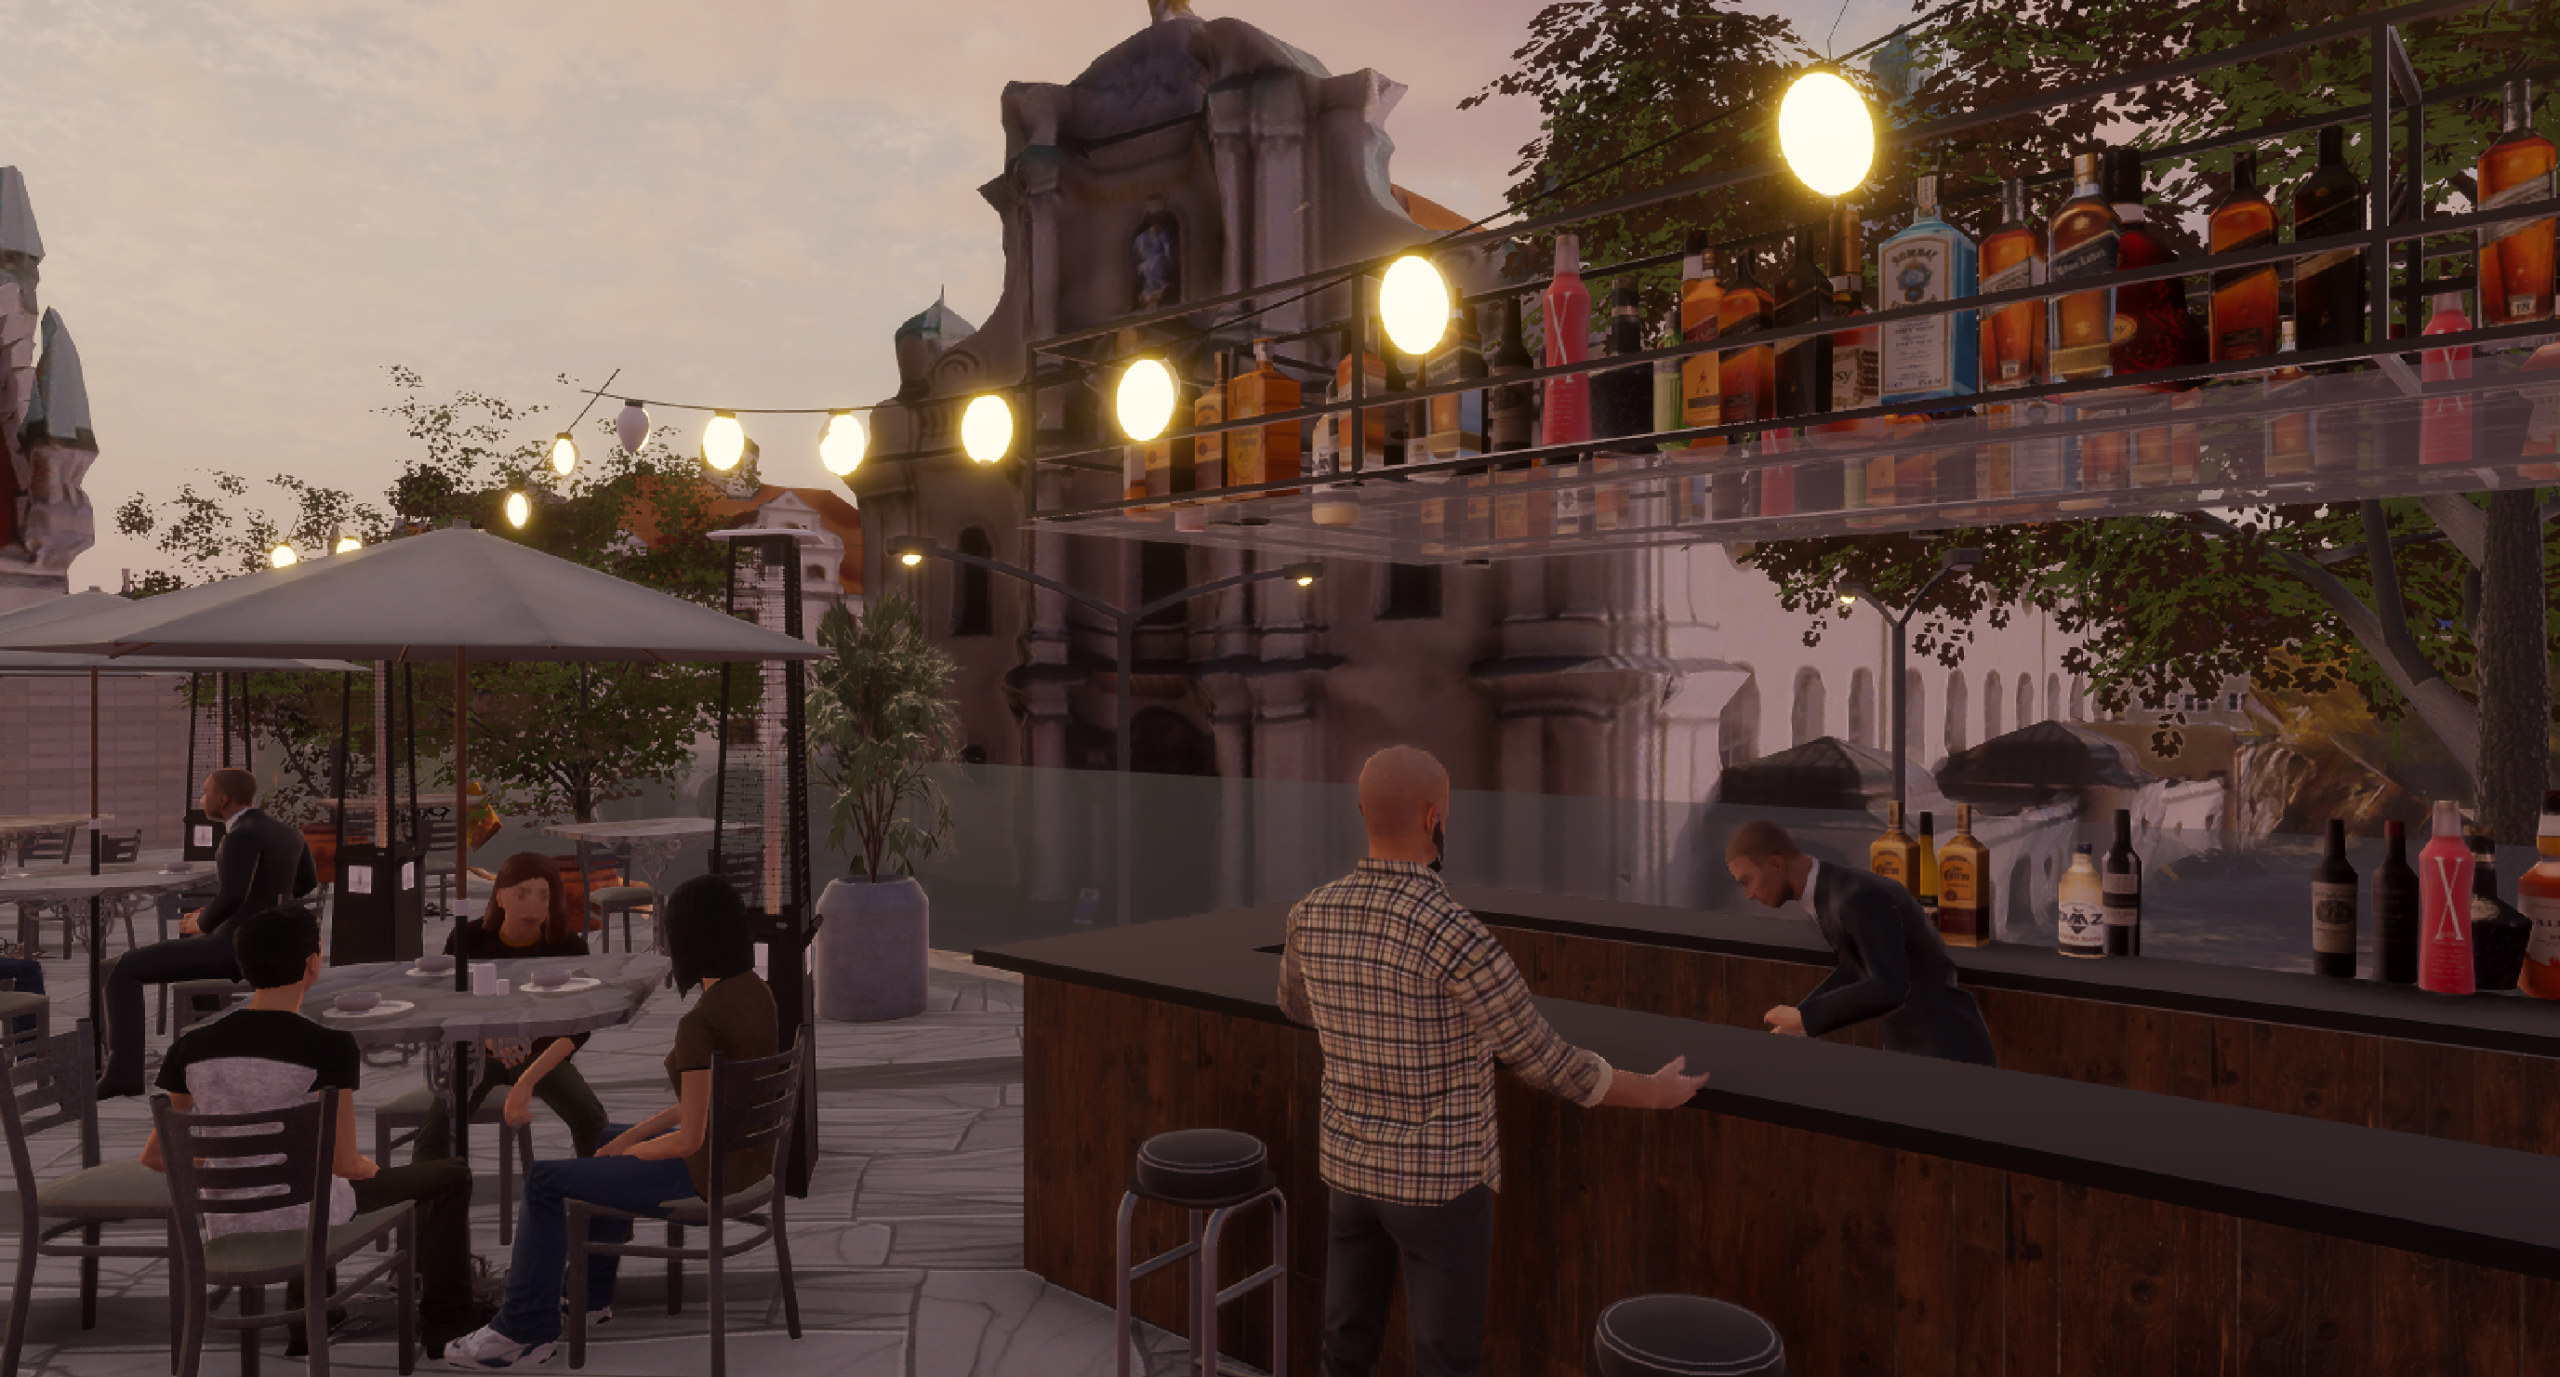
For this project, all the assets I use are free. I typically start by exploring the city to find a spot that inspires me to imagine the stories that could unfold there. I saw a two-story building with an empty rooftop in Munich Old Town. I thought this could provide a stage for a rooftop restaurant and bar. The viewpoint would be at the rooftop overlooking the street, where I will place street props and decals to make it interesting. For a full project, it’s always a good idea to spend as much time as you can to add details, and to build the details in layers. For example, you might start by applying street decals like dirt, cracks, or manhole covers, then place props such as trash bins, flowers or parked bikes on top of them. Once you have the story and narrative, you could also leverage a GenAI tool to create a 2D concept design as a reference image. Here’s a list of objects that I planned to add to my scene:
Rooftop restaurant and bar:
- Bar counter and props
- Green roof vegetation
- Rooftop railing
- String lights
- Candles
- Dinnerware
- Umbrellas, awnings and heating
- Tables
- Animated characters
Street Level:
- Cars, bikes, or trams
- Traffic lights, street lamps
- Trees and flowers
First, I carved out the lower quality meshes from dataset to create a cleaner canvas using spatial filtering and mesh modification.

After mesh modification, I created a plane as the rooftop floor, then started to add assets on top. I used two asset sources in this project: Unity Asset Store which provides optimized and streamlined integration for Unity, and SketchFab which has many free good-quality assets.
To ensure 3D assets remain correctly positioned and visible in ArcGIS Maps SDK for Unity—especially during runtime—it’s essential to attach the ArcGIS Location Component to game objects. The ArcGIS Location Component is used to place a Game Object at specific geographic location. The location component synchronizes its position relative to the ArcGISMap’s spatial reference and origin. You can batch add location component by creating an empty game object following the setup shown in the image.
🔧 Tip: In Unity, when you import 3D assets, you may notice that some objects move at different angles instead of along the expected XY axes. This happens because many GIS meshes are imported with a rotated transform based on their real-world orientation, causing the movement gizmo to align with the object’s local axis instead of the world axis. To fix this, simply switch the gizmo mode from Global to Local. While here, I also turned off the visibility of the grid to make the scene cleaner.

After downloading the assets, I saw that some materials didn’t render correctly. I will discuss remaking materials in Section 4.
Next, I will categorize the assets I used and discuss each.
3.2 Vegetation
Unity supports different options for representing vegetation depending on your visual requirements and performance needs. I published a paper discussing GIS data-based vegetation modeling in VR, using a workflow with CityEngine and rendered in a game engine (Huang, J., Lucash, M. S., Scheller, R. M., & Klippel, A. (2021). Walking through the forests of the future: using data-driven virtual reality to visualize forests under climate change. International Journal of Geographical Information Science, 35(6), 1155-1178.). A few of the many vegetation model libraries are listed below.
SpeedTree
SpeedTree offers some of the most visually realistic trees available for real-time rendering. Originally developed for film and games, SpeedTree assets feature detailed geometry, PBR-ready materials, and built-in level of detail (LOD)s.
XfrogPlants
XfrogPlants provides vegetation models by region and species. They are especially helpful if precise representations of vegetation types are important for your project.
Unity Asset Store Trees
Unity’s native terrain tree tools and third-party vegetation packs available in the Unity Asset Store are often more optimized. They are best for broader coverage of terrain or runtime environments.
For this project, I used a free Unity tree asset. I remade the tree material, which will be discussed in Section 4.
In this project, I visualized over 10k trees in the scene. With the built-in LOD system that comes with the tree models, the scene still runs smoothly. I queried an ArcGIS Feature Service for Munich tree data, and instantiated 3D tree prefab in Unity at each feature’s geographic location using the location component and surface placement. This particular dataset does not have tree diameter, so the tree diameter is inferred from the height. I changed shader material properties to represent fall colors for realistic, seasonal tree foliage. One thing to note is that most ArcGIS Feature Services only return up to 2000 records per query, so I used pagination to fetch all features. The sample code can be accessed in my github repo. In the future, we plan to natively support feature layers which will provide an easier workflow.

3.3 Props
I searched for “City”, “City Pack”, “European street” in Unity Asset Store and SketchFab to find generic street props. For the storefront, you can search for “storefront”, “shopfront”, “European building facade” to find meshes or textures. I mixed and matched different props together. The drinks, bar counters and bar stools are from different assets and I put them together. Same with dinnerware, chairs, and tables.
I also created some 3D assets. For lights, I downloaded a free string light model from SketchFab, then manually added light to each light bulb. I tried point light and emissive material applied to spheres and found emissive spheres easier for placement. I also used this for street lamps. I made the guardrail with a glass material. The wall, floor and storefronts are all simple planes with textures.
4. Working with Materials
After importing the assets, some materials show a pink color. This usually indicates a shader mismatch, meaning the material is using a shader designed for a different render pipeline (like the Built-in, URP, or HDRP) than the project pipeline. Unity has tools to auto-convert Built-in pipeline to URP/HDRP pipelines. In my case, I used HDRP, so I went to Window-Rendering->HDRP Wizard->Convert all Built-in Materials to HDRP.
After automatic conversion, if there are still some broken materials, or if the assets don’t come with materials, you can remake materials based on texture files that come with the asset. If the prefab has LODs, you need to make materials for different LODs too. In HDRP, materials are built using texture maps.
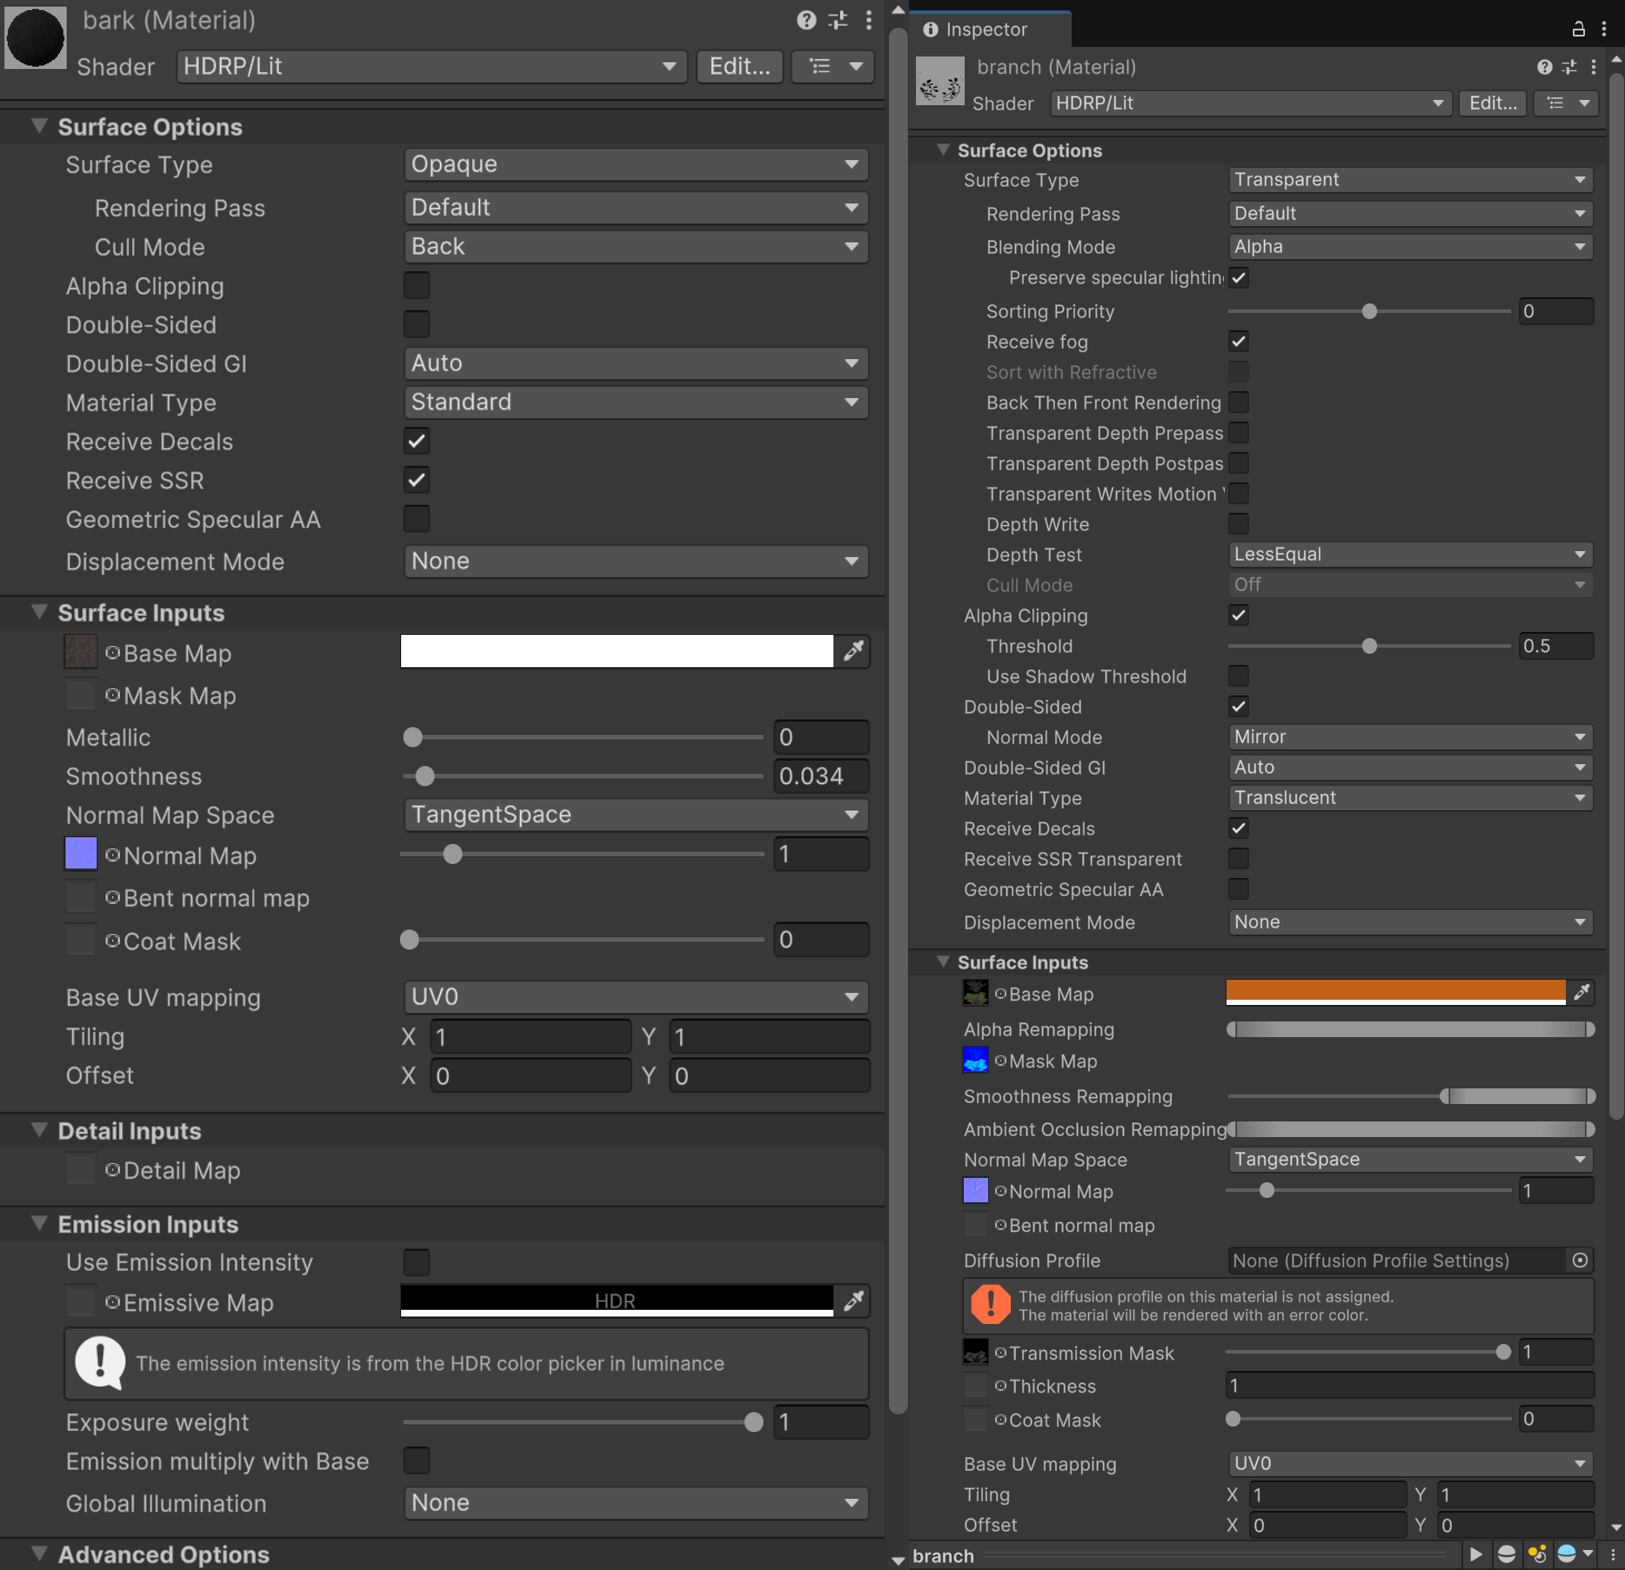
🔧 Tip: The most common materials include the Base Map, which defines the object’s color; the Normal Map, which simulates surface detail and small bumps; and the Mask Map, a rich texture that stores Metallic (R), Ambient Occlusion (G), Detail Mask (B), and Smoothness (A) in one file to optimize performance. You can also use Emissive Maps to make parts of your material glow, which is perfect for objects such as neon signs or screens in nighttime scenes.
Using tree materials as an example: use the HDRP/Lit or URP/Lit shader depending on your render pipeline. For bark materials, set Surface Type as Opaque. Depending on what textures are available, set Base Map and Normal Map. You can adjust Smoothness to create the rough feeling of the bark. For leaves and branches, set Surface Type as Transparent, assign the Base Map, Normal Map and Mask Map, and enable Double-Sided. You can also change the color of the leaves. Below is an example setup.
For architectural or natural materials to represent floors, walls, or terrains, you’ll find material options in the Unity Asset Store. To get custom floor materials, you can also search for “floor texture seamless”. Use UV tiling to control the tiling. UV tiling controls how many times a texture is repeated across a mesh’s surface. By adjusting the UV tiling values, you can make a texture appear larger and less repetitive (low tiling values) or more detailed and denser (high tiling values).

5. Animating Characters
I downloaded several free characters from the Unity Asset Store, then used Mixamo to retarget the animation. Mixamo is an excellent resource for downloading free animations. Retargeting is the process of transferring animations created for one character skeleton onto another character with a different skeleton structure. Once I downloaded the characters and the Mixamo animation, I went to the Rig tab and changed the Animation Type to Humanoid. I did the same thing for the character. I then went back to my animation in the Animation tab, changed the animation name and checked Loop Time for the animation to loop. I then dragged and dropped the character into the scene and dragged and dropped the animation into the character. When I did that, Unity created Animator Controller for the character. Animator Controller manages animation sequence and logic in a graphic format. At this point, you can go to play mode and watch the animations play in action. For my scene, I had a bartending animation, a standing and talking animation, and a few variations of sitting and talking animations.

🔧 Tip: If you notice character jittering with animation in play mode, check if your camera is at the same or nearby position with your origin position (your camera does not have to use the same spatial reference with the origin, but they should point to a similar position on the map).
6. Cinematic Camera Flythrough
Unity provides an easy workflow to render cinematic flythrough videos. I used Cinemachine, Timeline, and Recorder for this process. In Package manager, I first downloaded the packages Recorder and Cinemachine (if not already downloaded). I added a CinemachineCamera to the scene via GameObject > Cinemachine > Cinemachine Camera. Then, I created a new Timeline by Window > Sequencing > Timeline. In Timeline, I dragged and dropped the CinemachineCamera into it and selected Add Animation Track. I then clicked on the red record button, while moving the CinemachineCamera to record key frames. I then went to Window > General > Recorder to set up the rendering option, which renders image sequences. Afterwards, you can use video editing software such as Adobe Premier Pro to convert image sequences to a video. With this process, you should be able to render a video including your animated character.
For this small-scale area rendering, I didn’t need to use ArcGIS camera with Cinemachine camera, but if you are working with a large area, our documentation provides tips and tricks to work with ArcGIS Camera.

7. Conclusion
Whether you are crafting an immersive urban simulation, a story-driven experience, or a compelling data visualization, ArcGIS Maps SDK for Unity offers a powerful bridge between real-world geospatial data and interactive 3D environments. By combining authoritative GIS layers with Unity’s cinematic and creative tools, you can transform raw datasets into rich, emotionally resonant scenes that communicate more than just facts—they tell stories. I hope this post gives you the inspiration and technical starting point to explore your own GIS-powered narrative workflows. The code used in this project is shared in my github repo. To get started with ArcGIS Maps SDK for Unity, download the latest version from the Unity Asset Store and visit the Esri Developer website for more information.
Assets used in this project:
Unity Asset Store
AllSky Free – 10 Sky / Skybox Set
Demo City By Versatile Studio (Mobile Friendly)
SketchFab
Attribution for rooftop scenes in this blog post:
Data credit: BVV – geodaten.bayern.de, Copyright © 2021 Hexagon / Esri. All rights reserved., Sources: Vantor, Airbus DS, USGS, NGA, NASA, CGIAR, GEBCO, N Robinson, NCEAS, NLS, OS, NMA, Geodatastyrelsen and the GIS User Community, Microsoft, Vantor, Earthstar Geographics.

Article Discussion: