At a utility, keeping your network data accurate is critical, but it often means your GIS team spends hours handling small edits that others could easily make themselves. Minor updates can pile up, pulling you away from the strategic work that really matters. ArcGIS Web Editor, a simple, browser-based way to edit utility network data without relying on desktop tools or advanced GIS expertise can empower your organization to edit data authoritatively.
With Web Editor, you can empower others in your organization to make quick, accurate updates themselves. This means fewer bottlenecks, less back-and-forth, and more confidence that your data stays current. By equipping team members to edit data easily and with accuracy, you’ll spend less time correcting errors later and more time focusing on improving supporting strategic business goals. This also frees up crews and teams who might be closer to the assets in the field to make edits to the network, without formal training or years of GIS experience.
ArcGIS Web Editor brings focused, web-based editing to a broader group of editors at your utility. To help you discover the utility network editing features and workflows available in Web Editor, we’ve created this two-part blog series. In this first blog, we’ll explore common workflows that show just how straightforward it is to use Web Editor to keep your utility network data accurate and authoritative. If you’re curious how we’ve configured utility network editing in ArcGIS Web Editor, then check out our second blog here. Now, let’s walk through various utility network editing workflows available in Web Editor.
Contents
Jump to a section in this blog using the links below.
-
-
- Pre-Requisites & Version Notes
- Navigating ArcGIS Web Editor
- Creating utility network features in Web Editor
- Zoom to the Area of Interest
- Enable Snapping on all Layers
- Creating a Branch Version
- Editing Using Templates
- Review the New Features and Associations
- Tracing the New Assets
- Conclusion
- Additional Resources
-
Pre-Requisites & Version Notes
Having a utility network service will make this blog easier to follow along.
The screenshots and directions were taken using ArcGIS Enterprise 11.5 and ArcGIS Pro 3.5.
Navigating ArcGIS Web Editor
There are many resources available to familiarize yourself with ArcGIS Web Editor. This blog will dive into the features that allow a user to edit a utility network and does not go over the basic functionality of ArcGIS Web Editor.
Minimum requirements needed: ArcGIS Enterprise 11.5 and ArcGIS Pro 3.5
Creating Utility Network features in Web Editor
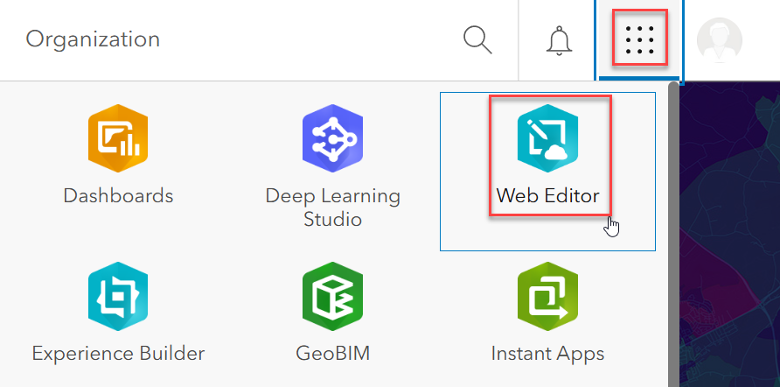
To begin, we will open our web map that includes a utility network feature service in ArcGIS Web Editor in our Enterprise Portal.
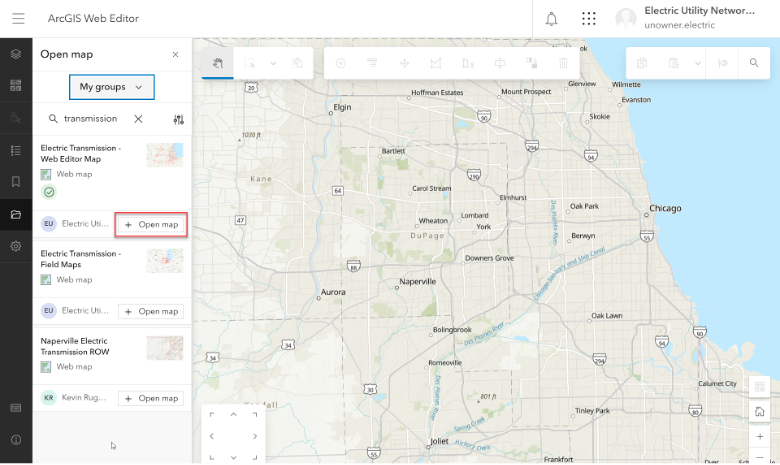
This web map has been published with utility network capabilities, layers and tables, and traces that we need to edit and analyze the utility network.
Zoom to the Area of Interest
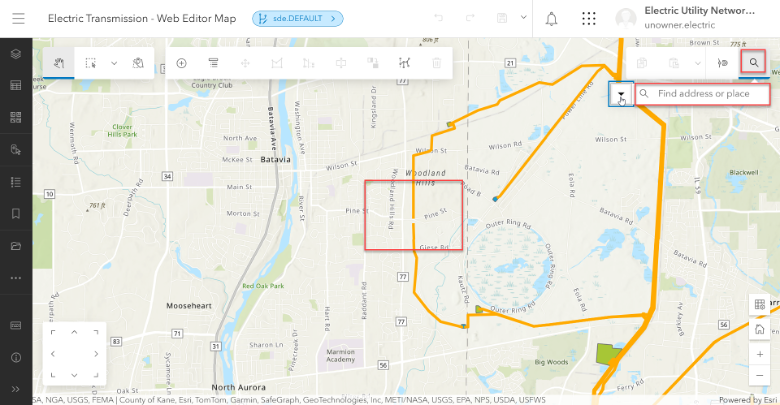
First, let’s navigate to our area of interest, where we need to add a new high voltage conductor and series of poles with attachments.
Enable Snapping on all Layers
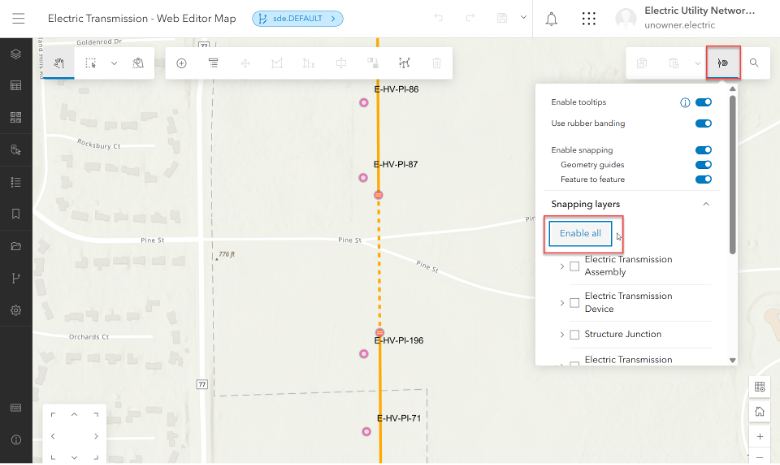
Here we need to enable snapping on all layers by turning on snapping. This is critical for ensuring precise connectivity, maintaining data integrity by preventing gaps/overlaps, and enforcing network rules automatically during edits.
Creating a Branch Version
When editing a utility network in ArcGIS Web Editor you will want to create a new branch version or open an existing branch version.
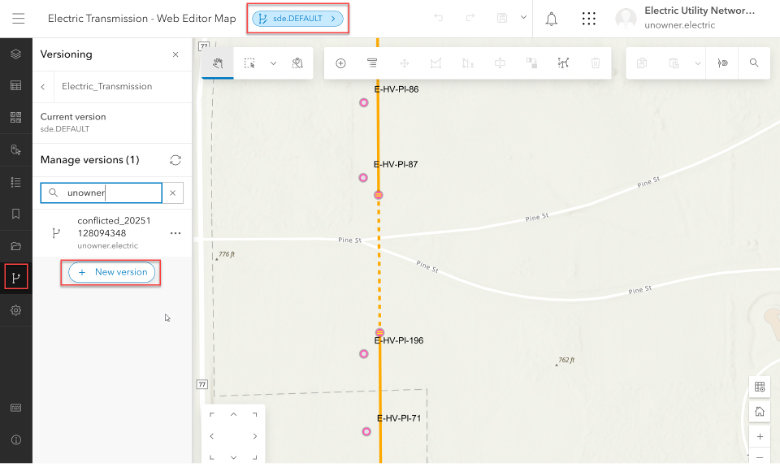
In this example, we will use the Versioning tool in Web Editor. We are currently in the sde.DEFAULT version which we can see by the version name at the top of the screen in blue.
Note: Editing the Default version means making immediate, live changes to the primary data, while editing a named Version means working on an isolated copy for controlled, concurrent changes that get merged later, offering safety, quality control, and flexibility for complex projects. The Default is the main authoritative source, while named versions are temporary workspaces (like branches in Git) that isolate edits until reconciled and posted back, preventing direct disruption to live data.
To create a new branch version, click the + New Version button
You will need to give the version a name, a description and choose whether the access will be public, private or protected.
Leave the toggle on to switch to version and click Save.
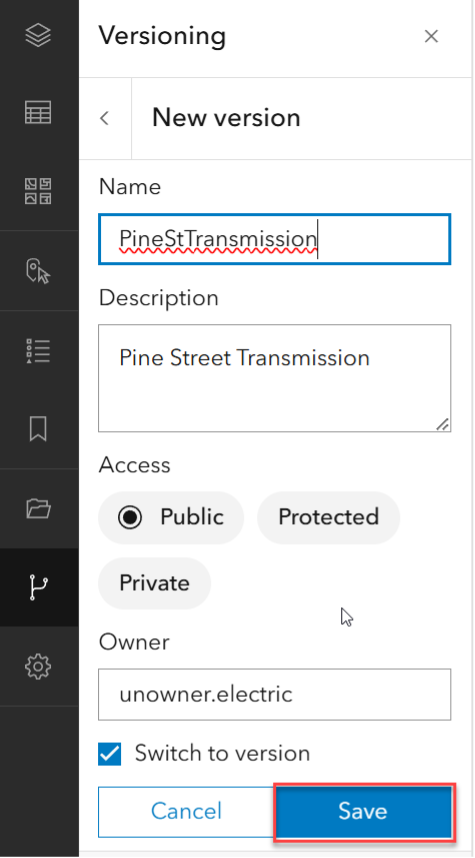
Once you click save you will see that the version name at the top of the page has been updated to reflect the new version name you just created.

You are now ready to begin editing your utility network.
Editing Using Templates
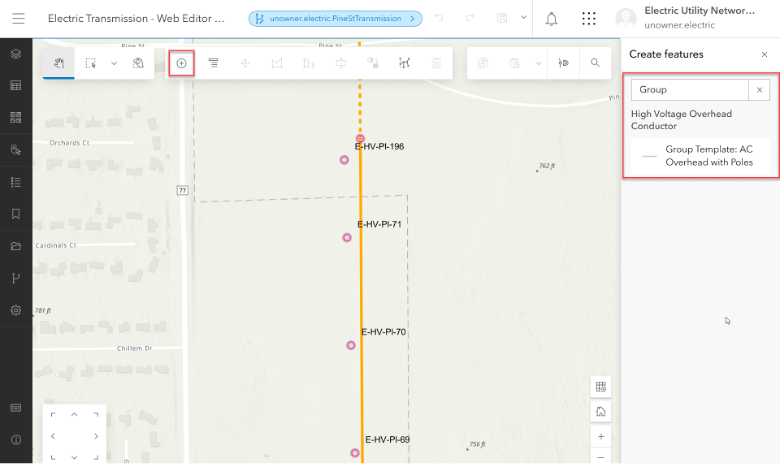
A new transmission line is being proposed which will add a new conductor, poles and attachment points between poles E-HV-PL-71 and E-HV-PL-70. We could add each asset individually using editing templates, but we can also streamline the process using the Group Template functionality that is accessed via the feature service.
Click the Create button in the editing toolbar and then under the Create features pane, search for the group template. In this case, we have a group template called Group Template: AC Overhead with Poles.
To begin editing, you will snap to the existing high voltage conductor and begin drawing. At each vertex, a pole and an attachment point will be created. When you have completed your edits, click the Create All button
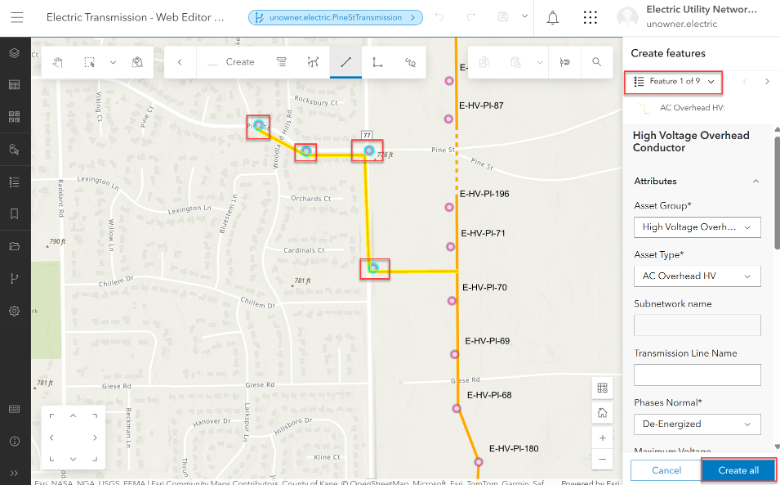
Each new feature will have an attribute pane where you can add or update attributes using drop downs and adding in other pertinent information. Some of the attributes will be auto-populated based on templates, default values or generated from either a calculated expression or an attribute rule.
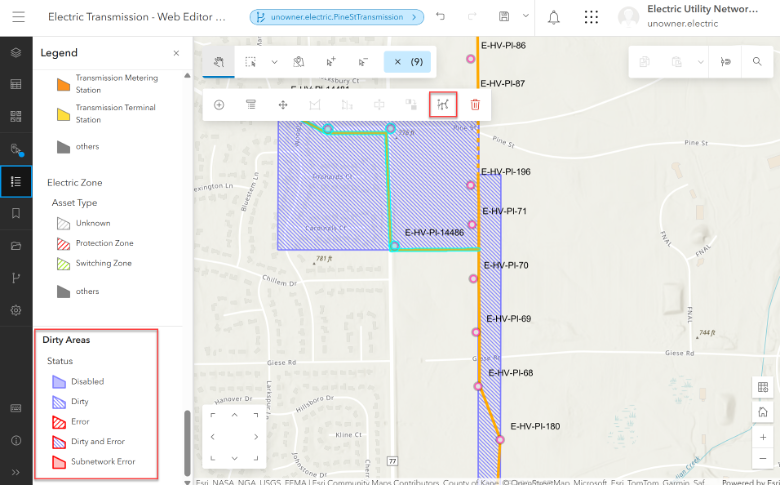
Once the new assets have been created you will see new features created called Dirty Areas. To complete our editing, we will need to validate the dirty areas to ensure that it adheres to the network rules of the utility network.
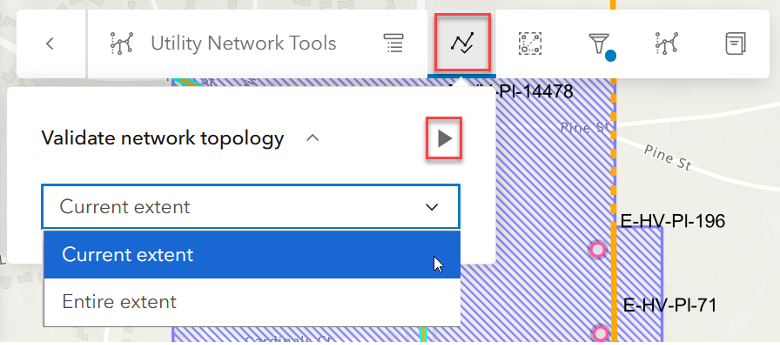
In the Editing tool bar, click the Utility Network button to open the utility network toolbar.
Once opened click the Validate button

Choose current extent and hit the Validate button. If the edits are valid, the dirty areas will disappear.
You can now save your edits by hitting the Save button at the top of the editor.

Clear your selection by hitting the x next to the (#)

Review the New Features and Associations
As part of the edit process, logical associations were created between the poles and the attachment points. To visualize the associations, we can turn them on to show the connectivity.

Using the attribute pane, you can also view associations for each asset.

Tracing the New Assets
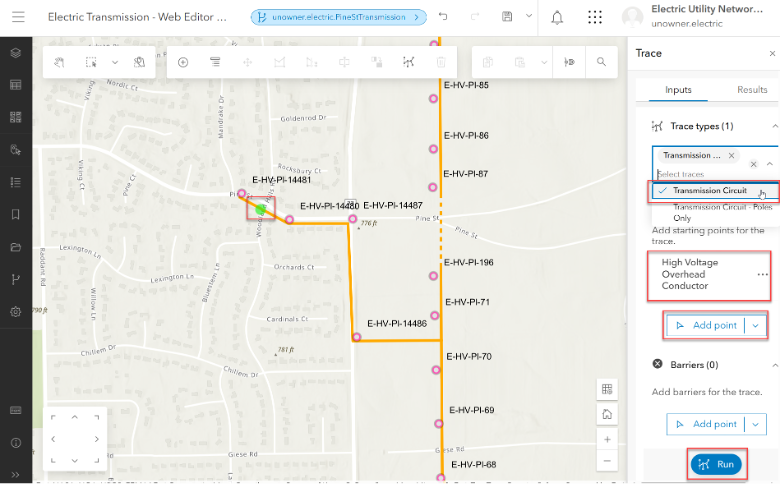
Now that we have added in the new assets, we can run a trace to ensure they are connected.
Click the Trace button to open the trace widget. Select a Trace type from the list, add a starting point and click run.
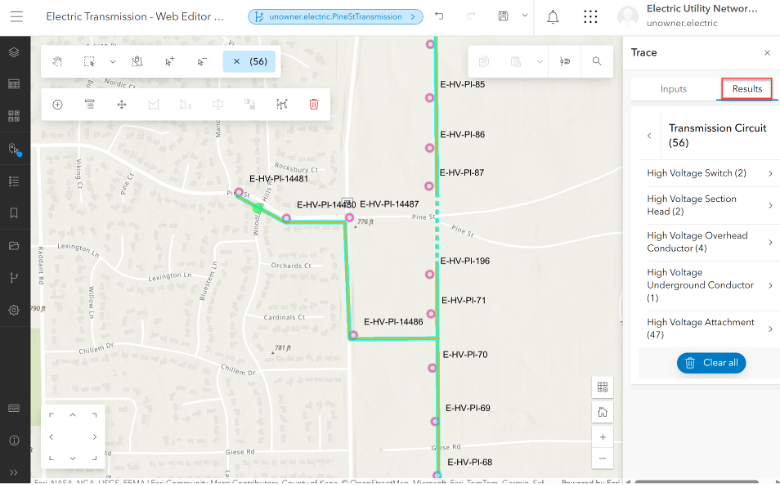
In this trace, 56 assets have been selected as part of the circuit. You can review the results in the trace pane.
Conclusion
ArcGIS Web Editor enables you to streamline editing workflows and empower users throughout your organization to edit data without needing a background in GIS. In this blog, we’ve shown some utility network editing workflows available today in the latest version of Web Editor. With Web Editor, you can perform focused edits, validate network topology and perform traces to your utility network from a browser. From here, you might be wondering how to set up or configure Web Editor to be able to edit a utility network. We’ve got you covered, this was the first blog in a two-part series. To learn how to setup your Utility Network service and web map to use Web Editor you can check out the second blog here. Stay tuned for more content highlighting utility network editing workflows in ArcGIS Web Editor.
Additional Resources
For more information on ArcGIS Web Editor, ArcGIS Utility Network, and workflows for Utilities, check out the following resources.
- Get a high-level overview of ArcGIS Web Editor with this introductory blog.
- For an introduction to Web Editor, check out this tips and tricks blog.
- Try ArcGIS Web Editor with this helpful tutorial.
- Learn more about configuring Web Editor for specific editing workflows with this blog.
- We love hearing from you! Visit Esri Community to ask questions, access resources, and submit ideas for new features you want to see in ArcGIS Web Editor.
- Learn the basics of Web Editor with this short video.
- Stay up to date with the latest blogs about ArcGIS Utility Network.
- Explore cutting edge concepts in your industry.


Commenting is not enabled for this article.