ArcGIS Web Editor is a lightweight, user-friendly app designed to streamline editing workflows and make them accessible to more people across your organization. Built for both experienced GIS editors and team members who only need to make occasional edits, Web Editor empowers non-GIS staff—such as asset owners and engineers—to contribute accurate edits without relying on complex desktop tools. For GIS Analysts, this means less bottlenecks and more authoritative data, as everyone can play a role in keeping your utility network up to date.
Web Editor in ArcGIS Enterprise enables you to edit utility networks in the web, using this focused app. This means you can empower folks in your organization to make their own edits, doing their part to keep your network up-to-date and authoritative. Web Editor honors existing data rules and topologies, so you can trust that edits follow the standards you set. In this blog, we’ll walk through the steps to configure your environment, so you can enable this capability and simplify editing for your entire organization.
There are some steps necessary to enable utility network editing within Web Editor. This blog post is the second in our two-part blog series on editing utility networks with ArcGIS Web Editor. In the first blog, we explored common utility network editing workflows in Web Editor, you can find that blog here. Now, we’ll shift focus to configuration. To enable utility network editing in Web Editor, there are a few key steps you need to complete. In this blog, we’ll walk through how to set up your environment and configure the necessary components, so you can start editing with confidence.
Contents
Jump to a section in this blog using the links below.
-
- Pre-Requisites & Version Notes
- ArcGIS Server Manager: Shared Template Editing Capabilities
- ArcGIS Pro: Map Authoring
- ArcGIS Pro: Sharing a web map to an ArcGIS Enterprise portal
- Initial Web Map Creation
- Update a linked web map in portal
- ArcGIS Pro: Storing Edit Templates
- Map Viewer: Configuration
- Configure forms for attribute editing
- ArcGIS Web Editor: Opening your Web Map
- Conclusion
- Additional Resources
Pre-Requisites & Version Notes
This blog expects that you have a Utility Network service already published with at least 1 named trace configuration created.
The screenshots and directions were taken using ArcGIS Enterprise 11.5 and ArcGIS Pro 3.5.
ArcGIS Server Manager: Shared Template Editing Capabilities
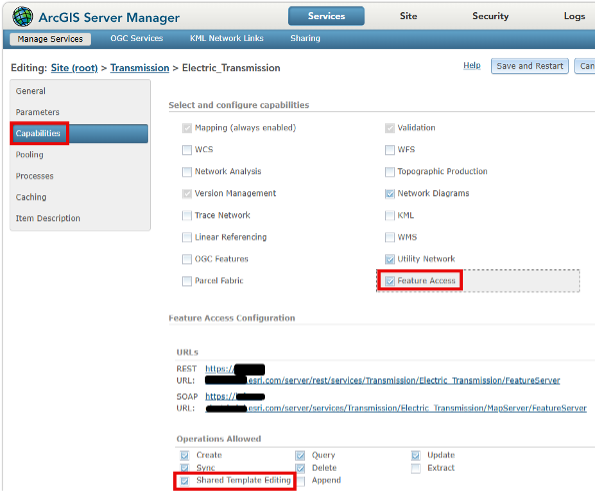
Our first step is to go into ArcGIS Server Manager and enable the “Shared Template Editing” capability on a Utility Network service. This capability will allow editing templates authored in ArcGIS Pro to be shared with other ArcGIS clients in the web and mobile environments. This setting only needs to be set once but does require stopping and restarting your utility network service. Make sure to do this when no users are active in the system.
- ArcGIS Server Manager
- Click on the utility network service
- Click on the Capabilities tab
- Click on the “Feature Access” capability
- Check “Shared Template Editing”
- Click the “Save and Restart” button
ArcGIS Pro: Map Authoring
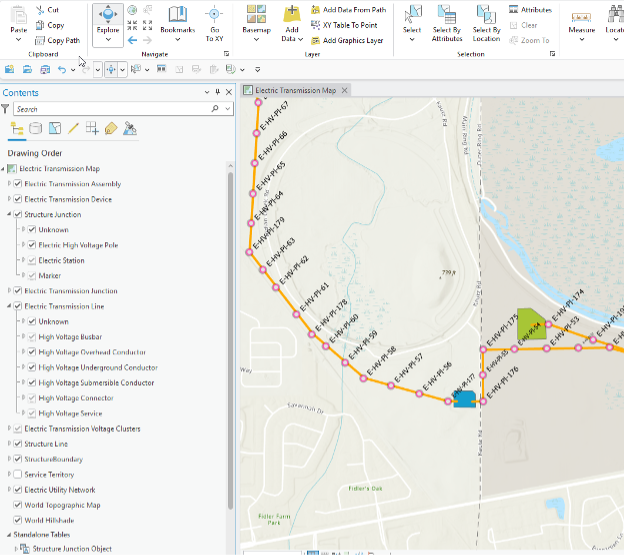
A web map from your ArcGIS Enterprise portal is necessary to use ArcGIS Web Editor. As opposed to creating a brand-new map from scratch, begin by making a copy of your editing map used in your ArcGIS Pro workflows. Let’s leverage the effort you’ve already put into defining your subtype group layers, symbology, pop-ups, labels, display filtersand editing templates.
Note: ArcGIS Pro is currently the only authoring application where subtype group layers can be added to a map.
ArcGIS Pro: Sharing a web map to an ArcGIS Enterprise portal
Initial Web Map Creation
Once satisfied with your map configuration, let’s use ArcGIS Pro to publish it to our ArcGIS Enterprise portal.
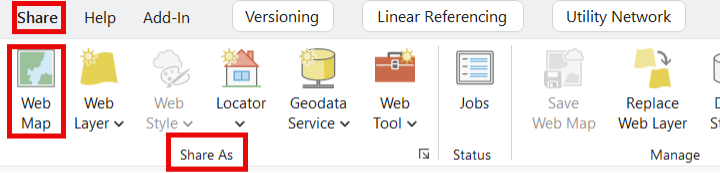
On the ribbon, click the Share tab. In the Share As group, click Web Map.The Share as Web Map pane will appear.
The item detail’s name will be set to the map name. I typically change the name by adding a prefix of “Web Editor Map” so that I know the purpose of this map in my portal.
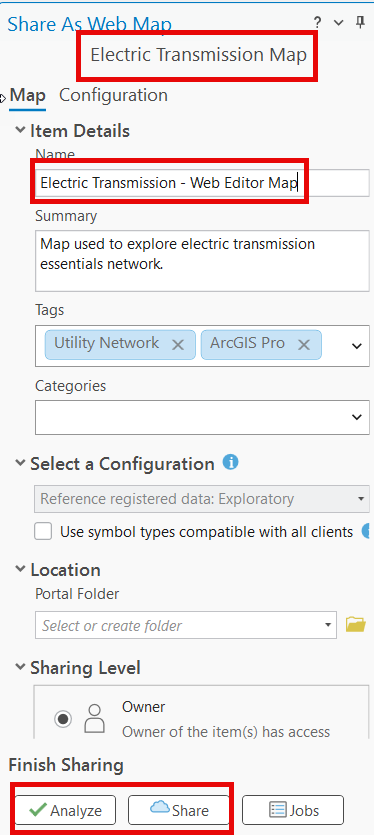
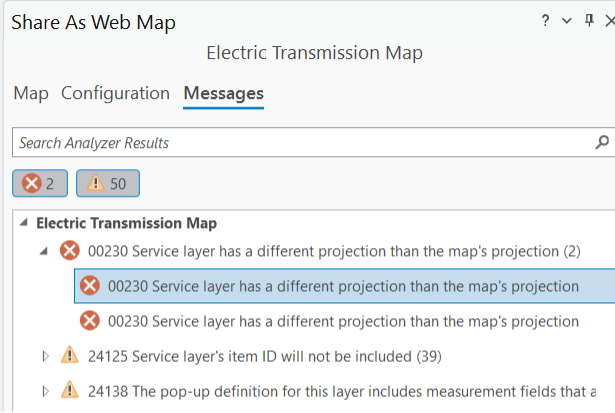
Click the Analyze button. If errors are detected, they must be fixed before the map can be shared to portal.
Warnings don’t have to be fixed but it’s recommended to review them and decide if action is needed.
A common error is 00230: Service layer has a different projection than the map’s projection.
The resolution is to either change the map’s coordinate system to Web Mercator or use a custom basemap with your coordinate system.
Once all errors are resolved, click the Share button and wait for the web map to be shared to portal.

Every time you run the Share as Web Map tool, a new web map with a unique ID is created in portal. This is great for the initial creation but to make changes to an existing web map, a different tool will be used. The Save Web Map tool will be discussed in the next section.
Update a linked web map in portal
ArcGIS Pro can be used to edit an existing web map in portal. Examples for using ArcGIS Pro to edit a linked map include complex symbology changes or adding a new subtype to a subtype group layer.
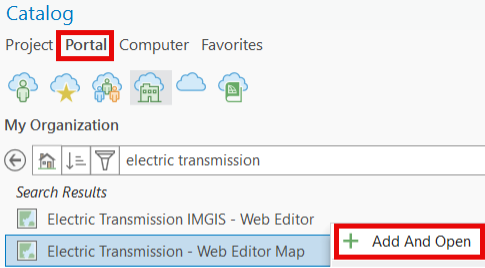
In the Catalog Pane, click the Portal tab, search for your web map and open it.
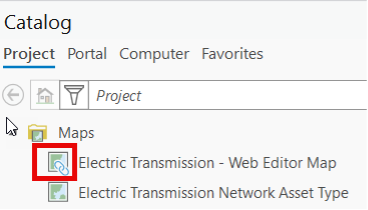
Notice the subtle icon difference with the linked web map.
After making changes to the linked web map, you can save those changes back to portal and the Save Web Map tool will preserve the web map item ID.
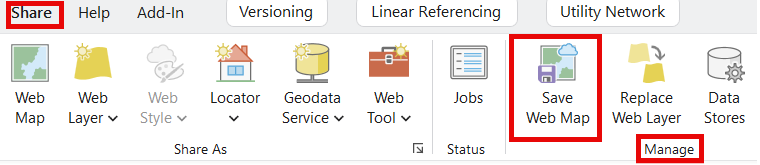
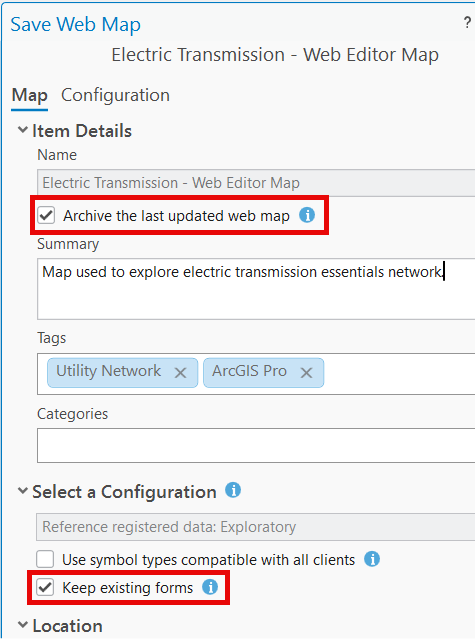
On the ribbon, on the Share tab, in the Manage group, click Save Web Map.
- Note: The Save Web Map button is unavailable if the active map is not linked to a web map.
IMPORTANT: In the Save Web Map pane, make sure to check the “keep existing forms” option before clicking the save button. Otherwise, you will lose any form configurations that were previously authored in Map Viewer.
ArcGIS Pro: Storing Edit Templates
- Feature Templates create features on a single target layer.
- Group Templates create multiple features on multiple source layers. They reference existing feature templates and use semiautonomous feature constructors called feature builders to create and place features relative to one primary feature that is sketched in a map.
- Preset Templates add predefined features to a map in the same arrangement that they are selected when the template is created.
With Group and Preset templates nonspatial objects, associations, and related records can also be created.
Feature templates are the default template type in ArcGIS Pro. To enhance the editing experience, you can author Group and Preset templates and save with the map.
Storing templates in a database is used with workflows that require editing templates authored in ArcGIS Pro to be shared with web applications such as ArcGIS Web Editor.
Click the Command Search box at the top of the application window and type Store Templates
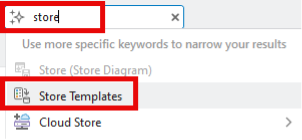
The Store Templates dialog will appear showing all of the edit, group and preset templates in the active map.
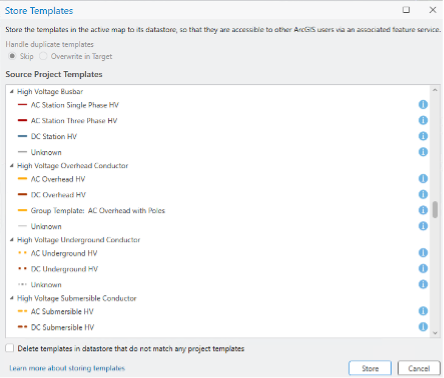
Note: As you scroll through the list, you may see templates on layers that you will never use. Examples include feature templates for Dirty Areas and Subnetline features. Use the Manage Templates tool to delete them.
Click the Store button to save the editing templates to a system table in the enterprise geodatabase. This will make them available via the feature service capability described earlier in this blog.
Map Viewer: Configuration
With our web map in portal, let’s open it using Map Viewer. There are settings and configuration changes that need to be made before it’s ready for Web Editor.
- Confirm that the Web Map contains the utility network layer
- Add the Dirty Areas layer to the web map
- Assign named trace configurations
- Configure forms for attribute editing
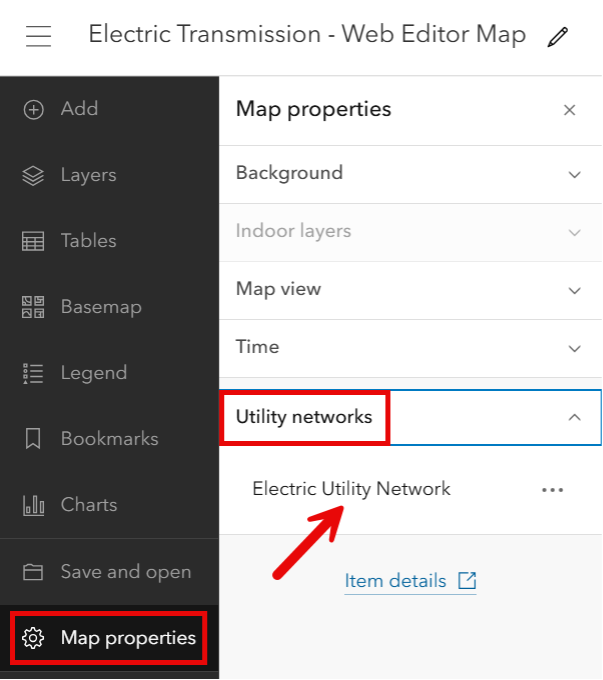
Upon reviewing the layers in the Map Viewer, you’ll notice that the utility network layer isn’t in the table of contents. To confirm that the web map is utility network aware, click on the Map Properties Tab and tip open the Utility network section. The name of the utility network should be displayed. The utility network being recognized in the web map will unlock capabilities within Web Editor.
To add the Dirty Areas layer, click on the ellipse button next to the utility network name and then click Add dirty areas
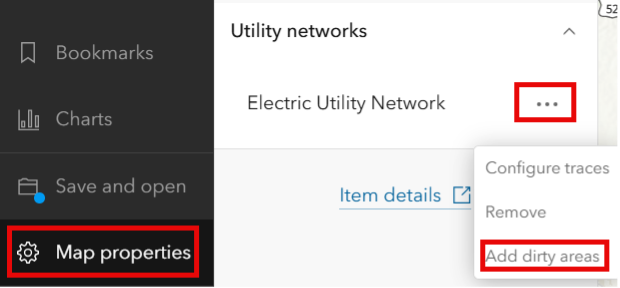
- Note: The Dirty Areas layer is added at the top of the Table of Contents. You’ll want to move it the bottom so that network assets are rendered above it.
To assign named trace configurations, click the ellipse button next to the utility network name and then click Configure traces
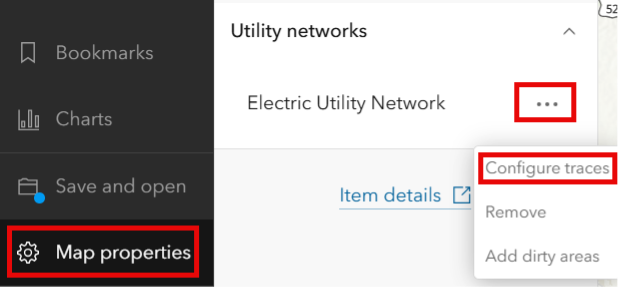
Note: Trace Configurations need to be created within ArcGIS Pro for them to use in this step
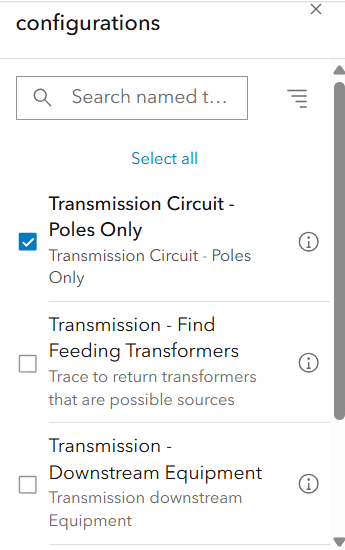
The list shows all named trace configurations available in this utility network. Checking the configurations you want assigned to this web map will make them available in Web Editor’s trace widget.
Configure forms for attribute editing
You can define Forms that editors can use when they update field values for the feature layers in the web map. You can define a form for every feature layer in the map or only those layers that you know the users of the map will need to edit.
When you configure a form, you specify what form elements the form contains and how the elements appear. Having a form helps guide editors to the correct fields and allowable attribute values for each editable field.

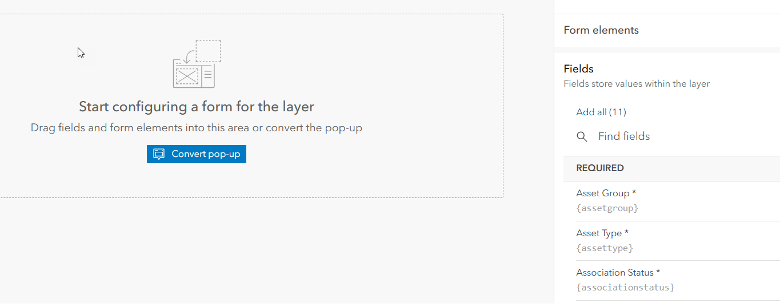
To configure a form, click on the Layers tab, select a specific layer, click Configure Editing tab, and click Forms
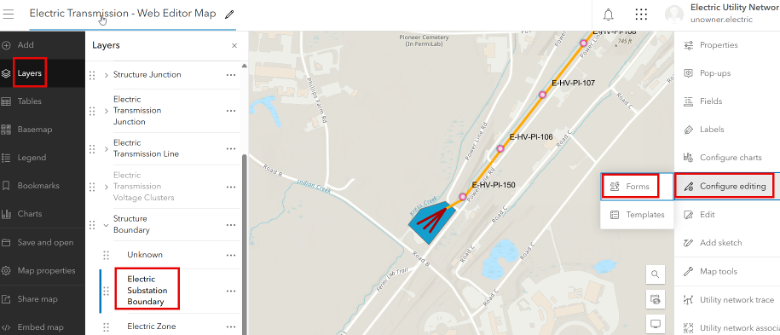
The Configure form window appears and you now can build out your form by adding elements to the form. Form elements are field groupings and the input fields that appear on the form. Field elements are based on existing fields in the feature layer.
Reminder: Save your changes often so that you don’t lose any work
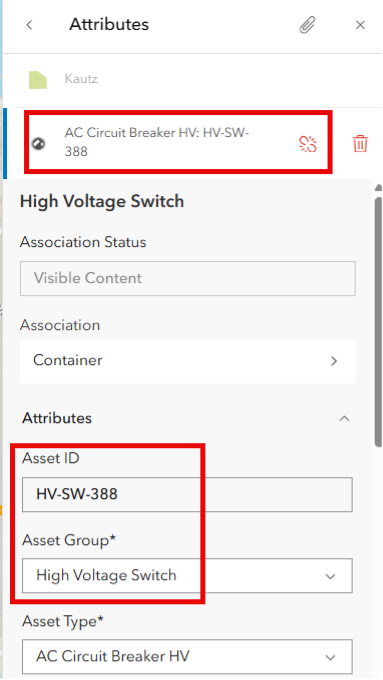
A utility network specific element that can be added to the form is Associations. This allows viewing and editing of nonspatial objects and associated features. It also lets you access the features that participate in the association.
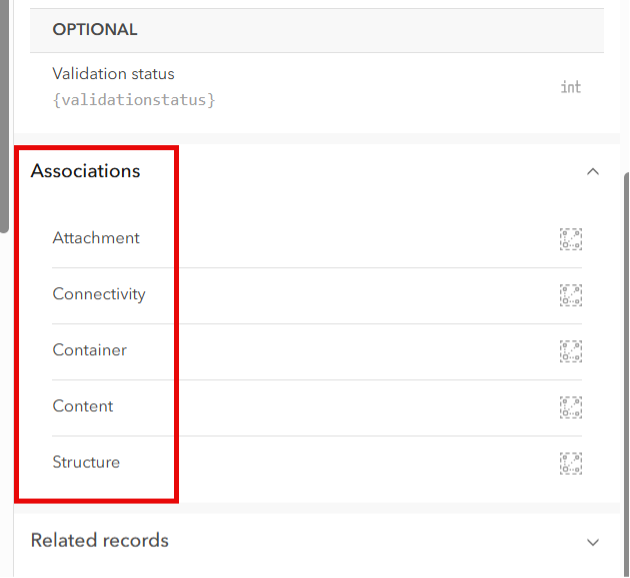
Here’s an example of a configured form containing an Association element.
A substation feature has been selected for editing. To see the features contained within the Substation, we can access them through the Association element.
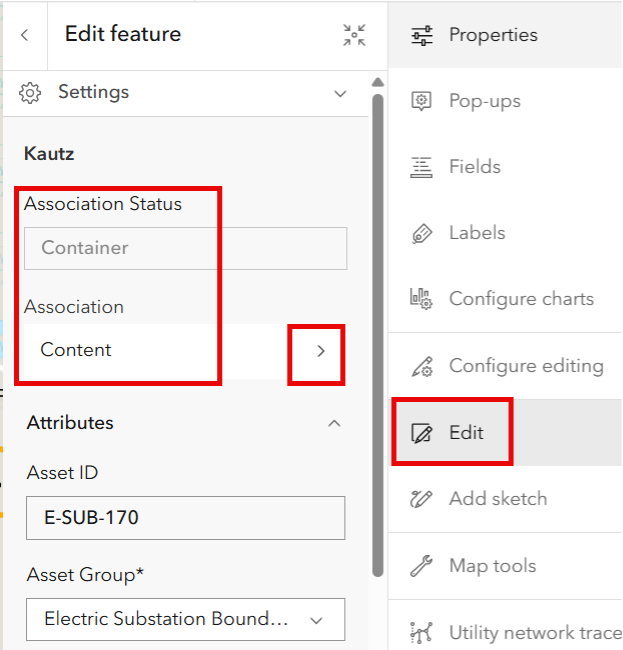
Click on the Content arrow to see the features contained within the substation. Click on the arrow to drill into the individual features.
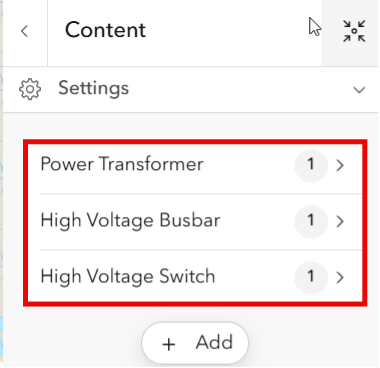
Continue to drill in until you reach the individual feature. If necessary, make attribute changes for the associated feature.
ArcGIS Web Editor: Opening your Web Map
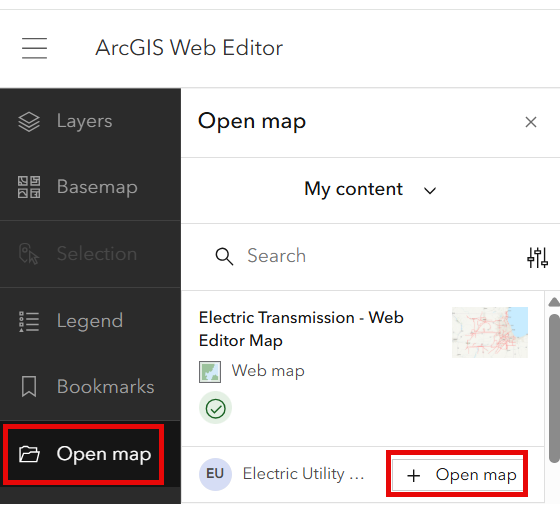
From your portal’s app launcher, click on Web Editor icon

Click Open Map and navigate to your map and click + Open Map
You’ll see the Versioning tab, the named version pointing to sde.DEFAULT, the Utility Network Tools icon
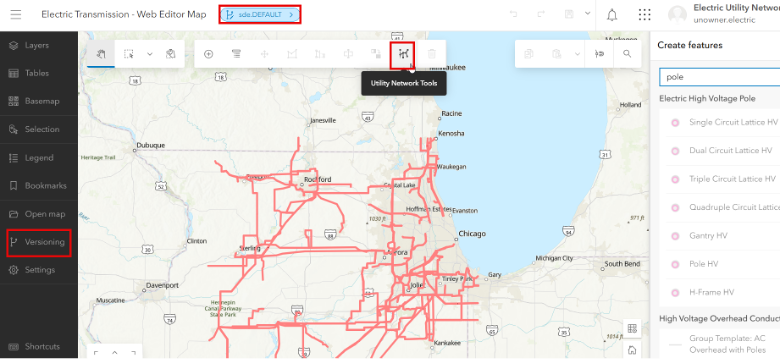
You are now ready to begin testing your editing workflows!
Conclusion
This blog walked through how you can prepare a web map for editing your utility network in ArcGIS Web Editor. We’ve shown you things like how to author your map in ArcGIS Pro, how to store your editing templates, and how to configure your web map in Map Viewer before using it in Web Editor. We hope the information in this blog provided you with the necessary background information to start editing your utility network data in Web Editor and empowering editors across your utility who might not have a GIS background. If you’re interested in walking through some utility network editing workflows in ArcGIS Web Editor, check out the first blog article in the series here.
Additional Resources
For more information on ArcGIS Web Editor, ArcGIS Utility Network, and workflows for Utilities, check out the following resources.
- Get a high-level overview of ArcGIS Web Editor with this introductory blog.
- For an introduction to Web Editor, check out this tips and tricks blog.
- Try ArcGIS Web Editor with this helpful tutorial.
- Learn more about configuring Web Editor for specific editing workflows with this blog.
- We love hearing from you! Visit Esri Community to ask questions, access resources, and submit ideas for new features you want to see in ArcGIS Web Editor.
- Learn the basics of Web Editor with this short video.
- Stay up to date with the latest blogs about ArcGIS Utility Network.
- Explore cutting edge concepts in your industry.


Commenting is not enabled for this article.