One of the benefits of using ArcGIS Workflow Manager is to improve work efficiency and optimize repetitive processes. Workflow Manager aims to build automated data orchestration and promote automated workflows in order to reduce labor costs, avoid work redundancy, and increase productivity within the organization. Workflow Manager allows users to schedule when the task is to be created and the steps within the workflow to be run.
Workflow Manager provides the following capabilities in automated scheduling:
- Schedule automated creation of recurring jobs at a specific time or preferred time frequency.
- Schedule the steps within the workflow diagrams to run at a specific time or after a duration.
Scheduling of recurring jobs and the step running automation requires the Workflow Manager Server Advanced role.
Recurring Scheduling
Recurring scheduling is applied in automated creation of recurring tasks, such as performing data quality inspection every week, submitting a summary report at the end of the day, or creating and sending business trip itinerary requests on the first day of each month.
Recurring job creation is configured using a job template. Let’s examine the following two use cases on how to schedule recurring jobs.
Scenario 1: A utility company sends field workers to modify field data. The edits are performed in a branch version. Every Saturday morning, a data quality inspection is expected to run against the branch version. The data quality inspection job can trigger a geoprocessing service, which runs through the edited data and sends it back to the field worker if the edits do not pass the inspection. The geoprocessing service normally requires the server to allocate more resources, thus it is recommended to run during off-business hours. Job recurring scheduling makes it possible to automatically create the data quality inspection. Now let’s take a closer look at the configuration.
1. In the job template of the data quality inspection, we can go to the Automated Actions tab and Add Scheduled Task under Job Creation.

2. For example, we would like to automatically create the Data Quality Inspection job to run every Saturday at 8 a.m. This time is configured based on the local time zone. Adjustments are required for locations where daylight saving time is observed.
3. Each month, we would like to review the recurring data quality inspection and determine if the recurring frequency needs to be updated, so we end the recurring schedule after 4 occurrences.

Scenario 2: A retail company would like to request a summary report from each department on each month’s sales transactions. A status report task is automatically created on the last day of each month. The task requests each department to submit a transaction history form and generate a sales summary report. We can configure the recurring schedule as follows:
1. In the job template of the Monthly Transaction Report, we enable recurring schedule.
2. The report task is created on the last day of each month at 12 p.m. We configure the last day as the 31st, however this task is automatically created on the last day of the month, which has less than 31 days. For example, the report job is created on February 28th in a non-leap year, or April 30th.
3. In this configuration, the end date is set to Never. However, it is recommended that the End Date for automation is set or disabled as needed due to recurring job creation could slow down the server and eventually affect the application performance.

4. In Portal for ArcGIS, a task is created to automatically trigger the job creation.


Run a step on a schedule
Workflow Manager allows you to run a step in a workflow at a scheduled time. The step can be configured to run:
1. At a specified time
2. After a duration
3. At a specified time parsed from Arcade Expression
Once the workflow reaches the step, the step is then placed on hold and automatically runs at the scheduled time. Let’s examine the following scenarios for applying a step schedule to the workflow.
Scenario 1: A trucking company uses the following workflow to manage the truck drivers’ daily clock in, clock out, and check-in delivery status.
The steps outlined in red are configured as scheduled. The truck drivers create the job, and the first step is set to automatic run to clock them into the system. The job will confirm with the truck driver if they have been assigned delivery tasks. The question step is scheduled to run at 8 a.m. after they clock in. If the truck driver has been assigned a delivery, he will check in the delivery information including the destination address and the estimated delivery time. Another check-in is scheduled to confirm the delivery at the timestamp of estimated delivery time provided by the driver in the previous check-in.
If the truck driver answered no, he will be assigned a delivery task and a check-in step is scheduled to run in 15 minutes to allow the driver to prepare for the delivery and check in again at the estimated delivery time. Now let’s take a closer look at the configuration of these scheduling steps and how they can be run.

Here are the step configuration details:
1. In the “Out for delivery?” question step, choose the option Run on a Schedule. This step is designed to run daily at 8 a.m. after the truck driver clocks into the system. Choose the option of Wait until a specific time and configure the running time at 8:00 under Hour of Day.

2. If the truck driver has not been assigned a delivery task, the system will wait for 15 minutes to allow a new task to be assigned before checking in. Choose the option of Wait a period of time and set to 15 minutes.

3. The check-in step is using the Update Job Properties step type and allows the truck driver to enter the delivery address and the estimated delivery time. The estimated delivery time is stored in the Workflow Manager extended property table and can be retrieved from arcade expression. You can learn more about the Update Job Properties step here.
4. The step of “Delivery Check-in” is scheduled to run at the estimated delivery time entered by the truck driver and the timestamp is parsed from arcade expression jobExtendedProperty($job, ‘order’, ‘eta’). order is the extended property table name and eta is the property name. You can learn more about Arcade in Workflow Manager here.

The timestamps configured in the step are local time and converted into Coordinated Universal Time (UTC) and stored in the data model. However, be cautious when using arcade expression, the time parsed from arcade is in UTC and directly applied to the step scheduling.
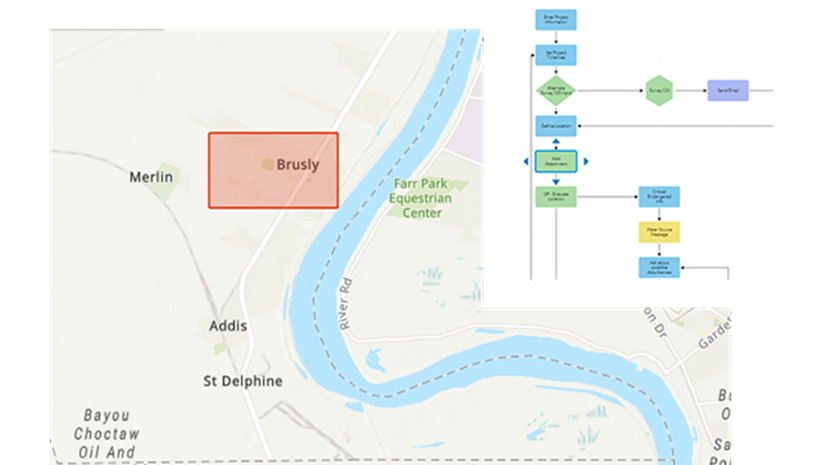
Scenario 2: The step schedule can be applied to the data editing workflow that customers are using. Once the field crew has performed data edits, an Evaluate Data Quality step is needed. This process may take some time and hold the field crew from working on another task. Moreover, multiple jobs waiting for a data quality evaluation around the same time could occupy server resources. A better solution is to schedule the step to automatically run during off-business hours. Once the data edits are complete, the Evaluate Data Quality step is put on hold and will be run at midnight while the server is not heavily used. Complete the following steps to configure the step schedule:
1. In the Evaluate Data Quality check step Options, choose Run on a Schedule.
2. We would like to run the step every day at 12 a.m. The offset creates an acceptable time range to run the steps. This is out of server performance concern to avoid lots of jobs being scheduled to run at the same time.

Alternatively, if the data does not pass the quality check, the step failure leads to the failure path and triggers to fix the bad data. Once the data has been fixed, the Evaluate Data Quality step is triggered again. This time it does not wait until midnight and automatically re-runs the step right away. Here is how to configure this workflow:
1. Add a Manual Step “Waiting”, and configure it to run at midnight. It is held until midnight then runs automatically. This manual step does not have any step help or user prompt thus it runs without any user interaction and proceeds to the Evaluate Data Quality step. The Evaluate Data Quality step is set to Automatic and is triggered to run.
Adding the scheduled manual step instead of scheduling the Data Quality step to run at midnight runs the data quality step again automatically if it fails and the workflow loops back to rerun the step after fixing the bad data.
Learn more on how to configure a Manual Step without interaction here.
2. If the Evaluate Data Quality step fails, it takes the Fail path and triggers to fix the bad data accordingly.
3. Once the bad data has been fixed, it loops back and automatically triggers the Evaluate Data Quality step to run again.


Step scheduling is available starting in 10.9 and job recurring scheduling is available starting in 10.9.1. With the implementation of these two features, Workflow Manager optimizes server resources and improves work efficiency. We would like to hear your use cases on how to apply Workflow Manager scheduling in your organization.
To learn more about Workflow Manager, refer to the resources below:
- Connect with the ArcGIS Workflow Manager Community
- Learn more on the ArcGIS Workflow Manager product page
- Check out the Workflow Manager Learning Plan on Esri Academy
- Access Workflow Manager documentation
- Check out the Workflow Manager Getting Started video on YouTube


Hello Meggie,
my name is John Diniz, I’m with Santander Bank.
I have a Question related to running a work flow using ESRI’s tools run the job once per day at the same time (5:30), we have Microsoft Scheduler.
Work Flow: using Model Builder, reads two files from a Microsoft SQL table, Geocodes records, performs a proximity as the crow-flies, (Point to Point), final step pushes the results back into a SQL Table.
The issue we are having, is the job does not run on the weekends.. and did not run while i was on Vacation for 4 days. otherwise, it runs on the week days, even if I’m logged ON or OFF.
have you experienced this in the past or do you know if there are any other settings i should be checking off. I did check the box in the Microsoft Schuler to ” Run whether the user is logged on or off.
any insights why the Scheduler does not run on the weekends would be helpful…
thank you in advance.
John Diniz