By Jim Herries and Tamara Grant, ArcGIS Living Atlas Team
Every item in ArcGIS Online has a thumbnail image to give a visual cue as to what the item is or contains. Have you noticed that items in the Living Atlas, StoryMaps website, and the Esri Marketplace have large thumbnails?
With the latest update to the Living Atlas Contributor App, you can now upload a single, large thumbnail to represent your item. (updated Jan 2019) both a small and large thumbnail for each item you wish to nominate. Every item in ArcGIS Online can have a small thumbnail that is 200 x 133 pixels in size, and a large thumbnail that is 286 x 190 pixels in size.
Thumbnails help people remember your layer, web map, scene, map package, story map, so it’s important that they look good, and that they communicate what the item is or contains.
So what makes a good thumbnail? Well, it depends on the type of item you want to share. A thumbnail for a layer should visually communicate that “this is a layer” while a thumbnail for an application should visually communicate that “this is an app.”
A thumbnail for a web map should differ from that of a web scene, because you want the web scene’s thumbnail to communicate that this item contains a 3D scene of the subject. Let’s look at the most common item types: layers and web maps.
Many layer items and web map items in ArcGIS Online have a thumbnail that emphasizes the extent of the data rather than what’s important: what the data looks like at a useful scale. If your layer contains locations of code violations around the city, make a thumbnail that shows that at the neighborhood scale. The layer title might be “Peoria Code Violations” – let the title communicate that the layer’s extent includes all of Peoria, and let the thumbnail show what the data looks like at its best scale.
A web map has many layers, so its thumbnail might include an area that shows those layers working together to deliver the desired information.
Applications benefit from thumbnails that depict what the application looks like (in miniature form of course), or depict a particular piece of information the app is good at delivering (e.g. a dashboard element, a chart, a graph, a popup, etc.). Apps are usually about delivering functionality, so a thumbnail that captures that is a good start.
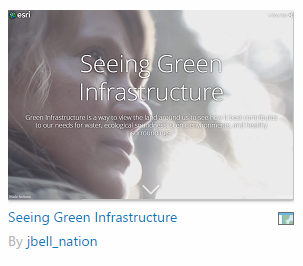
Story maps are often given thumbnails that look like the first page of the story map. Think of it like the cover of a book.
Many people incorporate corporate logos and icons into the thumbnails. Why is that? Once you start creating items, eventually you realize that what you have is a family of related layers, maps, scenes, apps, story maps, etc. You may want to include a little indicator on each thumbnail so that it’s obvious who stands behind it, or how it can be used.
There are good thumbnail generators out there in the ArcGIS Marketplace.
If you’ve never created your own thumbnail, you’ll find the instructions below useful. It’s easy to create thumbnails. Step 1: Get something onscreen that looks the way you want it to look. Step 2: Take a screenshot. Step 3: Crop, or resize, to fit the desired large or small size. Step 4: Upload your custom thumbnail and press Save.
Please find below basic steps for capturing thumbnails on either a PC or a Mac.
PC
- Open the item page in ArcGIS Online. Click on the item to open it in its default viewer (layers and web maps open in ArcGIS Online viewer, web scenes open in Scene Viewer, web apps open in a browser, etc.).
- Zoom and pan until you find a view that displays the item and its content at its best.
- When ready to take a screenshot, press the Windows logo key-PrtScn for a screen shot of your entire screen. This key might appear as PrtSc or another similar abbreviation. Some devices may not have a PrtScn key or could use a different key combination to capture the screen. It is recommended you check the manual or complete a quick internet search to find specific screen capture shortcuts for your device.
- Screenshots are saved as .png files in the Pictures > Screenshots folder in Windows v8.1/8.1 RT and later. They’re automatically named “Screenshot (number).png.” Go find your screenshot, right-click on it and choose to Open with > Paint to edit it. If you have Windows 7 please reference this Microsoft article and Windows Vista take a look at this article.
- Crop the map image to focus on an interesting area that is at least 600 x 400 pixels. Save the image.
- For thumbnails of apps and story maps, maximize your browser, get the app to look the way you want, maybe click on the map to show a popup or chart, and press the Windows logo key-PrtScn to capture the entire screen.
- Go find your screenshot, right-click on it and choose to Open with > Paint to edit it.
- Crop the image to cut out any extra stuff outside the browser window, and resize that image to 600 x 400 pixels. This can be completed by using the Resize button located on the Home tab. Save the image.

- Go back to your item page and upload the image.
Mac
- Open the item page in ArcGIS Online. Click on the item to open it in its default viewer (layers and web maps open in ArcGIS Online viewer, web scenes open in Scene Viewer, web apps open in a browser, etc.).
- Zoom and pan until you find a view that displays the item and its content at its best.
- When ready to take a screenshot, press Command-Shift-3 for a screen shot of your entire screen, or, if you prefer, Command-Shift-4 for a screenshot of a rectangle you draw. See this Apple article for other useful options.
- For thumbnails of layers and web map content, use Command-Shift-4 and draw a rectangle of600 x 400 pixels.
- Screenshots are saved as .png files on the desktop in Mac OS X v10.6 and later. They’re automatically named “Screen Shot date at time.png.” Go find your screenshot, double-click on it to edit it in the Preview app.
- For thumbnails of apps and story maps, maximize your browser, get the app to look the way you want, maybe click on the map to show a popup or chart, and press Command-Shift-3 to capture the entire screen.
- Go find your screenshot on the desktop, and double-click on it to edit it in the Preview app.
- Crop the image to cut out any extra stuff outside the browser window, and resize that image to600 x 400 pixels. Save the image.
- Go back to your item page and upload the image.
For inspiration on what makes for a good thumbnail, just look around the thousands of items in the Living Atlas, StoryMaps website, and the Esri Marketplace.


Commenting is not enabled for this article.