ArcGIS Living Atlas of the World is the foremost collection of geographic information from around the globe. It includes curated maps, apps, and data layers from Esri and the global GIS user community that support your work.
Types of Living Atlas content
Much of the content found in the Living Atlas is public and ready-to-use in maps, scenes, and apps with no restrictions or authentication required. However, some content is not publicly available and falls into two categories:
Subscriber content is the collection of layers published by Esri that requires an organizational subscription account to access. These are layers such as Landsat 8 imagery, NAIP imagery, landscape analysis layers, and historical maps. Subscriber content is provided as part of your organizational subscription and does not consume any credits.
Premium content is a type of subscriber content. It’s the collection of layers published by Esri that requires an organizational account to access, and also consumes credits. These are layers such as demographic and lifestyle layers.
Quick links
The sections below describe how you can identify both types of subscriber content and how to use them in public maps, scenes, and apps. Use these links to jump to a section of interest.
Identify subscriber content
Subscriber content sharing in Map Viewer and Scene Viewer
Subscriber content in apps
- Use subscriber content in ArcGIS Instant Apps
- Use subscriber content in Configurable App Templates
- Use subscriber content in ArcGIS StoryMaps
- Use subscriber content in ArcGIS Dashboards
- Use subscriber content in ArcGIS Experience Builder
- Use subscriber content in ArcGIS Web AppBuilder
Authorize subscriber layers
More information
Identify subscriber content
Unique badges identify subscriber and premium subscriber content. These badges appear whenever items are displayed.
Authoring a map or scene
When you author a map using Map Viewer, one of the places you can search for layers is Living Atlas.

A shield indicates subscriber content.

A shield with a coin indicates premium subscriber content.

The same badges appear when searching Living Atlas from Scene Viewer.
Search
ArcGIS Online search results will display the same badges for subscriber content. For example, this badge indicates subscriber content:
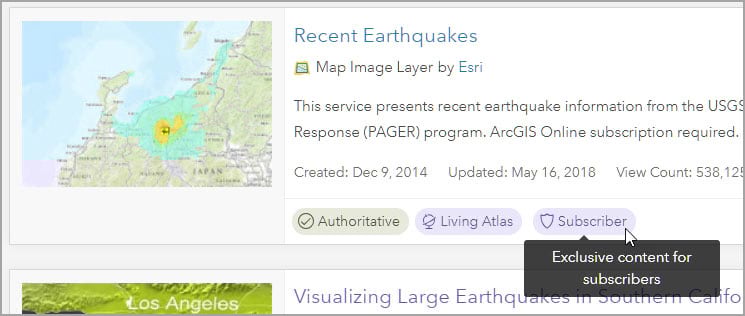
This badge indicates premium subscriber content:

Browse (Living Atlas website)
Using Browse from the Living Atlas website will display similar badges for subscriber content. This badge is displayed on subscriber content:

This badge is displayed on premium subscriber content:

Subscriber content in Map Viewer and Scene Viewer
When you share a web map or scene using subscriber content, you’ll be notified that the map contains subscription content and others may not be able to view the map.

You can’t authorize subscriber content in Map Viewer or Scene Viewer for public use. The best way to enable subscriber content publicly is via an app, story, dashboard, or experience.
Using Map Viewer or Scene Viewer for subscriber or premium subscriber content within your organization is transparent. Since you are sharing it with others that are signed in, there is no authorization or authentication required.
If you attempt to share the web map or scene outside your organization using Map Viewer or Scene Viewer, users will be prompted to authenticate.
Embedding maps or scenes with subscriber content
When using subscriber content in a map or scene you want to embed, you are warned that the map has subscriber content when you save and share (as shown above). You cannot authorize subscriber content in the HTML for embedding maps or scenes. If you need to embed subscriber content in a website, the best way is to use an app.
Subscriber content in apps
The best ways to share subscriber content publicly is to share it using an app. While you cannot use Map or Scene Viewer, or the embed HTML, to share public maps that contain subscriber content, you can create an app that can be shared or embedded for public consumption. Apps have other advantages.
Apps let you create a better experience for viewers, plus built-in options let you authorize subscriber content for public use. See the sections below for more information.

Use subscriber content in Instant Apps
ArcGIS Instant Apps make it easy to create and share interactive web applications in ArcGIS Online and ArcGIS Enterprise. Based on your goals and your audience’s needs, you can select from a variety of app templates.
Instant Apps are the next generation configurable apps, and are the fastest and simplest way to go from a map to an interactive app. Choose a template, configure tools and options via express or full setup, then share your app.
Regular subscriber content in the map will automatically be authorized (proxied) for use, enabling you to share your app with anyone. Premium subscriber content will be identified and you will be provided an opportunity to authorize its use.
For example, below a map that includes premium subscriber content is being used in the Media Map Instant App. The configuration panel provides notification that the map uses premium subscriber content, and delivers an opportunity for the app author to authorize access for public (anonymous) users.
Click Authorize to enable premium subscriber content for a public audience.

While the exact appearance and location of this setting may differ from template to template, all configurable apps support this capability. The “classic” configurable app will prompt to enable all subscriber content, both subscriber and premium subscriber content. The new Instant Apps automatically enable subscriber content, and only notify when premium subscriber content is used.
Use subscriber content in ArcGIS Configurable Apps
Older configurable apps, such as Basic Viewer and others found on the Configurable Apps Gallery, will not automatically authorize public use for non-premium subscriber content. Both subscriber and premium subscriber content will be identified; check the box to enable public use in the app.

Use subscriber content in ArcGIS StoryMaps
When publishing a public story that includes a map using subscriber content, only premium subscriber content is identified. Non-premium subscriber content is automatically authorized for use, without needing additional action. Since premium content consumes credits, the story author will be prompted to authorize the content.

Use subscriber content in ArcGIS Dashboards
ArcGIS Dashboards will identify all subscriber content, both regular subscriber content and premium subscriber content. Before sharing a dashboard publicly, you must authorize all subscriber content for public use.
In the Layout panel, click Subscriber content.

In the Subscriber content pane, toggle the slider to enable public access.

Use subscriber content in ArcGIS Experience Builder
If using premium subscriber content in your experience, you will be notified when you click Publish.

Toggle the slider to authorize the content for use in a public experience.

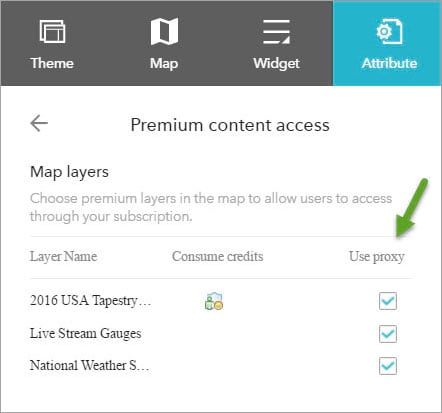
Use subscriber content in Web AppBuilder
Web AppBuilder will also identify subscriber content, and provide a way to authorize their public use. In Web AppBuilder, click Attribute and then click the arrow next to Premium content access, as shown below.

Subscriber content will be listed, check the box for Use proxy for each layer you want to authorize for public use.
Authorize subscriber layers
You can also authorize subscriber content at the layer source; its REST service endpoint. It’s much easier and better to enable public access when a map using the subscriber content is used in a app as described above. However, there may be use cases where you want to pre-authorize layers for public use. For example, when you want to embed a map in your website or blog or when you want to use the Map Viewer.
Note: This workflow currently requires Map Viewer Classic and is not supported in Map Viewer.
In the example below, we will use the Living Atlas 2019 USA Population Density subscription layer. Follow the steps below to authorize it for public use.
Step 1 – In the item details overview, scroll down on the right hand side to find the URL of the service, and click Copy.

Step 2 – In My Contents, click Add Item, then choose From a URL.

Step 3 – The default option is ArcGIS Server web service.
a – Paste the URL obtained in Step 1 above in the URL input. The secure service will be detected, and you will see additional inputs to authenticate for the service.
b – Enter the user name and password to provide authentication for subscription content access.
c – Choose whether you want to store the credentials with the service, or not. If you choose Do not store credentials with service item, then anonymous (public) users will be prompted to sign in. If your goal is to deliver subscription content in public maps and apps, you will want to choose Store credentials with service item to eliminate the need for the viewer to sign in to use the map or app.
d – Enter a title for the item.
e – Choose tags. Since the item is being added from its service endpoint, tags will automatically be added from the service description if they are present. Edit the tags, and/or add your own.
f – Click Add Item when done.

When finished, share the layer publicly. When adding credentials to the service you may also want to limit usage for premium subscription services. To limit usage go to the item Settings:

Click Limit Usage to view options, choosing those that make the most sense for your usage and needs.

Step 4 – Add the subscription layer to a web map.

Step 5 – Copy the layer.

Step 6 – Remove the original layer, and save the map with the copied layer and share it publicly.

Step 7 – Open ArcGIS Online Assistant and sign in to your account.
Note that ArcGIS Online Assistant is an unsupported utility toolset that has been developed by Esri staff. It’s commonly used and is reliable. An alternative method would be to edit the map item JSON, but using the Assistant is much easier.

Step 8 – In the I want to… dropdown choose Update URLs of Services in a Web Map.

Step 9 – Find the map, and swap the the URL shown for the operational layer with the the URL of the authenticated service.
Find the map you saved in Step 6 above and select it.
a – Using the URL of the authenticated service created in Step 3, copy and paste the URL from the item details Overview (see Step 1 above for help) into the Operational Layer URL input box.
b – click Update.

Swapping the URL of the copied layer will enable it to be used publicly and will also preserve the original pop-up configuration and styling.
Step 10 – Exit ArcGIS Online Assistant, and finalize the map.
You may want to edit the layer name, and consider the default map extent. When finished, save the map.
More information
For more information see:
- Add layers to maps (Help)
- Add layers to scenes (Help)
- Create apps from maps (Help)
- Create apps from scenes (Help)
This article was originally published on January 13, 2018, and has been updated.

Commenting is not enabled for this article.