In a previous blog article, we showed you a detailed example of using ArcGIS Notebooks in “Scheduled Mode”, which is brand new functionality in the April 2021 release of ArcGIS Online. Our example was to schedule a notebook to run once a day, which downloads an online dataset from a URL, performs some data engineering on it, then produces a hosted feature layer in our organization. As part of this new built-in scheduling functionality, you also have the ability to insert parameters into the notebook, which are applied upon notebook execution. Here are some examples of use cases for scheduling parameters:
- An organization collects data for all counties in the state of California. They’ve built a notebook to generate a report on this data, and they want the flexibility to filter this report to a specific county at runtime. They also want the ability to run this report for any county on a weekly schedule.
- You want to explore different analytical scenarios by changing model parameter values. For example, your organization is in the retail sector, and you want to be able to calculate drive-times to your stores based on traffic conditions at different times during the day. To do so, you insert a parameter for time of day. Another example would be that you are an ecologist collecting data on whether two species tend to co-locate with one another in a wildlife refuge. As such, you insert a parameter in your notebook which allows you to change the neighborhood search distance that determines colocation.
- You have administrative workflows that require password/access key protection, so you create parameters for these credentials. For example, you have an Amazon S3 Bucket data source that you want to pass into your notebook at execution time, but you do not want the AWS Access Key to save when you share the notebook. Another example would be that your notebook has a code cell for an ArcGIS organization username and password, which you do not want visible when you look at the HTML preview of the completed scheduled notebooks.
In the following example, we’ll highlight two of these use cases: First, we’ll set up some parameters to insert ArcGIS organization credentials in a notebook, then add another parameter that allows us to filter a dataset in our notebook based on a query. Inserting these parameters makes our scheduled notebooks more flexible, in that we can change the code and results without actually changing the code. When using notebooks in scheduled mode, the parameters are the only place where there is any user interaction with the notebook.
How to set up parameters in a scheduled notebook?
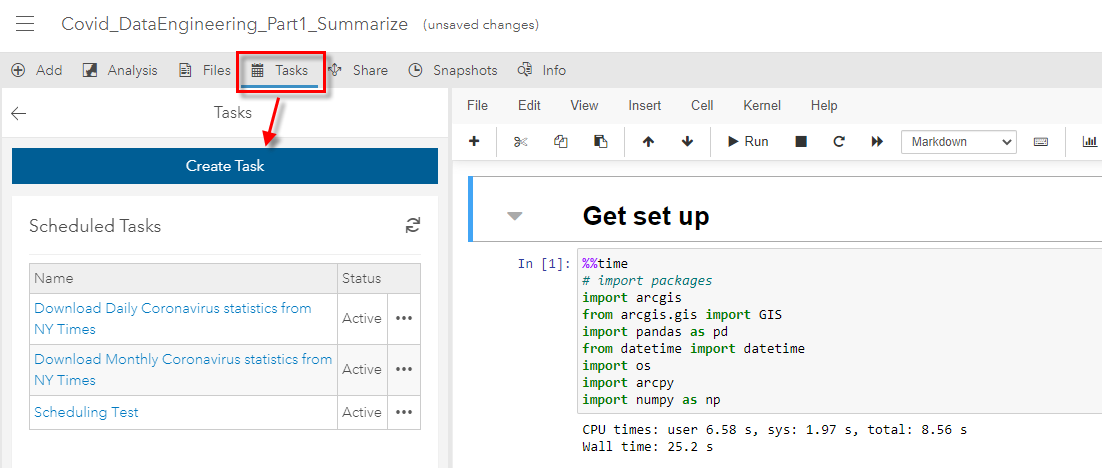
When you create a task to schedule, one of the very first options you see is to set parameters. However, the workflow for creating parameters actually starts in the notebook that you want to schedule.
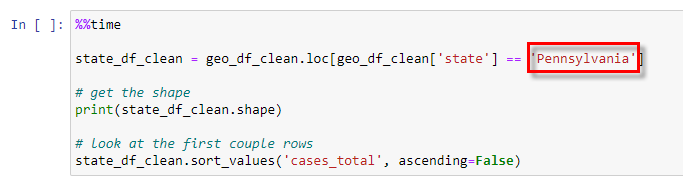
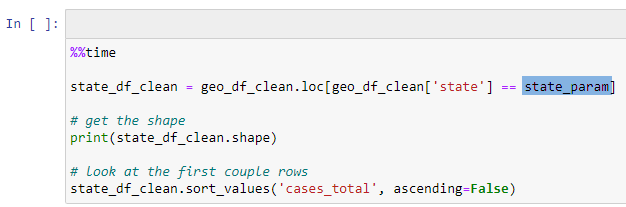
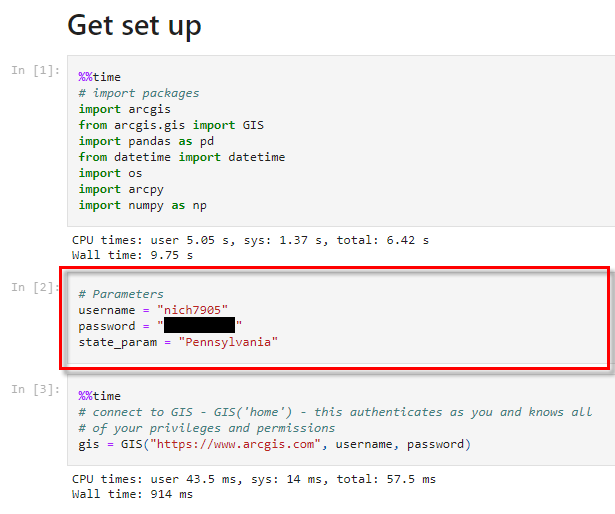
Step 1: Decide which notebook values you want to be able to change using parameters. In my case, I want to use parameters to hide the username and password to log into my GIS, as well as a parameter to filter my US county-level dataset to a particular state.

Step 2: Insert a new code cell above the cell that contains the values you want to change.
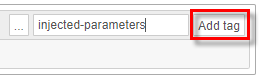
Step 3: From the View dropdown, choose Cell Toolbar, then Tags. You’ll see a bar appear above each cell in the notebook.

Step 4: On the right side of the newly added cell, name the cell “injected-parameters”, then click Add tag. It has to be named this way for the parameters to work.
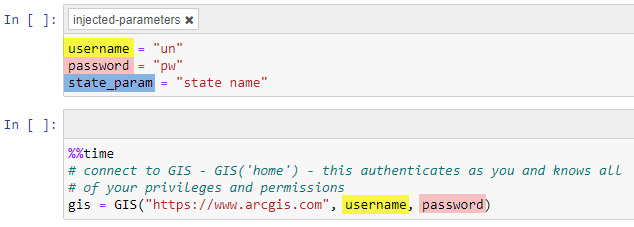
Step 5: In the parameters cell, create variables representing the parameters you want to inject into your notebook. At this point, it does not really matter what the variable values are, as these will be changed from the Tasks pane when scheduling the notebook.
Step 6: Save the notebook.
Step 7: Create a Task from the top ribbon to schedule this notebook.
Step 8: After naming the task, add the key and value pairs that represent the variables and values you want to inject as parameters in the notebook.
Note: the keys have to be exactly the same as the variables you added into the parameters cell. Also, make sure that you click the + sign after adding each key value pair.
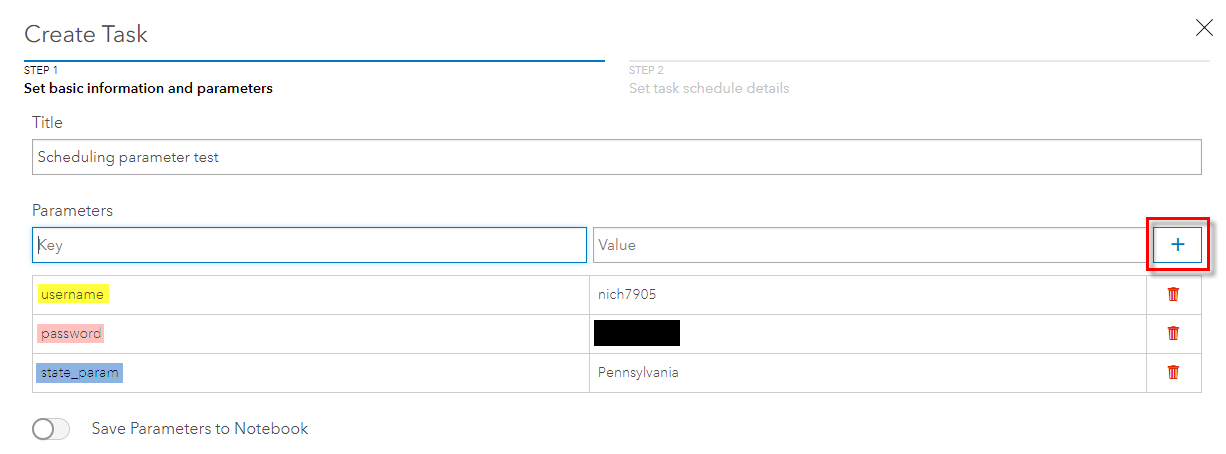
These key value pairs represent the values that will be injected into the notebook, which will override the values we used in the parameters cell we added in Step 5. In our case, the username (“un”) and password (‘pw’) values will be replaced by my ArcGIS Online credentials (“nich7905”/”password”), and the state_param value (“state name”) will be replaced with “Pennsylvania”.
If you toggle on Save Parameters to Notebook, the parameters you typed into the Create Task dialog will be injected into the notebook, and they will be added as a new cell in the notebook. Because the username/password is sensitive information, we do not want it to be included in the notebook after it is run, so we will keep the Save Parameters to Notebook toggled off.
Step 9: After clicking next, you can fill out the task schedule details, which we discussed in detail in this blog post.
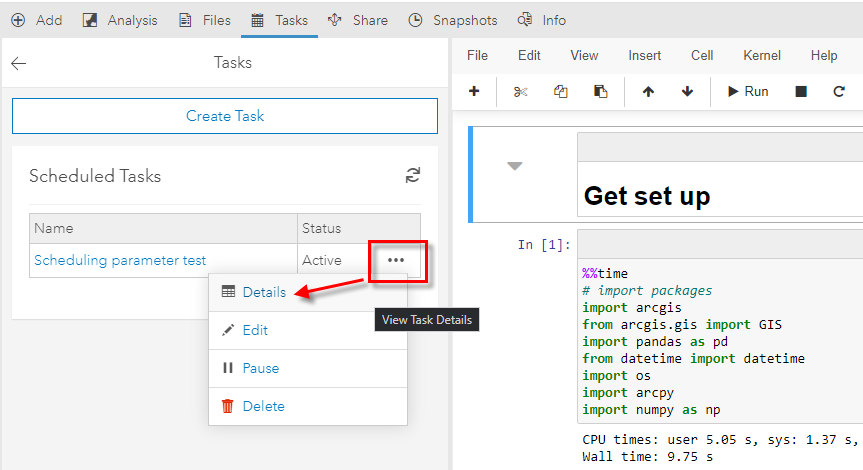
You can view your completed tasks by viewing the task details.
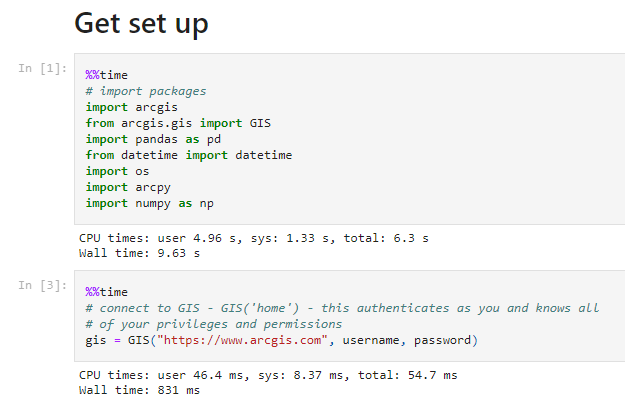
The first example shows the results of an executed notebook in which I did not save parameters, which is ideal for a workflow where you do not want certain information visible (e.g. passwords) when you view the HTML preview of the notebook.
The second example shows the results of an executed notebook where I chose to save the parameters to the notebook. Notice that the parameters are injected as a new cell in the notebook.
Join the GeoNet Community
Whether you want to talk about parameterization in scheduled notebooks, or ArcGIS Notebooks in Online, Enterprise, or Pro in general, please join the ArcGIS Notebooks community . Ask questions, share ideas, and get help from your fellow notebook users. You can also visit the ArcGIS Notebooks product page for product level information and quick links to resources.

Hi Nick! Thanks for sharing this article! I have followed this in the past and got it to work, but it seems there have been some changes to the Notebook in AGOL and now there is no longer a “Cell Toolbar” option under “View” and so I am unable to add the injected-parameters tag. Do you have any workarounds for this?