The holidays are here! Between keeping an eye on the oven and preparing for guests to arrive, your to‑do list is ever-expanding. Whether you’re collecting data yourself or setting up maps for others, templates can help you save time. With templates, editors spend less time filling out forms and more time focusing on what matters. The payoff? Cleaner, more reliable data and a smoother data collection experience. In this step‑by‑step guide, we’ll unwrap what templates are, why they’re so handy, and how to update them in Map Viewer — all before the timer on your oven goes off.

Why Use Templates?
Let’s say we’re mapping invasive plant locations. The attributes for our plants layer include fields like Common Name, Scientific Name, and Plant Code. These fields are connected, meaning the value in one field drives the value in another. For example, one of the plants we’re mapping is commonly known as Giant reed. The scientific name for Giant reed is always Arundo donax. So, instead of asking data collectors to enter the scientific name each time (imagine the typos!), we can set it up to fill in automatically. This is where feature templates come in. Templates let us predefine default values for different categories of features, like different species of plants. Let’s take a look at how to set this up in Map Viewer.
Hint: If managing templates is new to you, you may want to check out this article for an overview.
Step-by-step Guide
Step 1: Open the map
We’ll start by opening our Invasive Plants map in Map Viewer.
Step 2: Pick a layer
Next we’ll select the layer we want to work with.
Step 3: Open the Styles pane
This is where we can customize the symbols that appear on the map.
Step 4: Choose attributes
Here we can select a field for styling the layer. We’ll choose the field Common Name since it contains a list of the types of plants we’re mapping.

Every value in the list is styled by a unique symbol that we can customize.
Hint: These values are also displayed in the legend.

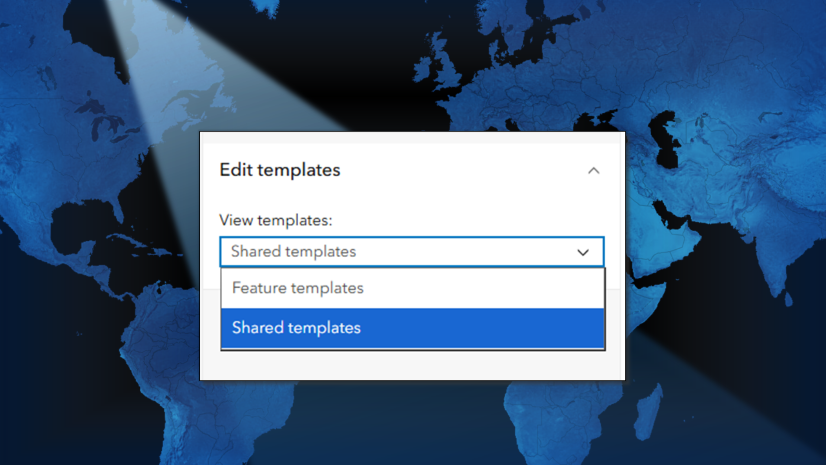
Step 5: Open the templates window
Now we’ll get started creating templates for each plant species. To open the Templates window, click the Configure editing button on the light toolbar and select Templates.
Step 6: Update templates
Across the top of the feature templates window is an alert prompting us to sync our templates with the layer’s style. This means that we can match every value in the legend we saw above with its own template. That way the style and the templates are in sync.

We’ll click the Update button and just like that, the list of templates is automatically updated – without the need to enter values, set symbology, or do any additional work. Pretty slick, right?
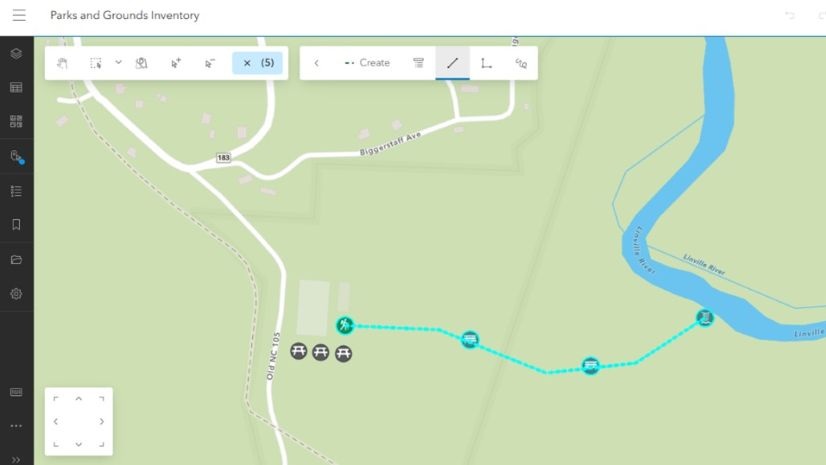
Step 7: Set default values
Now that each plant has its own template, we can plug in the details for each one. We’ll select the template for Giant reed and set default values for fields like Scientific Name and Plant Code so they auto-fill whenever someone uses that template.

Using Templates in the Wild
Once saved, our templates are ready to use. They’ll appear in apps that support editing, like Map Viewer, Instant Apps, Web Editor, Field Maps, and more*. Editors can simply select a template, draw a feature on the map, and see the default values already filled in. Using templates to auto-fill forms saves time, reduces errors, and helps keeps our data squeaky clean.
*Follow up: With recent support added for using shared templates in ArcGIS Online, you may have questions about when feature templates appear and when shared templates appear. Check out this article on Shared templates to learn more.
Summary
Templates speed up editing and help ensure cleaner data from the start. In this guide, we saw how to quickly generate templates to match a layer’s style in Map Viewer, and how to set unique default values for each one. So this holiday season, unwrap the gift of templates and enjoy faster, easier, more accurate data collection. As always, stay tuned for future updates, and be sure to share your ideas and suggestions with us on Esri Community.


Commenting is not enabled for this article.