If you’ve been following what’s new in ArcGIS Online, you may have heard some buzz about Media Layer, a recent addition to Map Viewer. Media Layer allows you to quickly overlay static images on top of maps and place them in a specific geographic location.
At the Dev Summit earlier this year, my colleague Mohanraj Balumiri demonstrated how to style a media layer using a combination of tools in Map Viewer to achieve some cool cartographic effects. If you missed it, you can watch the video here. In this post, you’ll learn how to apply those effects using the same image.
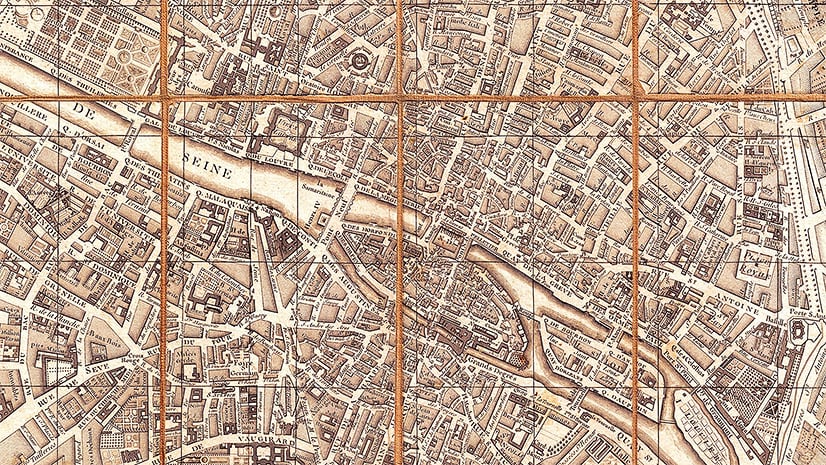
With this 1941 map of the Mall of Washington, D.C, you’ll use tools including Sketch, Group Layer, Blend Modes, Effects, and Visible range to blend the image into a basemap in Map Viewer. Then you’ll style the basemap for the finishing touch.

This workflow is acheived using Media Layers in Map Viewer. You start by adding and placing the image (aka media layer) in your map. This article won’t go into detail about that, but if working with media layers is new to you… start with this previous post. Then come back here to style the media layer.
Download the image for use in this article from the Library of Congress here.
Once you’re happy with how the image is placed in your map, you’ll can follow along with these steps to blend the image into the map, trim away some text, and give the image a soft, faded edge. Adding this kind of high-end visual polish is possible to do in just a few minutes using tools readily available in Map Viewer.
Step 1: Create a Sketch
In this step, you’ll use Sketch to trim the media layer.
Once your image is placed in Map Viewer (see above), you’ll sketch a polygon over the portion of the media layer that you want to preserve. Later, you’ll crop the rest using a blend mode.
- On the light toolbar, click Sketch to add a new sketch layer to the map
 .
. - From the sketch tools, choose Polygon
 .
. - Draw a polygon over the area in the image that you want to keep, leaving out areas you want to crop out, such as the text at the top and bottom of the image.

By default, the sketch Fill transparency is set to 75%. This polygon should be solid, as any transparency will carry through to the media layer later when applying a blend mode.
Move the slider all the way to the left to change the Fill transparency to 0%.

Step 2: Group the Target Layers
You can use Groups to target specific layers when using effects and blend modes. Otherwise tools like blend modes can affect more layers in the map, including the basemap. You’ll add the sketch layer and the media layer to a New Group to ensure that only those layers are affected by blend modes and effects you’ll apply later.
Open the Layer pane if needed.
On the Sketch layer, click Options  .
.
In the menu that appears, click Group.

Click to expand the Group Layer.
Drag the media layer into the Group, placing it below Sketch. This is a crucial step, as you’ll see that the layer order makes a difference when you apply a blend mode.

Step 3: Apply a Blend Mode
Blend modes are pure cartographic magic. They allow us to blend layers on the map, or use one layer to drive how another is displayed. There are over 30 blend modes available in the Layer Properties panel in Map Viewer. For this workflow, you’ll use a mode called Destination Atop to ‘Crop’ the Media layer to Sketch.
Open the Properties Panel if needed. Under Blending, notice that ‘Normal’ is selected by default.
Use the drop down to change the blend mode to Destination Atop.
Applying this blend mode to the top layer in a Group appears to crop the bottom (Media) layer to the extent of the top layer (Sketch)- without actually cropping the image.

Step 4: Apply an Effect
Next apply an effect to the Sketch layer to give the media layer a soft, faded edge that helps to blend it into the basemap underneath it.
With Sketch layer selected in the Layer pane, click Effects on the light toolbar  .
.
Click to enable the Bloom effect.
Bloom has 3 adjustable properties: strength, radius, and threshold.
Increase the strength value slightly to create a softer edge.
Adjust the radius and threshold sliders until you achieve the desired effect- to create a soft, blended edge while trimming off unnecessary text from the image.
These values are a good starting point, but feel free to use your own:
- Strength: 0.7
- Radius: 0.4
- Threshold: 10

Step 5: Set the Scale and Visible Range
You’ll set both the visible range for the Group layer and the map scale so that the map and media display at the desired scale.
With the Group layer selected in the Layer pane, click Properties  .
.
The Visible range slider is located at the bottom of the Properties panel.
Click the slider on the left and drag it closer to the center. This will keep the entire group from displaying beyond the D.C. area.

Click on Map Properties on the dark toolbar  .
.
Click to enable Preserve map scale.
This ensures that the map loads at the same scale regardless of the screen size, so users will see the image when they open the map.

Step 6 (Extra Credit): Style the Basemap
The final step is to style the basemap to better match the styled image. Applying Effects to basemaps allows you to quickly customize the appearance of any basemap to suit your needs. You’ll select a darker basemap in the gallery, and use effects to give it a Sepia tint more in line with the image.
- Click Basemap on the dark toolbar to open the Gallery
- Select Human Geography Dark Map
- At the top of the panel, click Current Basemap
This basemap consists of 3 separate layers: Labels, Details, and Base. Effects can be applied to any of these layers. You’ll work with the top two, Labels and Details.
- Select Human Geography Dark Label
- On the light toolbar, Click Effects
- Click to enable the Sepia effect, giving the labels a sepia tent, and adjust the settings to your preference
- To really make the text pop, click to enable both Bloom and Dropshadow effects and adjust the settings as you see fit
Next, Select Human Geography Dark Detail.
Add these two effects and adjust as needed to tint the the map details and make them pop: Sepia and Dropshadow.
You can play around with adding more effects, or even changing the order of effects to see how it affects the outcome in your map.
When you’re happy with how the basemap looks, your work is done.

There you have it, now you have some experience styling a media layer using blend modes, effects, and more. You’ve seen how grouping layers directs the outcome when using these tools. Hopefully you’ve gained some insight into how you can leverage existing tools in Map Viewer to quickly style your media layers, easily taking your web cartography to the next level. If you’d like to test drive a webmap with these options already configured, click here, and feel free to explore more options for styling your own images in Map Viewer.


Article Discussion: