This tutorial is going to mix things up a bit – old tools (pen and paper) with new (ArcGIS Pro). If you want to learn how to add your own hand drawn terrain to an otherwise digitally-produced map, read on.
When choosing what to map in order to demonstrate this technique, I searched the globe for a place with interesting terrain, but not too much of it. I settled on the volcanic island of Iturup, which happens to be disputed territory between Russia and Japan.
Here’s a detail of the finished map:

For this trick you will need a few extra materials aside from ArcGIS Pro:
- Tracing paper
- Tape
- A fine black felt tip pen
- A scanner
Here is what you are going to do:
- Trace the Esri hillshade basemap in your own unique style.
- Scan that image, clean it up, and place it back onto your map.
And here’s how to do it:
Open your map in ArcGIS Pro and add a hillshade imagery layer. I recommend this one:

Turn off all of the layers except for the hillshade and one reference layer. In some of my pictures below you can see that I used the coastline for my reference. But now that I’ve tried it, I don’t recommend it. A rectangle representing the extent of your map works well. Or a road or point layer that is relatively well distributed across the map. If the layer is too busy and obscures too much, filter it to just show a few features. You will use this layer later for georeferencing.
Adjust the appearance of the hillshade using the enhancement controls for brightness, contrast and gamma, found on the Appearance tab of the ribbon:

This step is optional, but I find it helpful for removing a lot of the fainter terrain information. Tracing is much harder than people imagine. Like everything else in cartography, it is mainly an exercise in deciding what information to leave out. So the more you can simplify the image before tracing it, the easier your job will be.

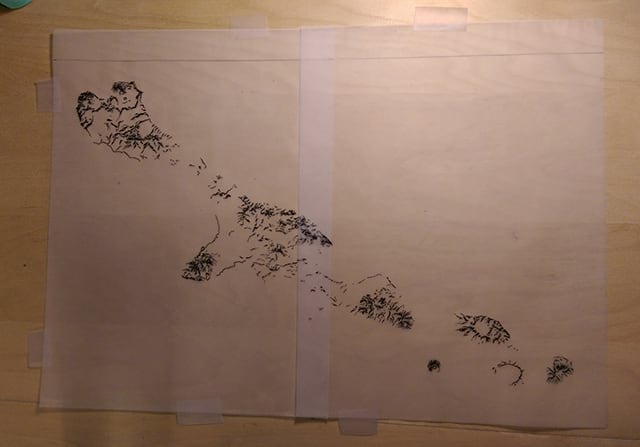
Get out your tracing paper.
Scale here is important. You should trace the hillshade at the same scale that you want for the finished map, or larger. For example, the layout for my map was 11×17″, so I made sure that my tracing paper was also 11×17″. To get finer, tighter line-work, I would want to make sure my drawing was larger than 11×17″ – probably twice as big. But of course, the larger your paper is, the harder it will be to scan later on.
If you want to make sure your scale is correct, make a layout in ArcGIS Pro using your desired scale and extent. Trace the width of the layout onto some tracing paper and tape the paper to your computer screen. Zoom in on the screen until the width of you layout matches the width of your paper.
Projection is important too. If your map isn’t already in the projection that you want for the end product, change it now.
Guess what? Your computer makes the best light table ever! So get cracking on tracing that hillshade!

Don’t distress when your drawing doesn’t look good enough. It will take some practice before you get a consistent style. And seriously, we can’t all be Eduard Imhof.
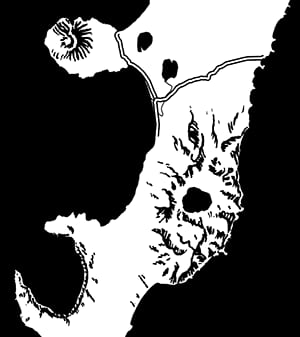
Case in point:

So as those practice sketches show, I’ve still got a long way to go before I’ve got jaw-dropping hachures. But that’s ok. Most of it gets covered up by labels in the end anyway.
I can, however, pass on one trick to up your terrain-tracing game. I previously told you to use a felt tip pen. This is the safe choice that I encourage. But risks come with rewards. The risky choice here is an old fashioned nib pen, the kind you dip in a jar of ink. Use one with a sharp tip, not the wide tipped ones used in calligraphy. With a fancy pen like this you can create lines with variable thickness, and so draw terrain that looks less like barcodes and more like volcanoes.

Of course, it takes practice to get the control you need, and to avoid unfortunate ink blobs (see practice image above!) And most importantly, you must be constantly alert to the risk of spilling ink all over your computer.

Another pro tip: while you’re working, try not to wrinkle, crease or smudge the tracing paper. It may be difficult to remove these marks later.
Don’t forget to trace a few key points from your reference layer. The best plan is to trace bits that will get covered up in your final map by features.
Scan your finished drawing.
The scanned image is likely to be kind of “dirty”, since the scanner’s light bounces around a lot when the thing it’s scanning is transparent. Don’t worry, you’ll be able to clean up most of this noise later in ArcGIS Pro. If there are more obvious blemishes that aren’t just paper texture or shadows, wipe them out with the eraser tool in Microsoft Paint.
If you have Photoshop or a similar program, you can clean, adjust and edit this picture to your heart’s content. I like to strip it down until all pixels are either black or transparent. If you make the background transparent, also make sure to save the image as a png.
Add the cleaned image to your map in Pro. Use the same add data dialog that you use for regular geographic data.
Your drawing isn’t projected so it’s going to land somewhere off the western coast of Africa. Zoom to the layer.
Now you are going to georeference the image. If you’re already a pro georeferencer, skip to the next step. For everyone else, here’s what you need to do:
- Select the layer in the Contents pane.
- Select the Imagery tab on the ribbon and click the Georeference button. A new Georeferencing tab opens on the ribbon.
- Turn off the Auto Apply button.
- Click the button to Add Control Points.
- Zoom to the image.
- Click on one of your reference points or corners.
- Zoom to the map.
- Click the same point on the map.
- Repeat a few more times. You want to choose control points that are spaced around your map, not all in the same part.
- Export the control points in case you need to do this again.
- Click Apply and Save and Close Georeference.
Your terrain drawing should now draw in the correct part of the world. Turn on your other layers to see what it looks like in your map!
But wait – the picture above is clearly of a terrain drawing that was already cleaned up in Photoshop. Wasn’t there some kind of promise about being able to do that in Pro?
Don’t worry. Just use the Enhancement tools again on the Appearance tab of the ribbon. Adjust until you are satisfied.

Keep mapping! In my map of Iturup I went for a pure black and white look, but you can also apply layer transparency to the drawing so it doesn’t overwhelm the map, and even mask parts of it so your annotation is legible on top:
The finished map of the Island of Iturup:


Commenting is not enabled for this article.