Have you ever uploaded a PDF file as an attachment and later discovered that updates to the original file were not reflected in the attached version? Attaching media files to features over the years has provided incredible benefits when accessing data attributes. For example, viewing images of fire hydrants or other geographic features along with textual attributes during field inspections can provide valuable details. As they say; “A picture is worth a thousand words!” The possibilities are vast when adding media files to a feature in a feature class! Unfortunately, for some organizations, loading media data as attachments presents more cons than pros. Many have discovered by sad experience that if you attach one or more .pdf files to a feature class, they are copies of the original files. The expectation was that if these files are updated by others outside of the geodatabase, everyone sees the changes, but those accessing the attached copy do not.
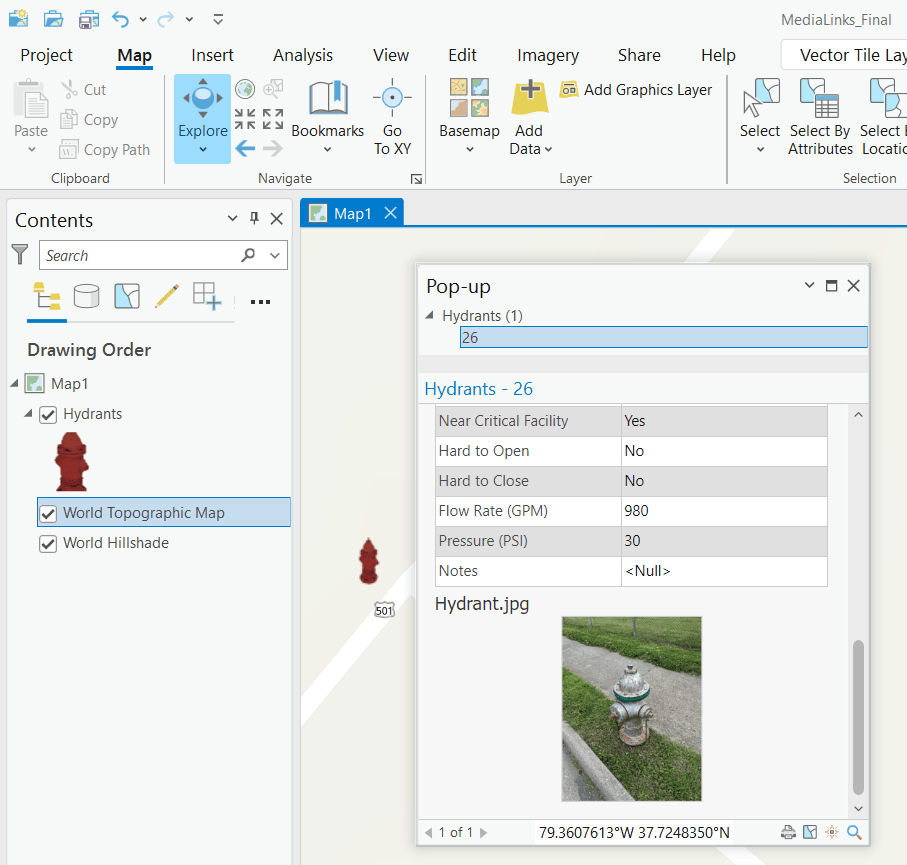
In this blog, I’ll show how you can use a suite of sample tools that provide an alternative to loading media files as attachments, using hyperlinks. They’ll provide a similar workflow to the attachment tools many of us are already familiar with and reference the data that others in the organization work with outside of the geodatabase. A video and FAQ section have also been provided at the end of this blog to demonstrate how the tools work and answer additional questions.
Using hyperlinks instead of attachments
Hyperlinks provide a way to reference media data outside of the software for a feature. A feature class attribute table can only support one hyperlink for one feature per column. To support multiple hyperlinks in the attribute table, you would need to add more columns. Creating multiple columns to support multiple hyperlinks might not be ideal as cells may have null values.

Prior to the advent of attachments, personal and file geodatabases supported raster images in a raster column. This raster column was also in the attribute table, but you could only have one. The attachment model creates a stand-alone table to store all media as a binary large object (BLOB) for all the data for all the features. With all attachments in a single table, it eliminated both limitations. Our goal is to do the same with hyperlinks and eliminate another limitation of working with a static copy. However, prior to this blog, there were no tools to load multiple media files as hyperlinks like the enable, add, remove, and disable tools for attachments. Sure, this can all be done manually. Trust me, I’ve set this up manually, and these tools simplify the workflow exponentially! Let’s introduce you to the sample tools!
The tools
Let’s pretend that we are creating an Airports feature class. We want to store all hyperlinks to our associated .pdf, .docx and image files for our airports inside one table. I’ve decided to keep the data simple to see whether using these tools meets our organizational needs. Let’s begin!
Enable Media Links – sample tool
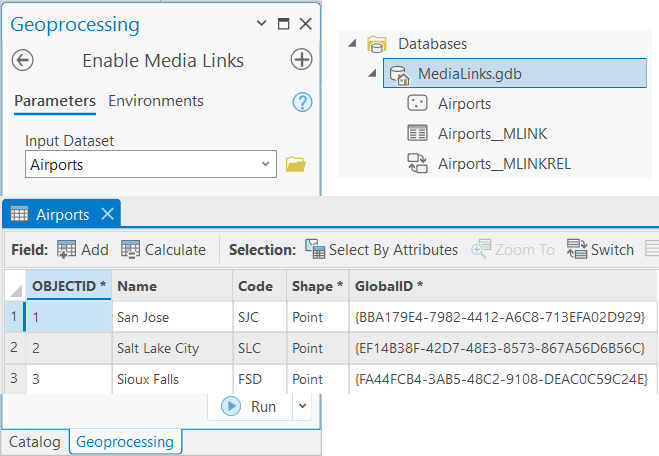
We will use this tool to enable our Airports feature class to store hyperlinks instead of attachments. When the tool has completed successfully it creates the following items:
- Adds a GlobalID field to the feature class attribute table (unless one already exists).
- Creates a stand-alone table to store all hyperlinks (Airports__MLINK)
- Creates a relationship class to manage the association between the feature class attribute table and stand-alone table. (Airports__MLINKREL)
Using the Enable Media Links sample tool, we’ll add Airports as the feature class we want to enable for hyperlinks. We see that it created the stand-alone table and relationship class and added a new GlobalID column to the attribute table. Our Airports feature class is now enabled for one or more hyperlinks per feature, stored in the stand-alone table.
Generate Attachment Match Table
Before we can add hyperlinks to the Airports__MLINK table, we need to create a match table. The Add Media Links tool requires a match table as one of its parameters. Fortunately, we can use the core geoprocessing tool in ArcGIS Pro – Generate Attachment Match Table. This tool includes the following benefits:
- Enhanced at ArcGIS Pro 3.1
- Creates an output match table with two fields – MatchID and Filename.
Because a match table is required for adding hyperlinks (and removing hyperlinks), let’s look at an example of using the tool to create one or more match tables for our Airports feature class.
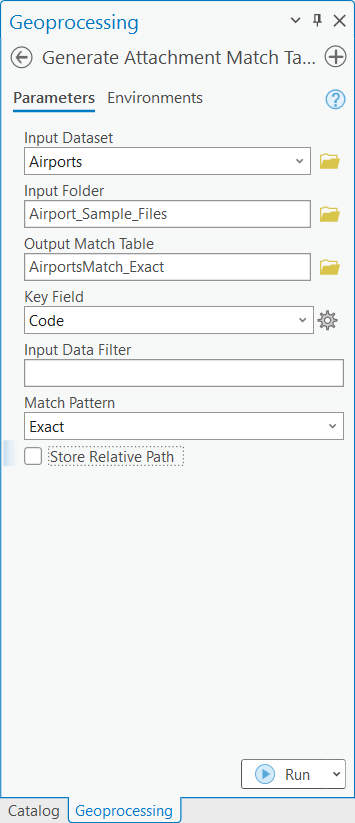
Input Dataset – Extract matched ObjectIDs from the feature class. Matching ObjectIDs will be added to the match table MatchID field.
Input Folder – Reads file names from the selected Input Folder. Matching file names will be added to the match table Filename field.
Output Match Table – The user provides a workspace and name for the match table.
Key Field – Column in the feature class attribute table. Used to match values from the key field with values of each file in the file names folder.
Input Data Filter – A data filter used to limit files considered for matching.
Match Pattern – Defaults to Exact (other choices: Prefix, Suffix, and Any).
Store Relative Path – Checked by default. Uncheck to return absolute path to be used by the software as a hyperlink.
Using the conditions below, we see the results of two match tables generated from the tool.
- The input folder has three files: CLT.jpg, AirportInfo_CLT.pdf and CLT.docx.
- The airport feature for Charlotte has a value of CLT in the Code column (Key Field).
- The Match Pattern uses the default of Exact.
The match table (AirportMatch_Exact) is created with two rows. MatchID would be the ObjectID for the Charlotte airport feature, and the two file names (not including their path extension) that were an exact match of “CLT” from the Code column.

If we change the Match Pattern to Any and run the tool again, all file names are added to the new match table (AirportMatch_Any) as they all have the Code field value CLT in any part of their name. We now have two match tables to add or remove hyperlinks for the Airports feature class. We’ll use these two match tables to illustrate using the Add and Remove Media Links sample tools.
Add Media Links and Remove Media Links – sample tools
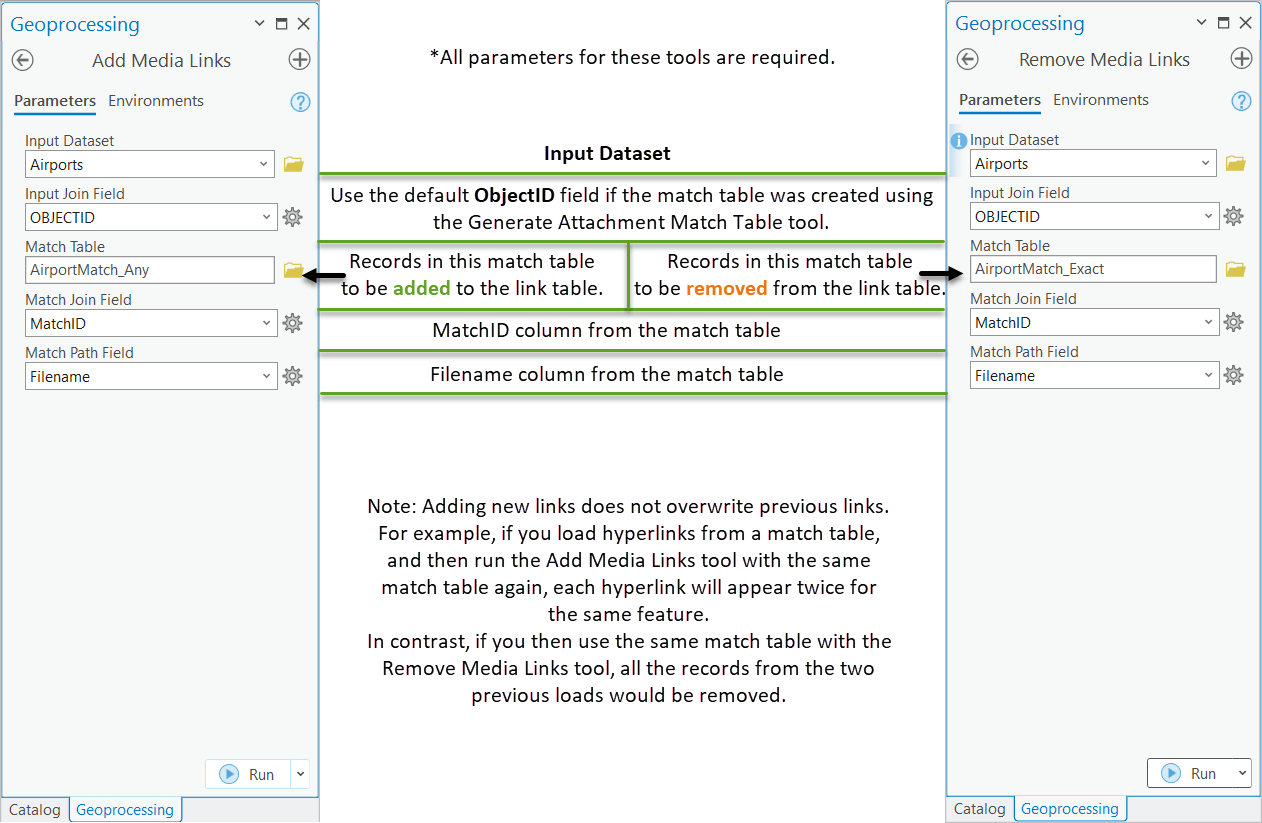
These tools are identical with the exception that one adds hyperlinks and the other deletes them from the link table based on the match table selected.
- Add one or more hyperlinks from the match table to the stand-alone link table.
- Remove one or more hyperlinks from the match table to the stand-alone link table.
Here is a simple scenario on adding and removing hyperlinks with the two match tables we just created: The Add Media Links tool, with the AirportsMatch_Any table would add three rows to the Airports link table. Then, if we run the Remove Media Links tool with the AirportMatch_Exact match table, it removes two rows from the link table. The result would be one hyperlink in the stand-alone link table for Charlotte: AirportInfo_CLT.pdf. To see a demonstration of adding and removing hyperlinks with these tools, click the Video link in this blog below.
Disable Media Links – sample tool
This sample tool disables multiple hyperlinks on a feature class by deleting the stand-alone link table and relationship class. The GlobalID column remains in the feature class attribute table.
- Delete the stand-alone link table.
- Delete the relationship class.
- Leave the GlobalID in the attribute table.
Using the above scenario, I’ve decided that I want to continue adding more airports to my feature class. My testing with selecting features and referencing the hyperlinks in the pop-up window on the map meets my expectations. For this reason, I will not use the Disable Media Links tool in this workflow so that I can continue to add more airports and hyperlinks.
To see a demonstration of the scenario above, see the Video link in this blog.
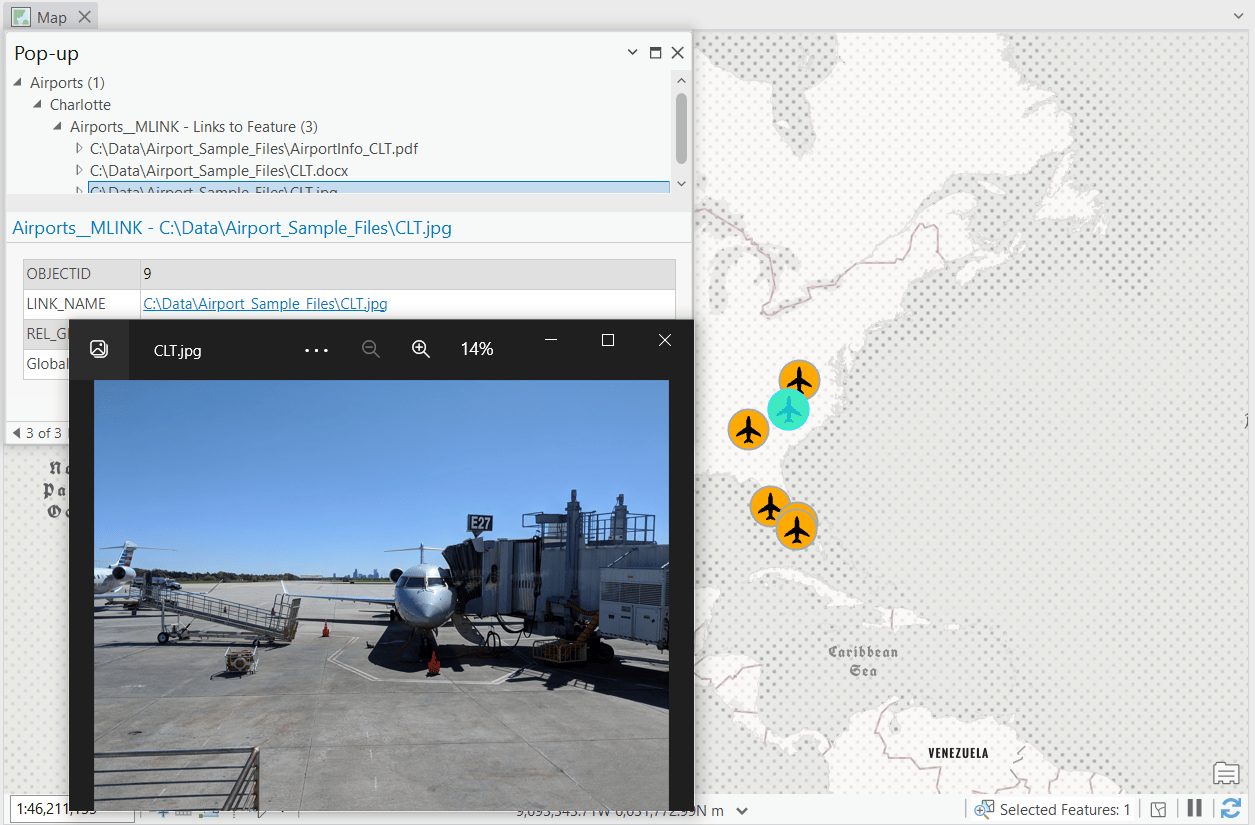
As I prepare to add more airports and hyperlinks, my GIS team realizes that we have some media available online. Instead of referencing local or network paths for each link, we want to use web addresses. The challenge is all our web addresses are stored in Windows shortcut files. This was done so that we could store them in a Windows folder. However, this means that each URL is still mapped to a local or network drive. We need a tool that will allow us to extract from each .url file the web address and populate it into a new field of our existing match table. For that, we used the URL File to URL Match Table sample tool.
URL File to URL Match Table – sample tool
To extract web addresses from our .url files, we performed the following steps.
- Created a match table that matches .url files with each feature ObjectID using the Generate Attachment Match Table.
- Export the match table and add a new text field. We called our field URL.

3. Fill in the tool parameters:
-
-
-
- Input Table— Exported match table.
- URL Filename Field—Field with .url files.
- New URL field—The new text field to store the extracted web addresses.
-
-
4. Click Run.

5. Use the updated match table with the Add Media Links tool. Select the URL field instead of Filename for Match Path Field.
6. All hyperlinks will now have their full URL path for each matching feature.
Using web addresses as hyperlinks really opens the door for accessing media files outside of the geodatabase! It provides more efficient workflows without having to access media files from local or network drives. If you are like me, my imagination really kicks in when I think of what can be accomplished with these sample tools and working with hyperlinks to shared media files throughout an organization.
Download the tools
Download the tools from this ArcGIS Online location.
Video:
FAQs
Here are some frequently asked questions and answers to consider when using these sample tools:
Can I add or delete hyperlinks manually during an edit session without using the Add Media Links or Remove Media Links sample tools?
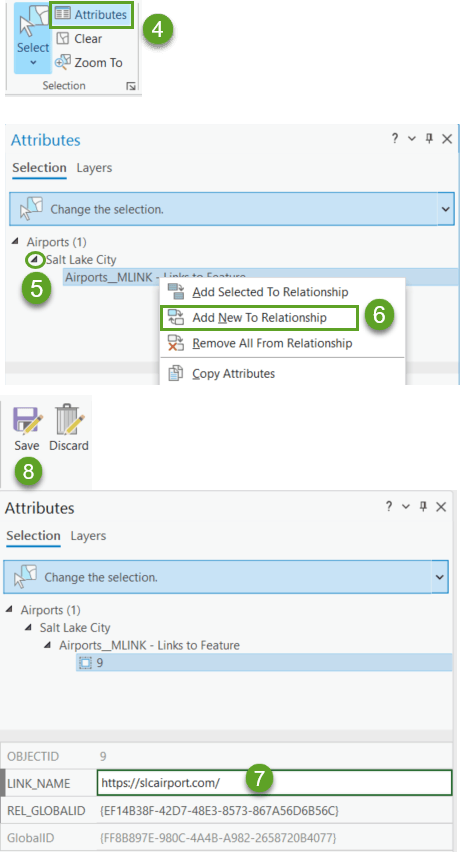
Yes. While the Add Media Links and Remove Media Links sample tools allow us to work with many hyperlinks, sometimes we just need to add or remove a few during an edit session. Here is the recommended workflow:
- In the ArcGIS Pro project, I added my Airports feature class to a map.
- Select the Edit tab on the ribbon.
- Add a new feature or select an existing feature. I selected an existing feature.
- Click Attributes (in the Selection section of the Edit tab).
- In Attributes, click the triangle icon to show the related link table.
- Right-click the related link table and choose Add New To Relationship.
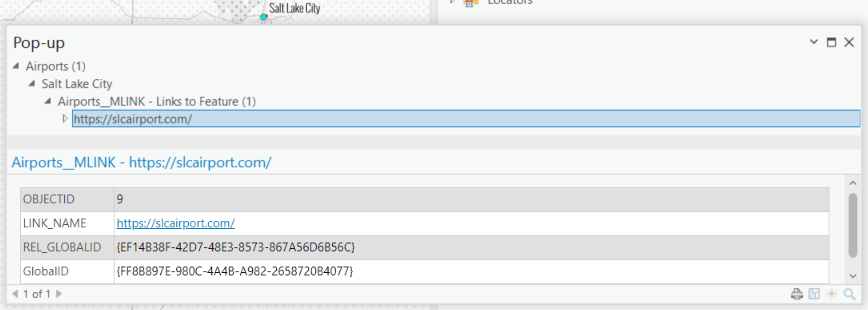
- Paste a hyperlink into the LINK_NAME field (or delete the hyperlink to remove an existing hyperlink).
- Click Apply and click Save Edits.
Can I share a feature class that has been enabled for hyperlinks as a web layer?
Yes, but you need to add both the feature class and feature class link table (for example, Airports__MLINK) into the Contents pane prior to publishing. If the link table is not added to the contents pane, it will not be included as a related table with the published feature class.
The following steps are recommended:
- Enable the feature class.
- Add the feature class and link table to the Contents pane.
Share the feature class as a web layer.
Can I use all the sample tools with a feature class that has been shared as a web layer?
Add Media Links and Remove Media Links—Yes. Enabled for hyperlink features classes that have been shared as a web layer with their related link table can use these tools to add or remove hyperlinks. One way to verify if the link table was published with the feature class is to view the published web layer from the Portal tab in the Catalog pane of ArcGIS Pro. Fill in the parameters with the web layer as the Input Dataset for either tool. The Add Media Links and Remove Media Links tools will then add or remove hyperlinks with the same parameters used with feature classes.
Enable Media Links and Disable Media Links—No. These sample tools work with feature classes only.
Are the tools supported in mobile, file, and enterprise geodatabases?
Yes. Enterprise geodatabase data owner users have permissions to enable, add, remove, and disable hyperlinks with each sample tool. Editors have permissions to add, remove and select hyperlinks. Viewers have permission to select hyperlinks. Mobile and File geodatabase users generally have full access to enable, add, remove, disable hyperlinks with these sample tools.
Can I use the tools with versioned feature classes?
Yes, traditional versioning for the enabled feature class. Branch versioning was not tested.
Can I update, add, or remove records from a match table and reuse it to add or remove hyperlinks?
Absolutely! Match tables can be reused or edited for adding or removing specific hyperlinks.
Can I create my own custom match table to add or remove hyperlinks?
Yes! The purpose of the match table is to match hyperlinks with the correct features when adding or removing hyperlinks. For example, if you have a table with file paths or web addresses, load the table into the geodatabase. Add new columns as needed and use joins with the feature class attribute table to build your own match table.
Can I delete the link table (__MLINK) and relationship class (__MLINKREL) manually to disable hyperlinks for the feature class without using the Disable Media Links tool?
Yes. The Disable Media Links tool was created to complete the full suite of tools like the tools for managing attachments. Deleting them manually has the same results.
Licensing information
Basic: No Standard: Yes Advanced: Yes
More information
Additionally, check out these other helpful resources for data management, Python, and custom script tools:


Commenting is not enabled for this article.