A feature layer is a layer containing a group of similar features and their associated properties. Feature layers are how ArcGIS Pro represents feature classes. Feature layers can use data from any source that provides point, polyline, polygon, multipoint, or multipatch vector feature data. Often these are feature classes contained in a geodatabase, but they can also be shapefiles or online feature services.
In this blog, you will configure several feature layers from a single feature class contained in a geodatabase. The objective is to control feature layer behavior to create unique and efficient feature templates for editing. The layers and their associated feature templates may then be shared as layer files, layer packages or web layers and can be used across a wide range of applications in ArcGIS. Your feature layers may be used in hosted feature layer views that allow you create multiple unique windows into your data, and customize them to fit your audience.
Explore source layer properties
1. Click Configure Feature Layers and choose Open in ArcGIS Pro to download the item.
Note: Alternatively, you can download the project package, start ArcGIS Pro, and unpack the package. The project is downloaded as a .pitemx file. Double-click the file to unpack the project package and open ArcGIS Pro.
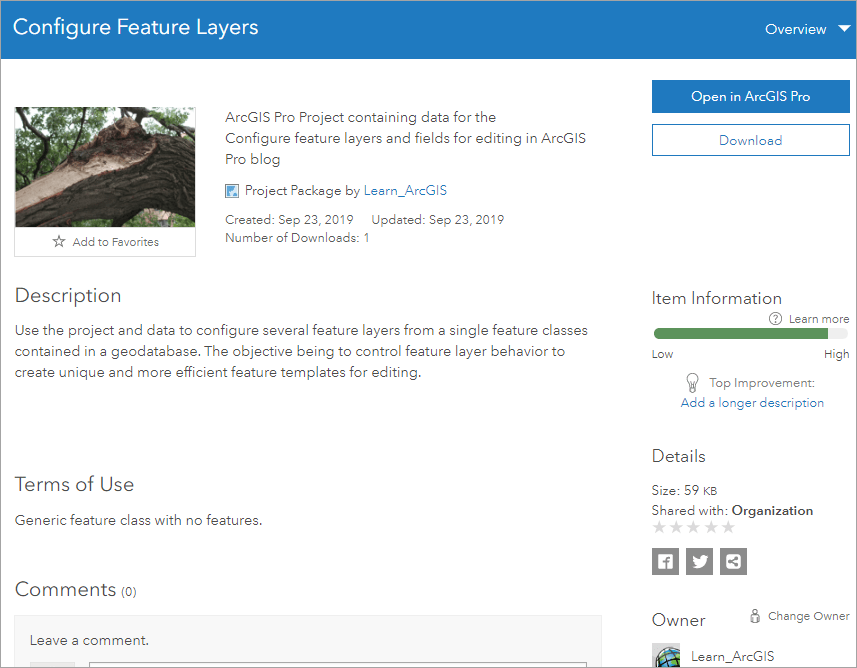
2. In ArcGIS Pro, if prompted, sign in using your licensed ArcGIS account.
Note: If you don’t have ArcGIS Pro or an ArcGIS account, sign up for an ArcGIS free trial.
The ConfigureFeatureLayers ArcGIS Pro project opens and displays a map named Configure Feature layers. In addition, the project consists of a geodatabase named configurefeaturelayer.gdb.
3. In the Catalog pane, expand the Databases folder, and click configurefeaturelayer.gdb.
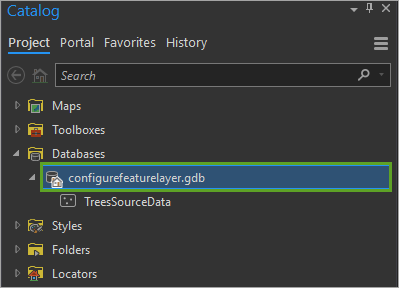
Notice that the geodatabase contains a feature class named TreesSourceData. You will use this source feature class to generate several feature layers suitable for various uses and different users.
4. Right-click TreesSourceData and choose Add To Current Map. The TreesSourceData feature class has an alias and displays as the Trees layer in the map
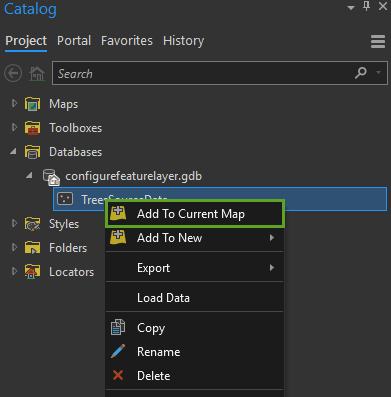
Note: Adding the TreesSourceData feature class to the map, creates your first feature layer. Keep in mind that the feature layers reference the feature classes for display and use in maps and scenes.
5. In the Contents pane of the ConfigureFeatureLayers map, review the Trees layer.
Because this layer has no attribute validation, the layer displays using Single Symbol display.
6. In the Contents pane, right-click the Trees layer, and choose Attribute Table.
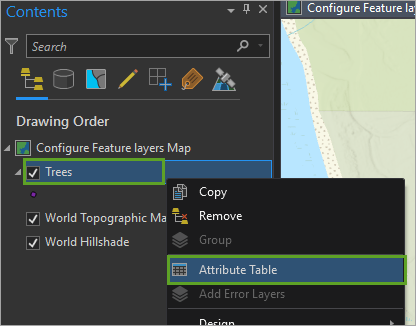
7. Optionally move and dock the attribute table below the map.
Attribute information in a table is organized into rows and columns. In ArcGIS, rows are known as records and columns are referred to as fields.
8. Review the Trees attribute table and note the field names. You may need to dock and scroll the attribute table to review all fields.
This table has no records, as you are creating feature layers for use by editors who will be collecting new tree features. Notice that the layer’s field names are descriptive and contain spaces. This indicates that the source feature class has field aliases assigned to the fields. Field aliases allow you to assign an alternate name for a field. Typically, field names are as short as possible to describe the data stored in that field. You cannot use spaces or special characters in the field name, so a field alias allows you to give the field a more descriptive name.
9. With the Trees attribute table active, click the Data on the Feature Layer tab.
10. On the Data tab, in the Design group, click Fields.

The Fields view displays a layer’s attribute fields and properties. When working in the Fields view, note that some field properties are specific to the layer and some are specific to the data source from which that layer was built.
11. In the Fields view for the Trees layer, review the current field properties.
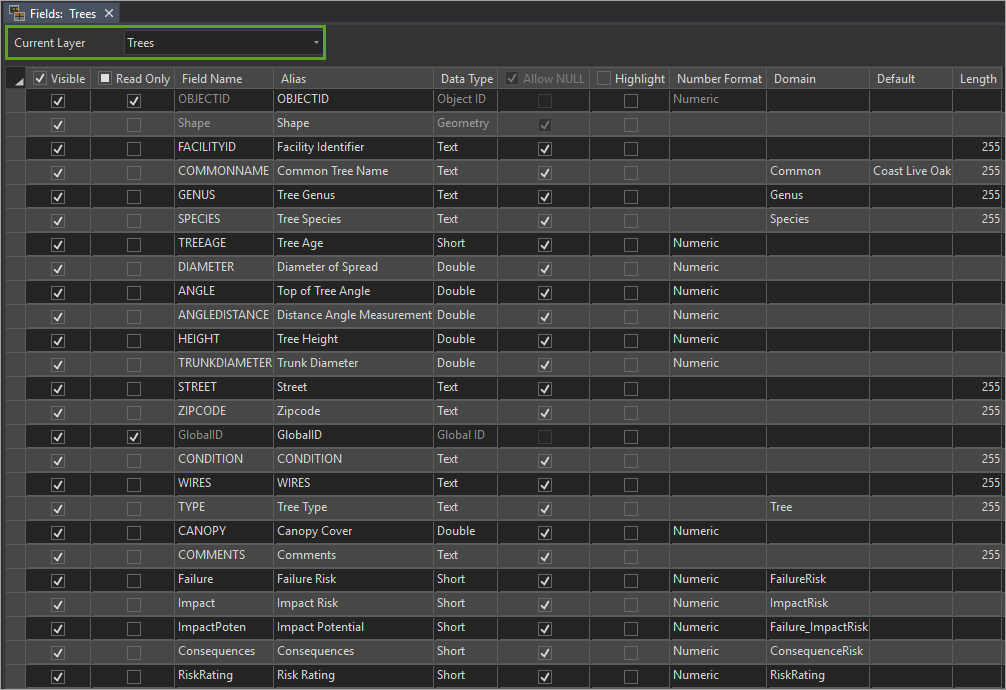
Layer fields properties include the following:
-
- Visible to show or hide a field.
- Read Only to define whether a field is editable.
- Alias to apply an alternative name for a field.
- Highlight to accentuate the field when displayed.
- Number Format to change display formatting for numeric fields.
- Domain to apply a domain to a field.
- Default to set a default value to a field.
- Length to set the maximum number of characters allowed.
12. In the Fields view, click the drop-down menu for Current Layer and select Data Source.
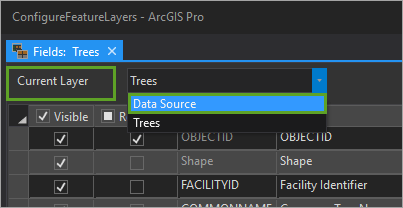
The Fields view updates and the following columns are displayed:
-
- Field Name
- Alias
- Data Type
- Allow Null
- Domain
- Default
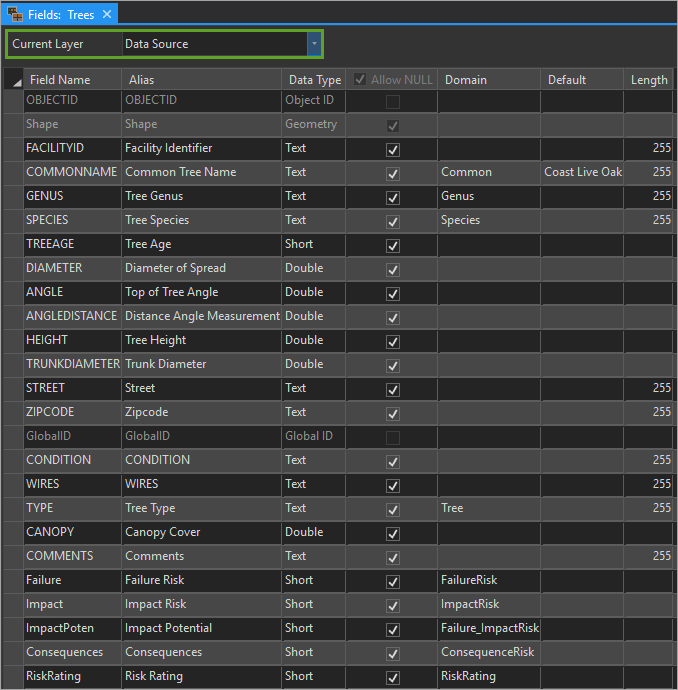
When you make changes in the Data Source view, the changes are made to the underlying data source, which includes all the layers that are based on that source. However, changes made to the layer-level fields only change that specific layer. This difference is important, since one data source can have multiple layers associated with it.
13. In the Fields view, note the fields and associated domains used for tree identification.
| Field Name | Domain |
| COMMONNAME | Common |
| GENUS | Genus |
| SPECIES | Species |
| TYPE | Tree Type |
Note: Attribute domains describe the valid values for a field. They are used to constrain the values allowed in an attribute for a table or feature class. They enforce data integrity by limiting the values to either a range or a list of valid choices.
14. In the Fields view, note the fields associated with tree failure and risk.
| Field Name | Domain |
| Failure | FailureRisk |
| Impact | ImpactRisk |
| ImpactPoten | Failure_ ImpactRisk |
| Consequences | ConsequencesRisk |
| RiskRating | RiskRating |
15. Close the Fields view for the Trees layer.
16. Save the project.
You have now identified groups of attribute fields that can be used in layers created specifically for different users and roles. Both of these groups of fields can be used in various applications. Next, you will create multiple feature layers from the original source layer.
Configure feature layers
In this section, you will create copies of the tree layer and make changes to the layer fields that will be used by users while editing and updating tree information.
- In the Contents pane of the Configure Feature layers Map, right-click the Trees layer and choose Copy.
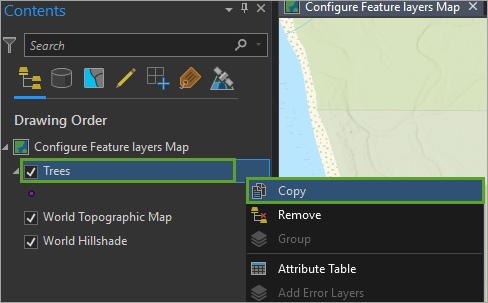
2. In the Contents pane right-click Configure Feature Layers Map and choose Paste to create a copy of the Trees layer.
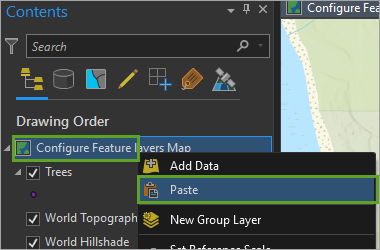
3. Create a second copy of the Trees layer using Paste.
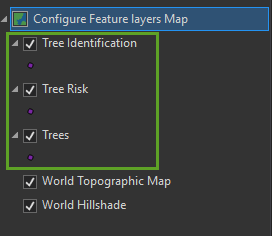
4. Rename the copied layers Tree Risk and Tree Identification.
5. In the Contents pane, verify that you have three tree layers.
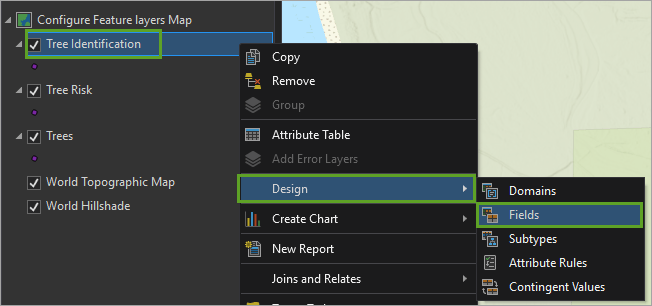
6. In the Contents pane right-click Tree Identification, and choose Design and Fields.
The Fields view opens. The design for this layer calls for the layer to display the specific attribute fields relevant to identifying a tree. Some attributes cannot be edited in the table. Managed fields—such as ObjectID, Shape_Length, and Shape_Area—cannot be edited. You also cannot edit fields that are marked as read-only for the layer in the Fields view of the table.
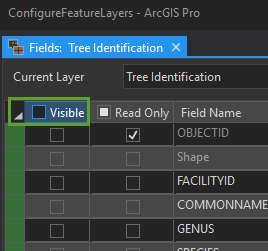
7. In the Fields view, check Visible to hide all fields in the layer table. This is a shortcut to uncheck all fields before selecting those you want the layer to display.
8. In the Fields view, for Visible, check the following fields so they will display:
-
- FACILITYID
- COMMONNAME
- GENUS
- SPECIES
- TYPE
Next, reorder the layer fields. It is important to note that layer field properties can be updated and configured without making changes to the underlying data source. Layer fields are stored with the layer definition in a project, and data source fields are stored with the layer’s source.
9. In the Fields view, click to the left of the TYPE field to select it, and drag the selected field below the FACILITYID field.
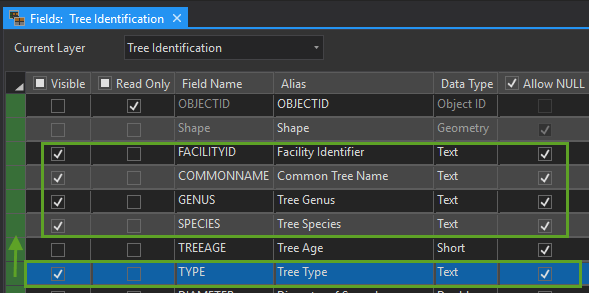
10. With the Tree Identification Fields view active, click Data on the Feature Layer tab.
11. On the Fields tab, in the Changes group, click Save.

12. Close the Fields view.
13. Configure the display of the following fields for the Tree Risk layer and move them below each other:
-
- FACILITYID
- STREET
- ZIPCODE
- Failure
- Impact
- ImpactPoten
- Consequences
- RiskRating
- COMMENTS
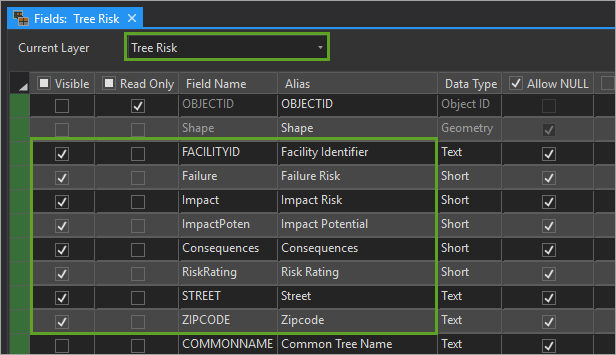
14. On the Fields tab, in the Changes group, click Save.
15. Close the Fields view.
Next, you will configure feature templates based on the Tree Risk and Tree Identification layers.
Configure feature templates
1. On the map, in the Contentspane, click the Tree Identification layer to select it.
2. On the Edit tab, click the Manage Templates button in the lower right corner of the Features group.
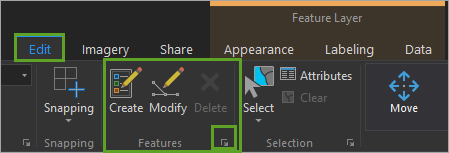
The Manage Templates pane appears.
3. In the Manage Templates pane, if necessary, expand the Configure Feature Layers map.
4. In the Manage Templates pane, under the Configure Feature Layers Map, click the Trees layer.
5. If necessary, right-click the Trees layer and choose Create all templates to create a feature template for the layer.
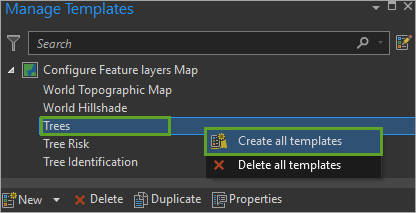
6. Choose the Trees template, and click Properties.
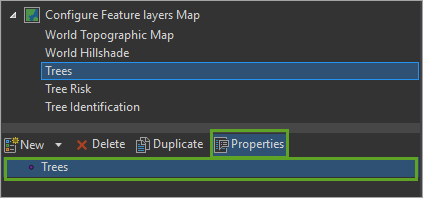
7. In the Template Properties pane, click Attributes.
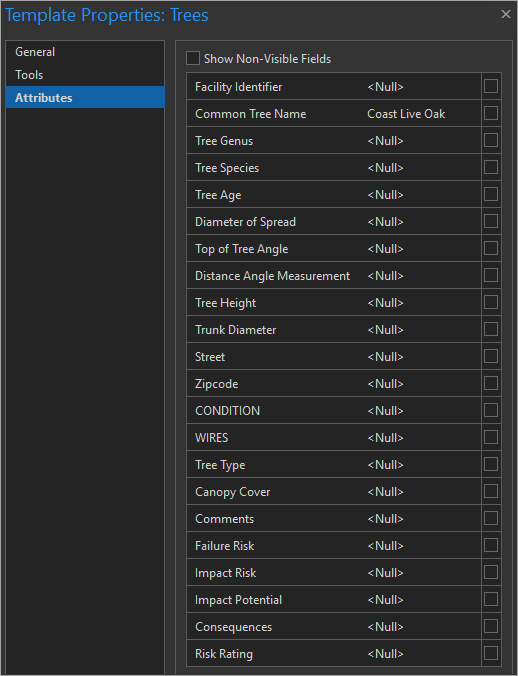
Notice that all the source layer fields are listed, and it is not possible to choose specific fields for use in the feature template.
8. Click OK to close the Template Properties pane.
9. In the Manage Templates pane, under the Configure Feature layers map, click the Tree Identification layer.
10. Right-click the Tree Identification layer and choose Create all templates.
11. Choose the Tree Identification template and click Properties.
In the Template Properties pane, you can configure a feature template’s name, the tools that appear on the tool palette, and whether you are prompted for attribute values.
12. In the Template Properties pane, for Name, type Collect and Identify a Tree.
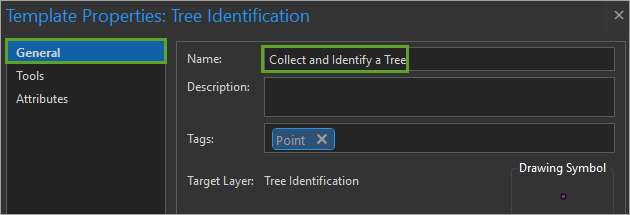
13. In the Template Properties pane, click Tools.
14. Uncheck Point At End of Line Tool from the list of construction tools.

Notice that the Point Tool is identified as the default point construction tool.
15. In the Template Properties pane, click Attributes.
Notice that only the layer fields you checked as visible in the Fields view are available.
If you had not preselected specific layer fields, the attributes list would contain all source fields as it did for the Tree layer.
16. In the Template Properties pane to the right of the field names, check Prompt for attribute values for each layer field.

17. Click the Tree Type field drop-down arrow and choose Uncategorized.
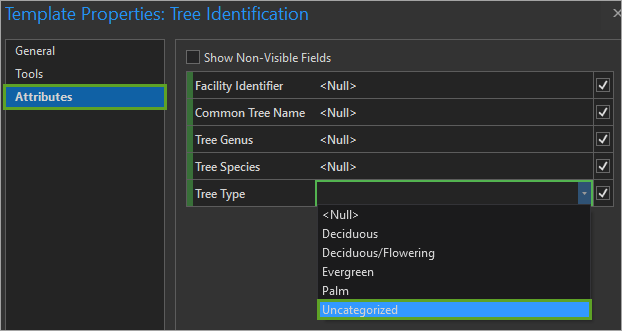
You set the default domain value, and you do not need to update this field unless you identify the tree type before creating a new feature.
18. Click the drop-down arrow for the Common Tree Name, Tree Genus, and Tree Species fields and choose <Null>.
19. In the Template Properties pane, click OK.
In the same manner, create and configure a feature template for the Tree Risk layer.
20. In the Template Properties pane, for Name, type Tree Risk Assessment.
21. In the Template Properties pane, for Attributes check Prompt for attribute values for all layer fields except Facility Identifier and Comments.
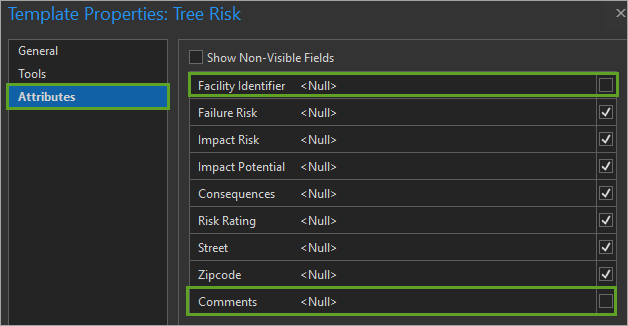
22. In the Template Properties pane, click
23. Save the project.
Feature templates are a property of a layer and are maintained in an ArcGIS Pro project. If the layer is saved as a layer file, the feature templates are maintained as a property of the layer file.
24. Close the Manage Templates
Now you’ll test the feature templates and explore the contingent values applied to the fields.
Use the feature templates
- On the map, in the Contentspane, uncheck the Trees
2. On the map, in the Contentspane, click the Tree Identification layer to select it.
3. On the ribbon, click the Edit In the Features group, select Create.
The Create Features pane appears.
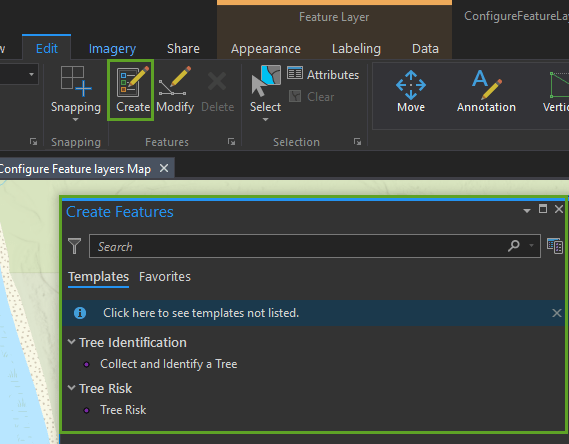
In the pane, notice the feature templates for Tree Identification and Tree Risk.
4. In the Create Features pane, click Collect and Identify a Tree.
The template updates to display the available construction tools for creating a tree feature, and the attribute fields displayed are specific to identifying the tree type, species, and so on.
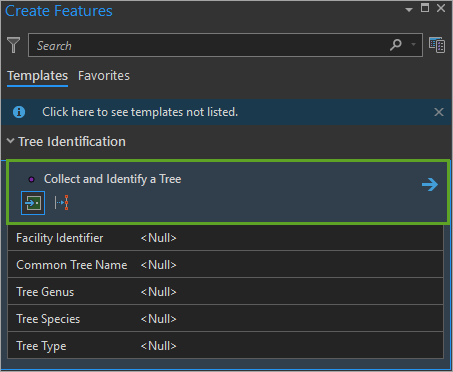
5. In the Collect and Identify a Tree feature template, click the Tree Type drop-down arrow and choose Palm.
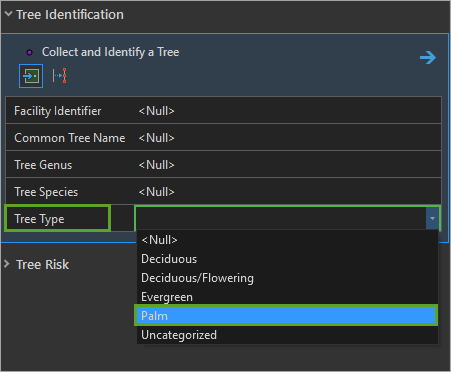
6. In the Common Tree Name drop-down menu , choose California Fan Palm.
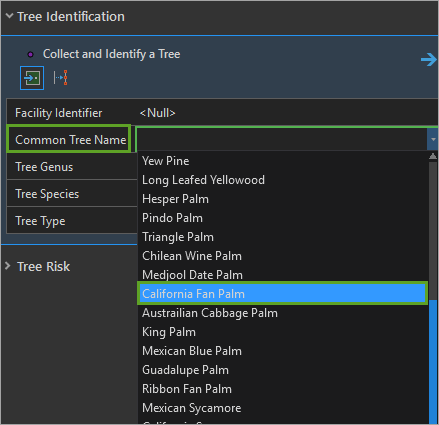
For each of these fields, the drop-down list of values is a result of setting a domain. Remember that domains enforce data integrity by limiting the field value to either a range or a list of valid choices.
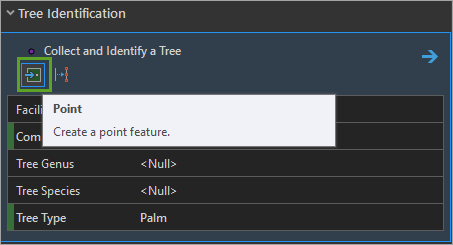
7. In the Create Features pane, select the Point construction tool and add several palm trees to the map.
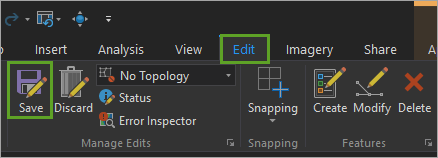
8. On the ribbon, click the Edit tab. In the Manage Edits group, click Save.
9. In the Save Edits pane, click Yes.

10. Click the Tree Risk Assessment feature template and experiment with setting risk factors.
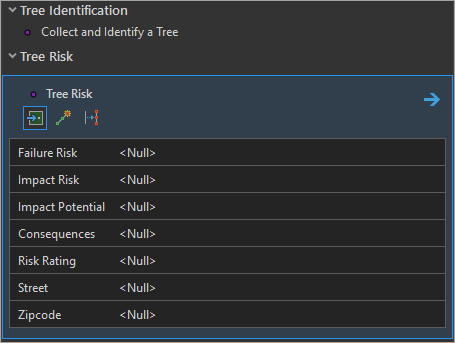
11. Optionally create a new feature on the map.
12. When you are finished, save your edits and close the Create Features
13. Save the project.
Conclusion
In this blog, you explored how to configure several feature layers from a single feature class contained in a geodatabase. In addition, you created and configured feature templates to facilitate editing of new features by users with different roles. You can now share the layers and their associated feature templates as layer files, layer packages, or web layers and use them across a wide range of applications in ArcGIS.


Commenting is not enabled for this article.