Setting the stage
My wife is from London so every couple of years we try to make it over there for vacation. When school gets out, she and the kids head over for a few weeks to visit her side of the family, leaving me at home to get ready for the User Conference in San Diego. As soon as the conference is over, I fly over to meet them for a summer vacation.
Why am I telling you this? Well, while I do miss them, having everybody out of the house is a really good time to get all those little things done that have built up on the to-do list. Yesterday I was tidying up around the back yard, trimming back plants to get ready to spread some new mulch. We have some rose bushes that have grown out of control, pushing perhaps eight to ten feet in height so I figured now would be a great time to tackle that job.
Because I was giving these bushes a serious trim, I needed to use a couple of different tools – loppers for the thick, woody growth and hand pruners for the younger stems. If you’ve ever worked with a rose bush, especially one that has been allowed to have its stems harden (read, Kory hasn’t taken care of these things in a couple of years) you’ll know how sharp and unyielding the thorns can be. There I was, alternating between loppers and pruners as needed, trimming back stem after stem to reshape these plants into something more civilized, cutting each long stem down into shorter segments so that they would fit into the green waste bin. It didn’t take long before I had fallen into a rhythmic pattern:
Lop. Lop, lop, lop. Prune, prune, prune. Discard.
Lop. Lop, lop, lop. Prune, prune, prune. Discard.
Lop. Lop, lop, lop. Prune, prune, prune. Discard.
At some point during my trimming and discarding, I couldn’t help but think that this is like editing. (This isn’t the first time I’ve found myself thinking about ArcGIS Pro while doing something seemingly unrelated.) And every time I was pricked by a thorn, I wished I had that T shortcut key to only show “vertices” when I wanted to…
Key editing features in ArcGIS Pro
Now that we know what got me thinking about editing in ArcGIS Pro I wanted to highlight a few key features. If you’re coming from ArcMap, these will be all new to you. If you’ve been working in ArcGIS Pro for a while, you still may learn something new or enhance your editing knowledge.
Automatic edit sessions
ArcGIS Pro automatically starts an edit session when you modify existing data or create data. You can edit any data source that is granted view and edit privileges. Saving or discarding your edits automatically stops the edit session. Any subsequent edits you make resumes the edit session until you save or discard your edits. This means that you are not constrained to editing only a single workspace at once – you can seamlessly edit data from different databases, shapefiles, feature services, and so on without having to stop to switch workspaces.
“But what if I want more control over when I’m editing?”
Great question – we’ve got you covered! You can use one or both of the following methods for more fine-grained control over when and what you’re editing. Both of these settings are found in the project Options > Editing tab.
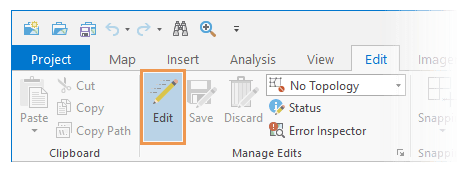
Enable and disable editing from the Edit tab
Disabling editing on the Edit tab disables editing tools and feature templates. By default, this setting is hidden.
To show this button, see Enable and disable editing.
Turn editing off by layer
Turning editing off by layer allows you to specify which layer can be edited. These settings apply to the current map or scene and do not change permissions granted at the data source.
To learn more, see Specify which layers can be edited.
Save edits at recurring intervals
Now that you have control over your edit session and have specified which layers can be edited, you can also enable recurring automatic saves of your edits. By default, automatically saving edits is disabled, but throughout the ArcMap years we had this request come up again and again. So in ArcGIS Pro, you have the option to automatically save edits based on either a time interval (minutes) or number of operations. See Save edits at recurring intervals for the details.
Group templates
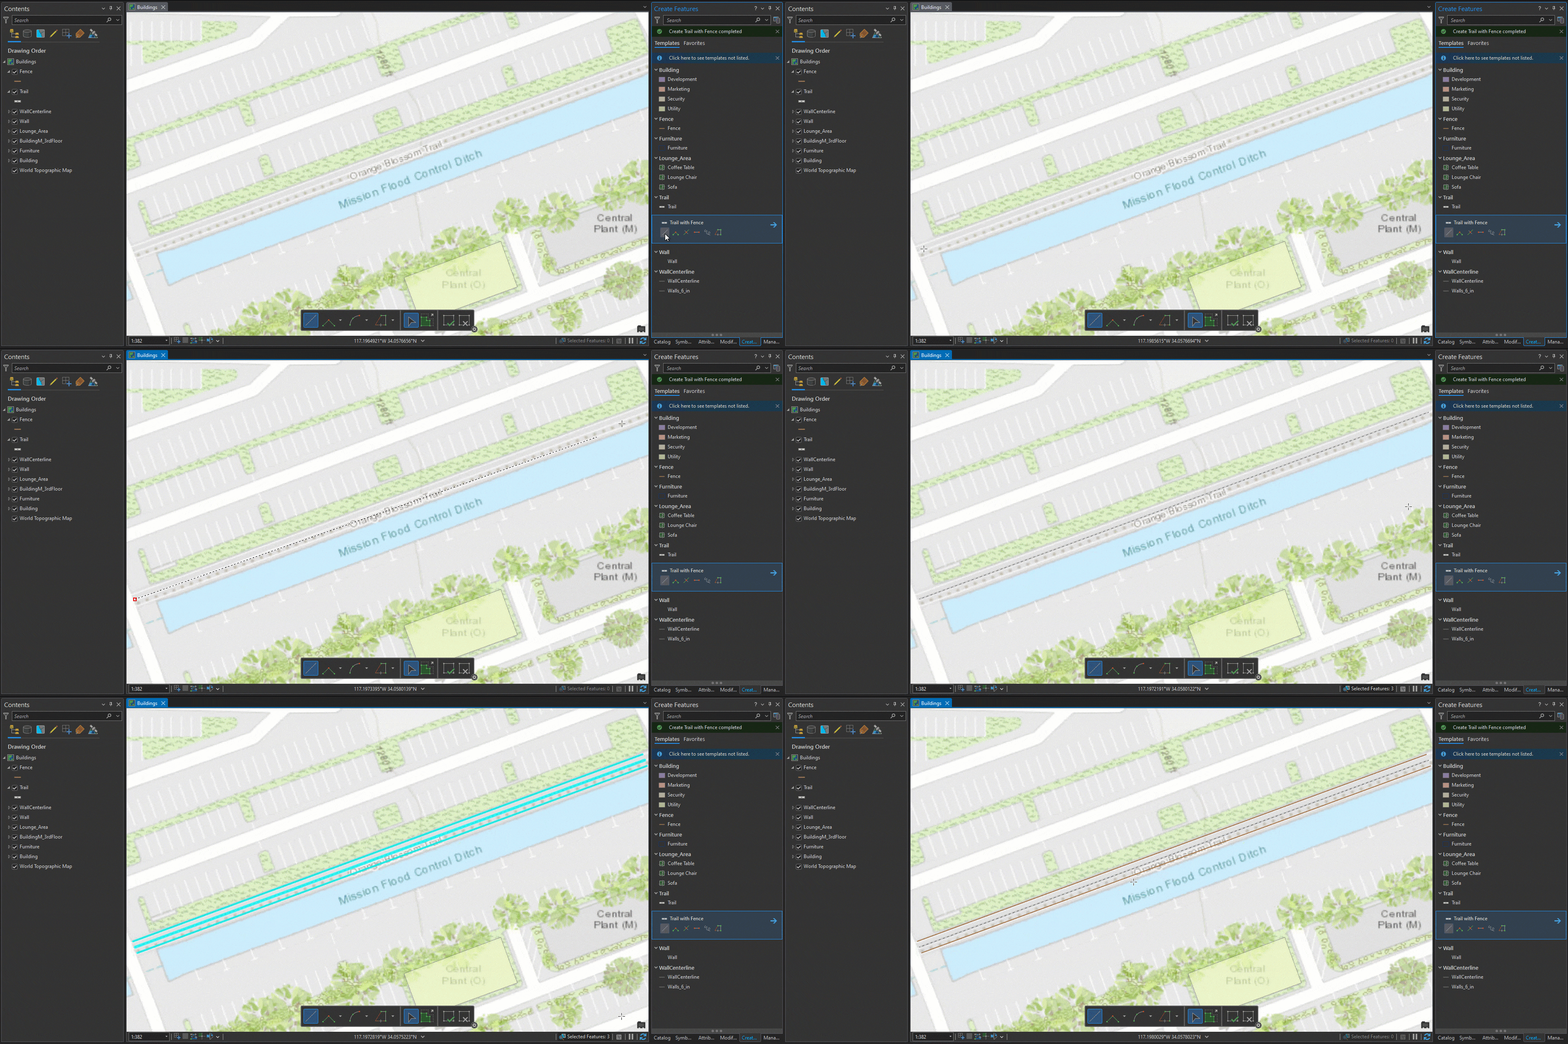
Group templates in ArcGIS Pro are one of my favorite editing features because it feels like magic as you create features. Group templates allow you to compile a template of various feature templates so that when you’re creating features from the primary template, other features are automatically created.
Here is a simple example. I will be digitizing a trail feature and all along the trail I know that there is a fence on both sides, five feet from the trail’s centerline. My ‘Trail with Fence’ group template looks like this:

This means that as I create my trail feature, my fences are automatically created all at the same time. Magic!
Learn more about creating a group template.
Reference grid, on-screen constraints, and inference constraints
ArcGIS Pro has multiple features that lend to a productive editing experience. The following three features can be accessed from the editing status bar at the bottom of the active map or scene. The status bar can be configured.

Reference grid
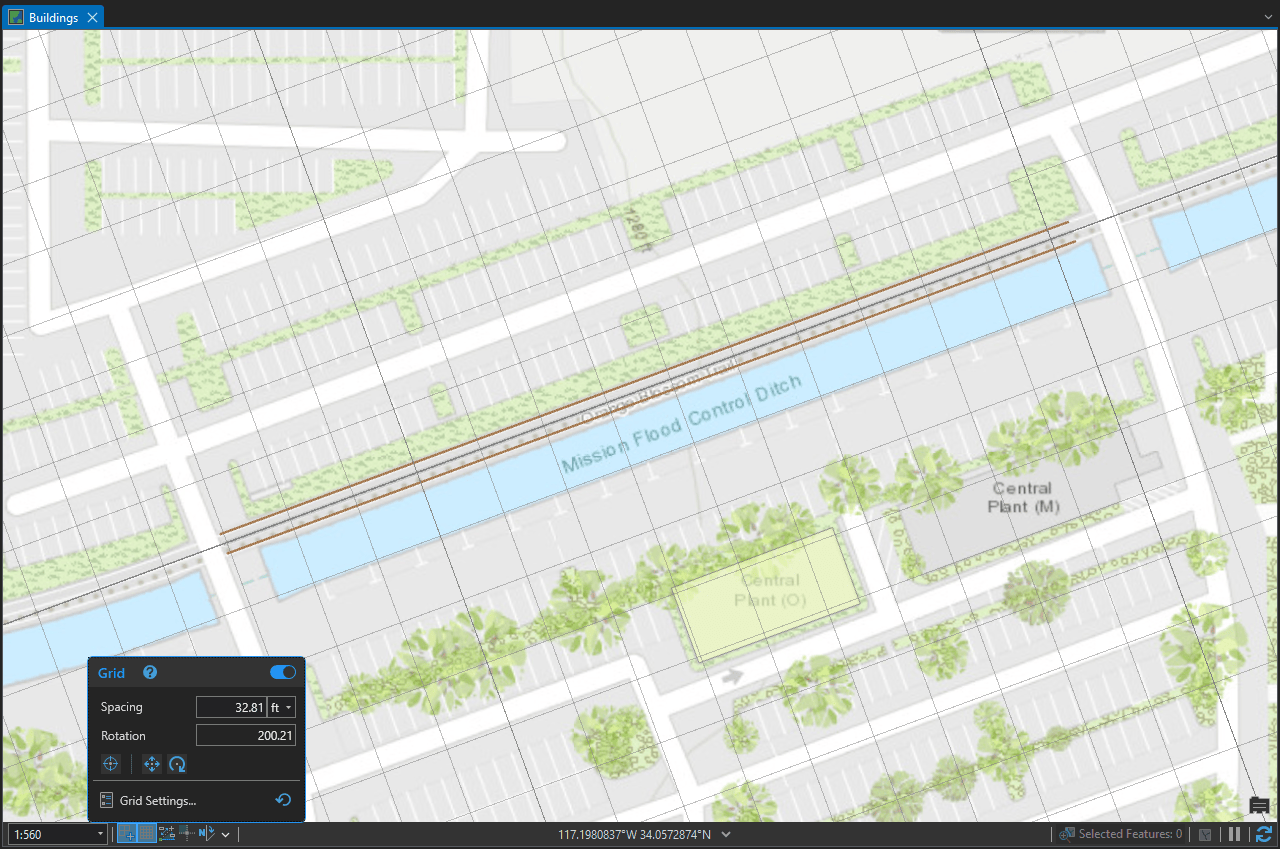
The reference Grid overlay for editing comprises configurable horizontal and vertical grid lines that help you align features and visualize distances as you modify or create features.
When you use the grid, consider the following:
- If snapping is on, the pointer snaps to grid line edges and intersections.
- For quick access to grid spacing, origin, and rotation settings, hover over Grid on the status bar.
- To configure advanced settings, click Grid Settings.
On-screen constraints
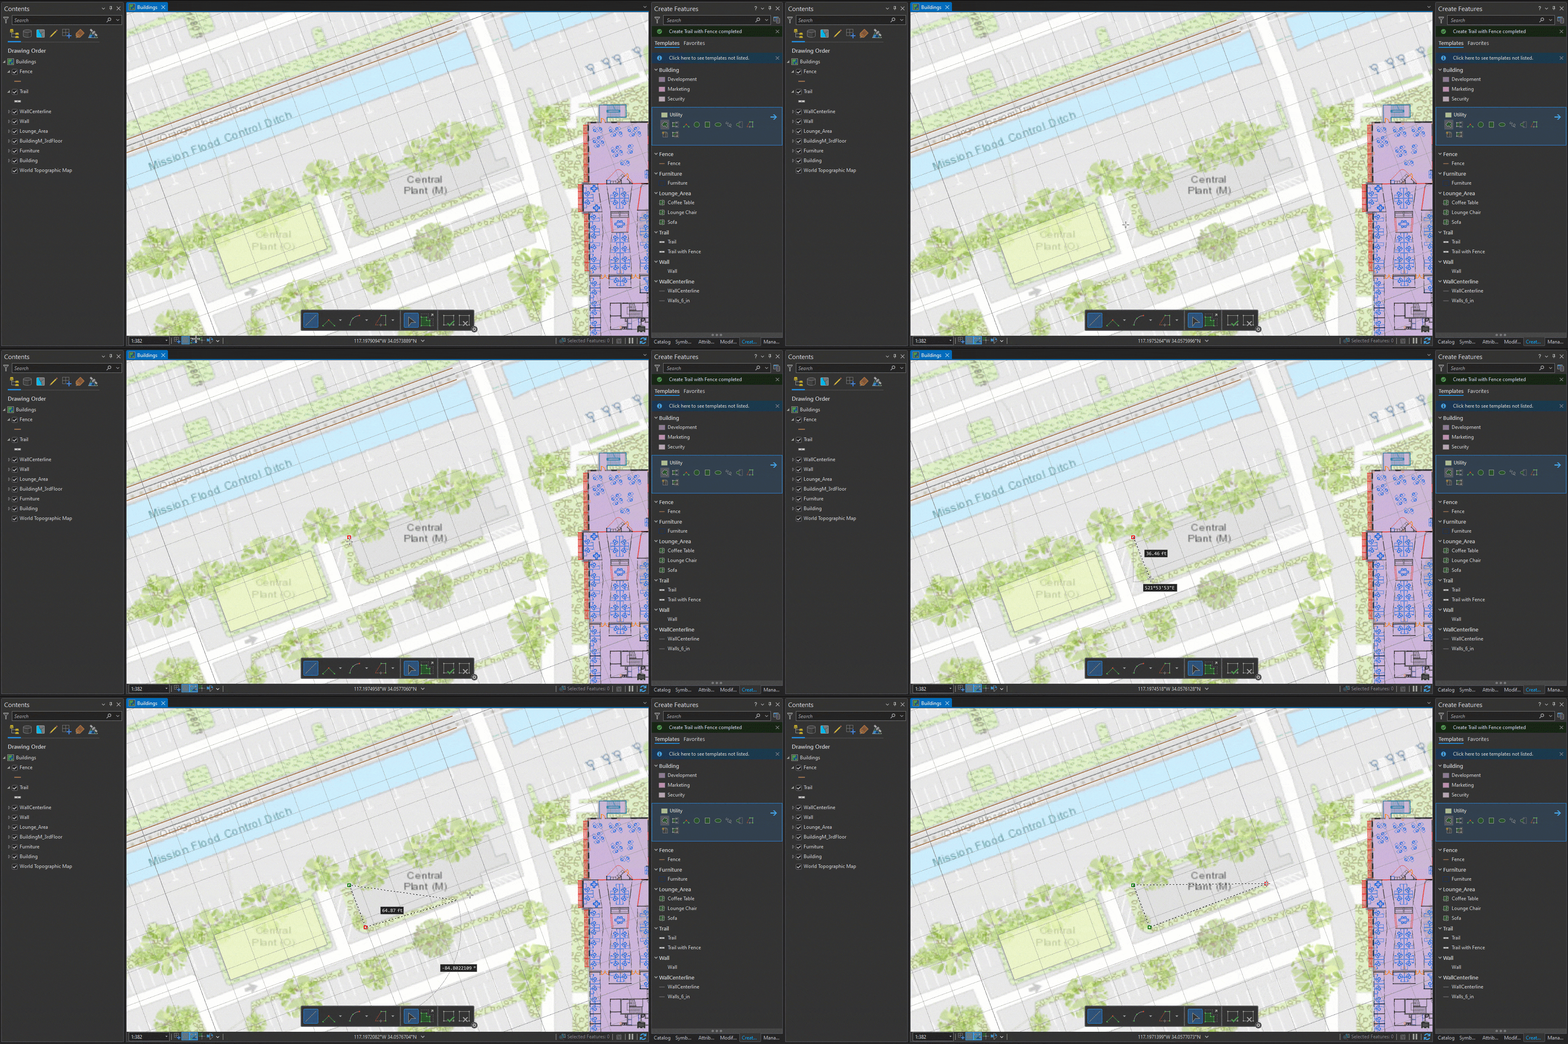
The on-screen Constraints setting prompts you to type direction and distance values as you draw line and polygon segments. It also prompts for a rotation angle with the Rotate tool. On-screen constraints, the reference grid, and snapping are independent drawing aids that are frequently used together to quickly create aligned features at standard intervals.
Inference constraints
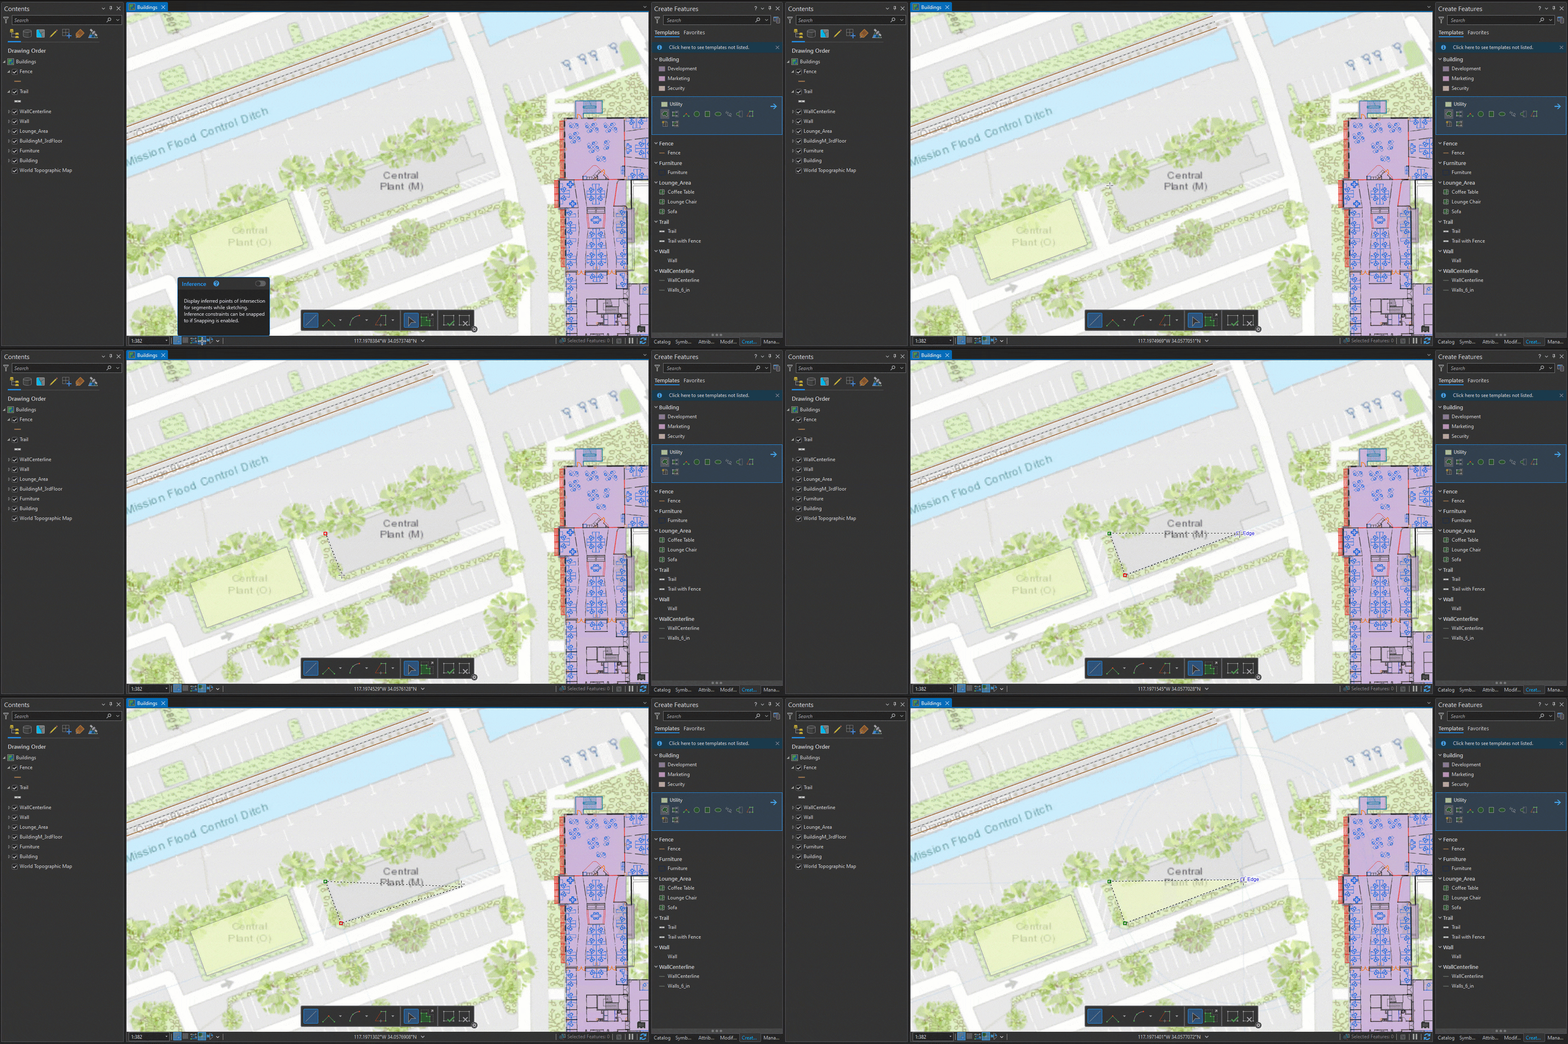
Inference is a constraint mode that uses your current snap settings to snap the pointer to inferred geometric relationships between the current vertex and existing feature geometry. Inference is primarily intended for drawing rectilinear shapes that represent objects in built environments. Note the light blue inference lines and how I can snap to them to quickly digitize a feature.
Editing at the User Conference
If you are attending the User Conference in July and are interested in learning more, plan on attending one or more of the following:
ArcGIS Pro: An Overview of Editing
ArcGIS Pro: Configuring and Using Feature Templates for Editing
ArcGIS Pro: Editing Features and Attributes
ArcGIS Pro: Preparing Maps for Editing
If you’re particularly interested in some awesome new functionality coming to editing in ArcGIS Pro later this year, don’t miss ArcGIS Pro: The Road Ahead.
Or come visit the dedicated Editing kiosk in the ArcGIS Pro showcase area. (Use this map https://uc2023.esri.com/eventmaps/map.html)
For ArcMap Users
Much of what I’ve touched upon here is functionality that was not available in ArcMap. Remember that ArcGIS 10.8.2 is the current release of ArcGIS Desktop and will enter Mature Support in March 2024. There are no plans to release an ArcGIS Desktop 10.9, and it is recommended that you migrate to ArcGIS Pro. See Migrate from ArcMap to ArcGIS Pro for more information.
Additional Resources
Banner photo by Joshua Harris on Unsplash


Article Discussion: